
Table of Contents
If you’re looking for a comforting dessert that will impress your friends and family, look no further than the Crazy Crust Apple Pie. This delightful pie combines the classic flavors of sweet apples with a unique crust that is simply irresistible. Have you ever craved a dessert that balances the sweet and tart flavors of fresh apples perfectly? Well, this pie does just that. Every bite of Crazy Crust Apple Pie is an adventure.
The ease of the recipe allows even novice bakers to produce a delicious pie that looks as good as it tastes. Picture this: a golden crust, warm apple filling, and that delightful cinnamon aroma wafting through your kitchen. It’s a feast for the senses. What makes this recipe stand out is its crumbly, almost cookie-like crust that contrasts beautifully with the tender, spiced apples inside. Wouldn’t you love to share such a heartwarming dessert? Let’s dive into the reasons why Crazy Crust Apple Pie is a must-try.
Key Benefits of Crazy Crust Apple Pie
Why You’ll Love This Recipe
- Easy to Make: You don’t need to be a professional baker to whip up Crazy Crust Apple Pie. The steps are straightforward, making it perfect for anyone. Just mix, press, and bake. Even kids can help!
- Delicious Flavor: The combination of apples, cinnamon, and brown sugar creates a comforting flavor that everyone loves. Each bite is a delightful mix of sweet and tart.
- Versatile Ingredients: You can swap out ingredients to fit your dietary needs or preferences. Want to use gluten-free flour? Go for it!
- Perfect for Any Occasion: Whether it’s Thanksgiving, a family gathering, or just a cozy night in, Crazy Crust Apple Pie is the perfect dessert for any occasion. It fits right in among all your favorite meals.
- Leftovers (If Any): With the right storage, you may even enjoy this pie for days. It stays fresh in the fridge and tastes great reheated, making it a lovely treat for breakfast!
- Impressive Presentation: Despite its simple preparation, Crazy Crust Apple Pie looks impressive when served. The crumbly top crust has a rustic charm, making it a hit at any gathering.
What Makes It Stand Out
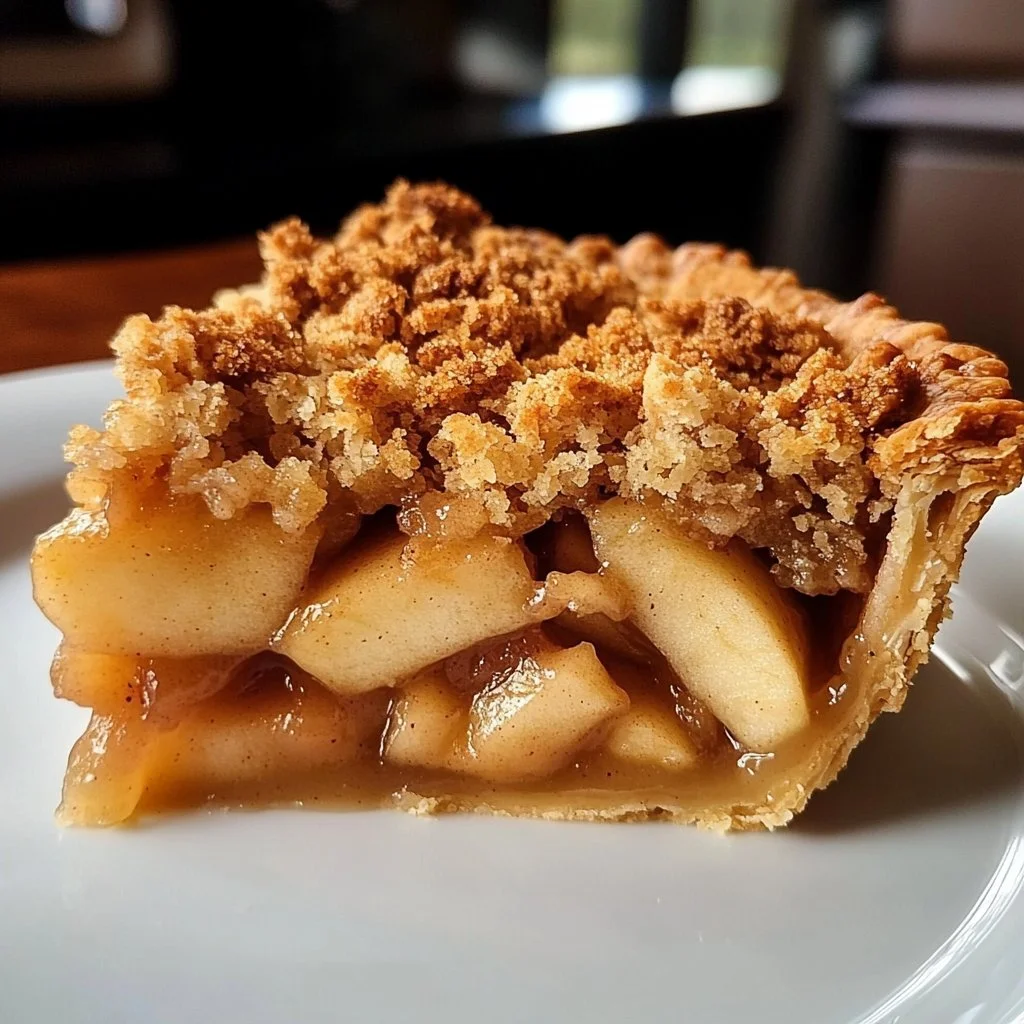
Crazy Crust Apple Pie isn’t your typical apple pie. The standout feature is its unique crust, which is both easy to prepare and delicious. Unlike traditional pie crusts that require rolling and careful handling, this pie’s crust is more like a buttery, crumbly cookie dough. You simply mix everything together, press half into your pie pan, and crumble the rest on top of the apple filling. This method saves time and effort, making it more accessible for everyone.
Moreover, the blend of sweet apples, tart lemon juice, and a dash of cinnamon creates a filling that’s bursting with flavor. Many pie recipes focus on the crust or the filling, but this one harmonizes both elements perfectly. The use of both white and brown sugar adds depth to the flavors, enhancing the overall sweetness without overwhelming the natural apple taste.
When you bake Crazy Crust Apple Pie, your kitchen will be filled with the warm, inviting aroma of cinnamon and baked apples. It’s truly a sensory experience, reminiscent of homemade pies from grandma’s kitchen. It’s a recipe that bridges nostalgia and modern simplicity, making it a memorable dessert for all ages.
Ingredients for Crazy Crust Apple Pie
Complete Ingredient List with Measurements
- 2 cups all-purpose flour: This forms the base of the crust. Make sure to level off your measuring cup for accuracy.
- 1 cup unsalted butter, softened: Plenty of butter gives the crust a rich flavor and crumbly texture.
- 1 cup sugar: Provides sweetness to both the crust and filling.
- 1 teaspoon baking powder: Helps the crust to be light and tender.
- 1/2 teaspoon salt: A little salt enhances the flavors in the pie.
- 1/2 teaspoon cinnamon: Adds that warm, cozy spice that pairs beautifully with apples.
- 4 cups thinly sliced apples: Use a mix of tart and sweet varieties (e.g., Granny Smith and Honeycrisp) for optimal flavor.
- 1 tablespoon lemon juice: Helps to keep the apples fresh and adds brightness to the filling.
- 1/2 cup brown sugar: This gives the apple filling a caramel-like flavor and sweetness.
Substitutes and Alternatives
If you have dietary restrictions or simply don’t have certain ingredients on hand, there are plenty of substitutions available for Crazy Crust Apple Pie. For a gluten-free variation, substitute the all-purpose flour with a gluten-free flour blend. Make sure it contains a binding agent, as this is crucial for texture. For those watching their sugar intake, consider using coconut sugar or a sugar substitute like erythritol in the crust and filling. If you’re dairy-free, replace the butter with a plant-based alternative, like coconut oil or vegan butter.
If certain spices aren’t your favorite, feel free to omit the salt or cinnamon—although cinnamon is a classic flavor, it’s also adaptable! For the apples, if you can’t find Granny Smith or Honeycrisp, any apples you love will work. The key is to use a combination that balances sweetness and tartness. You can even mix in pears or blueberries for a different flavor profile.
These alternative ingredients ensure that everyone can enjoy the Crazy Crust Apple Pie, regardless of dietary restrictions or ingredient availability.
How to Make Crazy Crust Apple Pie – Step-by-Step Directions
Step 1 – Prepare Your Workspace and Ingredients
Before you begin, it’s essential to set the stage for success. Preheat your oven to 350°F (175°C). While the oven heats, gather all your ingredients and have your tools ready: a large mixing bowl, a pie pan, and a cutting board for slicing apples. Make sure your butter is at room temperature, as this will help it blend smoothly into the crust.
Step 2 – Combine the Crust Ingredients
In your large mixing bowl, combine the all-purpose flour, softened butter, sugar, baking powder, salt, and cinnamon. Use a fork or your hands to mix the ingredients until they form a crumbly dough. You want to have a texture similar to coarse crumbs. This step is essential as it creates the wonderful crust that makes this pie so unique.
Step 3 – Form the Bottom Crust
Take half of the crumbly mixture and press it firmly into the bottom of the pie pan. Use your fingers or the back of a measuring cup to ensure it’s evenly distributed and tightly packed. This forms the foundation of your pie, so make sure it’s level. The crust should have a slight rise along the edges, creating a barrier for the apple filling.
Step 4 – Prepare the Apple Filling
Now it’s time to prepare the filling. Slice the apples thinly, about 1/4 inch thick, ensuring even cooking. In a separate bowl, toss the sliced apples with the lemon juice and brown sugar. The lemon juice will not only keep the apples from browning but will also enhance their flavor. Make sure each apple slice is coated well.
Step 5 – Assemble the Pie
Once your apples are ready, pour the apple mixture evenly over the crust in the pie pan. Arrange the apples so they fit together snugly. This step is crucial for an aesthetically pleasing pie. The apples will shrink slightly as they cook, so don’t be too worried about the height.
Step 6 – Crumble the Top Crust
With the apple filling in place, take the remaining crumbly dough and sprinkle it evenly over the top of the apples. Aim for a rustic look with some sections thicker than others; this creates a deliciously crunchy topping. Make sure no apples are visible; this helps to keep the moisture in.
Step 7 – Bake Your Pie
Place the pie in the preheated oven and bake for about 35 to 45 minutes. Keep an eye on it during the last 10 minutes to ensure the topping doesn’t burn. The crust should be golden brown, and the apples should be tender when pierced with a fork. Your kitchen will fill with the irresistible aroma of baking apples and cinnamon.
Step 8 – Cooling Before Serving
Once baked, remove the pie from the oven and allow it to cool slightly. Even though it’s tempting to dig in right away, letting it cool for about 20 minutes helps the filling set, making it easier to slice.
Step 9 – Serve and Enjoy
Slice the Crazy Crust Apple Pie into wedges and serve it warm. It pairs beautifully with a scoop of vanilla ice cream or a dollop of whipped cream. The warm pie combined with cold ice cream is a match made in heaven.
Step 10 – Store the Leftovers
If you have any leftovers, let the pie cool completely before covering it with plastic wrap or placing it in an airtight container. It will stay fresh in the refrigerator for several days, and you can reheat individual slices in the microwave or oven.
Serving Suggestions for Crazy Crust Apple Pie
Best Occasions to Serve This Dish
Crazy Crust Apple Pie is suitable for virtually any occasion! Whether it’s a family gathering during the holidays, a summer barbecue, or simply a weekday dessert to brighten your evening, this pie never disappoints. It’s also perfect to bring to potlucks or bake sales, where it will surely be a crowd-pleaser. The delightful aroma and warm flavors are sure to evoke nostalgia and comfort. Sharing a slice of this pie often sparks conversations about family recipes and shared memories, creating a lovely atmosphere.
What to Serve With It
When serving your Crazy Crust Apple Pie, consider pairing it with a scoop of creamy vanilla ice cream or a dollop of whipped cream for added richness. If you want something more refreshing, a scoop of lemon sorbet can provide a nice contrast to the warm pie. Don’t forget about beverages! A steaming cup of coffee or a chilled glass of apple cider complements the sweet and spicy flavors beautifully. You could even serve it with a drizzle of caramel sauce for a decadent touch.
How to Store Crazy Crust Apple Pie Properly
Best Storage Practices
Proper storage will let you enjoy your Crazy Crust Apple Pie for several days. Once the pie has cooled completely, cover it loosely with plastic wrap or aluminum foil. Alternatively, place it in an airtight container to keep it fresh. Stored this way, it can last in the fridge for about 3 to 5 days. If you’re planning to keep it longer, freeze the pie for up to 2 months. Just make sure it’s well-wrapped to prevent freezer burn.
Reheating and Freezing Tips
To reheat your Crazy Crust Apple Pie, preheat your oven to 350°F (175°C) and place a slice on a baking sheet. Cover it lightly with aluminum foil to keep the crust from burning, and heat for about 10-15 minutes, or until warmed through. If you decide to freeze it, it’s best to do so before baking. Allow the frozen pie to thaw in the fridge overnight before baking it according to the original instructions.
Tips & Tricks for Crazy Crust Apple Pie
Mistakes to Avoid
- Using Cold Butter: Ensure your butter is softened. Cold butter won’t blend well into the dough and will lead to a dense crust.
- Not Pressing the Crust Firmly: Make sure to pack the crust tightly in the pie pan. A loosely pressed crust will crumble and may break apart easily.
- Overbaking: Keep an eye on your pie as it bakes. Overbaking can dry it out and lead to a tough texture.
- Skipping the Lemon Juice: Lemon juice helps enhance flavor and keeps apples from browning. Don’t skip this step!
- Incorrect Apple Slicing: Slice your apples evenly for uniform cooking. Uneven slices can lead to some apples being mushy while others are still hard.
- Not Letting It Cool: Allow the pie to cool before slicing. This helps the filling set, making it easier to serve.
Extra Tips for Better Results
To take your Crazy Crust Apple Pie to the next level, consider mixing in a handful of chopped nuts like pecans or walnuts into the crumbly crust for added texture and flavor. You might also try adding a pinch of nutmeg or allspice to the cinnamon for extra warmth. Experiment with your choice of apple varieties for diverse flavors; this can enhance taste and provide a fun, customizable experience every time you bake. For a more sophisticated presentation, dust the top with powdered sugar before serving for a beautiful finish.
Recipe Variations of Crazy Crust Apple Pie
Creative Twists
- Caramel Apple Twist: Drizzle caramel sauce over the apple filling before adding the top crust. This adds a delicious layer of gooey sweetness.
- Berry Blend: Mix in raspberries or blackberries for a delightful fruit combination. Berry flavors pair wonderfully with apples and add a pop of color.
- Nutty Crunch: Fold in chopped nuts like pecans or almonds into the apple mixture for an extra crunch and depth of flavor.
- Spiced Up Version: Incorporate different spices, such as ginger or cardamom, into the filling for a more unique twist on traditional apple pie.
Dietary Adjustments
For a vegan version of Crazy Crust Apple Pie, substitute the butter with a plant-based margarine and use flax eggs or apple sauce in place of any eggs if they are added in other recipes. For a gluten-free option, choose a gluten-free flour blend that works for baking. You might want to add a bit of xanthan gum for better texture. For those who prefer low-carb options, consider using almond flour and a sugar substitute to keep the sweetness without the carbs.
Conclusion about Crazy Crust Apple Pie
In conclusion, Crazy Crust Apple Pie is more than just another dessert; it’s a creation that merges simplicity with deliciousness. The unique crumbly crust paired with naturally sweet apples creates a pie that resonates with so many flavors and textures. It evokes memories of family gatherings and holiday celebrations. As you gather around the table, sharing slices of this delightful pie, you’ll find that it sparks joy and conversation alike. Whether you’re a seasoned baker or just starting, Crazy Crust Apple Pie is an accessible recipe that promises great results. Try it out, share it with loved ones, and experience the joy it brings!
FAQs about Crazy Crust Apple Pie
What if it doesn’t turn out right?
If your Crazy Crust Apple Pie doesn’t turn out as expected, don’t fret! Baking can sometimes be unpredictable. Ensure you’re measuring ingredients accurately and keep an eye on baking times. If the crust seems too crumbly, it might need more moisture. If it’s too dense, remember that the butter must be softened properly.
Can I make it ahead of time?
Yes, you can prepare Crazy Crust Apple Pie ahead of time! You can assemble the pie a day in advance and refrigerate it unbaked. Bake it the day you plan to serve it, or if baked, store it in an airtight container for a few days before serving.
Can I freeze it?
Absolutely! Crazy Crust Apple Pie can be frozen before or after baking. If freezing before baking, wrap it tightly in plastic wrap and foil. For freezing after baking, allow it to cool completely, then store it in an airtight container in the freezer.
How long does it stay fresh?
When stored properly, Crazy Crust Apple Pie lasts for about 3 to 5 days in the refrigerator. If you freeze it, it can last about 2 months. Remember to thaw it in the fridge before reheating if you freeze it after baking.
What can I serve it with?
Crazy Crust Apple Pie is delicious on its own, but you can elevate it with a scoop of vanilla ice cream, whipped cream, or even a drizzle of caramel sauce. A warm cup of coffee or spices cider makes for an excellent pairing too.
Can I use different types of apples?
Certainly! You can use any apple variety you prefer. For a balanced flavor, mix sweet apples like Honeycrisp with tart ones like Granny Smith. Experimenting with different apple varieties can create exciting flavor profiles.
Is it possible to make a mini version?
Yes! You can make mini Crazy Crust Apple Pies in muffin tins. Just adjust the baking time accordingly. These individual servings are perfect for parties or events.
What if I don’t have a pie pan?
If you don’t have a pie pan, you can use any oven-safe dish or even a cast-iron skillet. Just adjust your baking time as needed, checking for doneness regularly.
Can I replace sugar with honey or maple syrup?
You can substitute sugar with honey or maple syrup, but you will need to adjust the amount. They are sweeter than granulated sugar, so use them sparingly and reduce the overall liquid in the recipe.
Do I have to peel the apples?
While peeling the apples will give a smoother texture, it’s not required. Leaving the skins on can add a bit of color and nutrition to your Crazy Crust Apple Pie.

Crust Apple Pie
Equipment
- 9-inch Pie Dish
- Rolling Pin
- Mixing Bowls
Ingredients
Crust / Pastry
- 2 ½ cups all-purpose flour flour plus extra for rolling
- 1 tsp salt
- 1 tsp sugar
- 1 cup unsalted butter butter cold, cut into cubes
- 6-8 Tbsp ice water ice water
Filling
- 6 apples peeled, cored, thinly sliced (e.g. Granny Smith or mix)
- ⅔ cup sugar
- ⅓ cup brown sugar
- 1 Tbsp all-purpose flour for thickening filling
- 1 tsp ground cinnamon
- ¼ tsp ground nutmeg
- 1 Tbsp lemon juice freshly squeezed
- 1 Tbsp butter small pats to dot over apples
Egg Wash (optional)
- 1 egg egg beaten, for brushing top crust
- 1 Tbsp water or milk to thin egg wash
Instructions
- Prepare crust: in a bowl, whisk flour, salt, sugar. Cut in cold butter until mixture resembles coarse crumbs.
- Add ice water a tablespoon at a time, mixing gently, until dough just comes together. Divide into two disks, wrap and chill at least 1 hour.
- Preheat oven to 425 °F (220 °C).
- Roll out one disk of dough to fit a 9-inch pie dish, leave overhang. Fill with apple mixture (toss apples with sugars, flour, cinnamon, nutmeg and lemon juice).
- Dot with small pats of butter over the apple filling.
- Roll out second dough disk and place over top (as full crust or lattice). Trim and crimp edges to seal.
- Brush top crust with egg wash (egg + water/milk) if using, and cut vents to allow steam to escape.
- Bake at 425 °F for 15 minutes, then reduce heat to 350 °F (175 °C) and bake another 35–45 minutes until crust is golden and filling bubbles.
- If edges brown too fast, cover them with foil or a pie shield mid-bake.
- Allow pie to cool at least 1 hour (or more) before slicing to let filling set.