
Table of Contents
Introduction about Pumpkin Patch Dirt Cups
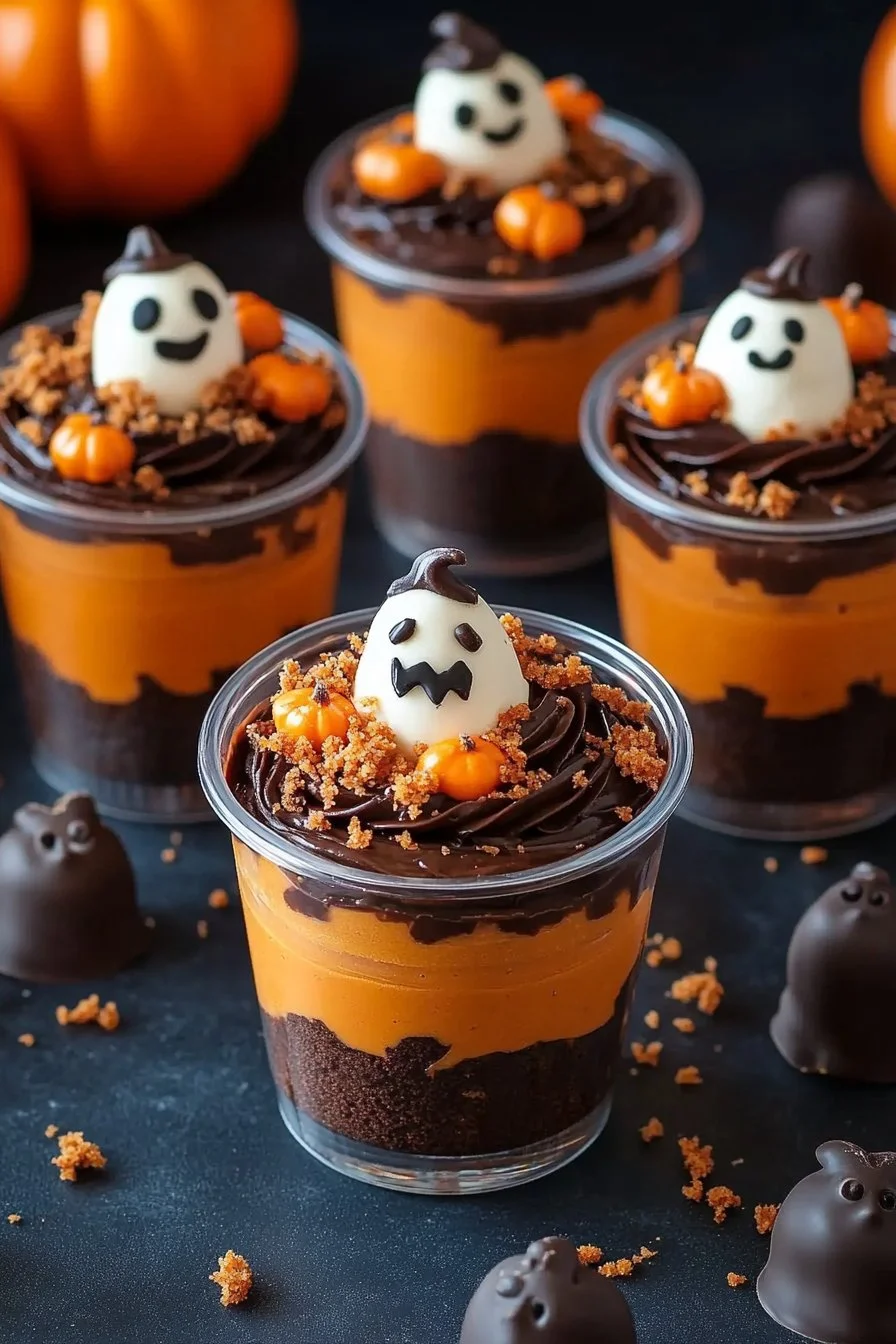
Have you ever craved a dessert that looks as good as it tastes? Enter the delightful Pumpkin Patch Dirt Cups! If you’re looking to impress family and friends at your next gathering, these cups are not just a treat for the taste buds, but they are visually appealing as well. Just imagine little cups filled with rich chocolate pudding, crunchy Oreos, and fluffy whipped cream, all topped off with whimsical candy decorations.
Isn’t it great when a dessert brings a smile to everyone’s face? These Pumpkin Patch Dirt Cups are perfect for all ages. They’re not only simple to whip up, but they sparkle with festive charm. Plus, you have so many options for customization! Whether it’s Halloween, a fall gathering, or a simple family dinner, these cups can bring the spirit of the season directly to your table.
So, why make these adorable cups? Their ease of preparation and appealing presentation make them a must-try dessert. Get ready to embrace this delightful recipe that’s sure to be a hit!
Key Benefits of Pumpkin Patch Dirt Cups
Why you’ll love this recipe
- Delicious Taste: The creamy chocolate pudding, crunchy Oreos, and light whipped cream create a perfect blend of flavors and textures.
- Easy to Make: With just a few ingredients and straightforward steps, anyone can create these adorable cups.
- No Baking Required: Say goodbye to complicated baking procedures! This recipe is entirely no-bake.
- Kid-Friendly: Children will love the fun presentation, and they can even help with assembling the cups!
- Customizable: You can switch up the ingredients or decorations based on your preferences or dietary needs.
- Perfect for Any Occasion: Whether it’s a holiday, party, or just a fun dessert at home, these cups fit right in.
What makes it stand out
The Pumpkin Patch Dirt Cups stand out because they beautifully blend fun and flavor. They tap into that nostalgic vibe of childhood mud pies while bringing an exciting twist with Halloween themes and fall decorations. What sets them apart is the ability to customize these cups according to personal preference. Want to add a unique topping? Go for it! Craving a different flavor layer? Easy peasy!
Because of their versatility, these cups are perfect for any occasion. Whether it’s a spooky Halloween get-together or a family picnic in the autumn air, these delightful cups will brighten everyone’s day. With such originality and flair, who wouldn’t love a treat like this?
Ingredients for Pumpkin Patch Dirt Cups
Complete ingredient list with measurements
Here’s what you’ll need to create your very own Pumpkin Patch Dirt Cups:
- 1 package of chocolate pudding mix
- 2 cups of milk
- 1 package of Oreo cookies, crushed
- 1 cup of whipped cream
- Candy pumpkins for decoration
- Gummy worms (optional)
Substitutes and alternatives
If you have specific dietary needs or preferences, here are a few substitutes you can consider:
- Dairy-Free: Use almond milk or coconut milk instead of regular milk and opt for a dairy-free whipped cream.
- Gluten-Free: Look for gluten-free cookie options to replace Oreos.
- Sugar-Free: Consider using sugar-free pudding mix if you want to cut down on sugar.
- Add-Ons: Get creative! Adding crushed nuts or other candies can give your dirt cups an extra twist that suits your taste.
How to Make Pumpkin Patch Dirt Cups – Step-by-Step Directions
Step 1 – Prep your workspace and ingredients
Before you dive into making your Pumpkin Patch Dirt Cups, make sure your kitchen is tidy and organized. Gather all your ingredients and equipment. You’ll need mixing bowls, serving cups, a whisk, and spoons. Having everything on hand will make the process smooth and enjoyable!
Step 2 – Prepare the chocolate pudding
Start by preparing the chocolate pudding. In a bowl, whisk together 2 cups of milk with the package of chocolate pudding mix. Follow the instructions on the package to achieve the right consistency. You should end up with a smooth, creamy chocolate mixture. This will be the delicious base of your cups!
Step 3 – Crush the Oreo cookies
Next, it’s time for some fun! Place the Oreo cookies in a plastic bag and crush them. Use a rolling pin or your hands to turn those cookies into fine crumbs. If you prefer larger chunks for added texture, don’t be afraid to vary the crushing size. Set the crushed Oreos aside for layering.
Step 4 – Prepare the whipped cream
In another bowl, add your whipped cream. If you’d like to sweeten it, you can add a dusting of powdered sugar. Gently fold in the sugar if you choose this option. This will create a nice balance of sweetness in the cups. Whipped cream should be light and fluffy, perfect for layering!
Step 5 – Start layering the cups
Now it’s time for the fun part—layering! Spoon a layer of chocolate pudding into your serving cups. The pudding is the first layer, and you want it to have a nice, even spread along the bottom.
Step 6 – Add the crushed Oreo layer
After your pudding base, sprinkle a generous layer of crushed Oreo cookies on top. This crunchy layer adds texture and resemblance to soil in a pumpkin patch, which is the magic of our Pumpkin Patch Dirt Cups!
Step 7 – Add whipped cream
Once your Oreos are settled, add a layer of whipped cream on top. This light and fluffy layer serves as a perfect contrast to the denser, richer pudding and cookie layers below. Use a spoon to spread it gently, creating a nice, smooth surface.
Step 8 – Repeat layers
Repeat the layering process until your cups are full. Depending on the size of your cups, you might get two or three layers. Don’t forget to end with the whipped cream layer for a nice finishing touch!
Step 9 – Decorate your cups
Now it’s time for the cherry on top—decorating! This is where the Pumpkin Patch Dirt Cups truly come to life. Add candy pumpkins and gummy worms on top for that festive flair. Kids love to get involved at this stage, so let them help with decorating!
Step 10 – Chill and serve
Once your cups are beautifully decorated, place them in the refrigerator. Allow them to chill for at least 30 minutes. This helps all the flavors meld together and makes them extra refreshing. When ready to serve, gather your friends and family and enjoy these magical treats!
Serving Suggestions for Pumpkin Patch Dirt Cups
Best occasions to serve this dish
- Halloween Parties: The fun decorations and spooky vibe make them a hit for Halloween gatherings.
- Fall Festivals: Perfect for celebrating the change of seasons with friends and family.
- Birthday Parties: Add a little extra fun to any birthday celebration.
- Family Dinners: Bring a smile to your loved ones at the dinner table with this playful dessert.
What to serve with it
- Beverages: Pair these cups with apple cider, pumpkin spice latte, or hot chocolate.
- Toppings: Consider offering extra toppings like chocolate syrup, additional candy decorations, or nuts for those who’d like to add a personal touch.
- Sides: Serve them alongside some homemade cookies or chocolate cake to create a sweet spread.
Storing Pumpkin Patch Dirt Cups Properly
Best storage practices
If you have leftover Pumpkin Patch Dirt Cups, here’s how to store them properly. Keep them in the refrigerator for optimal freshness. Use airtight containers or cover serving cups with plastic wrap to avoid drying out.
Reheating and freezing tips
- Reheating: There’s no need to reheat these cups; they are best served chilled. Enjoy them fresh from the fridge!
- Freezing: While these dirt cups are not ideal for freezing due to the whipped cream, you can freeze the pudding and cookie components separately. When you want a cup, simply assemble the freshly made layers!
Tips & Tricks for Pumpkin Patch Dirt Cups
Mistakes to avoid
- Too Much Liquid: Make sure to follow the pudding recipe correctly—excessively runny pudding won’t hold the layers well.
- Not Chilling Long Enough: Allow the cups to chill adequately before serving to ensure better texture and flavor.
Extra tips for better results
- Make Ahead: These cups can be prepared a day in advance. Just keep them stored in the fridge, covered to prevent drying.
- Get Creative with Decorations: Use different types of seasonal candies, or even fun sprinkles to make them more festive according to the occasion.
Recipe Variations of Pumpkin Patch Dirt Cups
Creative twists
- Add Nut Butter: Drizzle peanut or almond butter in between layers for a different flavor punch.
- Spice it up: Sprinkle pumpkin pie spice into the pudding for a seasonal twist.
- Holiday Theming: Change the decorations with themed candies for different holidays—think red and green for Christmas or pastel colors for Easter!
Dietary adjustments
- Vegan Version: Substitute with vegan pudding mix and dairy-free whipped cream, and you’re all set.
- Keep it Gluten-Free: Use gluten-free cookies or even make your own crust from gluten-free ingredients.
Conclusion about Pumpkin Patch Dirt Cups
In conclusion, the Pumpkin Patch Dirt Cups offer a combination of flavor, fun, and creativity all in one adorable dessert. They are easy to make, visually appealing, and can be customized to suit any occasion or diet.
If you’re looking for a dish that will bring smiles and compliments, this is it! Don’t hesitate to try out this delightful recipe and share feedback with family and friends. Gather everyone around and enjoy these charming treats that truly celebrate the spirit of the season.
FAQs about Pumpkin Patch Dirt Cups
What if it doesn’t turn out right?
Don’t worry! If your pudding seems too runny, it may not have set properly. Just give it a bit more time in the fridge, and it should firm up. If it’s too thick, you can add a splash of milk and whisk until you achieve desired consistency.
Can I prepare it ahead of time?
Absolutely! You can assemble the cups a day in advance. Just keep them stored in the fridge, covered properly to maintain freshness.
What are the best ingredient substitutions?
Some great substitutes include using almond or oat milk for a dairy-free version, or gluten-free cookies for anyone avoiding gluten. You can also swap in non-dairy whipped cream for those with lactose intolerance.
How long can it be stored?
The Pumpkin Patch Dirt Cups can be kept in the refrigerator for about 2-3 days. However, for the freshest taste and texture, it’s best to enjoy them within the first couple of days.
Can I use store-bought dough or crust?
While this recipe doesn’t require a crust, if you prefer to use one, feel free to use a pre-made one! Just be sure it matches the flavor profile you’re aiming for.
Is this recipe kid-friendly or family-appropriate?
Definitely! This fun dessert will delight kids and adults alike. Their playful nature makes them perfect for family gatherings or birthday parties.
Can I make this recipe allergen-free?
Yes! By using appropriate substitutes, like allergy-safe cookies and non-dairy alternatives, you can cater to those with allergies. Be sure to check the ingredients to ensure they fit your dietary needs.

Pumpkin Patch Dirt Cups
Ingredients
Pudding Base
- 1 package chocolate pudding mix For a rich chocolate flavor
- 2 cups milk Regular, almond, or coconut milk can be used
Layers
- 1 package Oreo cookies, crushed For a crunchy layer
- 1 cup whipped cream Can sweeten with powdered sugar if desired
- 1 cup Candy pumpkins For decoration
- Optional Gummy worms For additional decoration
Instructions
Preparation
- Prep your workspace and gather all ingredients and equipment.
- In a bowl, whisk together 2 cups of milk with the chocolate pudding mix.
- Crush the Oreo cookies in a plastic bag until fine, or leave larger chunks if preferred.
- In another bowl, prepare whipped cream. Sweeten with powdered sugar if desired.
Layering
- Spoon a layer of chocolate pudding into serving cups.
- Add a generous layer of crushed Oreo cookies on top.
- Follow with a layer of whipped cream, smoothing the surface.
- Repeat the layers until cups are full, finishing with whipped cream.
- Decorate with candy pumpkins and gummy worms.
Chill and Serve
- Chill the cups in the refrigerator for at least 30 minutes before serving.
- Serve chilled and enjoy with family and friends!