
Table of Contents
Introduction about No-Bake Reese’s Peanut Butter Cheesecake Dream
Have you ever craved a dessert that’s as easy to whip up as it is deliciously indulgent? Imagine a rich, creamy cheesecake filled with peanut butter surrounded by an irresistible chocolate crust. If that sounds heavenly, you’re in for a treat! The No-Bake Reese’s Peanut Butter Cheesecake Dream is not just a dessert; it’s an experience—one that’s sure to make your taste buds dance!
This fantastic recipe is perfect for any occasion, whether it’s a holiday gathering, a birthday party, or simply a sweet way to celebrate the everyday moments. You won’t need to turn on your oven, which means less mess and more time enjoying your creation. The beauty of this recipe lies in its simplicity and the heavenly combination of peanut butter and chocolate—a match made in dessert heaven!
Let’s dive into this easy-to-follow recipe that’s bound to become a family favorite. Are you ready to create the No-Bake Reese’s Peanut Butter Cheesecake Dream?
Key Benefits of No-Bake Reese’s Peanut Butter Cheesecake Dream
Why you’ll love this recipe
- Delicious Flavor Combo: The sweet and savory blend of peanut butter and chocolate will satisfy your cravings.
- Easy to Make: No baking required! Just mix, chill, and enjoy.
- Quick Preparation: Assemble it in under an hour; it just needs time to chill in the fridge.
- Family-Friendly: Perfect for kids and adults alike, making it an ideal treat without any fuss.
- Customizable: You can easily adapt it to fit seasonal flavors or personal tastes.
- Perfect for Any Occasion: Great for parties, potlucks, or a cozy night in.
What makes it stand out
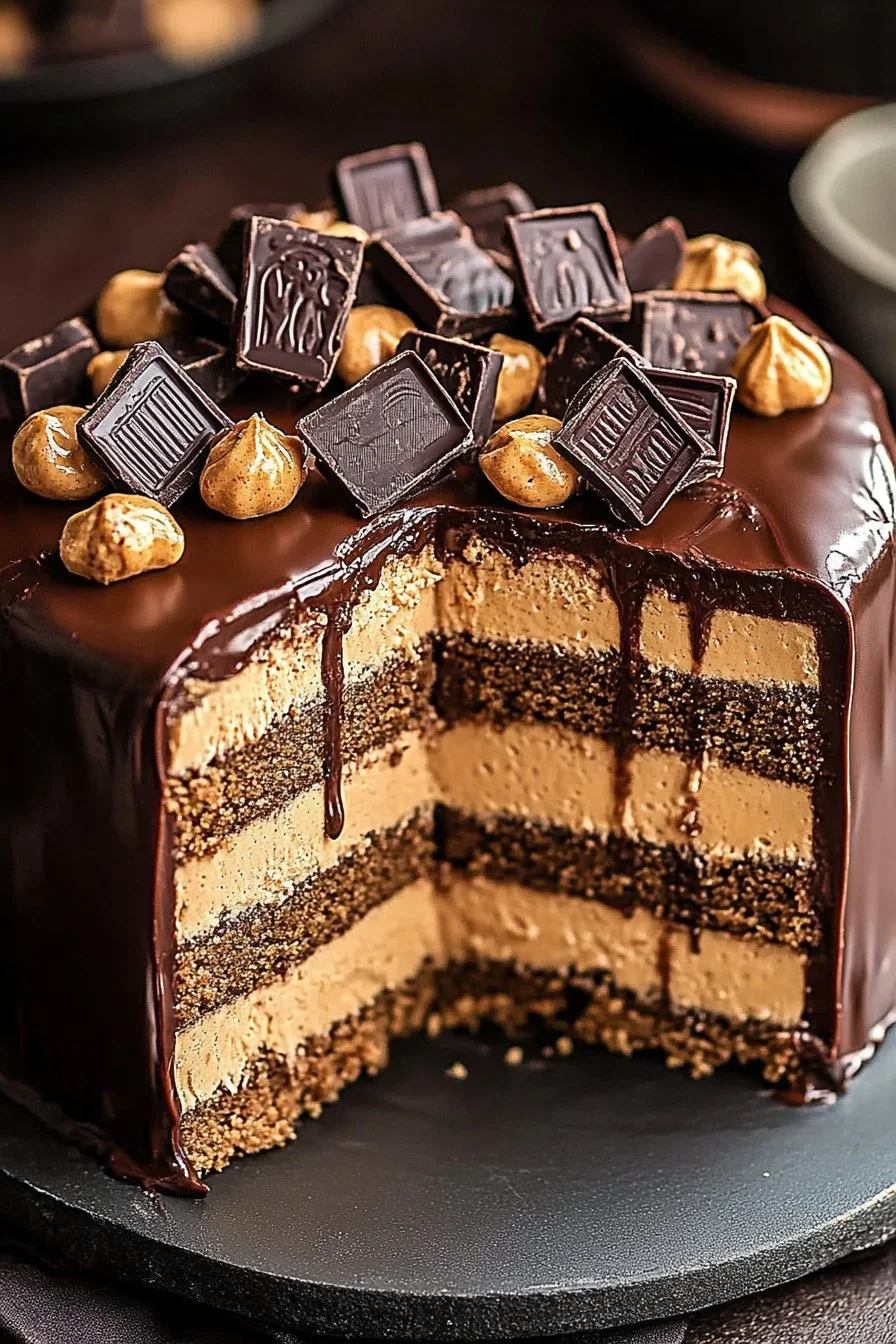
What sets the No-Bake Reese’s Peanut Butter Cheesecake Dream apart from other desserts is the rich, creamy texture that melts in your mouth and the crunch from the graham cracker crust. The use of full-size Reese’s Peanut Butter Cups adds a level of indulgence that’s hard to resist. Plus, there’s something special about not having to turn on your oven, especially during hot summer months!
Whether you’re celebrating a special day or simply want to treat yourself, this cheesecake delivers sweet satisfaction in every bite. You can customize it by layering different flavors or adding unique toppings, making it as unique as you are!
Ingredients for No-Bake Reese’s Peanut Butter Cheesecake Dream
Complete ingredient list with measurements
Here’s what you’ll need to create this decadent dessert:
For the Crust:
- 2 sleeves graham crackers (about 18-20 crackers)
- 1/4 cup sugar
- 6 tablespoons butter, melted
- Pinch of salt
For the Peanut Butter Layer:
- 8 oz cream cheese, softened
- 1 cup creamy peanut butter
- 1 cup powdered sugar (sifted if you’re feeling fancy)
- 1 teaspoon vanilla extract
- 1 1/2 cups heavy whipping cream
For the Chocolate Layer:
- 8 oz cream cheese, softened
- 1/2 cup cocoa powder (unsweetened)
- 3/4 cup powdered sugar
- 1 teaspoon vanilla extract
- 1 1/4 cups heavy whipping cream
For Toppings:
- 1/4 cup mini chocolate chips
- 12-15 full-size Reese’s Peanut Butter Cups, chopped
- Extra whipped cream (optional)
- Chocolate shavings or a drizzle of melted peanut butter (optional)
- A few whole Reese’s for decoration (optional)
Substitutes and alternatives
If you have allergies or dietary preferences, here are some easy swaps:
- Gluten-Free: Use gluten-free graham crackers for the crust.
- Dairy-Free: Substitute vegan cream cheese and coconut cream for the heavy whipping cream.
- Nut-Free: Replace peanut butter with sun butter or a similar nut-free spread.
- Sugar Alternatives: Use agave nectar, maple syrup, or a stevia blend instead of sugar.
How to Make No-Bake Reese’s Peanut Butter Cheesecake Dream – Step-by-Step Directions
Step 1 – Prep your workspace and ingredients
Start by gathering all your ingredients. Make sure your cream cheese is at room temperature; it needs to be really soft. You may also want to set up your mixing bowls and measuring cups for easy access.
Step 2 – Prepare the base or crust
- Crush the graham crackers: Place the graham crackers in a zip-top bag and crush them with a rolling pin until fine crumbs form.
- Mix: In a bowl, combine crushed graham crackers, sugar, melted butter, and a pinch of salt. Stir until fully mixed.
- Press into a springform pan: Pour the mixture into the bottom of a 9-inch springform pan. Press it down evenly with your fingers or the bottom of a glass.
- Set aside: Place the pan in the refrigerator to firm up while you make the filling.
Step 3 – Make the peanut butter filling
- Cream the base: In a large mixing bowl, use an electric mixer to beat softened cream cheese until smooth.
- Add peanut butter: Mix in 1 cup of peanut butter until fully incorporated.
- Sift in powdered sugar: Gradually add in the sifted powdered sugar and vanilla, blending until smooth and creamy.
- Whip the cream: In another bowl, whip 1 1/2 cups of heavy cream until stiff peaks form.
- Combine: Gently fold the whipped cream into the peanut butter mixture.
- Spread: Pour this mixture over the chilled crust in the springform pan. Smooth the top and set back in the fridge.
Step 4 – Prepare the chocolate layer
- Blend cream cheese and cocoa: In a clean bowl, beat the softened cream cheese until smooth. Add unsweetened cocoa powder and powdered sugar, mixing well.
- Incorporate vanilla: Stir in the vanilla extract.
- Whip cream: In another bowl, whip 1 1/4 cups of heavy cream until stiff peaks form.
- Combine with chocolate mixture: Again, gently fold the whipped cream into the chocolate cream cheese until fully mixed.
Step 5 – Layer on top of the peanut butter layer
- Spread chocolate layer: Pour the chocolate filling over the peanut butter layer and gently smooth the top.
- Chill: Cover the cheesecake with plastic wrap and chill in the refrigerator for at least 4 hours or preferably overnight so it sets properly.
Step 6 – Final touches
- Prepare toppings: Before serving, chop the Reese’s cups into small pieces and whip some extra cream if desired.
- Decorate: Remove the cheesecake from the springform pan and transfer to a serving platter. Top with chopped Reese’s, mini chocolate chips, and extra whipped cream.
Step 7 – Serve and enjoy
- Slice: Use a hot knife to slice through the cheesecake easily to avoid the layers mixing.
- Garnish: Drizzle melted peanut butter or chocolate on top for that extra touch.
Step 8 – Clean up
- Store leftovers: Cover any leftovers securely in the refrigerator to enjoy later!
Serving Suggestions for No-Bake Reese’s Peanut Butter Cheesecake Dream
Best occasions to serve this dish
This cheesecake is a showstopper and is perfect for various occasions, including:
- Birthday Parties: Delight all ages with this delicious cake!
- Holidays: Thanksgiving, Valentine’s Day, or Christmas gatherings can be more special with this treat.
- Potlucks: Make a grand impression at your next gathering by bringing this dessert.
What to serve with it
Pair your cheesecake with:
- Coffee or Tea: A lovely hot beverage.
- Milk: Never underestimate the simplicity of a cold glass of milk.
- Whipped Cream: Extra toppings to add a little fluff.
- Fruit: Fresh berries can add a nice tartness that balances the sweetness.
Storing No-Bake Reese’s Peanut Butter Cheesecake Dream Properly
Best storage practices
The No-Bake Reese’s Peanut Butter Cheesecake Dream can be kept in the refrigerator for up to a week. Cover it well with plastic wrap or store it in an airtight container to prevent it from absorbing other fridge odors.
Reheating and freezing tips
- Freezing: If possible, cut the cheesecake into slices before freezing. Wrap each slice tightly in plastic wrap, then place in a freezer-safe bag. It can last for about 2 to 3 months in the freezer.
- Thawing: To thaw, transfer to the refrigerator a few hours before you plan to serve it rather than heating it, which could change the texture.
Tips & Tricks for No-Bake Reese’s Peanut Butter Cheesecake Dream
Mistakes to avoid
- Skipping softening the cream cheese: Make sure your cream cheese is truly softened for the best texture.
- Not chilling between layers: Each layer needs to chill adequately for the best results.
- Overmixing whipped cream: Stop mixing as soon as you see stiff peaks to keep it light and airy.
Extra tips for better results
- Use high-quality ingredients: Good chocolate and creamy peanut butter can elevate the flavor.
- Add a pinch of sea salt: It enhances the sweetness and balances the flavors.
- Decorate lavishly: The visual appeal adds to the enjoyment!
Recipe Variations of No-Bake Reese’s Peanut Butter Cheesecake Dream
Creative twists
- Nutty flavors: Toss in some crushed nuts like almonds or walnuts for added crunch.
- Flavor infusions: Incorporate different extracts—like almond or coffee—for a unique twist.
- Holiday-themed variations: Experiment with peppermint or pumpkin spice for seasonal flair.
Dietary adjustments
- Gluten-Free: Use gluten-free graham crackers as a base.
- Vegan option: Swap out dairy products for vegan alternatives.
- Healthier version: Use reduced-fat cream cheese and lighter whipped cream for fewer calories.
Conclusion about No-Bake Reese’s Peanut Butter Cheesecake Dream
The No-Bake Reese’s Peanut Butter Cheesecake Dream is as easy to make as it is delicious. With creamy layers of peanut butter and chocolate set in a crunchy graham cracker crust, it’s a dessert that fits any occasion. Whether for a special celebration or just a treat for yourself, this cheesecake is sure to impress.
Don’t hesitate to try this recipe, and I hope it becomes a beloved addition to your dessert repertoire! If you do give it a go, I’d love to hear about your experience and how it turned out for you.
FAQs about No-Bake Reese’s Peanut Butter Cheesecake Dream
What if it doesn’t turn out right?
No dessert is perfect, but don’t worry! If it doesn’t set properly, it could be due to not chilling long enough. Just pop it back in the fridge and let it rest longer. If the mixing was off, carefully fold or blend the mixture again.
Can I prepare it ahead of time?
Absolutely! This cheesecake can be made a day or two in advance. Just make sure to store it properly in the fridge or keep it well-wrapped if you’re freezing it.
What are the best ingredient substitutions?
You can use different nut butters, sweeteners, or even dairy alternatives depending on your dietary needs. Just make sure to match the texture and consistency as closely as you can.
How long can it be stored?
When refrigerated, the cheesecake can last for up to a week. If frozen, it can maintain its quality for 2-3 months.
Can I use store-bought dough or crust?
While the homemade graham cracker crust is recommended for flavor and texture, you can opt for a pre-made crust if you’re short on time!
Is this recipe kid-friendly or family-appropriate?
Yes! The No-Bake Reese’s Peanut Butter Cheesecake Dream is a family favorite that delights both kids and adults. Just keep an eye on the sugar content if serving to young children.
Can I make this recipe allergen-free?
Yes! By using gluten-free graham crackers, dairy-free substitutes, and nut-free spreads, you can create a dessert suitable for various allergies and dietary restrictions.

No-Bake Reese’s Peanut Butter Cheesecake Dream
Ingredients
For the Crust
- 2 sleeves graham crackers (about 18-20 crackers)
- ¼ cup sugar
- 6 tablespoons butter, melted
- Pinch of salt
For the Peanut Butter Layer
- 8 oz cream cheese, softened
- 1 cup creamy peanut butter
- 1 cup powdered sugar (sifted if you’re feeling fancy)
- 1 teaspoon vanilla extract
- 1 ½ cups heavy whipping cream
For the Chocolate Layer
- 8 oz cream cheese, softened
- ½ cup cocoa powder (unsweetened)
- ¾ cup powdered sugar
- 1 teaspoon vanilla extract
- 1 ¼ cups heavy whipping cream
For Toppings
- ¼ cup mini chocolate chips
- 12-15 full-size Reese’s Peanut Butter Cups, chopped
- Extra whipped cream (optional)
- Chocolate shavings or a drizzle of melted peanut butter (optional)
- A few whole Reese’s for decoration (optional)
Instructions
Preparation
- Gather all your ingredients and ensure your cream cheese is at room temperature.
Prepare the Crust
- Crush graham crackers in a zip-top bag with a rolling pin until fine crumbs form.
- In a bowl, mix crushed graham crackers, sugar, melted butter, and salt.
- Press mixture into the bottom of a 9-inch springform pan and refrigerate.
Make the Peanut Butter Filling
- Beat softened cream cheese until smooth; add peanut butter and mix.
- Gradually add sifted powdered sugar and vanilla; blend until smooth.
- Whip heavy cream until stiff peaks form and fold into peanut butter mixture.
- Spread mixture over chilled crust and smooth the top.
Prepare the Chocolate Layer
- Beat softened cream cheese with cocoa powder and sugar until smooth; add vanilla.
- Whip heavy cream until stiff peaks form and gently fold into chocolate mixture.
Layer the Cheesecake
- Spread chocolate filling over peanut butter layer and smooth the top.
- Cover with plastic wrap and chill in the refrigerator for at least 4 hours.
Final Touches
- Top cheesecake with chopped Reese’s, mini chocolate chips, and whipped cream before serving.
Serving
- Slice with a hot knife and garnish with melted peanut butter or chocolate if desired.
Storage
- Cover leftovers in the refrigerator for up to a week or freeze wrapped slices for 2-3 months.