
This post may contain affiliate links. As an Amazon Associate, I earn from qualifying purchases at no extra cost to you.
Table of Contents
🍴 Top Kitchen Essentials You'll Love


Introduction about Earthquake Cake Recipes Every Peanut Butter Fan Will Love
Have you ever felt that irresistible urge for something sweet and utterly indulgent? Let me introduce you to the magical world of Earthquake Cake! If you’re a peanut butter fan, you’re in for a real treat with this recipe. Earthquake Cake Recipes Every Peanut Butter Fan Will Love combines the rich, decadent flavors of chocolate and peanut butter, creating a dessert that’s not only delicious but also incredibly easy to make.
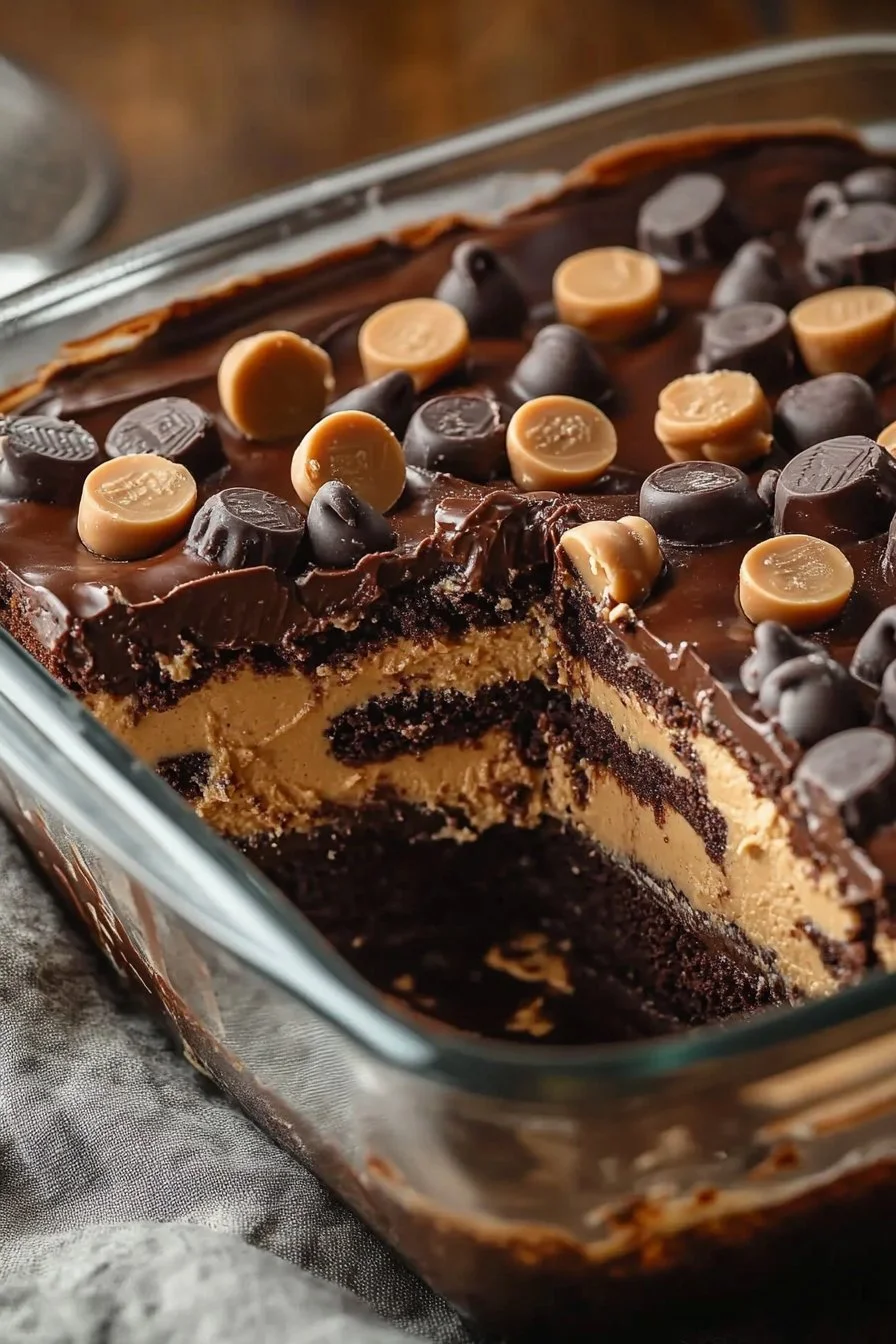
Why choose Earthquake Cake, you ask? Picture this: a moist chocolate cake with a creamy, peanut buttery filling that swirls beautifully throughout. That cracked surface adds texture and charm, making it an eye-catching centerpiece for any occasion. It’s the perfect dessert for lazy Sundays, family gatherings, or even a potluck with your friends.
This recipe is incredibly straightforward, making it ideal for both novice bakers and seasoned pros alike. So, whether you’re looking to impress at a get-together or simply indulge in a cozy dessert night, this Earthquake Cake will not disappoint.
Key Benefits of Earthquake Cake Recipes Every Peanut Butter Fan Will Love
Why You’ll Love This Recipe
- Deliciously Unique: The combination of chocolate and peanut butter is a match made in heaven.
- Ease of Preparation: With just a handful of ingredients and simple steps, you’ll have a dessert ready in no time.
- Kid-Friendly: Kids love peanut butter, and this cake is an excellent way to incorporate it into their diet.
- Versatile: Perfect for any occasion, from birthday parties to holiday feasts.
- Marble Effect: The marbled appearance not only tastes good but also makes it visually appealing.
- Leftover Friendly: This cake stays moist and delicious for days!
What Makes It Stand Out
Earthquake Cake is a unique blend of textures. The cake itself is rich and moist, while the peanut butter and cream cheese filling adds a creamy goodness that takes it to another level. Plus, the cracked top gives it an artisanal look that feels homemade and love-filled.
Seasonal variations can also make it extremely versatile; consider adding some festive spices during the holidays, or serve it in smaller portions for everyday events. Customizing this cake to suit your palate makes it not just a dessert, but a personal experience.
Ingredients for Earthquake Cake Recipes Every Peanut Butter Fan Will Love
Complete Ingredient List with Measurements
Here’s what you’ll need to whip up this delightful Earthquake Cake:
- 1 box (15.25 oz) chocolate cake mix (any brand)
- 1 cup water
- 1/2 cup vegetable oil
- 3 large eggs
- 1 cup creamy or crunchy peanut butter (your preference)
- 8 oz cream cheese, softened (full-fat recommended)
- 1/2 cup powdered sugar
- 1/2 cup creamy or crunchy peanut butter
- 1 teaspoon vanilla extract
- 1 cup chocolate chips (semi-sweet or milk chocolate)
- 1/2 cup chopped pecans or walnuts (optional)
Substitutes and Alternatives
If you have dietary restrictions or just want to switch things up, here are some alternatives you can consider:
- Gluten-Free Version: Use a gluten-free chocolate cake mix to accommodate gluten sensitivities.
- Dairy-Free: Swap the cream cheese for a dairy-free cream cheese alternative and use dairy-free chocolate chips.
- Nut-Free: If allergies are a concern, simply omit the nuts and replace peanut butter with sunflower seed butter.
- Egg Substitute: For a vegan version, replace eggs with flax eggs (1 tablespoon ground flaxseed mixed with 2.5 tablespoons water per egg) or applesauce.
How to Make Earthquake Cake Recipes Every Peanut Butter Fan Will Love – Step-by-Step Directions
Step 1 – Prep Your Workspace and Ingredients
Start by gathering all your ingredients and equipment. Make sure your baking area is clean. Preheat your oven to 350°F (175°C) and grease a 9×13-inch baking pan with cooking spray or butter.
Step 2 – Prepare the Cake Batter
In a large mixing bowl, combine the chocolate cake mix, water, vegetable oil, and eggs. Mix everything together according to the package instructions until you achieve a smooth and uniform batter. This should take about 2 minutes.
Step 3 – Layering Half the Cake Batter
Pour half of the cake batter into the prepared baking pan. Use a spatula to spread it evenly across the bottom. You want an even layer that covers the entire base to ensure it bakes uniformly.
Step 4 – Make the Cream Cheese Filling
In a separate bowl, beat the softened cream cheese until it’s smooth. It’s essential that it’s at room temperature to mix properly. Add in the powdered sugar, peanut butter, and vanilla extract, then mix until creamy and well-blended. This should take about 2-3 minutes.
Step 5 – Add the Cream Cheese Mixture
Drop spoonfuls of the cream cheese mixture evenly over the chocolate cake batter in the pan. Don’t worry about spreading it too much; the swirling will come in the next step!
Step 6 – Create the Marbled Effect
Take a knife or skewers and gently swirl the cream cheese mixture throughout the batter. Aim for a marbled effect that looks beautiful and appetizing.
Step 7 – Pouring the Remaining Batter
Carefully pour the remaining chocolate cake batter over the top of the cream cheese layer. Use your spatula to spread it gently, ensuring the cream cheese filling is covered.
Step 8 – Add the Toppings
Sprinkle chocolate chips and, if desired, chopped nuts over the top. These add an extra layer of texture and flavor. It’s tempting to add more than the recipe states, but stick to the quantities for best results!
Step 9 – Bake
Place the baking pan in your preheated oven and bake for 35–40 minutes. Keep an eye on it, and look for a cracked surface as your indicator that it’s ready. Insert a toothpick into the center; it should come out mostly clean with a few moist crumbs.
Step 10 – Cooling
Once it’s done baking, let the cake cool in the pan for 10–15 minutes. If you stick to this, you’ll get a gooier texture when serving. If you can wait, allow it to cool completely for cleaner slices.
Serving Suggestions for Earthquake Cake Recipes Every Peanut Butter Fan Will Love
Best Occasions to Serve This Dish
Earthquake Cake is perfect for a variety of situations. Here are some occasions when it truly shines:
- Family gatherings
- Birthday parties
- Potlucks or picnics
- Holiday dinners
- Casual dessert nights
- Game day or movie night snacks
What to Serve With It
Elevate your Earthquake Cake experience with these delightful pairings:
- Whipped cream or cool whip
- Vanilla ice cream
- A drizzle of chocolate sauce
- Coffee or tea
- A scoop of fruit sorbet for a fresh twist
Storing Earthquake Cake Recipes Every Peanut Butter Fan Will Love Properly
Best Storage Practices
To keep your Earthquake Cake fresh and delicious, follow these storage tips:
- In the Fridge: Store in an airtight container for up to 5 days.
- In the Freezer: Wrap it tightly in plastic wrap and then in aluminum foil. It can last for about 3 months in the freezer.
Reheating and Freezing Tips
- To Reheat: Heat individual slices in the microwave for 10-15 seconds until warmed. Make sure not to overheat to prevent dryness.
- To Thaw: If frozen, allow the cake to thaw in the fridge overnight before serving.
Tips & Tricks for Earthquake Cake Recipes Every Peanut Butter Fan Will Love
Mistakes to Avoid
To ensure your cake turns out perfectly, watch out for these common pitfalls:
- Overmixing the Batter: Mixing too much can lead to a dense cake. Aim for just a smooth mixture.
- Skipping the Cooling Period: Serving too soon can cause pieces to crumble. Let it set for the recommended time.
- Not Greasing the Pan Thoroughly: This could result in the cake sticking, making it hard to serve.
Extra Tips for Better Results
- Use Room Temperature Ingredients: Ensure your cream cheese and eggs are at room temperature for better mixing.
- Don’t Rush the Cooling Process: This really enhances the flavor and texture.
- Experiment with Toppings: Try different nuts or even drizzle caramel sauce for a gourmet touch.
Recipe Variations of Earthquake Cake Recipes Every Peanut Butter Fan Will Love
Creative Twists
Feel free to put your spin on this cake with fun add-ins:
- Add spices: Cinnamon or nutmeg can provide a warm flavor.
- Incorporate fruits: Chopped bananas or strawberries can add a fresh contrast to the rich cake.
- Flavor the peanut butter: Try honey or maple-flavored peanut butter for an interesting twist.
Dietary Adjustments
Want to cater to specific diets? Here’s how you can adjust the recipe:
- Gluten-Free: Use gluten-free cake mix and follow the same instructions.
- Dairy-Free: Choose non-dairy alternatives for cream cheese and chocolate chips.
- Vegan Option: Substitute eggs with flax eggs, and use dairy-free products.
Conclusion about Earthquake Cake Recipes Every Peanut Butter Fan Will Love
In conclusion, the Earthquake Cake Recipes Every Peanut Butter Fan Will Love is a delightful fusion of flavors that appeals to kids and adults alike. Its ease of preparation and luscious flavor make it a superb choice for any occasion. This cake not only looks impressive but also tastes unbelievably good.
So why wait? Gather your ingredients, give this amazing recipe a try, and experience the joy it brings. You’re going to love it, and we’d be thrilled to hear how it turns out!
FAQs about Earthquake Cake Recipes Every Peanut Butter Fan Will Love
What if it doesn’t turn out right?
Don’t worry! If it doesn’t look perfect, it will still taste incredible. Just ensure you follow the consistent steps for the best chance of success.
Can I prepare it ahead of time?
Absolutely! You can prepare the cake a day in advance and store it in the refrigerator, covered. Just make sure to let it come to room temperature before serving.
What are the best ingredient substitutions?
The best substitutions include using gluten-free cake mix or dairy-free alternatives for those with allergies or dietary restrictions.
How long can it be stored?
When properly stored, this cake will last in the fridge for 5 days and can be frozen for up to 3 months.
Can I use store-bought dough or crust?
This recipe specifically calls for cake mix. However, you can also use a homemade cake recipe formatted to achieve a similar texture.
Is this recipe kid-friendly or family-appropriate?
Definitely! Kids love peanut butter, and this cake is a fun way to incorporate flavors they enjoy. It’s easy to serve at family gatherings.
Can I make this recipe allergen-free?
Yes! You can tailor the recipe using allergy-friendly alternatives for ingredients like nuts, gluten, and dairy, making it suitable for your needs.
Now that you have all the guidance and insights, you’re all set to create a beautiful Earthquake Cake that everyone will love! Enjoy every bite!

Earthquake Cake
Ingredients
Cake Ingredients
- 1 box 15.25 oz chocolate cake mix Any brand
- 1 cup water
- ½ cup vegetable oil
- 3 large eggs
- 1 cup creamy or crunchy peanut butter Your preference
- 8 oz cream cheese, softened Full-fat recommended
- ½ cup powdered sugar
- 1 teaspoon vanilla extract
- 1 cup chocolate chips Semi-sweet or milk chocolate
- ½ cup chopped pecans or walnuts Optional


Instructions
Preparation
- Start by gathering all your ingredients and equipment. Preheat your oven to 350°F (175°C) and grease a 9×13-inch baking pan.
- In a large mixing bowl, combine the chocolate cake mix, water, vegetable oil, and eggs. Mix according to package instructions until smooth, about 2 minutes.
- Pour half of the cake batter into the prepared baking pan evenly.
- In a separate bowl, beat the softened cream cheese until smooth. Add in the powdered sugar, peanut butter, and vanilla extract, mixing until creamy.
- Drop spoonfuls of the cream cheese mixture evenly over the chocolate cake batter. Swirl with a knife for a marbled effect.
- Pour the remaining cake batter over the cream cheese layer and sprinkle with chocolate chips and nuts.
- Bake for 35–40 minutes or until the surface is cracked and a toothpick comes out mostly clean.
- Let the cake cool in the pan for 10–15 minutes before serving.