

Table of Contents
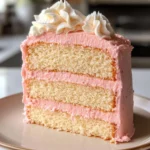
Have you ever craved a cake that’s not just delicious but also visually stunning? Enter the Vanilla Bean Layer Cake with Strawberry Cream Cheese Bliss. This cake is the epitome of elegance and indulgence, perfect for special occasions and everyday celebrations alike. Imagine soft, fluffy layers of vanilla bean-infused cake, beautifully complemented by a luscious strawberry cream cheese frosting. Doesn’t that sound delightful?
The beauty of the Vanilla Bean Layer Cake with Strawberry Cream Cheese Bliss lies in its simplicity and its unique flavor profile. It’s easy enough for beginner bakers yet impressive enough to wow your guests. Let’s dive deep into what makes this cake so irresistible and why you absolutely need to try it.
Key Benefits of Vanilla Bean Layer Cake with Strawberry Cream Cheese Bliss
Making the Vanilla Bean Layer Cake with Strawberry Cream Cheese Bliss at home offers numerous advantages that reflect in every bite.
Why you’ll love this recipe
- Flavor Fusion: The marriage of vanilla bean and fresh strawberries creates a taste explosion that’s pure bliss.
- Textural Harmony: With its moist layers and creamy frosting, each slice offers a delightful balance of textures.
- Impressive Presentation: This cake is a visual feast, making it perfect for celebrations.
- Versatile Occasion: Whether it’s a birthday, wedding, or just a Tuesday, this cake fits any occasion.
- Adaptable Recipe: You can make it your own by adding nuts or spices to create a signature touch.
- Beginner-Friendly: With clear directions, even novice bakers can shine.
What makes it stand out
What truly sets the Vanilla Bean Layer Cake with Strawberry Cream Cheese Bliss apart is its originality. While many cakes can seem homogeneous, this recipe elevates simple ingredients into a masterpiece of flavors. The incorporation of vanilla bean paste, instead of standard vanilla extract, gives an extra dose of authenticity and depth to the cake. Moreover, the vibrancy of real strawberry puree not only enhances the cake’s flavor but brings a beautiful pop of color to the frosting.
Seasonal appeal is another reason to cherish this cake. Fresh strawberries are often available in spring and summer, allowing you to take advantage of their peak flavor. This makes it a fantastic choice for garden parties, springtime birthdays, or summer gatherings.
Ingredients for Vanilla Bean Layer Cake with Strawberry Cream Cheese Bliss
Now that you’re eager to get started, let’s gather the essential ingredients for this delightful cake.
Complete ingredient list with measurements
For the Cake:
- 2 1/2 cups all-purpose flour
- 2 1/2 teaspoons baking powder
- 1/2 teaspoon salt
- 1 cup unsalted butter, softened
- 2 cups granulated sugar
- 4 large eggs
- 1 tablespoon vanilla bean paste
- 1 cup milk
For the Frosting:
- 8 oz cream cheese, softened
- 1/2 cup unsalted butter, softened
- 4 cups powdered sugar
- 1 cup fresh strawberries, pureed
Substitutes and alternatives
- Gluten-Free: Use a 1:1 gluten-free flour mix.
- Dairy-Free: Substitute butter with dairy-free margarine and use a non-dairy milk.
- Alternative Sweeteners: Swap granulated sugar with coconut sugar for a healthier option.
- Eggless Option: Replace eggs with flax eggs (1 tablespoon flaxseed meal + 2.5 tablespoons water = 1 egg).
How to Make Vanilla Bean Layer Cake with Strawberry Cream Cheese Bliss – Step-by-Step Directions
Follow these steps carefully, and you’ll produce a cake that will impress everyone!
Step 1: Preheat the Oven
Preheat your oven to 350°F (175°C). This ensures a perfect rise for your cake.
Step 2: Prepare Your Pans
Grease and flour three 9-inch round cake pans. This helps the cake layers release easily after baking.
Step 3: Mix Dry Ingredients
In a medium bowl, whisk together 2 1/2 cups all-purpose flour, 2 1/2 teaspoons baking powder, and 1/2 teaspoon salt until well combined. This prevents any clumps and ensures even baking.
Step 4: Cream Butter and Sugar
In a large mixing bowl, cream 1 cup softened unsalted butter and 2 cups granulated sugar together until light and fluffy. This process usually takes about 3-5 minutes.
Step 5: Add Eggs
Add 4 large eggs to the mixture, one at a time, mixing well after each addition. This helps incorporate air for a lighter cake.
Step 6: Add Vanilla Bean Paste
Stir in 1 tablespoon of vanilla bean paste. The flecks of vanilla bean will give your cake a gourmet touch.
Step 7: Combine with Dry Ingredients and Milk
Alternate adding the flour mixture and 1 cup of milk to the butter mixture. Start with the flour, mix, then add milk, and repeat until everything is fully incorporated.
Step 8: Divide the Batter
Divide the cake batter evenly among the prepared pans. Aim for roughly the same amount in each for even baking.
Step 9: Bake
Place the pans in the preheated oven and bake for 25-30 minutes. You’ll know they’re done when a toothpick inserted in the center comes out clean.
Step 10: Cool
Once baked, allow the cakes to cool in their pans for 10 minutes. Carefully transfer them to wire racks to cool completely.
Step 11: Prepare the Frosting
In a separate bowl, beat 8 oz cream cheese and 1/2 cup softened unsalted butter until smooth. Gradually add 4 cups of powdered sugar and 1 cup of pureed strawberries, mixing until fluffy and delightfully creamy.
Step 12: Assemble Your Cake
Once the cake layers are completely cool, frost the top of one layer, place the next on top, and repeat. Finish with frosting the top and sides of the entire cake.
Serving Suggestions for Vanilla Bean Layer Cake with Strawberry Cream Cheese Bliss
Now that your masterpiece is ready, let’s make plans to enjoy it!
Best occasions to serve this dish
- Birthdays: Celebrate years of life with slice after slice of blissful grandeur.
- Weddings: An elegant touch for a beautiful day.
- Weekend Family Meals: An indulgent way to treat loved ones after dinner.
- Spring and Summer Gatherings: The fresh fruit makes it perfect for warm weather events.
What to serve with it
- Drinks: Pair it with sweet iced tea, sparkling lemonade, or a fruity white wine.
- Sauces: Consider a drizzle of chocolate ganache or more strawberry puree for an extra touch.
- Toppings: Fresh whipped cream, sprigs of mint, or even edible flowers can elevate presentation.
- Sides: Serve alongside a light salad for a balanced meal.
Storing Vanilla Bean Layer Cake with Strawberry Cream Cheese Bliss Properly
Storing your cake correctly ensures it stays fresh and delicious.
Best storage practices
- Refrigerator: Store in an airtight container to keep the cake from drying out. It will last about 4-5 days.
- Freezer: For longer storage, wrap each layer in plastic wrap and place it in a freezer-safe container. It can last for up to 3 months.
Reheating and freezing tips
When ready to enjoy from the freezer, thaw the cake overnight in the fridge. Avoid sogginess by wrapping it tightly, ensuring no air can enter. If you need to reheat, do so at room temperature or in the oven at a low temperature, covered with foil to maintain moisture.
Tips & Tricks for Vanilla Bean Layer Cake with Strawberry Cream Cheese Bliss
Baking can be tricky, but with a few insider tips, you can avoid common pitfalls.
Mistakes to avoid
- Not Prepping Pans: Ensure the pans are well-greased or use parchment paper for easy removal.
- Overmixing Batter: Mix just until ingredients are combined to avoid a dense cake.
- Baking Too Long: Check for doneness a few minutes early; ovens can vary significantly.
Extra tips for better results
- Room Temperature Ingredients: Use room temperature butter, eggs, and milk for a smoother batter.
- Careful Cooling: Allow cakes to cool completely before frosting; this prevents melting and messy layers.
- Extra Flavor: Add a pinch of salt to the frosting; it will heighten flavors and add complexity.
Recipe Variations of Vanilla Bean Layer Cake with Strawberry Cream Cheese Bliss
Feel free to switch things up with these creative variations!
Creative twists
- Nuts: Incorporate finely chopped nuts like almonds or pistachios into the batter for a crunchy texture.
- Spices: Add a dash of cinnamon or nutmeg for a warm, spicy undertone.
- Seasonal Fruits: Swap in other fruits like raspberries or peaches when in season for a delightful twist.
Dietary adjustments
- Vegan: Use flax eggs, plant-based butter, and coconut cream for the frosting.
- Gluten-Free: Opt for a gluten-free flour blend that measures 1:1.
- Dairy-Free: Non-dairy milk and cream cheese alternatives will give you the same creamy texture without the dairy.
Conclusion about Vanilla Bean Layer Cake with Strawberry Cream Cheese Bliss
In summary, the Vanilla Bean Layer Cake with Strawberry Cream Cheese Bliss is not just another dessert; it’s an experience meant to be shared and savored. With its rich flavors, beautiful presentation, and the ability to adapt to various occasions and dietary needs, it’s a recipe that embodies versatility and indulgence.
Don’t just take my word for it—try making this delightful cake for yourself. You’re guaranteed to impress not only your taste buds but also everyone fortunate enough to share in your creation. Enjoy, share, and spread the bliss of the Vanilla Bean Layer Cake with Strawberry Cream Cheese Bliss!
FAQs about Vanilla Bean Layer Cake with Strawberry Cream Cheese Bliss
What if it doesn’t turn out right?
If your cake doesn’t rise, it could be due to old baking powder or incorrect oven temperature. Ensure ingredients are fresh and double-check the oven’s accuracy with an oven thermometer.
Can I prepare it ahead of time?
Absolutely! You can bake the layers a day in advance and store them tightly wrapped in plastic wrap until you’re ready to frost.
What are the best ingredient substitutions?
Common substitutions include using almond milk instead of dairy milk or coconut flour instead of all-purpose flour. Just be mindful of ratios for texture.
How long can it be stored?
This cake can be stored in the refrigerator for about 4-5 days; if frozen, it lasts for up to 3 months.
Can I use store-bought dough or crust?
This recipe does not use a crust; it’s a layer cake. However, you can make a quick version by using store-bought cake mixes if you’re short on time.
Is this recipe kid-friendly?
Absolutely! The flavors are sweet without being overpowering, making it a hit with both kids and adults.
Can I make it allergen-free?
Yes! Simply use gluten-free flour, dairy-free cream cheese, and egg substitutes to accommodate various allergies.
Now that you have a thorough understanding of this delectable recipe, it’s time to get baking! Grab your apron, gather your ingredients, and transform your kitchen into a haven of sweet aromas with the Vanilla Bean Layer Cake with Strawberry Cream Cheese Bliss. Enjoy!
Vanilla Bean Layer Cake with Strawberry Cream Cheese Bliss
Ingredients
For the Cake
- 2.5 cups all-purpose flour
- 2.5 teaspoons baking powder
- 0.5 teaspoon salt
- 1 cup unsalted butter, softened
- 2 cups granulated sugar
- 4 large eggs
- 1 tablespoon vanilla bean paste For an authentic flavor.
- 1 cup milk
For the Frosting
- 8 oz cream cheese, softened
- 0.5 cup unsalted butter, softened
- 4 cups powdered sugar
- 1 cup fresh strawberries, pureed Enhances flavor and adds color.
Instructions
Preparation
- Preheat your oven to 350°F (175°C).
- Grease and flour three 9-inch round cake pans.
- In a medium bowl, whisk together the flour, baking powder, and salt.
- In a large mixing bowl, cream the softened butter and granulated sugar together until light and fluffy, about 3-5 minutes.
- Add the eggs one at a time, mixing well after each addition.
- Stir in the vanilla bean paste.
- Alternate adding the flour mixture and milk to the butter mixture, starting and ending with flour.
- Divide the batter evenly among the prepared pans.
Baking
- Bake in the preheated oven for 25-30 minutes.
- Cool the cakes in their pans for 10 minutes, then transfer to wire racks to cool completely.
Making the Frosting
- In a separate bowl, beat the cream cheese and softened butter until smooth.
- Gradually add the powdered sugar and pureed strawberries, mixing until fluffy.
Assembling the Cake
- Once the cake layers are completely cool, frost the top of one layer and place the next on top, repeating the process until all layers are assembled.
- Frost the top and sides of the entire cake.