
This post may contain affiliate links. As an Amazon Associate, I earn from qualifying purchases at no extra cost to you.
Table of Contents
Imagine the smell of golden pastry baking in the oven, wafting through your home while a rich and savory filling simmers on the stove. This is the magic of Homemade Irish Pasties. These delightful pastries, stuffed with a comforting medley of ground beef or lamb, onions, carrots, and potatoes, are a culinary hug that beckons you to come and enjoy a plateful. They’re perfect for cozy family dinners, festive gatherings, or even as hearty snacks. Have you ever longed for a dish that not only warms your heart but also fills your tummy? This recipe is precisely that—right from the heart of Irish comfort food.
The beauty of Homemade Irish Pasties lies in their versatility. Whether you’re serving them as a traditional meal on St. Patrick’s Day or adding a creative flare for a casual get-together, these pastries shine on every occasion. Made with simple ingredients—like ground beef or lamb, diced vegetables, homemade pastry dough, and aromatic herbs—they are an invitation to come together and enjoy life’s simple pleasures. Who wouldn’t want to gather around a kitchen table, share stories, and indulge in flaky crusts filled with wholesome goodness?
What makes these savory pasties even more special is the ability to customize them to suit your taste or dietary needs. For instance, you can easily switch out the meat for a vegetarian filling or even opt for gluten-free pastry dough. This adaptability ensures that they can cater to everyone at your table, making them a fantastic option for family gatherings or weekly meal prep. Have you ever wondered how a single recipe could bring people together? This one does—by offering flexibility and deliciousness in every bite.
So, if you’re ready to roll up your sleeves and embark on a delightful culinary journey, let’s dive into the heart of the matter. In this article, we will explore everything you need to know about Homemade Irish Pasties, from the key benefits to ingredient lists, step-by-step instructions, and even serving suggestions. You’ll feel not only like a seasoned chef but also as if you’ve stepped into a cozy Irish kitchen, ready to create memories full of flavor and warmth. Are you excited to make this culinary classic? Let’s get started!
🍴 Top Kitchen Essentials You'll Love


Key Benefits of Homemade Irish Pasties
Why You’ll Love This Recipe
Flavor Profile: Each bite of Homemade Irish Pasties bursts with rich, comforting flavors. The combination of savory beef or lamb blended with sweet carrots and earthy potatoes creates a harmonious taste experience that is both satisfying and memorable.
Simple Ingredients: You don’t need a pantry full of exotic spices to whip up these pasties. With just a handful of everyday ingredients, you can recreate this traditional dish in your kitchen.
Time Efficient: These pasties come together in a relatively short amount of time. A simple filling cooked in one skillet means less cleanup, and you’ll have a hearty meal on the table in under an hour.
Versatility: The ability to switch ingredients based on dietary preferences or what you have on hand makes this recipe incredibly flexible. Veggie lovers can swap out meat for mushrooms and lentils, ensuring no one feels left out.
Freezer Friendly: Make a double batch and freeze half! These pasties hold up well in the freezer, making them perfect for those busy weeknights when you need a homemade meal in a snap.
Tradition with a Twist: While this recipe is rooted in Irish tradition, you can easily infuse your own twist—maybe a touch of cheese or different spices—turning this classic into something uniquely yours.
What Makes It Stand Out
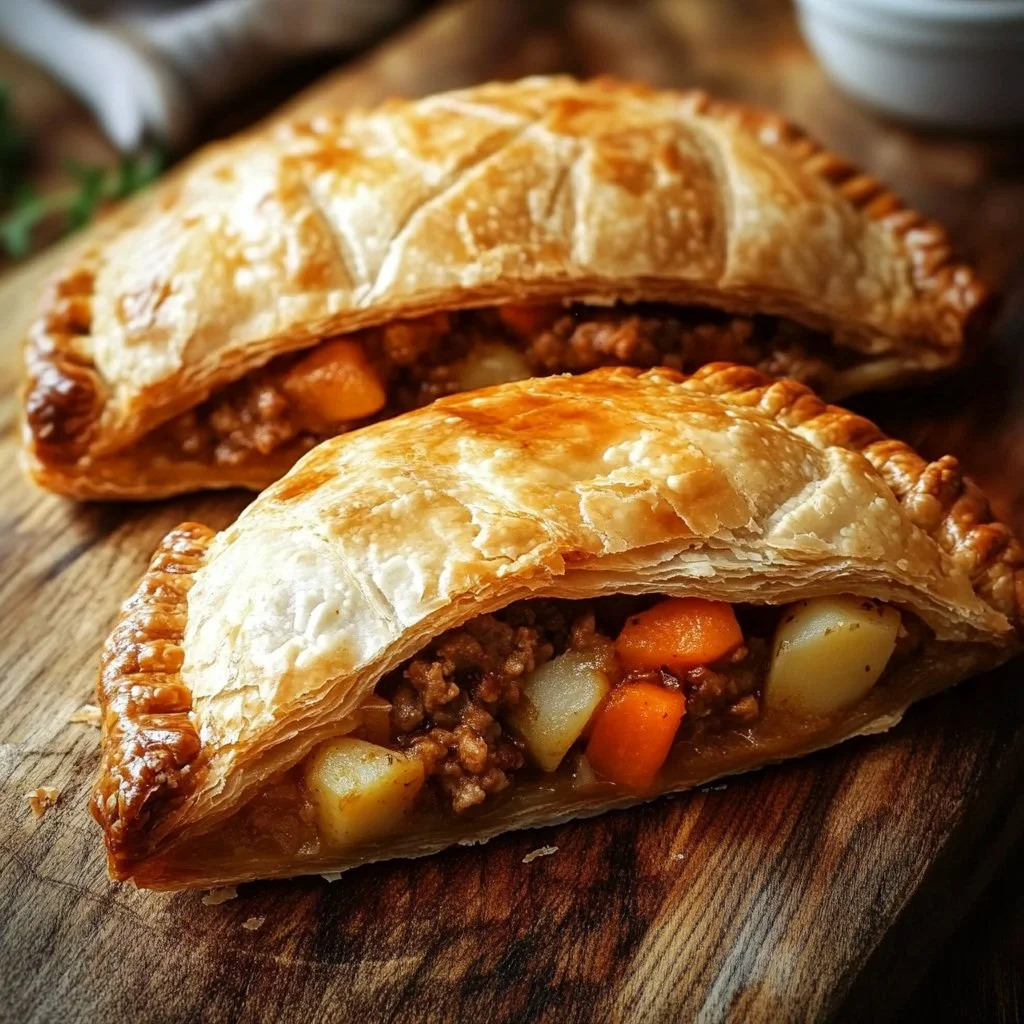
What sets Homemade Irish Pasties apart from other pastries is their rustic charm and heartiness. These are not just simple handheld snacks; they are a complete, satisfying meal packed into a flaky crust. The outer layer of golden pastry encases a warm filling that melds flavors together beautifully. Each bite reveals the tender, caramelized onions and hearty vegetables mingling with the succulent meat, creating a textural contrast that is utterly delightful.
Moreover, Homemade Irish Pasties are adaptable for various ingredients, making them suitable for any season. You can enjoy them in winter with hearty root vegetables or in summer with fresh garden greens. This adaptability not only makes them practical but also keeps them exciting, as there’s always room for creativity in the kitchen. You may try adding seasonal herbs or even incorporating regional spices to give each batch a personalized flair.
Ingredients for Homemade Irish Pasties
Complete Ingredient List with Measurements
- 1 lb ground beef or lamb: The primary protein, which adds depth and richness to the filling.
- 1 onion, diced: Adds sweetness and aroma, enhancing the overall flavor.
- 2 carrots, diced: Brings a natural sweetness and a good bit of color.
- 1 potato, peeled and diced: Provides heartiness, helping to bind the filling and adds a comforting texture.
- 1 cup beef or vegetable broth: Keeps the filling moist and flavorful.
- 1 teaspoon salt: Essential for seasoning and enhancing the flavors.
- 1/2 teaspoon pepper: Adds a mild kick; adjust according to preference.
- 1 teaspoon thyme: The earthy flavor balances the richness of the meat.
- 2 tablespoons olive oil: Used for sautéing the vegetables, infusing them with flavor.
- 1 package pastry dough: The base that holds everything together—homemade dough can also be used if preferred.
- 1 egg (for egg wash): This gives the pasties a beautiful golden shine when baked.
Substitutes and Alternatives
Exploring substitutions ensures everyone can enjoy Homemade Irish Pasties. If you’re adapting for dietary needs, here are some potential replacements:
- Meat Alternatives: For a vegetarian option, switch the ground beef/lamb for cooked lentils, quinoa, or extra mushrooms. If you seek a plant-based protein, using a store-bought vegan ground meat can also work wonderfully.
- Broth Options: Vegetable broth is a great alternative for those avoiding meat, and you can easily make your own by boiling vegetable scraps.
- Dairy-Free: For a dairy-free pastry dough, many brands are available or you can make your own using coconut oil or vegan butter.
- Gluten-Free: Use a gluten-free pastry dough, which is readily available in stores or can be prepared at home with a mix of gluten-free flours.
- Herbs and Spices: Feel free to experiment with other herbs such as rosemary or parsley, and spices like cumin or paprika can add an exciting twist to the filling.
How to Make Homemade Irish Pasties – Step-by-Step Directions
Step 1 – Prepare Your Workspace and Ingredients
Before diving into the cooking process, take a moment to set up your workspace. A clean, organized kitchen is essential for smooth cooking. Gather all your ingredients and tools: a large skillet, a wooden spoon, a rolling pin, a cutting board, and a baking sheet lined with parchment paper for an easy cleanup.
Mise en place, or “everything in its place,” is key to efficient cooking. Chop your vegetables and measure your broth and spices in advance. This preparation allows you to focus on cooking without interruption, making the experience enjoyable and stress-free.
Step 2 – Heat the Olive Oil and Sauté the Onions
In your skillet, heat 2 tablespoons of olive oil over medium heat. As the oil warms, it begins to shimmer slightly—this is your cue that it’s ready for the onions. Add the diced onion, stirring frequently. In just a few minutes, you’ll smell the rich aroma of sautéing onion filling the kitchen. Cook until they are softened and translucent, about 4-5 minutes. This step is crucial; caramelizing the onions enhances their natural sweetness, contributing to the overall flavor of your pasties.
Step 3 – Add the Carrots and Potatoes
Once the onions are softened, it’s time to add the diced carrots and potatoes to the pan. Stir them into the sautéed onions and cook for about 5 minutes. You’ll begin to see the vibrant colors of orange and yellow dancing in your skillet. As they cook, the vegetables will release moisture, creating a lovely steam that enhances their tenderness.
At this point, adding a pinch of salt can also help to draw out moisture, leading to more flavorful vegetables. The goal is to have the carrots tender but still crispy.
Step 4 – Brown the Meat
Now it’s time to incorporate the ground beef or lamb. Push the vegetables to the sides of the skillet, creating space in the center. Add the meat and break it apart with your spoon. As it cooks, you’ll hear a satisfying sizzle. Allow the meat to brown for about 10 minutes, stirring occasionally to ensure even cooking. You want it to be nicely browned, which contributes both flavor and texture to the filling.
Once browned, mix it back with the vegetables and add the thyme, salt, pepper, and broth. Stir everything together until well combined.
Step 5 – Simmer the Filling
Allow the mixture to simmer on low heat for about 10 minutes. The broth will reduce slightly, creating a savory filling that’s moist yet not overly wet. You want a consistency that holds together well when stuffed in pastries, so allow it to cook down until the liquid has mostly evaporated.
This step is where all the flavors meld together—just picture the wonderful aroma wafting through your kitchen as those ingredients come together.
Step 6 – Roll Out the Pastry Dough
While the filling is simmering, it’s time to prepare the pastry. If you’re using store-bought dough, take it out of the refrigerator and let it sit for about 10 minutes for easier rolling. On a clean, lightly floured surface, roll out the dough until it’s about 1/8 inch thick.
Use a round cutter (or a bowl) to cut out circles of dough, about 5-6 inches in diameter. The thickness of the dough is essential; too thin and it won’t hold the filling, too thick, and it won’t cook through properly.
Step 7 – Assemble the Pasties
Preheat your oven to 400°F (200°C) while you assemble the pasties. Once the filling has cooled slightly, place a generous spoonful in the center of each dough circle. Be careful not to overfill, as you need enough dough around the edges to seal them properly.
Fold the circle over to create a half-moon shape. Use your fingers to pinch the edges tightly, ensuring no filling escapes. For a professional finish, use a fork to crimp the edges, creating a decorative seal.
Step 8 – Brush with Egg Wash
To achieve that golden, glossy finish, beat an egg in a small bowl and brush the tops of each pasty with the egg wash. This step not only enhances the appearance but also adds flavor.
If you’re vegan or making dairy-free pasties, a simple mixture of almond milk and olive oil can achieve similar results.
Step 9 – Bake the Pasties
Place your assembled pasties onto a baking sheet lined with parchment paper. Bake in your preheated oven for 25-30 minutes, or until they are golden brown and flaky. Enjoy watching them puff up in the oven— the crust becomes crisp and inviting.
Step 10 – Serve and Enjoy
Remove the pasties from the oven and let them cool slightly before serving. The aroma is sure to draw everyone to the kitchen. Serve warm, perhaps with a side of chunky tomato sauce for dipping or a fresh garden salad.
These Homemade Irish Pasties are best enjoyed fresh but can be reheated if any leftovers remain.
Serving Suggestions for Homemade Irish Pasties
Best Occasions to Serve This Dish
Homemade Irish Pasties are wonderfully adaptable, making them suitable for various occasions. Whether you’re hosting a cozy family gathering to celebrate a holiday or simply enjoying a weekend dinner, these pastries fit the bill.
They are also perfect for casual parties or potlucks, easily served as finger food. Cut them into smaller pieces to create a delightful appetizer platter, or serve them as a main dish alongside a colorful salad.
On chilly evenings, these pasties can be a comforting meal, bringing warmth and satisfaction to your dinner table. The heartiness of the filling combined with the flaky pastry is truly the essence of comforting food.
What to Serve With It
When considering what to pair with your Homemade Irish Pasties, think about flavors and textures that will complement the dish. A simple side salad with crisp greens and a tangy vinaigrette works beautifully to cut through the richness of the filling.
Another delightful option is a creamy mashed potato or aromatic colcannon, elevating your meal with traditional Irish roots. If you want a bit of warmth and comfort, serve these pasties alongside some rich, creamy tomato soup or a hearty vegetable stew.
For drinks, a glass of stout or a light shandy pairs perfectly and enhances the seemingly simple meal, making it feel special.
Storing Homemade Irish Pasties Properly
Best Storage Practices
To keep your Homemade Irish Pasties fresh, allow them to cool completely before storing. They can be placed in an airtight container in the refrigerator for up to 3 days. If you choose to freeze them, ensure they are completely cooled, then wrap each pasty in plastic wrap or aluminum foil and store in a freezer-safe container.
Properly stored, they can last up to 3 months in the freezer without losing their delicious flavors or textures. When ready to eat, simply pull them out and reheat, bringing back that fresh-baked delight.
Reheating and Freezing Tips
For reheating, the oven is the best choice to restore that flaky texture. Preheat your oven to 350°F (175°C) and place the pasties on a baking sheet for about 15-20 minutes. Microwave reheating is quick but can lead to sogginess, so it’s best used as a last resort.
If you’re reheating frozen pasties, bake them from frozen, adding 5-10 minutes to the cooking time until they are heated through completely.
Tips & Tricks for Homemade Irish Pasties
Mistakes to Avoid
- Overfilling the Pastry: Using too much filling can lead to a messy bursting during baking. Leave enough edge to seal properly.
- Skipping the Chill: If your pastry dough is warm, it can become hard to work with. Always chill it if necessary for better handling.
- Not Prepping Ingredients: Not having your filling prepped and flavors melded can result in a bland taste. Take the time to sauté well.
- Neglecting to Seal Properly: If the edges are not sealed tightly, the filling will leak out during cooking. Make sure to crimp securely.
- Ignoring Baking Temperatures: Baking at too high a temperature can result in burnt pastry while the filling remains cold. Keep an eye on the oven!
- Forgetting the Egg Wash: Skipping the egg wash can lead to less appetizing, pale pasties. That golden hue makes a difference visually and taste-wise.
Extra Tips for Better Results
Personalize Flavors: Don’t hesitate to add a splash of Worcestershire sauce or a dash of hot sauce in your filling for depth.
Test for Seasoning: Always taste your filling before stuffing! Adjust salt and pepper as needed to ensure flavor perfection.
Experiment with Dough: Try different pastry types like puff pastry or phyllo for a fun texture change!
Emphasize Freshness: Fresh herbs add a remarkable difference in flavor; consider experimenting with rosemary, parsley, or even dill.
Recipe Variations of Homemade Irish Pasties
Creative Twists
Vegetable Medley Pasties: Load them with your favorite seasonal vegetables—zucchini, bell peppers, or mushrooms— mixed with a rich cheese sauce for added creaminess.
Bacon and Cheese Delight: Sauté some diced bacon with your onions and mix in shredded cheese, creating a savory and indulgent filling that will please any palate.
Spicy Tex-Mex Twist: Incorporate spices like cumin and chili powder into the meat mixture along with black beans and corn for a unique, flavor-packed variation.
Savory Pumpkin Pasties: In the fall, try a warm pumpkin filling mixed with ground meat, sage, and nutmeg for a seasonal delight that pairs perfectly with a spiced apple cider.
Dietary Adjustments
Creating Homemade Irish Pasties that suit every dietary need is easier than you think.
Vegan Pasties: Use crumbled tofu, lentils, or chickpea mash for the filling, and be sure to use dairy-free pastry dough.
Gluten-Free Version: Many gluten-free flours are available now; experiment with a mixture of almond flour and coconut flour for a delicious and light pastry.
Low-FODMAP: Swap regular onions for green onion tops and use lactose-free cheese if adding dairy to your filling.
Keto-Friendly: For a low-carb twist, make a filling of ground meat with lots of herbs and spices while creating a crust using cheese and almond flour for a dense, yet sumptuous alternative.
Conclusion about Homemade Irish Pasties
In summary, Homemade Irish Pasties are not just a recipe; they’re an experience. Bringing together the warmth of home-cooked meals and the joy of sharing with loved ones, they hold a unique place in the heart of comfort food. Easy to make, adaptable to many tastes and dietary requirements, and utterly delicious, these pasties are perfect for any occasion—from family dinners to festive gatherings.
As you embark on your cooking adventure, remember that the joy of preparing Homemade Irish Pasties extends beyond the food itself. It’s about creating cherished memories around the table, sharing stories, and indulging in flavors that warm your soul. So, gather your loved ones, get your ingredients ready, and make these delightful pasties a centerpiece of your next meal. You won’t regret it!
FAQs about Homemade Irish Pasties
What if it doesn’t turn out right?
If your Homemade Irish Pasties don’t turn out as expected, don’t be discouraged. Common issues include undercooked filling or pale coloring. Simply return them to the oven for a little longer, making sure to watch them closely. For texture, remember that the filling should be slightly moist yet not soupy, giving you a delightful bite when cooked.
Can I prepare it ahead of time?
Absolutely! You can prepare the filling the day before; just store it in the fridge. Assemble the pasties prior to baking as well, letting them sit covered until you’re ready to pop them in the oven.
What are the best ingredient substitutions?
The best substitutions depend on dietary needs. Use lentils or vegetables for a vegetarian version and gluten-free flour options for wheat intolerances. Cheese can easily be substituted with plant-based alternatives, and using vegetable broth instead of meat broth works splendidly.
How long can it be stored?
If stored correctly, Homemade Irish Pasties will last up to 3 days in the refrigerator or about 3 months in the freezer. Reheat as needed to enjoy that fresh-baked taste.
Can I use store-bought dough or sauce?
Yes! Store-bought pastry dough saves time and is a convenient option. Additionally, if you’re pressed for time, store-bought sauces can complement your filling, though homemade always delivers optimal flavor.
Is this recipe kid-friendly?
Absolutely! Kids love the flaky pastry and delicious filling. They can even help with the assembly, making it a fun family activity that encourages kids to explore cooking.
Can I make it allergen-free?
Definitely! Use substitutes such as gluten-free flour, dairy-free alternatives, and ensure your fillings are free from any allergens you’re concerned about.
What side dishes go best with it?
Complement your pasties with a fresh garden salad dressed in vinaigrette, creamy mashed potatoes, or vegetable soup for a complete meal.
Can I double or halve the recipe?
Yes! This recipe is easily adjustable. Simply double or halve the ingredients while maintaining proportions for all components.
What’s the secret to the best flavor?
The key is in the seasoning! Make sure to taste your filling before wrapping it. Also, cooking your filling components like onions and garlic until caramelized brings depth and enhanced flavors, making all the difference in your Homemade Irish Pasties.

Irish Pasties
Equipment
- Baking sheet
- Rolling Pin
- Mixing Bowl
- Pastry brush
Ingredients
Pastry Dough
- 2.5 cups all-purpose flour
- 1 tsp salt
- 1 cup cold unsalted butter, cubed
- 6–8 tbsp cold water as needed to bring dough together
Filling
- 1 lb ground beef
- 1 cup diced potatoes peeled and cut small
- ½ cup diced carrots
- ½ cup chopped onion
- 1 tsp salt or to taste
- ½ tsp black pepper
- ½ tsp thyme or mixed herbs optional
Finish
- 1 egg, beaten (for egg wash)


Instructions
- Preheat oven to 400°F (200°C). Line a baking sheet with parchment paper.
- In a bowl, mix flour and salt. Cut in cold butter with a pastry cutter or fingers until mixture resembles coarse crumbs.
- Add cold water 1 tablespoon at a time until dough forms. Shape into a ball, wrap, and chill for 15–20 minutes.
- In a separate bowl, combine ground beef, diced potatoes, carrots, onion, salt, pepper, and thyme. Mix well.
- Divide dough into 6 equal parts. Roll each into a 6-inch circle.
- Place about 1/2 cup of filling on one half of each circle. Fold over and crimp edges to seal tightly.
- Brush tops with beaten egg for a golden crust.
- Bake 35–40 minutes, until crust is golden and filling is cooked through.
- Serve warm with brown gravy or HP sauce if desired.