
This post may contain affiliate links. As an Amazon Associate, I earn from qualifying purchases at no extra cost to you.
Table of Contents
As the holiday season rolls around, the smell of pumpkin and spice fills the air, bringing families together. One delightful treat that is easy to make yet incredibly festive is Thanksgiving Cake Pops. Have you ever thought about how fun it would be to combine cake and lollipops? This unique recipe offers a twist on traditional desserts, making it perfect for Thanksgiving gatherings. You’ll find that Thanksgiving Cake Pops are not only cute, but they also pack a flavor punch that everyone will adore.
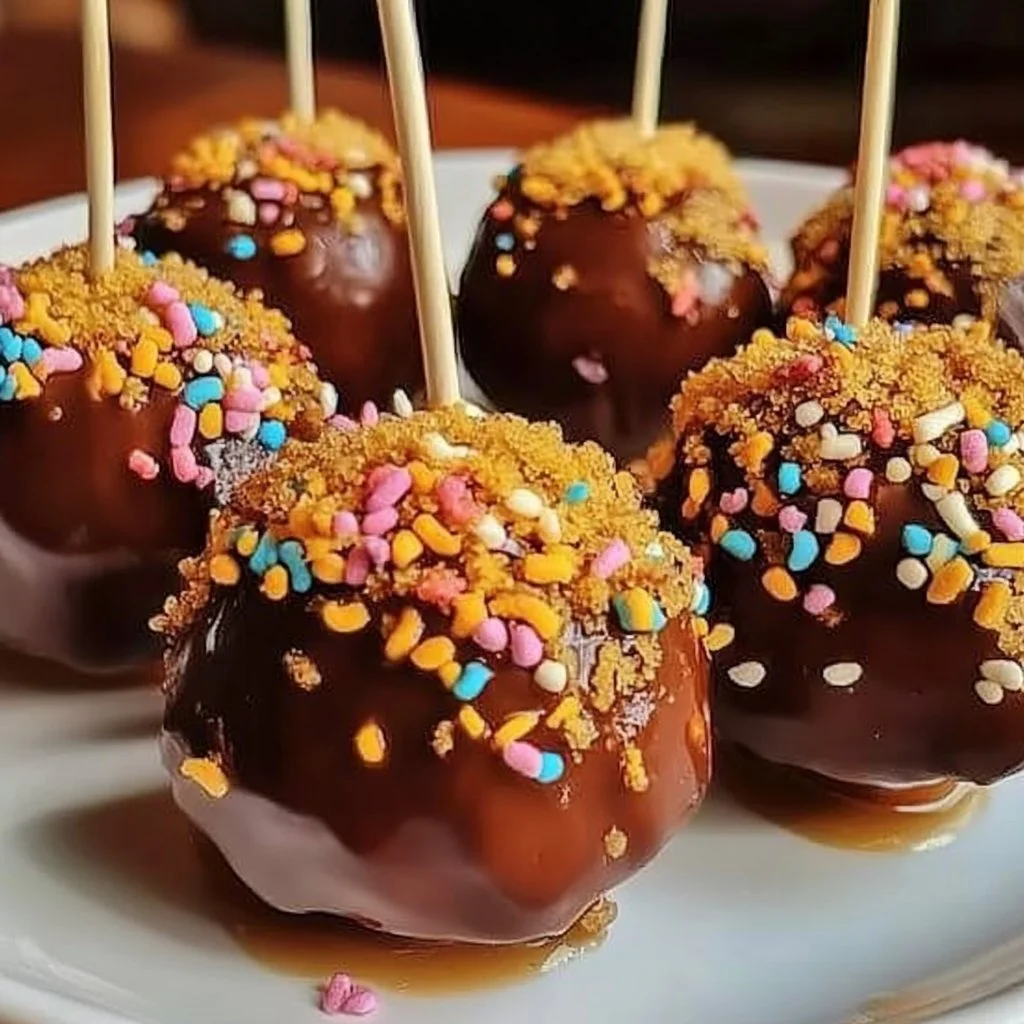
What makes Thanksgiving Cake Pops so special is their simplicity and versatility. Using a cake mix, you can create these fun treats with minimal effort. They’re also easy to customize, allowing every family member to add their personal touch. Picture it: Bite-sized cake pops drizzled in chocolate and topped off with colorful sprinkles, creating a festive presentation that will steal the show at any Thanksgiving table. Isn’t it exciting to think about how much joy these little delights can bring to your celebration?
The beauty of Thanksgiving Cake Pops lies in their ability to cater to any palate. By simply changing the cake mix flavor, you can create endless variations of this fun dessert. Whether you like chocolate, vanilla, or red velvet, there is a cake pop option for everyone in the family. Furthermore, this recipe serves as a fantastic way to involve kids in the kitchen, making memories as they help roll the cake mixture and decorate their pops. What’s not to love?
Beyond their taste and appearance, Thanksgiving Cake Pops are also incredibly shareable. They make great conversation starters at holiday gatherings and can be individually wrapped to serve as festive party favors. Picture your loved ones enjoying these tasty treats while reminiscing about old family stories. Thanksgiving Cake Pops are sure to become a staple at your holiday celebrations.
In this article, we will explore why Thanksgiving Cake Pops are a must-try, provide you with a detailed ingredient list, and walk you through step-by-step instructions on how to make these delightful treats. You’ll discover serving suggestions, storage tips, and even a few creative variations to try. After all, the holiday season is all about sharing, and nothing says “festive” like cake pops that everyone can enjoy.
🍴 Top Kitchen Essentials You'll Love


Key Benefits of Thanksgiving Cake Pops
Thanksgiving Cake Pops offer several advantages that make them perfect for your holiday festivities. Here are just a few reasons you’ll love this recipe:
Delicious Flavor: These cake pops can be made with any cake mix flavor, ensuring a taste that suits everyone’s palate.
Simple to Make: With just a few ingredients and straightforward steps, your Thanksgiving Cake Pops are ready in no time.
Customizable: Add unique toppings, flavors, or colors to personalize your cake pops for any occasion.
Family Friendly: Making cake pops is a fun activity for the entire family, providing great opportunities for bonding in the kitchen.
Perfect for Gatherings: Their bite-sized nature makes them easy to serve and share at holiday parties.
What Makes It Stand Out
What sets Thanksgiving Cake Pops apart is their originality. Unlike standard cakes or cupcakes, cake pops offer a fun twist that encourages creativity. Want to make them the star of your Thanksgiving dessert table? Consider decorating them with autumn-themed sprinkles or drizzling them with colored chocolate to make them more festive.
Customization is another key element that makes this recipe truly shine. You can easily swap flavors and toppings, allowing you to cater to varied tastes or dietary preferences. Want a hint of spice? A gingerbread cake pop with cream cheese frosting could be just the ticket. The possibilities are endless, and it’s simply a matter of personal choice.
Thanksgiving Cake Pops are also ideal for various occasions beyond Thanksgiving. They’re great for birthdays, Halloween, or even an everyday treat. Their charming appearance and delicious taste make them a crowd-pleaser, whether at a school event or a family gathering.
Ingredients for Thanksgiving Cake Pops
Complete Ingredient List with Measurements
To get started on your Thanksgiving Cake Pops, you’ll need the following ingredients:
1 cake mix (flavor of your choice): Choose from classic vanilla, rich chocolate, or festive pumpkin.
1 cup frosting: Store-bought or homemade, depending on your preference.
Candy melts or chocolate for coating: Choose white, milk, or dark chocolate based on your taste.
Lollipop sticks: These provide the perfect handle for your cake pops.
Sprinkles (optional): Consider seasonal or holiday-themed sprinkles for an extra festive touch.
Substitutes and Alternatives
If you have any dietary needs or allergies, don’t worry! There are plenty of substitutions you can make for your Thanksgiving Cake Pops. For instance, you can use gluten-free cake mixes to accommodate those with gluten sensitivities. Additionally, if you’re looking for a dairy-free option, many brands offer dairy-free frostings and chocolate.
Moreover, you can experiment with different cake flavors. Opt for a vegan cake mix and plant-based frosting to create a delicious vegan-friendly alternative everyone can enjoy. These simple swaps make it easy for anyone to enjoy your Thanksgiving Cake Pops.
How to Make Thanksgiving Cake Pops – Step-by-Step Directions
Step 1 – Prepare Ingredients
Before you start making your Thanksgiving Cake Pops, gather all your ingredients. Make sure you measure everything out to streamline the process. It’s easier to stay organized and create a delicious batch when you have everything ready.
Step 2 – Cook the Base
Preheat your oven and follow the instructions on your cake mix package. Bake the cake according to the directed time and temperature, setting a timer so you can focus on other tasks. Once baked, let the cake cool completely on a wire rack.
Step 3 – Crumble the Cake
Once cooled, transfer the cake to a large bowl. Crumble the cake into small pieces using your hands or a fork. It should be a fine texture to work well with the frosting. Make sure there are no large chunks remaining.
Step 4 – Mix in the Frosting
Add the cup of frosting into the crumbled cake and mix until it’s well combined. Your mixture should hold together when pressed, resembling cookie dough. Don’t be afraid to get your hands in there to ensure everything is evenly blended.
Step 5 – Roll Into Balls
Now comes the fun part! Take small portions of the mixture and roll them into balls, about 1 inch in diameter. Place the rolled balls onto a lined baking sheet. Make sure to leave some space between them as they may stick together.
Step 6 – Insert the Lollipop Sticks
Once your balls are ready, it’s time to insert the lollipop sticks. Push a stick gently into each ball, making sure it goes in about halfway. This step will help keep the cake pops stable during the coating process.
Step 7 – Refrigerate
Cover the baking sheet with plastic wrap and refrigerate the cake pops for about 30 minutes. This chilling time allows the pops to set, making it easier to coat them later.
Step 8 – Melt the Coating
While the cake pops cool, melt the candy melts or chocolate in a microwave-safe bowl. Heat it in intervals of 30 seconds, stirring in between to avoid burning. You want it to be smooth and pourable.
Step 9 – Dip the Cake Pops
Once the coating has melted, take a cake pop and dip it into the chocolate, ensuring it’s completely covered. Allow any excess to drip off before crafting the final touches.
Step 10 – Decorate and Set
If you want to use sprinkles, sprinkle them on the wet coating before it sets. Place the finished cake pops upright in a styrofoam block or on wax paper to dry completely. And there you have it, easy Thanksgiving Cake Pops ready for everyone to enjoy!
Serving Suggestions for Thanksgiving Cake Pops
Best Occasions to Serve This Dish
Thanksgiving Cake Pops are incredibly versatile and can be served on various occasions. They are perfect for Thanksgiving dinner, offering a fun twist on traditional dessert. Your guests will appreciate this portable treat, and kids will love them!
Consider serving them at birthday parties, school events, or bake sales too. Their delightful appearance and bite-sized nature make them ideal for gatherings. You could even accompany them with a dipping sauce for added flavor.
What to Serve With It
- Coffee or Hot Cocoa: Pair these sweet treats with warm drinks for a classic comfort combination.
- Ice Cream: A scoop of vanilla or pumpkin ice cream alongside cake pops can create a delightful contrast of flavors.
- Fruit Platters: Fresh fruit can offer a refreshing balance to the sweetness of the cake pops.
- Cheese Board: Consider a cheese platter for a more adult-centered gathering to balance rich flavors.
How to Store Thanksgiving Cake Pops Properly
Best Storage Practices
To keep your Thanksgiving Cake Pops fresh, it’s essential to store them properly. If you plan on serving them later, consider keeping them in the fridge. Place them in an airtight container, separating layers with parchment paper to avoid sticking.
If you expect to store them for longer, you can freeze the cake pops. Wrap each one individually in plastic wrap and then place them in a freezer-safe container. They can stay fresh for about a month while frozen.
Reheating and Freezing Tips
To enjoy your Thanksgiving Cake Pops after freezing, simply thaw them in the refrigerator overnight. Avoid microwaving as it can change the texture and melt the chocolate coating. Storing them properly will help ensure they remain as delicious as the day they were made.
Tips & Tricks for Thanksgiving Cake Pops
Mistakes to Avoid
Not Cooling the Cake: Be sure the cake is completely cooled before crumbling. Warm cakes can lead to a mushy texture.
Adding Too Much Frosting: Too much frosting can make the mix overly wet, causing pops to fall apart.
Skipping Refrigeration: Don’t skip chilling the pops; this helps them hold their shape during coating.
Overheating Chocolate: Always melt in intervals to avoid burning the chocolate or candy melts.
Improper Coating: Ensure the cake pop is well-coated but doesn’t have excessive dripping chocolate; it can ruin the look.
Extra Tips for Better Results
To elevate your Thanksgiving Cake Pops even further, consider adding flavored extracts such as vanilla, almond, or peppermint to the frosting. This will enhance the overall flavor profile. Another fun idea is to personalize them further with themed decorations or custom colors that fit your holiday décor.
Experimenting with different types of toppings can also improve the presentation. Use a mix of sprinkles, crushed nuts, or edible glitter to make your cake pops a real showstopper!
Recipe Variations of Thanksgiving Cake Pops
Creative Twists
Pumpkin Spice Cake Pops: Substitute a pumpkin cake mix and use cream cheese frosting for a seasonal favorite.
Chocolate Peanut Butter Cake Pops: Use chocolate cake mix and peanut butter frosting for a deliciously rich twist.
Caramel Drizzle Cake Pops: Once dipped in chocolate, drizzle with caramel sauce for an elevated flavor profile.
Dietary Adjustments
For a vegan version, use a plant-based cake mix and frosting. These adjustments allow everyone to enjoy the holiday treats without compromising on taste. Additionally, searching for gluten-free cake mixes can help accommodate guests with gluten intolerance.
Conclusion about Thanksgiving Cake Pops
In conclusion, Thanksgiving Cake Pops are an excellent addition to any holiday celebration. They combine simplicity and creativity, making the process of baking enjoyable for all ages. Their versatile flavors and beautiful presentation make them a delightful treat that your family and guests will love. Don’t just settle for ordinary desserts; try these easy-to-make cake pops and bring some fun to your Thanksgiving festivities. You won’t regret it—and your guests will certainly thank you!
FAQs about Thanksgiving Cake Pops
Can I prepare it ahead of time?
Yes, you can make Thanksgiving Cake Pops a day in advance and store them in the fridge before serving.
Can I freeze it?
Absolutely! You can freeze them for up to a month. Just make sure they’re well wrapped.
How long does it last?
In the fridge, they can last up to a week, but they’ll likely be gone much sooner!
What are the best substitutions?
You can use gluten-free cake mix, and for vegan options, look for plant-based frosting.
Is this recipe family-friendly?
Definitely! Kids love helping with the rolling and decorating process.
Can I use different mixes?
Yes! Choose any cake mix flavor that speaks to your tastes.
How do I prevent sticking?
Place wax paper between each layer in your storage container to avoid sticking.
Are there seasonal variations?
You can easily adjust the flavors and coatings based on the season, like peppermint for Christmas!
Can I make mini cake pops?
Absolutely! Simply adjust the size of your cake balls for bite-sized mini versions.
What tools do I need?
You’ll just need basic kitchen tools like a bowl, measuring cups, and a baking sheet for this simple recipe.
Thanksgiving Cake Pops
Ingredients
For the Cake Base
- 1 box 1 cake mix (flavor of your choice) Classic vanilla, rich chocolate, or festive pumpkin.
- 1 cup 1 cup frosting Store-bought or homemade, based on your preference.
For Coating and Decoration
- 1 cup Candy melts or chocolate for coating Choose white, milk, or dark chocolate.
- 20 pieces Lollipop sticks These provide the perfect handle for your cake pops.
- Sprinkles (optional) Consider seasonal or holiday-themed sprinkles.


Instructions
Preparation
- Gather all ingredients and measure them out.
- Preheat your oven and follow the instructions on your cake mix package.
- Bake the cake according to the directed time and temperature, then let it cool completely on a wire rack.
Assembly
- Crumble the cooled cake into small pieces in a large bowl.
- Mix in the frosting until combined, ensuring it holds together like cookie dough.
- Roll the mixture into 1-inch balls and place them on a lined baking sheet.
- Insert lollipop sticks into each ball, pushing gently halfway in.
- Refrigerate the cake pops for about 30 minutes.
- Melt the candy melts or chocolate in a microwave-safe bowl, stirring every 30 seconds until smooth.
- Dip each cake pop in the melted coating, allowing excess to drip off.
- Decorate with sprinkles before the coating sets, and place upright to dry on wax paper or in a styrofoam block.