
This post may contain affiliate links. As an Amazon Associate, I earn from qualifying purchases at no extra cost to you.
Table of Contents
The holiday season is a magical time filled with gatherings, laughter, and of course, delightful treats. Among the many festive favorites, Christmas Mini Tarts stand out as a perfect blend of flavor and charm. These little desserts not only tantalize the taste buds but also bring a touch of elegance to any holiday table. Have you ever wondered how such a simple recipe could create so much joy? With their buttery crust, sweet fruit filling, and crunchy nut topping, they are bound to win hearts and spread holiday cheer.
What makes these Christmas Mini Tarts special is their versatility. Whether you have a preferred flavor or want to use up some leftover preserves, this recipe allows for easy customization. They’re not just delicious; they’re also incredibly easy to prepare. You can involve the whole family in making them, turning dessert preparation into a cherished holiday tradition. This recipe ensures that your kitchen is filled with the sweet aroma of baked goods, creating a warm and inviting atmosphere.
In this article, we will explore the ins and outs of making the perfect Christmas Mini Tarts: 7 Ways to Spread Holiday Joy. You’ll discover various flavors and combinations, tips for enhancing this treat, and even clever alternatives to adapt the recipe to your dietary needs. Above all, we will celebrate the spirit of the season, encouraging you to make these treats a part of your holiday festivities. So, are you ready to roll your sleeves up and spread some joy?
🍴 Top Kitchen Essentials You'll Love


Key Benefits of Christmas Mini Tarts: 7 Ways to Spread Holiday Joy
Why settle for ordinary desserts when you can indulge in something truly special? Here are quick benefits that make this recipe a must-try:
- Flavorful Variations: Each tart can be made with a variety of fruit preserves, allowing everyone to find their favorite.
- Simplicity: The straightforward recipe is beginner-friendly, making it easy for anyone to whip up these treats.
- Family-Friendly Fun: Involving the kids in making the tarts can create joyful memories and pass down traditions.
- Versatility: These tarts can be customized with different toppings, fillings, and add-ins.
- Perfect for Gifting: Lovely presentation makes them ideal for sharing with friends, family, or as hostess gifts.
What Makes It Stand Out
What truly sets Christmas Mini Tarts apart is their adaptability. You can easily modify the recipe to fit various occasions or personal tastes. Want a richer flavor? Try adding spices like cinnamon or nutmeg to the dough. Feeling adventurous? Experiment with new fillings like chocolate ganache or caramel.
These tarts are not just for Christmas—they can brighten any gathering. Think New Year’s parties, birthdays, or weekend brunches. Their bite-sized nature makes them a hit at any event, allowing guests to enjoy a small taste of something sweet while mingling.
Ingredients for Christmas Mini Tarts: 7 Ways to Spread Holiday Joy
To create these heavenly Christmas Mini Tarts, gather the following ingredients:
- 1 cup all-purpose flour: The base for a sturdy yet tender crust.
- 1/2 cup unsalted butter, softened: Adds richness and flavor.
- 1/4 cup powdered sugar: Sweetens the dough and contributes to its fine texture.
- 1/2 teaspoon vanilla extract: A must for that delightful aroma.
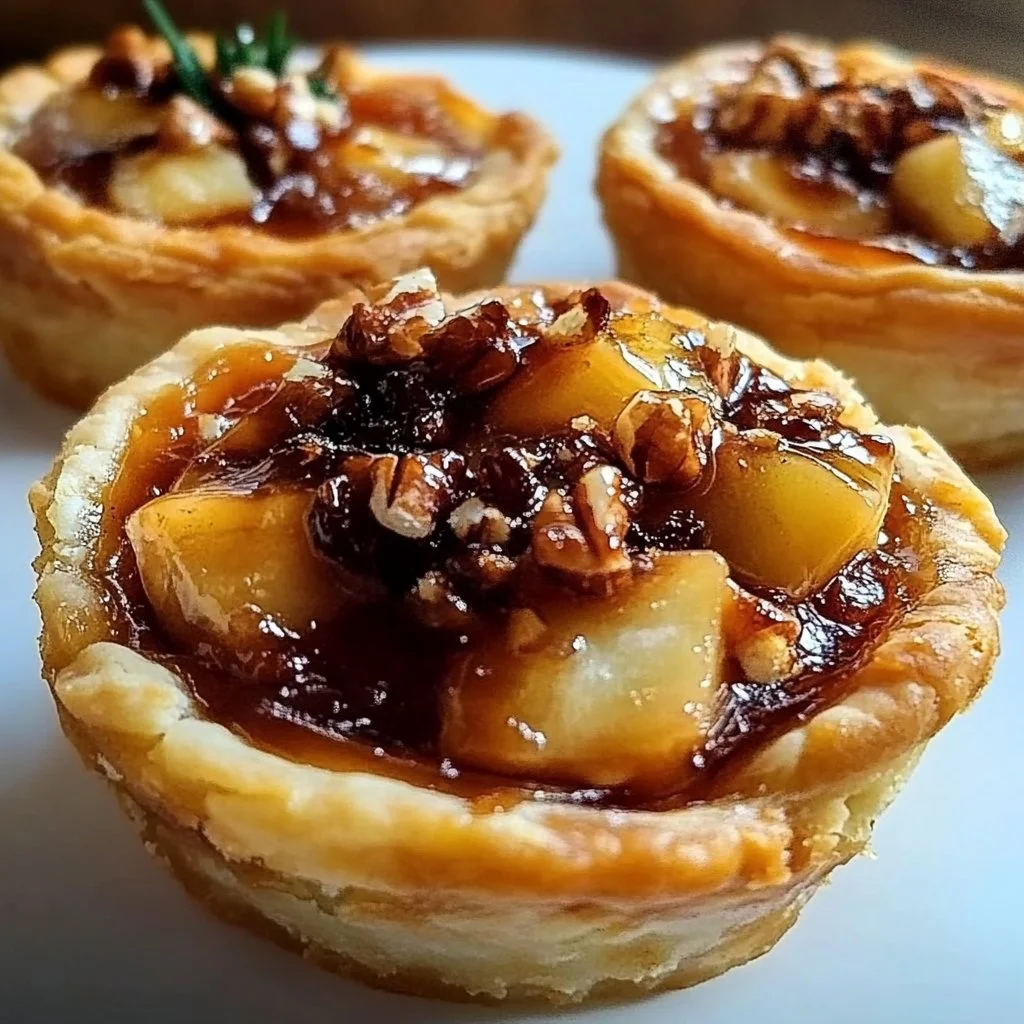
- 1/2 cup fruit preserves: Choose your favorite flavor like raspberry, apricot, or strawberry.
- 1/4 cup chopped nuts: Walnuts or pecans pair wonderfully with the sweet filling.
- 1 egg, beaten: For brushing on the edges and giving a lovely golden color when baked.
Feel free to mix and match the flavors of fruit preserves to suit your family’s preferences!
Substitutes and Alternatives
For those with dietary needs or allergies, there are plenty of ways to modify the Christmas Mini Tarts recipe without sacrificing flavor. If you’re gluten-free, you can substitute all-purpose flour with a gluten-free blend. Many brands offer quality products that perform well in baking.
If you’re vegan, swap out the butter for a plant-based alternative and use aquafaba in place of the egg. For a lower sugar option, consider a sugar substitute for the powdered sugar. This flexibility means that you can share these delightful treats with more friends, regardless of their dietary restrictions.
How to Make Christmas Mini Tarts: 7 Ways to Spread Holiday Joy – Step-by-Step Directions
Step 1 – Prepare Ingredients
Start by gathering all your ingredients in one place. Having everything ready can make the baking process smooth and enjoyable. Make sure your butter is softened for easy mixing.
Step 2 – Cook the Base
In a bowl, mix the flour, softened butter, and powdered sugar until the mixture is crumbly. This will create the foundation for your tarts. You want the texture to resemble coarse crumbs.
Step 3 – Add Vanilla Extract
Add the vanilla extract to your crumbly mixture. Mix until it’s well combined. The vanilla will elevate the flavor profile, offering a hint of warmth in every bite.
Step 4 – Shape the Tart Crust
Press the mixture into mini tart pans. Make sure the crust is even and covers the bottom and sides. This step is key for holding in the delicious filling while baking.
Step 5 – Fill with Fruit Preserves
Take your choice of fruit preserves and fill each tart shell generously. Make sure not to overfill, or they might bubble over in the oven.
Step 6 – Sprinkle Chopped Nuts
Sprinkle the chopped nuts over the top of the fruit preserves. This not only adds a nice crunch but also boosts the overall flavor of the tarts.
Step 7 – Brush with Beaten Egg
Using a pastry brush, lightly brush the edges of the tart crust with the beaten egg. This will give the tarts a beautiful golden color after baking.
Step 8 – Bake Until Golden
Preheat your oven to 350°F (175°C) and bake the tarts for 15-20 minutes or until they turn a lovely golden brown. Keep an eye on them to avoid burning.
Step 9 – Cool Before Serving
Once baked, let the tarts cool in their pans for a few minutes before removing them. This will make it easier to handle and serve.
Step 10 – Enjoy!
Serve your Christmas Mini Tarts warm or at room temperature. They make a perfect addition to any holiday spread!
Serving Suggestions for Christmas Mini Tarts: 7 Ways to Spread Holiday Joy
Best Occasions to Serve This Dish
Christmas Mini Tarts are perfect for a variety of occasions. Serve them at holiday parties, family gatherings, or cozy evenings at home. They’re also fantastic for potlucks, allowing others to experience their delightful flavors.
Consider presenting these tarts at a dessert table alongside other holiday treats like cookies and cakes. Their bite-sized nature makes them easy to enjoy while mingling. Guests will appreciate having a treat they can savor without overindulging.
What to Serve With It
To complement your Christmas Mini Tarts, consider the following suggestions:
- Hot cocoa or spiced cider to warm up chilly evenings.
- A scoop of vanilla ice cream for added indulgence.
- Freshly whipped cream for a delightful topping.
- Coffee or tea for a comforting beverage pairing.
How to Store Christmas Mini Tarts: 7 Ways to Spread Holiday Joy Properly
Best Storage Practices
Proper storage is essential to maintaining the delightful taste and texture of your Christmas Mini Tarts. Store them in an airtight container at room temperature if consuming within a few days.
For longer storage, opt for the refrigerator. This helps keep the crust crisp and preserves the freshness of the fruit filling. If you decide to freeze them, ensure they are well-wrapped or placed in a freezer-safe container.
Reheating and Freezing Tips
When you’re ready to enjoy your Christmas Mini Tarts after storing or freezing, reheating is easy! If they’ve been frozen, thaw them in the refrigerator overnight before reheating.
To reheat, place them back in a preheated oven at 350°F (175°C) for about 5-10 minutes. This will help restore that freshly baked texture.
Tips & Tricks for Christmas Mini Tarts: 7 Ways to Spread Holiday Joy
Mistakes to Avoid
- Overmixing the Dough: This can lead to tough crusts. Mix just until combined.
- Overfilling the Tarts: Too much filling can cause spillover. Keep it to a moderate amount.
- Skipping Chilling the Dough: If you find the dough hard to handle, chilling it in the refrigerator can help.
- Not Preheating the Oven: Always preheat your oven to ensure even baking.
- Using cold butter: Ensure your butter is softened to mix in smoothly for the best texture.
Extra Tips for Better Results
- Consider adding a pinch of salt to enhance the sweetness.
- Experiment with different nut toppings like almonds or pecans for a unique twist.
- For a festive touch, dust the cooled tarts with powdered sugar before serving.
Recipe Variations of Christmas Mini Tarts: 7 Ways to Spread Holiday Joy
Creative Twists
- Chocolate Hazelnut Tarts: Substitute fruit preserves with chocolate hazelnut spread for a decadent flavor.
- Lemon Curd Tarts: Swap the fruit filling for lemon curd, bringing a tangy twist to the tarts.
- Pumpkin Spice Tarts: Mix pumpkin puree with spices for a seasonal variation perfect for Thanksgiving.
- Nutella and Banana Tarts: A delightful combination that adds a rich, creamy element to the tarts.
Dietary Adjustments
Making these tarts vegan or gluten-free is easier than you might think. For a gluten-free version, use a blend like almond or coconut flour instead of all-purpose flour. For those who are dairy-free, swap the butter with coconut oil or a vegan margarine.
Adapting the recipe to fit your dietary needs ensures everyone can partake in the holiday joy!
Conclusion about Christmas Mini Tarts: 7 Ways to Spread Holiday Joy
Christmas Mini Tarts: 7 Ways to Spread Holiday Joy are more than just desserts; they symbolize the warmth and togetherness of the holiday season. With their delightful flavors, easy preparation, and endless customization options, they are perfect for any gathering. They will surely fill your home with sweet aromas and bring a smile to your loved ones’ faces.
Whether you decide to keep it traditional or experiment with new flavors, these mini tarts are bound to be a hit. So, gather your ingredients and make some joyful memories while baking. It’s an easy recipe that everyone can enjoy, making it worthy of becoming a cherished holiday tradition.
FAQs about Christmas Mini Tarts: 7 Ways to Spread Holiday Joy
Can I prepare it ahead of time?
Yes, you can prepare the dough and filling ahead of time. Just store them separately in the fridge and assemble them when you’re ready to bake.
Can I freeze it?
Absolutely! Just ensure they are well-wrapped. Freeze them before baking for the best results.
How long does it last?
Stored in an airtight container, they can last up to 3-5 days at room temperature or a week in the fridge.
What are the best substitutions?
Substitute all-purpose flour with gluten-free flour or butter with a vegan alternative for dietary needs.
Is this recipe family-friendly?
Absolutely! Kids love helping to press the dough and fill the tarts, making it a fun family activity.
Can I use other fillings?
Yes, feel free to experiment with different fillings like chocolate, lemon curd, or even savory options!
What’s the best way to present them?
Present them on a festive platter with a sprinkle of powdered sugar for an eye-catching display.
Do I need special tart pans?
While mini tart pans are ideal, you can also use a muffin tin for similar results.
Are these tarts good for gifting?
Yes! They make delightful homemade gifts, especially when packaged nicely.
How can I enhance the flavors?
Consider adding spices or zest to elevate the taste further, or pair with ice cream or whipped cream for extra indulgence.

Christmas Mini Tarts
Ingredients
For the Crust
- 1 cup all-purpose flour The base for a sturdy yet tender crust.
- ½ cup unsalted butter, softened Adds richness and flavor.
- ¼ cup powdered sugar Sweetens the dough and contributes to its fine texture.
- ½ teaspoon vanilla extract A must for that delightful aroma.
For the Filling
- ½ cup fruit preserves Choose your favorite flavor like raspberry, apricot, or strawberry.
For the Topping
- ¼ cup chopped nuts Walnuts or pecans pair wonderfully with the sweet filling.
- 1 large egg, beaten For brushing on the edges and giving a lovely golden color when baked.


Instructions
Preparation
- Start by gathering all your ingredients in one place. Make sure your butter is softened for easy mixing.
- In a bowl, mix the flour, softened butter, and powdered sugar until the mixture is crumbly.
- Add the vanilla extract to your crumbly mixture and mix until it’s well combined.
- Press the mixture into mini tart pans, ensuring an even coverage.
- Fill each tart shell generously with your chosen fruit preserves.
- Sprinkle the chopped nuts over the top of the fruit preserves.
- Lightly brush the edges of the tart crust with the beaten egg.
Baking
- Preheat your oven to 350°F (175°C) and bake the tarts for 15-20 minutes or until golden brown.
- Let the tarts cool for a few minutes before removing them from their pans.
- Serve warm or at room temperature.