

This post may contain affiliate links. As an Amazon Associate, I earn from qualifying purchases at no extra cost to you.
Table of Contents
🍴 Top Kitchen Essentials You'll Love


Introduction to best Valentine’s Day Cake Pops
Valentine’s Day is a time to express love and affection, and what better way to showcase your feelings than through sweet treats? best Valentine’s Day Cake Pops are not only adorably charming, but they also serve as the perfect vehicle for creativity in baking. These delightful bites embody love’s sweet elements, allowing you to tailor flavors and decorations to fit your romantic theme. Have you ever thought about how much joy a small, delicious cake on a stick can bring?
The beauty of best Valentine’s Day Cake Pops lies in their versatility. You can choose any cake flavor and frosting to create a combination that’s uniquely yours. Whether you opt for classic chocolate or a refreshing red velvet, the sky is the limit! Their easy-to-handle size makes them the ideal treat for parties and gatherings, providing a festive touch that will impress your sweetheart and guests alike.
Moreover, the process of making these pops becomes a cherished experience that can be shared. Picture this: rolling the cake mixture into little balls, dipping them in melted chocolate, and decorating them with colorful sprinkles—all while sharing love and laughter in the kitchen. It transforms a simple dessert into a memorable bonding activity, perfect for Valentine’s Day celebrations.
So, why wait? Embrace the sweetness of the season with delightful, homemade best Valentine’s Day Cake Pops that are sure to steal hearts!
Key Benefits of best Valentine’s Day Cake Pops
Why You’ll Love This Recipe
- Flavor Variety: Customize with any cake and frosting combination for a unique touch.
- Visual Appeal: Their vibrant colors and charming decorations make them visually stunning.
- Easy to Make: A straightforward recipe that requires minimal steps and resources.
- Perfect for Sharing: Bite-sized portions are perfect for parties or gifts.
- Creative Outlet: Great for personal expression through customization.
- Quick Storage: Easy to stash and serve later, maintaining freshness and flavor.
What Makes It Stand Out
One feature that makes best Valentine’s Day Cake Pops truly special is their adaptability. You can swap ingredients to suit dietary preferences or elevate the flavor profile with various fillings or toppings. This level of customization allows you to create a unique treat that speaks directly to the recipient’s taste.
These pops are not just for Valentine’s Day; they can be crafted for birthdays, anniversaries, or any occasion where love and appreciation are celebrated. Making them a versatile dessert option that pairs well with numerous themes and festivities.
Ingredients for best Valentine’s Day Cake Pops
Complete Ingredient List with Measurements
- 1 cake (any flavor, baked and cooled)
- 1 cup frosting (matching cake flavor)
- Chocolate candy melts (various colors)
- Lollipop sticks
- Sprinkles (for decoration)
- Styrofoam block (for drying)
Substitutes and Alternatives
If you’re oriented towards healthier options or accommodating allergies, there are simple substitutes you can employ. For a gluten-free version, choose gluten-free cake mix and frosting.
Dairy-free cakes and frosting are also available for those with lactose intolerance or dietary restrictions. Furthermore, feel free to explore alternative sweeteners or flavors to meet individual palates.
How to Make best Valentine’s Day Cake Pops – Step-by-Step Directions
Step 1 – Prepare Ingredients
Start by gathering all your ingredients to streamline the baking process. Make sure your cake is fully cooled to avoid a melted mess when mixing with frosting. If necessary, chop up your cake into manageable chunks.
Step 2 – Cook the Base
Crumble the cooled cake into a large bowl. It helps to break it down into smaller pieces to achieve a smoother consistency when blending with frosting. Aim for a fine crumb for an even texture.
Step 3 – Combine Cake and Frosting
Add one cup of frosting to your crumbled cake. Use your hands or a spatula to combine the mixture until it’s well-blended and holds together when formed into balls. You might find the texture a bit sticky; this is normal.
Step 4 – Shape Cake Pops
Roll the cake mixture into small balls, roughly one inch in diameter. This size is ideal for a one-bite treat. Once they are shaped, insert a lollipop stick into each ball, ensuring it goes in about halfway.
Step 5 – Chill the Cake Pops
Place the cake pops in the refrigerator for about 30 minutes. Chilling sets the shape and makes it easier to dip them into chocolate without losing their form.
Step 6 – Melt Chocolate Candy Melts
In this step, prepare your chocolate candy melts according to the package instructions. Use a microwave or a double boiler, ensuring the chocolate is fully melted but not scorched. This melted consistency is crucial for smooth dipping.
Step 7 – Dip Cake Pops
Take a chilled cake pop and dip it into the melted chocolate. Rotate it to cover it completely and allow the excess chocolate to drip off back into the bowl. Hold the cake pop upright for a moment to let it set slightly.
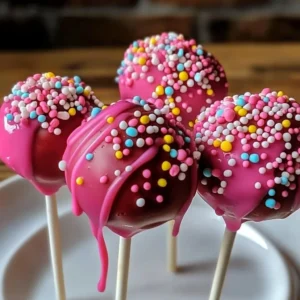
Step 8 – Decorate with Sprinkles
While the chocolate coating is still wet, sprinkle with your choice of decorations. This is where you can really get creative! Use heart-shaped sprinkles, edible glitter, or even coconut flakes for a unique twist.
Step 9 – Dry the Cake Pops
To allow the chocolate coating to set, place each decorated cake pop into a styrofoam block. This will keep them upright and prevent any smudging until they are fully dry and ready to serve.
Step 10 – Serve and Enjoy!
Once the chocolate is set completely, your best Valentine’s Day Cake Pops are ready for the spotlight. Place them on a decorative platter and enjoy gifting them to friends or sharing them with loved ones.
Serving Suggestions for best Valentine’s Day Cake Pops
Best Occasions to Serve This Dish
best Valentine’s Day Cake Pops are an excellent choice for Valentine’s Day celebrations, but their charm extends beyond this holiday. They can enhance birthday parties, wedding receptions, baby showers, or any festive gathering that craves a sweet touch.
Even casual get-togethers become extra special with these delightful treats. Their bite-sized nature makes them an easy choice for snacking while mingling, without the need for plates or utensils.
What to Serve With It
Pair your best Valentine’s Day Cake Pops with a cup of hot cocoa, coffee, or tea for a warm, comforting treat. You can also serve them alongside fresh fruit, such as strawberries or raspberries, which complement the sweetness beautifully. Adding a variety of drinks contributes to an inviting dessert table experience.
How to Store best Valentine’s Day Cake Pops Properly
Best Storage Practices
To keep your best Valentine’s Day Cake Pops fresh, store them in an airtight container at room temperature for up to a week. If you’re keeping them longer, you can move them to the fridge. However, avoid freezing them after they’ve been decorated, as this may cause the chocolate to crack.
Reheating and Freezing Tips
If you need to freeze your cake pops prior to decorating, wrap them individually in plastic wrap and place them in a freezer-safe container. When you’re ready to use them, let the pops thaw in the refrigerator for a few hours before decorating. For reheating, avoid microwaving to maintain the integrity of the chocolate coating.
Tips & Tricks for best Valentine’s Day Cake Pops
Mistakes to Avoid
1 – Skipping the Chill: Not refrigerating the pops before dipping can lead to them falling apart when dipped in chocolate. Always chill them properly.
2 – Overheating Chocolate: Melt the candy melts at a low temperature to avoid scorching. Gently stir and keep an eye on the melting process.
3 – Using Too Much Frosting: Adding excessive frosting can make the cake mixture too wet. Stick to the recommended measurement for ideal consistency.
4 – Weak Sticks: Ensure that lollipop sticks are inserted firmly; otherwise, they can pop out during dipping or handling.
5 – Ignoring Decoration Timing: If you let the chocolate set too much before adding sprinkles, they won’t stick. Time it just right for the best results.
Extra Tips for Better Results
For richer flavor, consider adding vanilla extract or flavoring to the cake mixture. Experimenting with different types of chocolate coatings, using semi-sweet, white chocolate, or even drizzle patterns can enhance the visual flair.
Using colored candy melts allows for seasonal themes, ensuring your cake pops look as good as they taste. Remember to have fun while making these treats; creativity is the name of the game!
Recipe Variations of best Valentine’s Day Cake Pops
Creative Twists
1 – Rainbow Cake Pops: Use a rainbow cake mix and layer different colored batters before baking. This fun twist adds visual excitement.
2 – Stuffed Cake Pops: Try filling the center of your pops with a small dollop of frosting or jam for an unexpected surprise.
3 – Chocolate-Covered Strawberry Cake Pops: Mix strawberry-flavored cake with chocolate frosting, and use pink candy melts for coating. Combine chocolate and fruit flavors for a classic romance.
Dietary Adjustments
For vegan best Valentine’s Day Cake Pops, substitute eggs with flaxseed meal or aquafaba and use non-dairy milk and butter. Gluten-free options are easily accomplished with a gluten-free flour blend instead of regular flour.
Dairy-free coatings can be achieved with coconut oil and dairy-free chocolate; ensure to check labels for pure ingredients.
Conclusion about best Valentine’s Day Cake Pops
In summary, best Valentine’s Day Cake Pops are a delightful way to express affection and creativity. They’re simple to prepare, incredibly versatile, and come with a touch of charm that makes them perfect for sharing. Whether you’re celebrating with a loved one or hosting a gathering, these pops elevate the occasion with their colorful presence and delicious taste.
Using this recipe, you not only whip up sweets but create moments filled with laughter, joy, and love. So, grab your ingredients and start making these irresistible treats. Your heart—and your tastebuds—will thank you!
FAQs about best Valentine’s Day Cake Pops
Can I make these ahead of time?
Absolutely! You can prepare your cake pops a day or two in advance, just store them in an airtight container.
How should I store leftover cake pops?
Leftover cake pops should be kept in an airtight container at room temperature for optimal freshness.
Can I freeze my cake pops?
Yes, you can freeze uncoated cake pops. Roll them and freeze before dipping to preserve their shape.
What can I do if my cake pops are too crumbly?
If your mixture is too crumbly, add a small amount of frosting gradually until it holds together.
Can I change the flavor of the cake?
Definitely! You can use any cake flavor you like, tailoring the frosting to match for a balanced taste.
What chocolate is best for dipping?
Candy melts work best due to their melting properties. Alternatively, you can use chocolate chips, but they may require additional melting aids.
How long do covered cake pops last?
Covered cake pops can last about a week at room temperature if stored properly in an airtight container.
Can I decorate cake pops in advance?
Yes, you can decorate them a few days in advance as long as they are stored properly afterward.
What tools do I need for this recipe?
You’ll need basic baking tools such as a mixing bowl, spoon, baking sheet, and lollipop sticks for pops.
Are cake pops gluten-free?
You can easily make gluten-free cake pops by using a gluten-free cake mix and frosting for the best results.
Irresistible and Best Valentine’s Day Cake Pops
Equipment
- Mixing Bowl
- Spatula
- Lollipop Sticks
- Styrofoam Block
- Microwave or double boiler
Ingredients
Cake Base
- 1 baked cake any flavor, cooled completely
- 1 cup frosting matching cake flavor
Coating & Decoration
- chocolate candy melts various colors
- sprinkles heart-shaped or themed decorations
- lollipop sticks for holding cake pops
- 1 styrofoam block for drying cake pops upright


Instructions
- Crumble the baked and cooled cake into a large bowl until it becomes fine crumbs.
- Add frosting and mix until well combined. The mixture should be moist and hold together when shaped.
- Form the mixture into small balls (about 1 inch in diameter) and insert lollipop sticks halfway into each ball.
- Chill the cake pops in the refrigerator for 30 minutes to firm up before dipping.
- Melt the candy melts using a microwave or double boiler until smooth and glossy.
- Dip each cake pop into the melted chocolate, rotating to coat evenly. Allow excess to drip off.
- Decorate immediately with sprinkles or edible glitter before the coating sets.
- Place the coated cake pops upright in a styrofoam block to dry completely.
- Once set, serve and enjoy your beautiful Valentine’s Day Cake Pops!