

This post may contain affiliate links. As an Amazon Associate, I earn from qualifying purchases at no extra cost to you.
Table of Contents
🍴 Top Kitchen Essentials You'll Love


Introduction to Butterfinger Caramel Crunch Bars
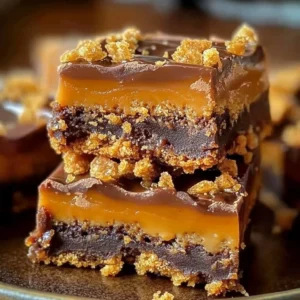
Looking for a sweet treat that is both indulgent and easy to make? The Butterfinger Caramel Crunch Bars may just be the answer. This delightful dessert combines the crispy crunch of rice cereal with the rich flavors of chocolate, caramel, and Butterfinger candy. Have you ever craved something sweet yet satisfying? This recipe provides that perfect blend, making it a go-to for gatherings or a personal snack.
What makes Butterfinger Caramel Crunch Bars so special? It’s the unique combination of textures and flavors that come together in each bite. The buttery and chocolatey layers melt beautifully, creating a rich base, while the crispy rice cereal gives it that delightful crunch. Plus, the addition of crushed Butterfinger bars introduces an irresistible peanut butter flavor that balances the sweetness of the caramel.
Anyone can master this recipe, as it requires minimal ingredients and straightforward steps. You don’t need the skills of a professional chef to deliver a dessert that will impress! Whether you’re an experienced baker or a beginner in the kitchen, the Butterfinger Caramel Crunch Bars offer a delicious homemade option for any dessert lover.
Key Benefits of Butterfinger Caramel Crunch Bars
Why You’ll Love This Recipe
- Flavor Explosion: The combination of chocolate, caramel, and Butterfinger creates a sweet, salty, and crunchy experience.
- Simplicity: With easy-to-follow steps, anyone can whip these up in no time.
- Versatility: Perfect for potlucks, birthday parties, or just enjoying at home.
- No Baking Required: Skip the oven and still make a delicious dessert.
- Crowd-Pleaser: These bars are loved by both kids and adults alike!
- Quick to Prepare: With just a little prep time, you can have these delicious bars ready to serve.
What Makes It Stand Out
One of the most notable features of Butterfinger Caramel Crunch Bars is their originality. While there are many dessert bars out there, this recipe combines nostalgic candy flavors with simple ingredients that yield a delightful treat. The layers of flavor—from chocolate to caramel—develop into a mouthwatering combination that beckons for more.
Customization is another key aspect of this recipe, allowing you to get creative with additions such as nuts or different types of candy. They’re not only great for special occasions but can also satisfy an everyday sweet tooth. So whether you’re celebrating a birthday or simply treating yourself on a Friday night, these bars are the perfect match.
Ingredients for Butterfinger Caramel Crunch Bars
Complete Ingredient List with Measurements
- 1 cup Butterfinger candy bars, crushed
- 1 cup chocolate chips
- 1 cup caramel sauce
- 2 cups crispy rice cereal
- 1/2 cup unsalted butter
Substitutes and Alternatives
If you have dietary restrictions or allergies, don’t worry! You can easily swap out certain ingredients. For instance, if you’re allergic to nuts, you can choose a nut-free candy or chocolate as a topping. If you’re looking for a dairy-free option, consider using dairy-free chocolate chips and a plant-based butter substitute. Gluten-free crispy rice cereals are available as well, making this recipe adaptable for several dietary needs.
How to Make Butterfinger Caramel Crunch Bars – Step-by-Step Directions
Step 1 – Prepare Ingredients
Start by gathering all your ingredients. Crush the Butterfinger candy bars into small pieces and set them aside. Measure out the chocolate chips, caramel sauce, crispy rice cereal, and unsalted butter so everything is ready to go.
Step 2 – Cook the Base
In a medium saucepan, melt the butter and chocolate chips together over low heat. Stir constantly to prevent burning, until the mixture is completely smooth. This should take around 3-5 minutes. You want a glossy, melted chocolate base as your starting point.
Step 3 – Add the Caramel Sauce
Once the chocolate and butter mixture is smooth, remove it from the heat. Add in the caramel sauce and stir until everything is well combined; the mixture should remain silky and rich.
Step 4 – Incorporate the Cereal
With the saucepan off the heat, gently fold in the crispy rice cereal. Make sure each piece gets coated with the gooey chocolate-caramel mixture for an even distribution of flavors. This step is crucial for ensuring that every bite of Butterfinger Caramel Crunch Bars has that delightful texture.
Step 5 – Mix in the Butterfinger Bars
Now it’s time to add the crushed Butterfinger candy bars. Carefully mix them into the cereal mixture, taking care to not break them into smaller pieces. The goal is to have chunks of Butterfinger distributed throughout your bars.
Step 6 – Prepare the Baking Dish
Grease a 9×9 inch baking dish with cooking spray or butter to ensure the bars do not stick. You can also line the dish with parchment paper for easier removal after chilling.
Step 7 – Pour the Mixture
Transfer the Butterfinger mixture to the prepared baking dish. Use a spatula to spread it evenly, pressing down firmly to create a solid layer. This step is essential for helping the bars hold together once set.
Step 8 – Chill in the Refrigerator
Place the baking dish in the refrigerator for about 1 hour or until the mixture has set firmly. This allows the chocolate and caramel to solidify, making it easier to cut into bars.
Step 9 – Cut the Bars
Once set, remove the Butterfinger Caramel Crunch Bars from the refrigerator. Using a sharp knife, cut the mixture into squares or rectangles, depending on your preference. Ensure to cut gently to maintain the integrity of the bars.
Step 10 – Serve and Enjoy
Your Butterfinger Caramel Crunch Bars are now ready to enjoy! Serve them as a sweet treat at parties, pack them in lunchboxes, or keep a stash for yourself at home.
Serving Suggestions for Butterfinger Caramel Crunch Bars
Best Occasions to Serve This Dish
Butterfinger Caramel Crunch Bars are an excellent choice for various occasions. They are perfect for birthday parties or holiday celebrations, bringing a festive feel with their delightful flavors. Family gatherings or movie nights also provide the perfect backdrop for indulging in these sweet treats. They’re not just for sharing; keep some at home for those unexpected late-night cravings.
What to Serve With It
These bars pair wonderfully with a scoop of vanilla ice cream or whipped cream for an extra indulgent experience. A drizzle of chocolate or caramel sauce on top enhances their flavor and makes for a beautiful presentation. Consider serving them alongside coffee, hot chocolate, or a glass of milk to complement the sweetness.
How to Store Butterfinger Caramel Crunch Bars Properly
Best Storage Practices
To store your Butterfinger Caramel Crunch Bars, place them in an airtight container at room temperature to keep them fresh. If you live in a warm climate, it’s best to refrigerate them to prevent melting. Layer the bars with parchment paper to avoid them sticking together.
Reheating and Freezing Tips
If you have leftover bars, you can freeze them for up to 3 months. Just ensure they’re well-wrapped in plastic wrap and then placed in a freezer-safe container. To enjoy later, simply thaw them in the refrigerator overnight. If you prefer to enjoy them slightly warm, pop them in the microwave for a few seconds.
Tips & Tricks for Butterfinger Caramel Crunch Bars
Mistakes to Avoid
- Not Prepping the Dish: Failing to grease or line the dish can lead to sticking, making it difficult to remove the bars.
- Overcooking the Chocolate: Melting the chocolate at too high of a heat can result in burning; always use low heat.
- Ignoring the Setting Time: Cutting the bars too soon can lead to messy pieces; patience here pays off!
- Inconsistent Mixing: Not mixing the cereal and Butterfinger thoroughly can result in uneven distribution, leading to some bars being too chewy or too crunchy.
- Improper Storage: Leaving the bars uncovered will cause them to dry out, so always seal them properly.
Extra Tips for Better Results
For enhanced flavor, you might consider adding a pinch of sea salt on top before chilling to create a sweet and salty experience. For those who adore peanut butter, consider drizzling some peanut butter on top before it sets.
Recipe Variations of Butterfinger Caramel Crunch Bars
Creative Twists
Consider adding different types of chocolate to the mix, such as dark chocolate or white chocolate for a unique flavor profile. For an added crunch, mix in some chopped nuts or toasted coconut to the base. You could also substitute Butterfinger bars with other candy like Twix or Snickers for a different taste!
Dietary Adjustments
For those following a vegan diet, swap the butter with coconut oil and choose dairy-free chocolate chips. You can also use almond or cashew butter in place of caramel for a healthier option. Gluten-free alternatives for crispy rice cereals make this recipe inclusive for those with dietary restrictions.
Conclusion about Butterfinger Caramel Crunch Bars
Butterfinger Caramel Crunch Bars offer an irresistible solution for anyone seeking a delicious dessert that is both easy to prepare and brimming with flavor. Their unique combination of chocolate, caramel, and crunchy goodness makes them a fan favorite suitable for all occasions. This dessert not only satisfies your sweet tooth but also allows for versatility in customization. Whether you’re making them for a special event or simply for a cozy night in, these bars are bound to leave a lasting impression. With a few simple ingredients and easy steps, you’ll have a special treat that can be enjoyed time and time again. So why wait? Dive into this delicious world of Butterfinger Caramel Crunch Bars and treat yourself!
FAQs about Butterfinger Caramel Crunch Bars
How long do Butterfinger Caramel Crunch Bars last?
These bars can last about a week at room temperature and up to three months in the freezer if stored properly.
Can I make them ahead of time?
Absolutely! You can prepare Butterfinger Caramel Crunch Bars a few days in advance, just ensure they’re well stored in an airtight container.
What’s the best way to cut the bars?
Use a sharp knife and cut gently to avoid mashing the bars; warming the knife briefly can help it glide through more cleanly.
Can I freeze Butterfinger Caramel Crunch Bars?
Yes, wrap them in plastic wrap and store them in a freezer-safe container to keep them fresh.
What can I substitute for the caramel sauce?
You can use melted peanut butter for a nutty flavor or make your own homemade caramel sauce if you prefer a less sugary version.
Are there any vegan alternatives for this recipe?
Yes! Swap the butter for coconut oil and use dairy-free chocolate chips for a delicious vegan version.
How do I get the bars out of the baking dish?
If you’ve greased or lined the dish, carefully lift the bars out using the parchment paper edges.
Can I use other candy bars instead of Butterfinger?
Certainly! Try using Twix, Snickers, or even Milky Way for different flavors and textures.
Can I add nuts to the mixture?
Absolutely! Chopped nuts like peanuts or almonds would provide an additional crunchy element and enhance flavor.
What’s the best way to store leftover bars?
Place them in an airtight container at room temperature or refrigerate them for freshness.
Butterfinger Caramel Crunch Bars
Equipment
- Medium saucepan
- Mixing Bowl
- 9×9-inch baking pan
- Parchment Paper
- Rubber spatula
Ingredients
Base Layer
- 3 cups crisp rice cereal
- 1 cup peanut butter creamy
- ½ cup light corn syrup or honey
- ½ cup granulated sugar
Caramel Layer
- 1 (11 oz) bag soft caramels unwrapped
- 2 Tbsp milk or heavy cream
Topping
- 1 ½ cups chocolate chips milk or semi-sweet
- 2 Butterfinger bars crushed


Instructions
- Line a 9×9-inch pan with parchment paper, leaving some overhang for easy removal.
- In a saucepan over medium heat, combine sugar and corn syrup. Stir until the sugar dissolves and the mixture just begins to bubble. Remove from heat and stir in peanut butter until smooth.
- Quickly mix in the crisp rice cereal until well coated. Press the mixture evenly into the prepared pan and set aside.
- In another saucepan, melt the caramels with milk or cream over low heat, stirring constantly until smooth. Pour the caramel over the cereal base and spread evenly. Let it cool for 10 minutes.
- Melt the chocolate chips in a microwave-safe bowl in 30-second intervals, stirring until smooth. Spread over the caramel layer.
- Sprinkle crushed Butterfinger pieces evenly over the top, pressing them gently into the chocolate. Refrigerate for at least 40 minutes, or until set.
- Once firm, lift from the pan and cut into bars. Store in an airtight container in the fridge.