
This post may contain affiliate links. As an Amazon Associate, I earn from qualifying purchases at no extra cost to you.
Table of Contents
🍴 Top Kitchen Essentials You'll Love


Introduction to Christmas Candy
Is there anything that brings joy and warmth quite like the sweet aroma of homemade candy during the festive season? Christmas Candy is not just a treat; it’s a delightful experience that fills your kitchen with memories. This simple recipe allows you to create mouthwatering candy that can be shared with friends and family or gifted to loved ones. Picture friends gathered around, laughing and enjoying a special moment, all while indulging in this delicious homemade confection.
This Christmas Candy recipe is easy to make, allowing even beginners to craft something truly special. It utilizes basic ingredients, yet the outcome is wonderfully impressive. The sugar, corn syrup, and water come together to form a rich, glossy treat that screams indulgence. The addition of vanilla extract gives it a unique flavor profile, making it a standout among seasonal confections.
What makes this recipe particularly special is its flexibility. You can customize it to fit your preferences; think of adding nuts, adjusting sweeteners, or even incorporating various spices to create a unique flavor. The possibilities are endless! Christmas Candy is perfect for holiday gatherings, potlucks, or simply as a tasty surprise for yourself. So why not bring a little sweetness to your season with this easy-to-follow recipe?
Key Benefits of Christmas Candy
Why You’ll Love This Recipe
- Delicious Flavor: A perfect balance of sweetness with a hint of vanilla.
- Easy Preparation: Minimal ingredients and straightforward steps make it beginner-friendly.
- Customizable: Add your favorite nuts or sweet spices for a personal touch.
- Perfect for Gifting: Beautifully packaged, it’s an ideal holiday gift.
- Memorable Family Activity: Great for making memories with kids or friends during the holidays.
- Versatile Use: Perfect for occasions beyond Christmas, such as birthdays or gatherings.
What Makes It Stand Out
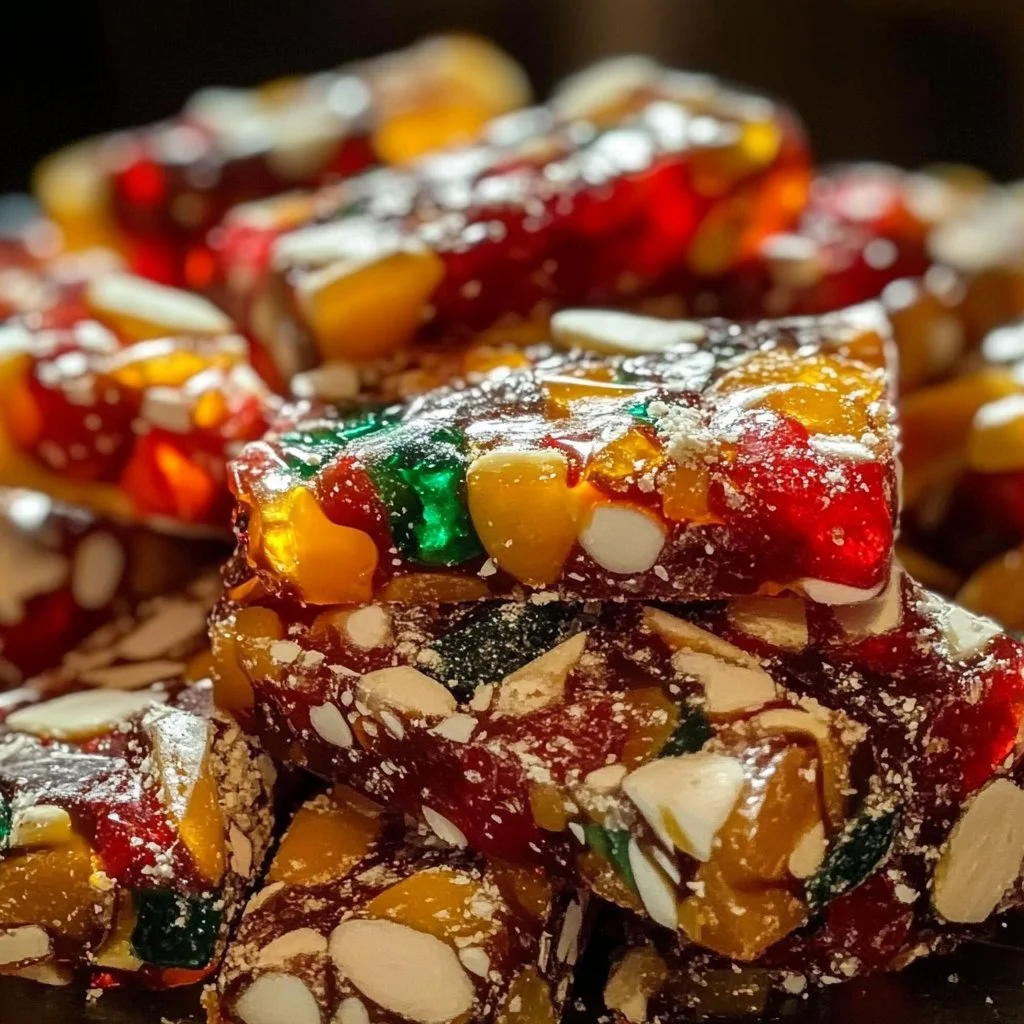
Christmas Candy stands out due to its rich, buttery flavor combined with the delightful crunch from optional nuts. Unlike other candies that might require complex techniques, this candy boils down to clarity and simplicity. Thanks to its hard crack stage, you’ll achieve a satisfying texture that’s perfect for breaking into shards.
Customization is another fantastic element. You can experiment with different nuts—like almonds, walnuts, or pecans—or even try adding a pinch of cinnamon or nutmeg to infuse unique flavors. This flexibility means it’s not just a seasonal treat; you can adjust and serve it year-round for any occasion.
Ingredients for Christmas Candy
Complete Ingredient List with Measurements
- 2 cups sugar
- 1 cup corn syrup
- 1/2 cup water
- 1 teaspoon vanilla extract
- 1 cup chopped nuts (optional)
- Butter (for greasing)
Substitutes and Alternatives
If you have dietary restrictions or allergies, you can easily modify the recipe. For instance, if you need a sugar substitute, experimenting with stevia or erythritol can work, though it may affect the final texture.
For nut allergies, simply omit the nuts or replace them with seeds like pumpkin or sunflower. You can also incorporate different extracts such as almond or hazelnut for a unique flavor twist.
How to Make Christmas Candy – Step-by-Step Directions
Step 1 – Prepare Ingredients
Start by gathering all your ingredients. Measure them out accurately and make sure to grease your baking sheet with butter to prevent sticking.
Step 2 – Cook the Base
In a medium saucepan, combine the sugar, corn syrup, and water. Heat the mixture over medium heat, stirring continuously until the sugar has dissolved completely. Don’t rush this step; patience is key.
Step 3 – Boil the Mixture
Once the sugar is dissolved, attach your candy thermometer to the side of the saucepan. Allow the mixture to come to a rolling boil without stirring. Keep a close eye on the temperature as it climaxes.
Step 4 – Reach Hard Crack Stage
Continue boiling until the thermometer reads 300°F, which is known as the hard crack stage. This process typically takes around 10-15 minutes. The mixture will look clear and bubbly.
Step 5 – Add Flavor
Once you’ve hit the desired temperature, immediately remove the saucepan from heat. Carefully stir in the vanilla extract and nuts, if you’ve chosen to include them. The mixture may bubble up, so proceed cautiously.
Step 6 – Pour onto Baking Sheet
Pour the hot candy mixture onto the greased baking sheet. Use a spatula to spread it evenly if necessary, but be careful; the mixture is very hot.
Step 7 – Let It Cool
Allow the candy to cool completely on the baking sheet at room temperature. This will take about an hour. You’ll know it’s ready when it’s completely hard to the touch.
Step 8 – Break into Pieces
Once cooled, you can break the candy into pieces as desired. Use your hands or a knife to achieve your preferred size.
Serving Suggestions for Christmas Candy
Best Occasions to Serve This Dish
Christmas Candy is wonderfully festive and perfect for holiday gatherings. Its bright and crunchy texture adds a delightful element to your dessert table. It works excellently alongside hot cocoa or coffee, making it suitable for cozy winter evenings.
Consider serving it at birthday parties as a sweet alternative or at potluck dinners where everyone can enjoy and indulge. The candy also makes for a beautiful centerpiece when arranged in a decorative jar.
What to Serve With It
Pair Christmas Candy with holiday beverages like eggnog or mulled wine for a complete festive experience. It also complements cheeses nicely, adding a touch of sweetness to cheese platters. For a delightful contrast, serve with a rich chocolate dessert or creamy vanilla ice cream.
How to Store Christmas Candy Properly
Best Storage Practices
To ensure your Christmas Candy stays fresh, store it in an airtight container at room temperature. A cool, dry place is ideal as humidity can affect its texture. If stored correctly, it can last for up to two weeks.
Reheating and Freezing Tips
If you find that your candy has become slightly soft, you can reheat it in the oven briefly on low heat to restore its crispness. For long-term storage, this candy can be frozen for up to three months. When you’re ready to enjoy it, just let it thaw at room temperature.
Tips & Tricks for Christmas Candy
Mistakes to Avoid
One common mistake is stirring the mixture once it starts boiling; this can cause sugar crystals to form. Make sure to monitor the temperature closely, as it’s crucial to hit 300°F. Using a low-quality candy thermometer can lead to incorrect readings.
Another issue is pouring the mixture onto an ungreased sheet, which will lead to a sticky situation. Always butter your pan adequately to prevent the candy from sticking.
Extra Tips for Better Results
For enhanced flavor, consider using high-quality vanilla extract or even vanilla bean paste. You can add a touch of sea salt on top of the cooled candy to balance the sweetness and add complexity.
When breaking up the candy, ensure you have a clean surface, and use a sharp knife for more precise pieces.
Recipe Variations of Christmas Candy
Creative Twists
You can add shredded coconut for a tropical twist or drizzle melted chocolate over the cooled candy for extra indulgence. Consider incorporating festive spices like nutmeg or cinnamon to enhance the holiday flavor.
For a nut-free version, sprinkle colorful holiday sprinkles on top before the candy cools for a fun and festive touch.
Dietary Adjustments
You can make this candy vegan by substituting the butter with a vegan alternative. Additionally, with gluten-free corn syrup, this recipe can easily fit the dietary needs of those avoiding gluten.
If you prefer a lower-sugar treat, consider using sugar substitutes mentioned earlier, being mindful of their unique flavor profiles, which may alter the taste.
Conclusion about Christmas Candy
In conclusion, this Christmas Candy recipe is a must-try during the festive season. Its combination of simplicity and deliciousness makes it approachable for everyone, no matter your culinary skills. The ability to customize it means you can truly make it your own, adapting it to fit various tastes and preferences. Whether you’re enjoying it at a holiday gathering, giving it as a gift, or simply indulging yourself, this candy promises to create lasting memories. So roll up your sleeves and dive into this delightful recipe to bring some sweetness to your holiday season!
FAQs about Christmas Candy
What is the best way to store Christmas Candy?
Store Christmas Candy in an airtight container at room temperature for optimal freshness.
Can I make this candy ahead of time?
Yes, you can make it several days in advance and store it properly to retain freshness.
What should I do if my Christmas Candy is too sticky?
If it has become sticky, you can reheat it briefly in the oven to restore its crispness.
Can I freeze Christmas Candy?
Yes, it can be frozen for up to three months. Thaw at room temperature when ready to enjoy.
How long does Christmas Candy last?
When stored correctly, it can last for up to two weeks at room temperature.
What can I substitute for corn syrup?
You can use agave syrup or honey as an alternative, though it may affect the final texture.
Is there a way to make this candy healthier?
You can use sugar substitutes like stevia or erythritol for a lower-sugar version.
Do I have to use nuts in the recipe?
No, nuts are optional, and you can leave them out or substitute them with seeds if needed.

Christmas Candy
Ingredients
Main Ingredients
- 2 cups sugar
- 1 cup corn syrup Can substitute with agave syrup or honey.
- ½ cup water
- 1 teaspoon vanilla extract For unique flavor; high-quality preferred.
- 1 cup chopped nuts (optional) Choose from almonds, walnuts, or pecans.
- Butter For greasing baking sheet.


Instructions
Preparation
- Gather and measure all ingredients. Grease baking sheet with butter.
Cooking
- In a medium saucepan, combine sugar, corn syrup, and water, and heat over medium heat, stirring continuously until sugar dissolves.
- Once dissolved, attach candy thermometer and bring to a rolling boil without stirring.
- Continue boiling until thermometer reads 300°F (hard crack stage), about 10-15 minutes.
- Remove from heat and carefully stir in vanilla extract and nuts, if using.
- Pour hot mixture onto the greased baking sheet and spread evenly if needed.
- Let the candy cool completely at room temperature, about 1 hour, until hard.
- Break cooled candy into pieces as desired.