

This post may contain affiliate links. As an Amazon Associate, I earn from qualifying purchases at no extra cost to you.
Table of Contents
🍴 Top Kitchen Essentials You'll Love


Introduction to Christmas Marshmallows: 5 Magical Tips for Holiday Bliss
As the holiday season approaches, the aroma of sweet treats wafts through the air, wrapping us in nostalgia and joy. Imagine a cozy evening spent with your loved ones, sipping hot cocoa topped with fluffy, homemade marshmallows. That’s the magic of Christmas Marshmallows: 5 Magical Tips for Holiday Bliss. These delightful confections not only add a festive touch to your favorite drinks but also serve as a perfect gift or party treat.
What makes this recipe so special? For starters, the process is surprisingly simple, making it an accessible option for bakers of all levels. You’ll find that with just a few basic ingredients—like sugar, corn syrup, and gelatin—you can create a deliciously airy marshmallow that melts in your mouth. Have you ever tasted a homemade marshmallow? The difference is remarkable! They are infinitely more flavorful and fresher than store-bought counterparts.
These Christmas Marshmallows can elevate any holiday gathering, providing a sweet surprise that will impress family and friends. Whether you’re roasting them over a fire for s’mores or adding them to your favorite dessert, their versatility is unmatched. Plus, they can be customized with flavors or colors to suit your holiday theme. Ready to dive into the world of homemade marshmallows? You’re in for a treat!
Key Benefits of Christmas Marshmallows: 5 Magical Tips for Holiday Bliss
Why You’ll Love This Recipe
- Delicious Flavor: The perfect balance of sweetness and creaminess enhances any dessert.
- Simplicity: Easy to follow instructions make this recipe suitable for any home cook.
- Versatile Use: Perfect in hot cocoa, on top of desserts, or just as a sweet snack.
- Customizable: Add flavors or colors to match your theme and preferences.
- Make-Ahead-Friendly: Keep them in the fridge or freezer for easy use later.
What Makes It Stand Out
Christmas Marshmallows: 5 Magical Tips for Holiday Bliss stand out because they encapsulate the spirit of the season through unique flavors and presentation. The creativity doesn’t end there; these marshmallows allow for endless customization. Want peppermint-infused marshmallows? Go for it! Prefer colors that match your holiday décor? You can do that, too. Not only are they a treat for taste buds, but they also delight the eyes, making your holiday table more inviting.
The best occasions to serve these marshmallows include holiday parties, cozy evenings at home, or as sweet companions to gifts. The joy of sharing homemade treats creates memories that last far beyond the season.
Ingredients for Christmas Marshmallows: 5 Magical Tips for Holiday Bliss
Complete Ingredient List with Measurements
- 1 cup granulated sugar
- 1/2 cup corn syrup
- 1/4 cup water
- 1 tablespoon gelatin
- 1/2 cup powdered sugar (for dusting)
- 1 teaspoon vanilla extract
- 1/4 teaspoon salt
Substitutes and Alternatives
If you have dietary restrictions or allergies, you can easily adapt this recipe. For a vegan option, substitute the gelatin with agar-agar, keeping in mind that the texture might differ slightly. For those avoiding corn syrup, a light honey or maple syrup can often be used without affecting the outcome significantly. Make sure to adjust the sugar levels according to the alternative sweeteners used, as they may vary in sweetness.
How to Make Christmas Marshmallows: 5 Magical Tips for Holiday Bliss – Step-by-Step Directions
Step 1 – Prepare Ingredients
Gather all your ingredients and ensure they are measured out accurately. Having everything on hand will simplify the process and make cooking more enjoyable.
Step 2 – Cook the Base
In a medium saucepan, combine the granulated sugar, corn syrup, and water. Heat over medium heat, stirring occasionally until the sugar fully dissolves. This step should take about 5-7 minutes. Once dissolved, increase the heat until the mixture reaches a boil.
Step 3 – Bloom the Gelatin
While the sugar mixture is cooking, combine the gelatin with 1/4 cup of cold water in a small bowl. Allow it to bloom for about 5 minutes. This step hydrates the gelatin so it can incorporate into the marshmallow mixture seamlessly.
Step 4 – Combine Sugar and Gelatin
Once the sugar mixture reaches a rolling boil, remove it from heat. Carefully pour the hot sugar mixture into the bowl with the bloomed gelatin. Whisk vigorously until the gelatin is fully dissolved and incorporated.
Step 5 – Add Flavoring and Salt
Stir in the vanilla extract and salt into the mixture. This not only boosts the flavor but also balances the sweetness. Mix until well combined.
Step 6 – Pour Into a Pan
Prepare an 8×8 inch greased pan by lightly oiling it or lining it with parchment paper (with some overhang). Pour the marshmallow mixture into the prepared pan, spreading it evenly with a spatula.
Step 7 – Let It Set
Let the mixture sit at room temperature for at least 4 hours or until fully set. You can also leave it overnight if you prefer. This firming time is crucial to creating the perfect texture.
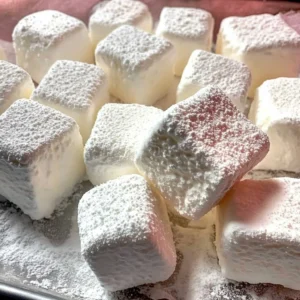
Step 8 – Dust with Powdered Sugar
Once set, dust the top with powdered sugar to prevent sticking. Use a sharp knife to cut the marshmallows into squares or any desired shape.
Step 9 – Store for Freshness
Place the leftover marshmallows in an airtight container, layered with more powdered sugar to prevent sticking. This can keep them fresh for several weeks.
Step 10 – Enjoy!
Now it’s time to enjoy your homemade marshmallows! Whether you’re popping them in hot cocoa or gifting them to loved ones, the deliciousness of your Christmas Marshmallows: 5 Magical Tips for Holiday Bliss will surely spread joy.
Serving Suggestions for Christmas Marshmallows: 5 Magical Tips for Holiday Bliss
Best Occasions to Serve This Dish
Christmas gatherings are simply incomplete without sweet treats. These homemade marshmallows are a perfect accompaniment to cocoa gatherings, enhancing the festive atmosphere. Additionally, they add a touch of whimsy to cookie platters or dessert tables during holiday parties. Their nostalgic charm makes them ideal for sharing with families, creating delightful moments.
What to Serve With It
These Christmas Marshmallows pair beautifully with a warm mug of hot cocoa, adding a luscious touch to every sip. You can also serve them with pie, brownies, or even in a fruit salad for a surprising twist. For a cozy winter evening, combine them with roasted chestnuts or gingerbread cookies.
How to Store Christmas Marshmallows: 5 Magical Tips for Holiday Bliss Properly
Best Storage Practices
To keep your Christmas Marshmallows fresh, store them in an airtight container at room temperature. If you have made a large batch, you might want to consider refrigerating them to prolong their life. However, keep in mind that this can change the texture slightly, making them a bit denser.
Reheating and Freezing Tips
Although there’s typically no need to reheat marshmallows, if you prefer a gooey texture, you can microwave a few for only a couple of seconds. For long-term storage, freezing is an option. Just make sure to dust them with powdered sugar and wrap them tightly in plastic wrap before placing them in an airtight container. They can last up to three months in the freezer; just allow them to thaw at room temperature before enjoying.
Tips & Tricks for Christmas Marshmallows: 5 Magical Tips for Holiday Bliss
Mistakes to Avoid
- Not Blooming the Gelatin: Skipping this step can lead to clumping and uneven mixing.
- Overheating the Sugar Mixture: If you overcook, you might harden the marshmallows, resulting in a chewy texture instead.
- Forget to Dust with Powdered Sugar: This step is essential for preventing your marshmallows from sticking together.
- Not Allowing Enough Set Time: Rushing this process can yield runny marshmallows that won’t hold shape.
- Using the Wrong Pan Size: Stick to the recommended pan size to ensure adequate thickness and texture.
Extra Tips for Better Results
- Experiment with Flavors: Instead of just vanilla, try almond extract or peppermint for a festive twist.
- Add Color: Incorporate food coloring for a beautiful, decorative touch that matches your holiday theme.
- Use Different Shapes: Cut marshmallows into holiday shapes using cookie cutters for added fun.
Recipe Variations of Christmas Marshmallows: 5 Magical Tips for Holiday Bliss
Creative Twists
- Chocolate-Dipped Marshmallows: For a gourmet touch, dip the marshmallows in melted chocolate and sprinkle with crushed candy canes or nuts before they set.
- Flavored Variants: Infuse flavors like orange zest, matcha, or espresso to customize your marshmallows further.
- Layered Marshmallows: For a visually striking dessert, create multiple layers with different flavors and colors in one pan.
Dietary Adjustments
For those with specific dietary needs, consider using agar-agar in place of gelatin for a vegan adaptation. Ensure to use gluten-free powdered sugar if needed. Coconut cream can replace heavy cream in toppings if you’re looking for a dairy-free option.
Conclusion about Christmas Marshmallows: 5 Magical Tips for Holiday Bliss
Embracing the spirit of the holidays doesn’t have to come with stress. These Christmas Marshmallows: 5 Magical Tips for Holiday Bliss provide an opportunity to engage in a fun and rewarding culinary experience. From their delightful taste to their versatility, these marshmallows can become a cherished tradition within your family. Whether you’re sharing them with friends, using them as decorations on desserts, or simply enjoying them on a chilly winter’s night, they are sure to bring warmth and joy. Try making these magical marshmallows and make your holiday season even brighter.
FAQs about Christmas Marshmallows: 5 Magical Tips for Holiday Bliss
Can I make Christmas marshmallows ahead of time?
Yes! You can easily make Christmas marshmallows a few days in advance.
How long do homemade marshmallows last?
When stored properly in an airtight container, homemade marshmallows can last for up to three weeks.
What do I do if my marshmallows are too sticky?
If your marshmallows end up sticky, you can dust them with extra powdered sugar to reduce the stickiness.
Can I freeze the marshmallows?
Absolutely! Layer a few marshmallows in an airtight container with powdered sugar and freeze them for up to three months.
How do I get the best texture in my marshmallows?
Be patient during the blooming and setting stages; these are crucial for achieving the perfect fluffy texture.
Can I use flavored gelatin instead of powdered gelatin?
Using flavored gelatin can change the outcome, but it can provide a unique taste. Adjust sugar levels accordingly.
How do I prevent the marshmallows from sticking together?
Dust the marshmallows with powdered sugar once cut, and store them in a single layer in an airtight container.
Can I add extracts for different flavors?
Yes! You can experiment with different extracts, like peppermint or almond, for varied tastes in your marshmallows.
What if I can’t find corn syrup?
Light honey or maple syrup can be suitable substitutes, but the consistency may vary slightly.
Can I make these marshmallows in larger quantities?
Yes, you can double or triple the recipe. Just ensure your pan size is adjusted accordingly for even setting.
Christmas Marshmallows
Equipment
- Candy Thermometer
- Stand mixer or hand mixer
- 9×9-inch pan
- Saucepan
- Parchment Paper
Ingredients
Base Ingredients
- 3 tablespoons unflavored gelatin
- ½ cup cold water (for blooming gelatin)
- 2 cups granulated sugar
- ¾ cup light corn syrup
- ¼ teaspoon salt
- ½ cup water (for syrup mixture)
- 1 tablespoon vanilla extract (or peppermint extract for holiday flavor)
Coating & Decoration
- ¼ cup powdered sugar
- ¼ cup cornstarch
- Red and green food coloring (optional, for festive swirl)
- Crushed candy canes or festive sprinkles (optional topping)


Instructions
- Line a 9×9-inch pan with parchment paper and lightly dust with a mix of powdered sugar and cornstarch.
- In the bowl of a stand mixer, combine gelatin with 1/2 cup of cold water and let it bloom while you prepare the syrup.
- In a saucepan over medium heat, combine sugar, corn syrup, salt, and 1/2 cup water. Stir until sugar dissolves, then attach a candy thermometer. Heat without stirring until the mixture reaches 240°F (115°C).
- Carefully pour the hot syrup into the gelatin mixture while mixing on low speed. Gradually increase to high speed and beat for about 10–12 minutes until thick, glossy, and tripled in volume. Add vanilla or peppermint extract in the final minute.
- If coloring, divide the mixture and fold in red and green food coloring for a festive swirl effect. Pour into prepared pan and smooth the top.
- Dust the top lightly with the powdered sugar mixture. Let set at room temperature for at least 3 hours or until firm.
- Once set, lift from pan, cut into squares, and toss in the powdered sugar mixture to coat. Optionally, decorate with crushed candy canes or festive sprinkles.