

This post may contain affiliate links. As an Amazon Associate, I earn from qualifying purchases at no extra cost to you.
Table of Contents
🍴 Top Kitchen Essentials You'll Love


Introduction to Christmas Stained Glass Cookies
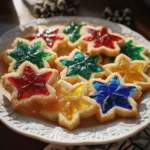
Christmas is a magical time of year filled with warmth, joy, and cherished traditions. One of the most delightful ways to celebrate the season is through baking, and what better treat to make than Christmas Stained Glass Cookies? These cookies are not just visually stunning with their vibrant colors, but they also bring a sense of nostalgia and creativity into the kitchen. They not only taste delicious but also become a wonderful activity for family gatherings or holiday parties.
Have you ever thought about the joy of watching children press hard candies into cookie shapes? The excitement builds as the cookies bake and transform, creating beautiful, stained glass windows to decorate your holiday table. It’s moments like these that make baking special. This recipe for Christmas Stained Glass Cookies is easy enough for even novice bakers, yet impressive enough to wow guests. Each bite offers a crisp texture complemented by the unique sweetness of melted candies.
These cookies stand out from typical holiday sweets due to their vibrant presentation. The sight of these colorful treats brings a festive cheer into any room. The best part? You can customize them for each holiday with different shapes and colors of hard candies. So whether it’s Christmas or any other festive celebration, these cookies are sure to become a beloved favorite in your household.
Key Benefits of Christmas Stained Glass Cookies
Why You’ll Love This Recipe
- Festive Appeal: The colorful, transparent centers mimic stained glass, making them a beautiful addition to any holiday platter.
- Delicious Flavor: The combination of buttery cookies and sweet, melted candy creates a delightful contrast.
- Simplicity: With straightforward steps, this recipe is perfect for bakers of all skill levels.
- Creative Potential: You can experiment with different shapes and candy colors to match your celebrations.
- Family Activity: Making these cookies can be a fun, hands-on project for kids and adults alike.
What Makes It Stand Out
Christmas Stained Glass Cookies are unique because they beautifully blend the art of baking with creativity. The transparency and colors of the candy create a striking effect that is sure to captivate anyone who lays eyes on them. Further, the ability to customize flavors and shapes means that every batch can have a personal touch, making them ideal for any holiday or event.
This recipe is not just meant for Christmas; it can be adapted for a multitude of occasions like birthdays, Halloween, or even Easter by simply changing the cookie shapes and candy colors. Their versatility makes them a timeless treat with a lasting impression.
Ingredients for Christmas Stained Glass Cookies
Complete Ingredient List with Measurements
- 2 1/2 cups all-purpose flour
- 1 teaspoon baking powder
- 1/2 teaspoon salt
- 3/4 cup unsalted butter, softened
- 1 cup granulated sugar
- 1 large egg
- 1 teaspoon vanilla extract
- 1 cup crushed hard candies (like Jolly Ranchers), assorted colors
- Icing (optional for decoration)
Substitutes and Alternatives
If you’re looking for swaps due to allergies or dietary restrictions, consider these options:
- For a dairy-free version, use margarine or coconut oil instead of butter.
- If gluten-free, substitute all-purpose flour with a gluten-free flour blend.
- Granulated sugar can sometimes be replaced with coconut sugar for a slightly darker flavor.
How to Make Christmas Stained Glass Cookies – Step-by-Step Directions
Step 1 – Prepare Ingredients
Begin by gathering all your ingredients on a clean countertop. Pre-measure each component to streamline the process. This helps maintain organization and makes the baking journey more enjoyable.
Step 2 – Cook the Base
Preheat your oven to 375°F (190°C). In a mixing bowl, whisk together the flour, baking powder, and salt until well blended. This ensures that the raising agent is evenly distributed throughout the flour.
Step 3 – Cream Butter and Sugar
In a separate bowl, combine the softened butter and granulated sugar. Use an electric mixer on medium speed, blending until the mixture is light and fluffy, typically about 2-3 minutes. This process incorporates air, which helps with the rise of the cookies.
Step 4 – Add Egg and Vanilla
Add the large egg and vanilla extract to the creamed mixture, beating until fully incorporated. The egg helps bind the ingredients while adding moisture and flavor to the dough.
Step 5 – Combine Dry and Wet Mixtures
Gradually mix the dry whisked ingredients into the wet mixture. This can be done in batches to avoid a flour explosion. Mix until no dry flour remains, forming a cohesive dough.
Step 6 – Roll Out the Dough
On a floured surface, roll out the dough to about 1/4 inch thick. Use a rolling pin for an even layer. Make sure to keep your working surface lightly floured to prevent sticking.
Step 7 – Cut the Cookies
Using cookie cutters, cut out desired shapes (like stars, hearts, or tree ornaments). Carefully transfer these shapes onto a baking sheet lined with parchment paper.
Step 8 – Create Cut-Out Centers
With a smaller cookie cutter, cut out the center of each cookie shape to form a window. These spaces will be filled with the crushed hard candies, allowing them to melt and create the stained glass effect.
Step 9 – Fill with Candy
Fill each cut-out center generously with the crushed hard candies. It’s essential to ensure the candy is finely crushed so it melts evenly.
Step 10 – Bake and Cool
Bake the cookies in the preheated oven for 8-10 minutes, or until the edges become lightly golden. Once removed, let them cool completely on a wire rack, allowing the candy to harden.
Serving Suggestions for Christmas Stained Glass Cookies
Best Occasions to Serve This Dish
These cookies are perfect for holiday gatherings, cookie exchange parties, or festive family get-togethers. Their vibrant colors and fun shapes make them appealing to both children and adults alike. They add a touch of creativity to dessert tables and make great gifts.
What to Serve With It
Christmas Stained Glass Cookies pair perfectly with a warm glass of milk, hot cocoa, or even a cup of tea. Serve them alongside other festive sweets like gingerbread or sugar cookies for a varied holiday platter.
How to Store Christmas Stained Glass Cookies Properly
Best Storage Practices
To keep your cookies fresh, store them in an airtight container. Place parchment paper between layers to prevent sticking. Ideally, cookies can be stored at room temperature for up to a week.
Reheating and Freezing Tips
For optimal freshness, you can freeze these cookies. Make sure they are completely cooled before placing them in an airtight container, where they can be stored for up to three months. To enjoy them again, thaw them at room temperature, or warm them briefly in the microwave.
Tips & Tricks for Christmas Stained Glass Cookies
Mistakes to Avoid
- Using cold butter: Always start with softened butter for the best texture.
- Overmixing the dough: Overmixing can lead to tough cookies, so mix until just combined.
- Choosing the wrong candy: Opt for hard candies that melt well and won’t burn easily.
- Forgetting to flour your surface: A floured surface keeps your dough from sticking, preventing frustration.
- Not letting cookies cool: Allowing cookies to cool completely ensures they maintain their shape.
Extra Tips for Better Results
- Experiment with different flavored extracts like almond or peppermint for a unique twist.
- Consider adding festive sprinkles on top before baking for added decoration.
- Use vibrant colored candies for a brighter stained glass effect.
Recipe Variations of Christmas Stained Glass Cookies
Creative Twists
- Chocolate Stained Glass: Incorporate cocoa powder into the dough for chocolate-flavored cookies, using complementary colored candies.
- Holiday Themes: Use cookie cutters shaped as various holiday icons to enhance the festive spirit.
- Savory Version: Add savory herbs into the dough for a unique, less sweet alternative, pairing it with appropriately flavored candies, if desired.
Dietary Adjustments
For those with dietary restrictions, you can easily adapt this recipe. To make it vegan, replace butter with a plant-based alternative and use a flax egg instead of a regular egg. For gluten-free options, select a gluten-free flour mix, ensuring it behaves similarly to all-purpose flour in baking.
Conclusion about Christmas Stained Glass Cookies
Christmas Stained Glass Cookies are an enchanting addition to your holiday baking arsenal. Their eye-catching design and delightful flavors not only make them a treat to eat but also a fun activity to create with family and friends. The process of making these cookies fosters creativity, allowing each baker to express their personality and holiday spirit.
As you snack on these colorful cookies, you’ll likely find that they bring joy and memories to life, transcending the simple act of baking. With their easy preparation and wide variety of customization options, there’s no reason not to try your hand at these festive delights this holiday season.
FAQs about Christmas Stained Glass Cookies
How long can I store Christmas Stained Glass Cookies?
You can store these cookies in an airtight container at room temperature for up to a week.
Can I make Christmas Stained Glass Cookies ahead of time?
Yes, you can prepare the dough ahead of time and refrigerate it for up to a week before rolling and baking.
What types of hard candies work best?
Hard candies like Jolly Ranchers or Life Savers are ideal because they melt well and provide vibrant colors.
Can I freeze Christmas Stained Glass Cookies?
Absolutely! Once cooled, freeze them in an airtight container for up to three months for later enjoyment.
Is it necessary to use a rolling pin?
While a rolling pin is helpful, you can also use your hands to flatten the dough, though results may vary in thickness.
What should I do if my cookie dough is too sticky?
If the dough is sticky, sprinkle a little more flour on the surface and knead gently until it reaches a workable consistency.
Can I use different extracts for flavoring?
Yes, you can experiment with different extracts like almond or lemon to impart unique flavors to your cookies.
Should I let my cookies cool before decorating?
Yes, allow the cookies to cool completely before adding any icing or additional decorations to prevent melting.
Christmas Stained Glass Cookies
Ingredients
Cookie Ingredients
- 2.5 cups all-purpose flour Can substitute with gluten-free flour.
- 1 teaspoon baking powder
- 0.5 teaspoon salt
- 0.75 cup unsalted butter, softened For a dairy-free version, use margarine or coconut oil.
- 1 cup granulated sugar Can substitute with coconut sugar.
- 1 large egg For a vegan version, replace with a flax egg.
- 1 teaspoon vanilla extract
- 1 cup crushed hard candies (assorted colors) Such as Jolly Ranchers.
Decoration (optional)
- Icing Optional for decoration.


Instructions
Preparation
- Gather all your ingredients on a clean countertop and pre-measure them.
- Preheat your oven to 375°F (190°C).
Mixing the Dough
- In a mixing bowl, whisk together the flour, baking powder, and salt.
- In a separate bowl, cream the softened butter and granulated sugar until light and fluffy.
- Add the egg and vanilla to the butter mixture and beat until incorporated.
- Gradually mix the dry ingredients into the wet ingredients, forming a cohesive dough.
Shaping and Baking
- Roll out the dough on a floured surface to about 1/4 inch thick.
- Cut out desired shapes with cookie cutters and place them on a baking sheet lined with parchment paper.
- Cut out the center of each cookie shape to form a window.
- Fill the cut-out centers generously with crushed hard candies.
- Bake in the preheated oven for 8-10 minutes, or until the edges are lightly golden.
- Let the cookies cool completely on a wire rack.