
This post may contain affiliate links. As an Amazon Associate, I earn from qualifying purchases at no extra cost to you.
Table of Contents
🍴 Top Kitchen Essentials You'll Love


Introduction about Christmas Tree Cupcakes
There’s something magical about the festive season—decorated homes, twinkling lights, and of course, scrumptious treats! Among these delights, Christmas Tree Cupcakes stand out as an irresistible dessert that captures the essence of holiday cheer. Have you ever wondered how to make cupcakes that not only taste fantastic but also bring a smile to everyone’s face? Well, look no further, because this recipe transforms the classic chocolate cupcake into a charming edible Christmas tree that your family and friends will adore.
With just a few simple ingredients and an easy-to-follow process, creating these delightful Christmas Tree Cupcakes can become a cherished tradition in your home. The soft chocolate cake paired with creamy, vibrant green frosting brings both flavor and festivity to your table. Don’t worry if you’re new to baking; this easy recipe is beginner-friendly and fun for the whole family.
Key Benefits of Christmas Tree Cupcakes
Why you’ll love this recipe
- Deliciously Unique: These festive cupcakes are not only tasty but also visually delightful, making them a perfect centerpiece.
- Easy to Make: Simple steps ensure that even novice bakers can join in on the fun without feeling overwhelmed.
- Quick to Prepare: In about an hour and a half, you can create a batch of Christmas Tree Cupcakes ready for decoration.
- Family-Friendly: This recipe is perfect for family activities; everyone can help with frosting and decorating!
- Customizable: You can tweak the ingredients or decorations to fit dietary needs or personal preferences.
- Budget-Friendly: Most of the ingredients are inexpensive and easy to find, making this an affordable holiday treat.
What makes it stand out
The standout feature of these cupcakes is their creative presentation. Shaped like Christmas trees, they are perfect for holiday gatherings and parties. The rich chocolate base paired with the vivid green frosting and festive sprinkles brings an inviting visual appeal that will have everyone reaching for seconds. Additionally, the recipe allows for multiple personalization options, letting you create a unique touch that showcases your style and flair during the holiday season.
Ingredients for Christmas Tree Cupcakes
Complete ingredient list with measurements
To begin your festive baking adventure, gather the following ingredients:
For the Chocolate Cupcakes:
- ½ cup vegetable oil
- ¾ cup sour cream
- ¾ cup heavy cream
- 4 eggs
- 1 box chocolate cake mix
- ¼ cup cocoa powder
- 1 tsp espresso powder (optional)
For the Vanilla Buttercream Frosting:
- 2 cups butter (cold and cut into chunks)
- 10 cups powdered sugar
- 2 tbsp vanilla
- ½ cup plus 2 tbsp heavy cream
- Pinch of salt
- Green Gel Food Coloring
- Golden Star Sprinkles
- Holiday Sprinkles
Substitutes and alternatives
If you’re looking to modify this recipe due to allergies or preferences, here are some alternatives:
- Vegetable Oil: You can replace it with melted coconut oil or applesauce for a lighter touch.
- Sour Cream: Greek yogurt works as a great substitute for a similar texture and tangy flavor.
- Eggs: Substitute with two flax eggs (2 tablespoons flaxseed meal + 6 tablespoons water) for a vegan option.
- Butter: Use dairy-free margarine or a vegan butter substitute to make the frosting allergen-friendly.
- Powdered Sugar: If you’re looking for less sweetness, you can reduce the amount of sugar by about a cup or use a natural sugar alternative.
How to Make Christmas Tree Cupcakes – Step-by-Step Directions
Creating Christmas Tree Cupcakes may seem daunting at first, but I assure you it’s a straightforward process. Follow these easy steps carefully, and you’ll be rewarded with delightful, festive treats!
Step 1 – Prep your workspace and ingredients
Begin by preheating your oven to 350°F (175°C). While the oven is warming, set out your ingredients and equipment. You’ll need a mixing bowl, a whisk or electric mixer, cupcake liners, and a cupcake pan. It’s always best to have everything within arm’s reach for a smooth baking experience!
Step 2 – Prepare the cupcake batter
In a large mixing bowl, combine the chocolate cake mix, cocoa powder, and espresso powder. Mix these dry ingredients together before adding in the wet ones. Following that, add the vegetable oil, sour cream, heavy cream, and eggs. Use a whisk or electric mixer to blend everything until smooth and well combined. Make sure there are no lumps in the batter; this will yield fluffy cupcakes!
Step 3 – Bake the cupcakes
Once your batter is ready, line the cupcake pan with liners. Fill each liner about two-thirds full with the batter. This allows room for the cupcakes to rise without overflowing. Place the cupcake pan in the preheated oven and bake for 18-22 minutes. You can check for doneness by inserting a toothpick into the center; if it comes out clean or with a few moist crumbs, they’re ready!
Step 4 – Cool the cupcakes
After baking, remove the pan from the oven and let it cool on a wire rack for about 5-10 minutes. Once they are cool enough to handle, carefully remove the cupcakes from the pan and let them cool completely on the wire rack. This cooling step is vital before frosting; if they’re warm, the frosting will melt!
Step 5 – Make the buttercream frosting
While the cupcakes are cooling, let’s whip up the frosting! In a large bowl, beat the cold butter with an electric mixer until it’s creamy and pale. Gradually add in the powdered sugar, mixing well after each addition. Next, pour in the heavy cream and vanilla, along with a pinch of salt. Continue beating on high speed for 3-4 minutes until light and fluffy. This step is crucial for achieving that delightful, spreadable texture!
Step 6 – Color the frosting
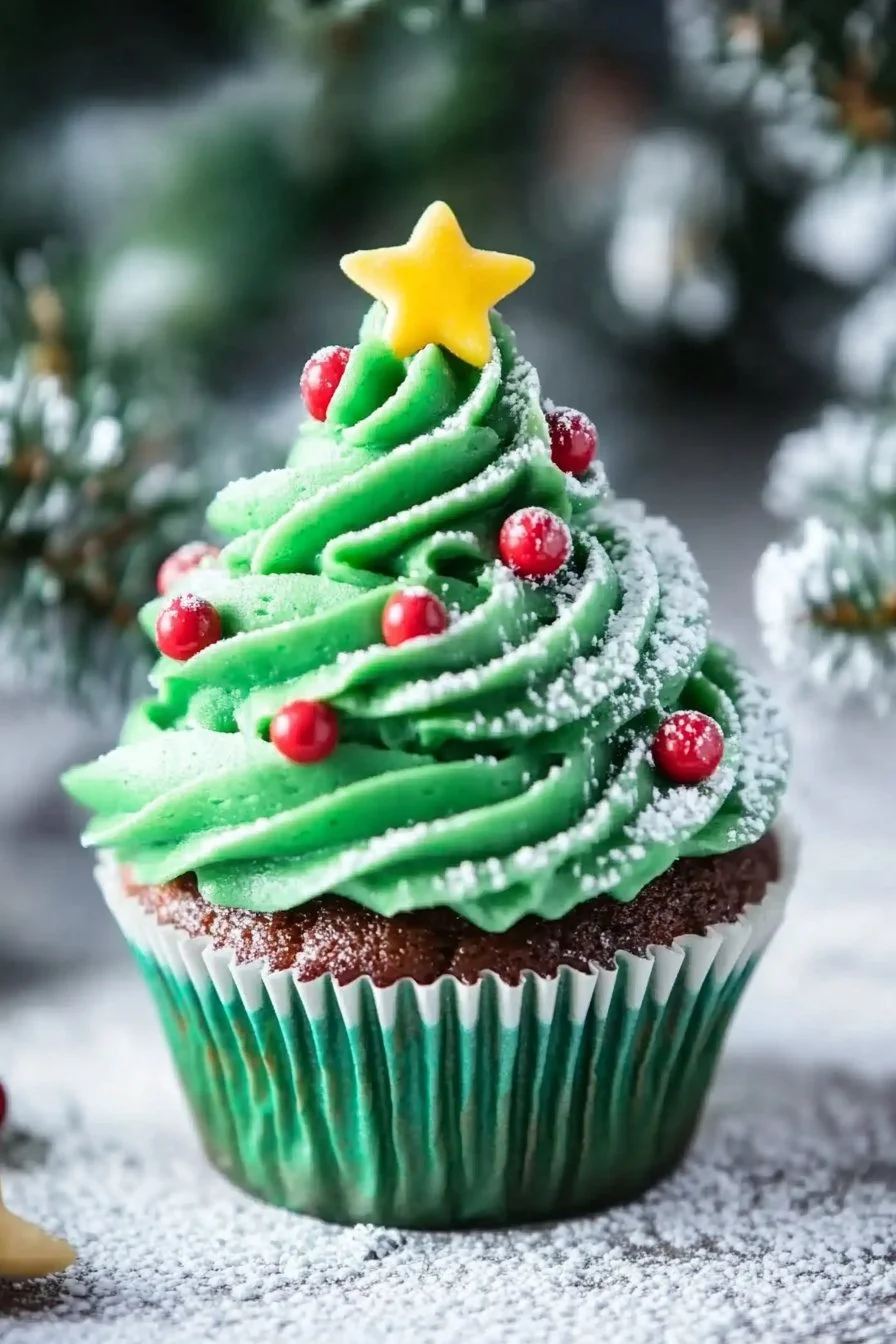
Once your buttercream is ready, it’s time to add that festive green color. Add a few drops of green gel food coloring and mix until you reach your desired shade of green. Aim for a bright, vibrant hue that resembles the evergreen trees we all love during the holidays.
Step 7 – Frost the cupcakes
Using a piping bag fitted with a 1 M piping tip, fill the bag with your green frosting. Start by frosting the top of each cupcake in a circular motion to create a tree shape. Begin at the outer edge and work your way in, creating swirls that mimic the layers of a Christmas tree. Don’t worry about perfecting it; the charm is in the homemade look!
Step 8 – Decorate the cupcakes
Now for the fun part! Sprinkle golden star sprinkles at the top of each cupcake to resemble tree toppers. Feel free to add holiday-themed sprinkles around the edges for extra festive flair. Get creative—there are no limits to how you can make your Christmas Tree Cupcakes shine!
Step 9 – Serve and enjoy
Your Christmas Tree Cupcakes are now ready to be showcased! Arrange them on a beautiful platter or decorate your dessert table. Share them with family and friends, and savor the delightful flavors of the holiday season.
Step 10 – Store any leftovers
If you happen to have some cupcakes left after the festivities, be sure to store them properly! You’ll find proper storage tips in the next section.
Serving Suggestions for Christmas Tree Cupcakes
Best occasions to serve this dish
These delightful Christmas Tree Cupcakes are perfect for various joyful occasions:
- Christmas Parties: Whether it’s an office gathering or an intimate family get-together, these cupcakes bring festive cheer.
- Holiday Treat Exchanges: Make a batch to share during holiday parties or exchange with neighbors and friends.
- Classroom Celebrations: These colorful cupcakes are ideal for school parties, bringing a sweet surprise to your child’s classmates.
- Festive Dinners: Pair them with your holiday meal for a delightful dessert that everyone will look forward to.
What to serve with it
Enhance your cupcake experience by offering complementary items:
- Hot Chocolate: A rich, creamy cup of hot chocolate pairs perfectly with your Christmas Tree Cupcakes.
- Milk or Eggnog: Classic options that children and adults alike will appreciate during the holiday season.
- Coffee or Tea: For that cozy vibe, serve your cupcakes with warm beverages to elevate the experience.
- Fruit Platters: Fresh fruit can help balance the rich sweetness and provide a refreshing contrast.
Storing Christmas Tree Cupcakes Properly
Best storage practices
To ensure your Christmas Tree Cupcakes stay fresh, it is vital to store them correctly. Here are some best practices:
- At Room Temperature: If you plan to eat them within a day or two, you can store the cupcakes in an airtight container at room temperature.
- Refrigeration: For longer storage, pop them into the fridge. Make sure they’re in an airtight container to prevent drying out.
- Freezing: You can freeze the un-frosted cupcakes for up to three months. Thaw them in the fridge before frosting.
Reheating and freezing tips
- Avoid Reheating Frosted Cupcakes: If you have frosting on them, it’s best not to microwave or bake them again, as this can ruin the frosting’s texture.
- Thawing Frozen Cupcakes: When you’re ready to enjoy your frozen cupcakes, leave them in the refrigerator overnight. The next day, bring them to room temperature, and they’re ready to serve!
Tips & Tricks for Christmas Tree Cupcakes
Mistakes to avoid
Avoid these common pitfalls to ensure your cupcakes turn out perfectly:
- Overmixing the Batter: Mix just until combined; overmixing can lead to tough cupcakes.
- Underbaking: Keep a close eye on baking time to avoid mushy cupcakes. Use a toothpick test!
- Frosting Too Runny: If your frosting is too soft, add more powdered sugar to thicken it.
Extra tips for better results
- Use Room Temperature Ingredients: Eggs, cream, and butter should be at room temperature for better blending.
- Opt for Gel Colorings: When coloring your frosting, gel food coloring will provide more vibrant colors without altering the frosting’s consistency.
- Experiment with Flavors: Don’t hesitate to add different extracts to your frosting for unique flavors. Almond or peppermint extracts work wonderfully!
Recipe Variations of Christmas Tree Cupcakes
Creative twists
Put a personal spin on your Christmas Tree Cupcakes with these suggestions:
- Peppermint Chocolate Cupcakes: Add crushed peppermint candies into your batter for a festive twist.
- Red Velvet Base: Substitute the chocolate cake for a red velvet mix to create more color contrast.
- Nutty Decor: Use chopped nuts as ornaments or accents—this adds texture and a touch of elegance.
Dietary adjustments
If you have dietary restrictions, consider these adaptations:
- Gluten-Free: Use a gluten-free chocolate cake mix to cater to those with gluten sensitivities.
- Dairy-Free: Substitute non-dairy products (i.e., almond milk, coconut cream) for butter and heavy cream.
- Vegan-Friendly Options: Use a vegan chocolate cake mix and follow the previously mentioned egg replacements for a fully plant-based treat.
Conclusion about Christmas Tree Cupcakes
The joy of baking Christmas Tree Cupcakes goes beyond simply following a recipe; it’s about creating lovely, delicious memories with your loved ones. These easy and delightful cupcakes not only satisfy your taste buds but also bring festive flair to any holiday gathering. From the rich chocolate base to the beautifully decorated trees, each bite embodies the spirit of celebration.
I encourage you to gather your loved ones, try out this Christmas Tree Cupcakes recipe, and unleash your creativity in the kitchen. Don’t forget to share your creations and let us know how they turned out!
FAQs about Christmas Tree Cupcakes
What if it doesn’t turn out right?
If your cupcakes don’t turn out as expected, don’t fret! They may still taste divine, and you can always transform them into a trifle by layering them with frosting and whipped cream.
Can I prepare it ahead of time?
Absolutely! You can bake the cupcakes a day in advance and store them in an airtight container. Frost just before serving for the best effect.
What are the best ingredient substitutions?
Common substitutions include Greek yogurt for sour cream, vegan butter for traditional butter, or gluten-free flour blends for those with specific dietary needs.
How long can it be stored?
When stored properly in an airtight container, these cupcakes can last up to 3 days at room temperature or up to a week in the refrigerator.
Can I use store-bought dough or crust?
While using store-bought cake mix simplifies the process, I highly recommend trying the homemade batter to keep with the creative spirit!
Is this recipe kid-friendly or family-appropriate?
Definitely! Kids will love helping with the decorating process, making it a fun family activity.
Can I make this recipe allergen-free?
You can easily accommodate various dietary restrictions. Check the substitutions section for gluten-free and vegan options that still taste amazing!

Christmas Tree Cupcakes
Ingredients
For the Chocolate Cupcakes
- 0.5 cup vegetable oil Can substitute with melted coconut oil or applesauce
- 0.75 cup sour cream Greek yogurt can be used as a substitute
- 0.75 cup heavy cream
- 4 pieces eggs Can substitute with flax eggs (2 tbsp flaxseed meal + 6 tbsp water)
- 1 box chocolate cake mix
- 0.25 cup cocoa powder
- 1 tsp espresso powder Optional for enhanced chocolate flavor
For the Vanilla Buttercream Frosting
- 2 cups butter Cold and cut into chunks
- 10 cups powdered sugar
- 2 tbsp vanilla
- 0.5 cup heavy cream Plus 2 tablespoons
- 1 pinch salt
- 1 drop Green Gel Food Coloring Adjust amount to desired shade
- Golden Star Sprinkles For decoration
- Holiday Sprinkles For decoration


Instructions
Preparation
- Preheat your oven to 350°F (175°C) and prepare your workspace with all ingredients and equipment.
Making the Cupcake Batter
- In a large mixing bowl, combine chocolate cake mix, cocoa powder, and espresso powder.
- Add vegetable oil, sour cream, heavy cream, and eggs. Mix until smooth and combined.
Baking the Cupcakes
- Line a cupcake pan with liners and fill each about two-thirds full with batter.
- Bake for 18-22 minutes until a toothpick comes out clean.
Cooling the Cupcakes
- Remove from oven and cool in the pan for 5-10 minutes before transferring to a wire rack to cool completely.
Preparing the Buttercream Frosting
- Beat cold butter in a large bowl until creamy, then gradually add powdered sugar, heavy cream, vanilla, and salt. Beat until light and fluffy.
Coloring the Frosting
- Add green gel food coloring to the frosting and mix until the desired shade is achieved.
Frosting the Cupcakes
- Use a piping bag to frost each cupcake in a circular motion to create a tree shape.
Decorating the Cupcakes
- Sprinkle golden star sprinkles on top and add holiday-themed sprinkles around the edges.
Serving the Cupcakes
- Arrange the cupcakes on a platter and enjoy with family and friends.
Storing Leftovers
- Store in an airtight container at room temperature for 1-2 days, or refrigerate for up to a week.