

This post may contain affiliate links. As an Amazon Associate, I earn from qualifying purchases at no extra cost to you.
Table of Contents
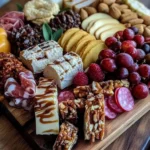
Are you searching for a fun and easy way to satisfy your sweet tooth? Look no further than the Dessert Charcuterie Board! This delightful creation brings together an array of sweets and treats, making it a show-stopping centerpiece for any gathering. Imagine a colorful board filled with assorted cookies, rich brownies, and seasonal fruits, all beautifully arranged and ready to be shared with family and friends. Isn’t that a mouthwatering thought?
This recipe is special not just for its delicious flavors but also for its versatility. You can customize a Dessert Charcuterie Board to suit any occasion, whether it’s a birthday party, holiday gathering, or just a cozy night in. The ease of preparation allows you to construct this board in no time, creating a harmonized dessert experience that delights both the eyes and palate.
What makes the Dessert Charcuterie Board truly stand out is its inviting presentation. Guests will love picking their favorite treats and dipping them into chocolate sauce or whipped cream. Every bite is a mix of flavor and texture, and that’s the beauty of it! Why stick to a traditional dessert when you can create something visually appealing and versatile like this board?
🍴 Top Kitchen Essentials You'll Love


Key Benefits of Dessert Charcuterie Board
Why You’ll Love This Recipe
- Flavor Variety: Enjoy a mix of sweet and refreshing tastes with cookies, brownies, and seasonal fruits.
- Easy Preparation: No baking required! Just arrange and serve.
- Customizable: Tailor the board to personal preferences or dietary needs.
- Family-Friendly: Perfect for kids and adults alike, making it an all-ages favorite.
- Great for Sharing: Ideal for social gatherings, encouraging everyone to partake.
What Makes It Stand Out
The uniqueness of a Dessert Charcuterie Board lies in its originality. You take the concept of a traditional charcuterie board and transform it into a sweet affair. This fresh take on dessert allows for endless creativity. You can use pre-packaged sweets or whip up homemade goodies; the choice is yours!
Moreover, each board can be customized according to themes or seasons. You might include peppermint delights during winter or fresh berries in summer. This flexibility makes it suitable for any occasion, whether it’s a casual get-together or a festive celebration.
Ingredients for Dessert Charcuterie Board
Complete Ingredient List with Measurements
- Assorted Cookies: About 1-2 dozen, mix and match flavors.
- Brownies: 6-12 pieces, cut into bite-size squares.
- Seasonal Fruits: 1-2 cups each of apples, pears, and grapes.
- Chocolate Sauce: ½ cup, for dipping.
- Whipped Cream or Marshmallow Fluff: ½ cup, for added sweetness.
- Nuts (Optional): ½ cup, like almonds or walnuts for crunch.
- Mint Leaves for Garnish (Optional): A handful to enhance presentation.
Substitutes and Alternatives
Don’t have certain ingredients on hand? No problem! You can substitute brownies with blondies or even a simple cake cut into squares. For cookies, consider using store-bought varieties for convenience, or you could bake your favorites.
If you’re looking for a healthier option, swap chocolate sauce with yogurt or a fruit dip. For fruits, it’s easy to use whatever is in season or available, making this board adaptable to different tastes and dietary needs.
How to Make Dessert Charcuterie Board – Step-by-Step Directions
Step 1 – Prepare Ingredients
Start by gathering all your ingredients. Wash the fruits and cut them into bite-sized pieces. Slice the brownies and arrange the cookies neatly.
Step 2 – Choose Your Board
Select a large, beautiful platter or board to showcase your treats. A wooden board or a colorful platter works wonderfully for this.
Step 3 – Arrange Cookies and Brownies
Begin by grouping your cookies and brownies. Create small clusters so they look inviting and organized on the board.
Step 4 – Fill with Seasonal Fruits
Next, fill in the gaps with your seasonal fruits. Aim for a colorful mix, creating a balance between the rich desserts and the fresh fruits.
Step 5 – Add Dipping Sauces
Include small bowls of chocolate sauce and whipped cream or marshmallow fluff. Position these bowls strategically around the board for easy access.
Step 6 – Sprinkle Nuts
For an added texture, sprinkle some nuts around the board. This provides a delightful crunch and visual appeal.
Step 7 – Garnish with Mint Leaves
Finish off your Dessert Charcuterie Board by garnishing it with mint leaves. This not only enhances the aesthetic but adds a hint of freshness.
Step 8 – Serve and Enjoy
Now it’s time to serve! Gather your friends and family around and watch them delight in this sweet creation.
Serving Suggestions for Dessert Charcuterie Board
Best Occasions to Serve This Dish
One of the best times to serve a Dessert Charcuterie Board is during family gatherings. It’s a casual yet festive way to enjoy desserts together.
Holiday celebrations also call for this sweet board. It adds a cheerful touch to any festive meal, especially during Christmas or Thanksgiving.
Movie nights are another perfect occasion. Having a dessert board makes snacking easy while focusing on the films.
What to Serve With It
- Coffee or Tea: Great for adding warmth to the dessert experience.
- Milk or Plant-Based Milk: A classic accompaniment to cookies and brownies.
- Ice Cream: Elevate the dessert experience by serving with scoops of ice cream.
How to Store Dessert Charcuterie Board Properly
Best Storage Practices
To store your Dessert Charcuterie Board, you can cover any remaining items with plastic wrap or transfer them to airtight containers. Keep items like cookies separate to maintain their texture.
The fruits can also be stored in a separate container in the fridge. Keeping everything sealed will help retain freshness before your next gathering or snack time.
Reheating and Freezing Tips
If you have leftover brownies or cookies, you can reheat them briefly in the microwave. Just a 10-15 second zap will help regain some warmth.
Generally, most components of the board don’t freeze well, especially fruits. However, you can freeze brownies for later enjoyment.
Tips & Tricks for Dessert Charcuterie Board
Mistakes to Avoid
- Overcrowding: Avoid placing too many items closely together, as it can appear cluttered.
- Neglecting Vegetables: Forgetting garnishes like mint can make the board less visually appealing.
- Not Balancing Flavors: Ensure a mix of sweet and slightly tart items for balance.
- Choosing Poor Quality Ingredients: Always use fresh fruits and quality sweets for the best taste.
- Ignoring Dietary Needs: Consider offering gluten-free or dairy-free items for guests with restrictions.
Extra Tips for Better Results
To enhance your Dessert Charcuterie Board, consider adding flavored chocolate or unique dipping sauces. Experiment with different fruit compotes for an interesting twist.
Creating themed boards lets you elevate your entertaining experience. For example, a “tropical” theme with pineapple, coconut cookies, and rum-flavored chocolate sauce could be exciting!
Recipe Variations of Dessert Charcuterie Board
Creative Twists
- Themed Holiday Board: Customize it for holidays with themed cookies and festive fruits.
- Decadent Chocolate Board: Focus exclusively on chocolate treats like truffles, chocolate-covered fruits, and fudge.
- Tropical Delight Board: Include tropical fruits, coconut macaroons, and caramel sauce for a vacation feel.
Dietary Adjustments
For a vegan version, use dairy-free cookies and brownies. Substitute whipped cream with coconut cream and choose a plant-based chocolate sauce.
If gluten-free is the focus, select gluten-free cookies and brownies while ensuring all garnishes and dips are gluten-free as well.
Conclusion about Dessert Charcuterie Board
The Dessert Charcuterie Board is an exciting way to entertain and indulge in a sweet buffet. This delightful dish not only pleases the eye but also tantalizes the taste buds. With endless options for presentation and ingredients, there’s no wrong way to create your board.
Gather your favorite sweets, arrange them beautifully, and watch as your family and friends enjoy a delightful interaction over dessert. Whether for a special occasion or a casual night at home, this recipe brings joy and deliciousness to any gathering.
FAQs about Dessert Charcuterie Board
Can I prepare it ahead of time?
Yes, you can prepare most elements beforehand. Just assemble closer to serving time.
Can I freeze it?
While cookies and brownies may freeze well, most fruits do not. Serve fresh fruits on the board.
How long does it last?
Generally, it’s best enjoyed fresh within 24 hours, especially with fruits.
What are the best substitutions?
You can substitute brownies with blondies and use any type of cookies.
Is this recipe family-friendly?
Absolutely, it’s great for all ages!
Can I make it gluten-free?
Yes, opt for gluten-free cookies and brownies.
What fruits are best for this board?
Seasonal fruits like apples, pears, and grapes work wonderfully.
Is it suitable for dietary restrictions?
Yes, you can adapt it for various dietary needs with just a few substitutions.
Can I mix sweet and savory items?
Yes, but this version is focused on sweet items. Mixing is a fun variation!
How do I make it visually appealing?
Use a variety of colors and shapes, and arrange items in clusters for a beautiful display.
Dessert Charcuterie Board
Ingredients
Dessert Ingredients
- 1-2 dozen Assorted Cookies Mix and match flavors.
- 6-12 pieces Brownies Cut into bite-size squares.
- 1-2 cups Seasonal Fruits (apples, pears, grapes) Use a variety of seasonal fruits.
- ½ cup Chocolate Sauce For dipping.
- ½ cup Whipped Cream or Marshmallow Fluff For added sweetness.
- ½ cup Nuts (Optional) Like almonds or walnuts for crunch.
- 1 handful Mint Leaves for Garnish (Optional) To enhance presentation.


Instructions
Preparation
- Start by gathering all your ingredients. Wash the fruits and cut them into bite-sized pieces. Slice the brownies and arrange the cookies neatly.
- Select a large, beautiful platter or board to showcase your treats.
- Begin by grouping your cookies and brownies. Create small clusters so they look inviting and organized on the board.
- Fill in the gaps with your seasonal fruits for a colorful mix.
- Include small bowls of chocolate sauce and whipped cream or marshmallow fluff positioned strategically around the board for easy access.
- Sprinkle some nuts around the board for added texture and visual appeal.
- Garnish with mint leaves to enhance aesthetics and add a hint of freshness.
- Gather your friends and family around the board and serve!