

This post may contain affiliate links. As an Amazon Associate, I earn from qualifying purchases at no extra cost to you.
Table of Contents
🍴 Top Kitchen Essentials You'll Love


Introduction to Fruity Thumbprint Cookies
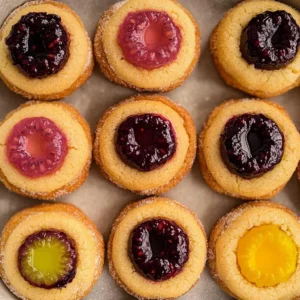
Have you ever craved a cookie that combines sweetness with a burst of fruity flavor? Look no further! Fruity Thumbprint Cookies are not just any ordinary cookies; they’re an explosion of deliciousness that is sure to impress. With a buttery base and delightful fruit filling, these cookies have become a favorite among those who enjoy a touch of sweetness in their treats.
This unique recipe allows for a variety of fruit flavors, making each batch customizable. Whether you adore raspberries, strawberries, or apricots, Fruity Thumbprint Cookies can be tailored to your taste buds. Imagine biting into a cookie that has a soft and chewy texture, complemented by the tangy sweetness of your favorite fruit. What could be better?
But it’s not just about the amazing taste. Making these cookies is easy and doesn’t require any advanced baking skills. Perfect for novice bakers and seasoned pros alike, the simplicity of this recipe brings joy to every kitchen. The delightful thumbprint of fruit not only adds a burst of flavor but also creates an eye-catching visual. This makes them a perfect addition to festivities, family gatherings, or simply as a sweet treat to enjoy at home.
Picture yourself baking these cookies, filling your home with the warm aroma of fresh ingredients, and finally sharing them with loved ones. The satisfaction you get from creating something homemade, delicious, and visually appealing is truly unbeatable. Let’s dive into this delectable world of Fruity Thumbprint Cookies that are bound to elevate your dessert game.
Key Benefits of Fruity Thumbprint Cookies
Why You’ll Love This Recipe
- Delicious Variety: Choose from various freeze-dried fruits to customize your flavors.
- Easy to Make: Simple steps ensure that even beginners can whip these up effortlessly.
- Visually Appealing: The thumbprint design makes for beautiful presentation.
- Perfect for Any Occasion: Great for holidays, parties, or a cozy family night.
- Supports Creative Cooking: Experiment with different toppings and fillings.
- Quick to Prepare: With minimal prep time, you’ll have fresh cookies in no time.
What Makes It Stand Out
Fruity Thumbprint Cookies stand out due to their versatility. You can easily mix and match different fruit flavors or even incorporate citrus for an added zing. This flexibility allows anyone to showcase their culinary creativity while also accommodating different palates.
Additionally, they are an ideal treat for various occasions. Whether you are attending a potluck, celebrating a birthday, or just want a sweet snack at home, these cookies are a perfect choice. Just imagine the delight on your loved ones’ faces when they see these colorful, fruity treats on the table!
Ingredients for Fruity Thumbprint Cookies
Complete Ingredient List with Measurements
- 6 tbsp butter, softened
- ½ cup granulated sugar
- 1 egg
- 1 tsp vanilla extract
- 1¼ cup all-purpose flour
- ½ tsp salt
- ⅔ cup freeze-dried fruit (sweetened or unsweetened depending on preference)
- 1 egg (for gloss if desired)
- ⅓ cup granulated sugar (for curd)
- 1 tsp cornstarch
- ¼ cup lemon or lime juice
- 1 tsp vanilla extract (for curd)
- 1 pinch salt
- Zest of 4 limes (if making lime curd)
- 2 tbsp butter (for curd)
- Green food coloring (optional, if making lime curd)
Substitutes and Alternatives
If you have allergies or dietary restrictions, there are plenty of substitutions that work well for Fruity Thumbprint Cookies. For a dairy-free option, substitute the butter with vegan margarine or coconut oil, maintaining the same measurements.
Those avoiding gluten can easily replace all-purpose flour with a 1-to-1 gluten-free flour blend, ensuring similar texture and flavor. Additionally, you can use applesauce instead of egg for a vegan alternative, although this might affect the cookie’s texture slightly. Always ensure any fruit fillings used are also gluten-free or vegan as needed.
How to Make Fruity Thumbprint Cookies – Step-by-Step Directions
Step 1 – Prepare Ingredients
Start by gathering all your ingredients. Ensure the butter is softened to room temperature for optimal mixing. Preheat your oven to 350°F (175°C) and line cookie sheets with parchment paper.
Step 2 – Cream the Butter and Sugar
In a mixing bowl, cream together the softened butter and granulated sugar until light and fluffy. This will take about 2-3 minutes. A hand mixer or stand mixer works best for this step to incorporate air into the mixture.
Step 3 – Add the Egg and Vanilla
Once your butter and sugar are well combined, add the egg and 1 tsp vanilla extract. Mix until everything is fully incorporated and smooth. The mixture should have a creamy texture.
Step 4 – Mix in Dry Ingredients
Next, in a separate bowl, whisk together the flour and salt. Gradually add this dry mixture to the wet ingredients, mixing until just combined. Be careful not to overmix, as this will affect the texture of your cookies.
Step 5 – Fold in the Freeze-Dried Fruit
Gently fold in the freeze-dried fruit of your choice using a spatula. This ensures the fruit is evenly distributed through the cookie dough.
Step 6 – Shape the Cookies
Using a tablespoon or cookie scoop, portion out the dough onto the prepared cookie sheets. Leave some space in between each scoop, as the cookies will spread slightly while baking.
Step 7 – Create the Thumbprint
Press your thumb into the center of each cookie dough ball to create a small indent. This is where the delicious fruit filling will go!
Step 8 – Bake the Cookies
Pop the cookie sheets into the preheated oven and bake for about 10-12 minutes, or until the edges are lightly golden. The cookies should be soft in the center.
Step 9 – Prepare the Curd Filling (Optional)
While the cookies are baking, prepare the lime curd. In a small saucepan, combine ⅓ cup sugar, cornstarch, lime juice, and a pinch of salt. Cook over medium heat while stirring until it starts to thicken.
Step 10 – Fill and Cool
Remove the cookies from the oven and allow them to cool slightly. Once cool enough to handle, fill each thumbprint with a spoon of the prepared curd. Allow cookies to cool completely on the baking sheet.
Serving Suggestions for Fruity Thumbprint Cookies
Best Occasions to Serve This Dish
Fruity Thumbprint Cookies are fabulous for any gathering. Whether it’s a casual coffee catch-up with friends or a holiday celebration, these cookies add a special touch. They also make an excellent choice for gift-giving during festive seasons, beautifully arranged in a decorative tin.
What to Serve With It
Pair these cookies with a refreshing cup of tea or coffee to enhance the flavors. They also go wonderfully with a scoop of vanilla ice cream or whipped cream for a more indulgent dessert treat. If you’re feeling adventurous, serve them alongside a fruity smoothie or a fruit salad for a vibrant, fresh dessert table.
How to Store Fruity Thumbprint Cookies Properly
Best Storage Practices
Keep your Fruity Thumbprint Cookies in an airtight container at room temperature for up to five days. For longer storage, consider placing them in the freezer; they can last in the freezer for up to three months. Just make sure to layer them with parchment paper to prevent sticking.
Reheating and Freezing Tips
To reheat, simply pop them in the microwave for about 10 seconds or until warmed through. If using frozen cookies, allow them to thaw in the fridge overnight or at room temperature for a few hours. This way, you will retain the cookie’s soft and chewy texture.
Tips & Tricks for Fruity Thumbprint Cookies
Mistakes to Avoid
1 – Not Soften the Butter: If the butter isn’t softened properly, your cookies may turn out dense instead of soft and chewy. Always ensure it’s at room temperature.
2 – Overmix the Dough: Mixing too much will lead to tough cookies. Mix until just combined and you’re good to go!
3 – Neglecting the Thumbprint: Missing the indent can lead to filling overflow and lost flavors. Be sure to press firmly!
4 – Skipping Parchment Paper: Baking directly on the pan can lead to sticking. Always line with parchment to ensure easy release.
5 – Baking at Incorrect Temperatures: Always preheat your oven for even baking and to get that lovely golden edge.
6 – Ignoring the Cooling Period: These cookies continue cooking on the baking sheet after you remove them from the oven. Wait a few minutes before transferring!
Extra Tips for Better Results
For a more intense flavor, consider toasting the freeze-dried fruit before adding it to the dough. This can enhance the cookie’s flavor profile. If you’re using lime for the curd, adding a bit more zest can create a deeper citrus flavor that pairs beautifully with the sweetness of the cookies.
Recipe Variations of Fruity Thumbprint Cookies
Creative Twists
- Chocolate-Dipped: After baking, dip half of each cookie in melted chocolate for an extra layer of indulgence.
- Nutty Addition: Add finely chopped nuts like almonds or walnuts to the dough for a bit of crunch and flavor contrast.
- Spiced Up: Incorporate spices like cinnamon or cardamom into the dough for a warm flavor twist.
Dietary Adjustments
For a vegan approach, substitute the egg with flaxseed meal mixed with water. To make them gluten-free, use almond flour or a gluten-free all-purpose mix, adjusting the liquid as needed to avoid a dry dough.
Conclusion about Fruity Thumbprint Cookies
In conclusion, Fruity Thumbprint Cookies are a delightful addition to any dessert lineup. They embrace the flavors of fruit while providing a simple recipe that can be customized to fit any occasion. Whether you choose to fill them with a luscious curd or simply enjoy the fruity essence, these cookies stand out with their beautiful presentation and wonderful taste.
Baking Fruity Thumbprint Cookies not only brings a delicious treat to your table but also creates an opportunity for creativity in the kitchen. So why not gather your ingredients and start creating these delightful cookies to share with family and friends? Your taste buds will thank you!
FAQs about Fruity Thumbprint Cookies
Can I make Fruity Thumbprint Cookies ahead of time?
Yes, you can prepare the dough in advance and refrigerate it for up to 24 hours. You can also freeze the unbaked cookies for later.
How should I store my cookies?
Store the cookies in an airtight container at room temperature for up to 5 days or freeze them for up to 3 months.
What if I don’t have freeze-dried fruit?
You can use any jam or fruit preserves as a filling, or even fresh fruit mixed with cornstarch to thicken it.
Can I use a different flour?
Yes, you can use gluten-free flour for a gluten-free version. Just ensure to follow specific recommendations for baking time and moisture.
Do Fruity Thumbprint Cookies need to be refrigerated?
No, they can be kept at room temperature in an airtight container, but refrigeration extends their freshness.
How do I get my thumbprint to stay?
Ensure you press firmly into the dough before baking; if the indentation seems shallow, you can press it again after they come out of the oven.
Can I add more than one type of fruit?
Absolutely! Feel free to mix different freeze-dried fruits to create a unique flavor profile.
What is the best way to reheat these cookies?
Microwave the cookies for 10-15 seconds or warm them in a preheated oven at 300°F (150°C) for a few minutes.
Fruity Thumbprint Cookies
Equipment
- Mixing Bowl
- Baking sheet
- Parchment Paper
Ingredients
Cookie Dough
- 1 cup unsalted butter softened
- ⅔ cup granulated sugar
- 2 egg yolks
- 1 tsp vanilla extract
- 2 cups all-purpose flour
- ¼ tsp salt
Filling
- ½ cup fruit jam strawberry, raspberry, or apricot


Instructions
- Preheat the oven to 350°F (175°C) and line a baking sheet with parchment paper.
- In a mixing bowl, cream together the softened butter and sugar until light and fluffy.
- Mix in the egg yolks and vanilla extract until well combined.
- Add the flour and salt and mix until a soft dough forms.
- Roll the dough into small balls and place them on the prepared baking sheet.
- Press a thumbprint into the center of each cookie and fill with a small spoonful of fruit jam.
- Chill the cookies for about 20 minutes to help them hold their shape.
- Bake for 10–12 minutes until the edges are lightly golden. Allow to cool before serving.