
This post may contain affiliate links. As an Amazon Associate, I earn from qualifying purchases at no extra cost to you.
Table of Contents
🍴 Top Kitchen Essentials You'll Love


Introduction to Homemade Butter Tarts
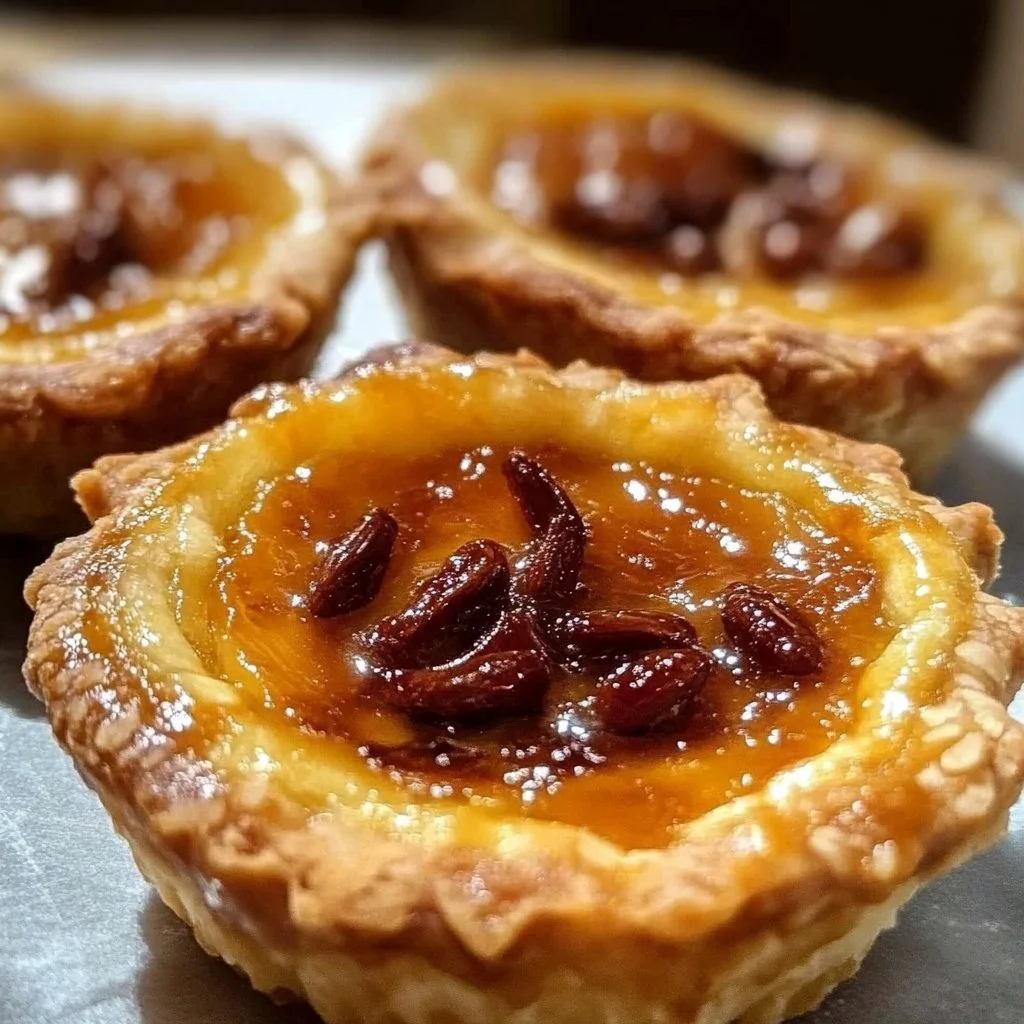
If you’ve never snacked on a homemade butter tart, you’re in for a delightful surprise. These little pastries are more than just desserts; they are a celebration of sweet nostalgia and comfort. Who can resist a sweet, gooey filling cradled in a buttery, flaky crust? Homemade butter tarts capture the essence of homemade goodness while boasting a silky filling that oozes rich flavor with every bite.
What makes this recipe special? It’s not just the ingredients; it’s the connection you create while making these treats. The act of mixing, rolling, and baking allows you to unleash your creativity. They’re perfect for family gatherings, holiday celebrations, or simply as a sweet indulgence on a cozy afternoon. Plus, the versatility means you can customize them to your liking, with options to add raisins, nuts, or even chocolate chips for that extra touch of indulgence.
Eager to make your very own batch of homemade butter tarts? This unique recipe will guide you through every step, ensuring you end up with tarts that not only taste amazing but fill your kitchen with a delightful aroma. So grab your apron and let’s dive into the world of homemade butter tarts, where every bite tells a story!
Key Benefits of Homemade Butter Tarts
Why You’ll Love This Recipe
- Delicious Flavor: The combination of buttery crust and sweet filling creates a perfect taste sensation.
- Easy to Make: Simple ingredients and straightforward steps allow even novice bakers to create a delicious dessert.
- Customizable: Add your favorite ingredients like pecans, walnuts, or dried fruit for a personalized touch.
- Perfect for Any Occasion: Serve them at parties, potlucks, or family gatherings for a sweet treat that everyone will enjoy.
- Traditional Appeal: These tarts are a beloved classic in Canadian cuisine, making them a delightful way to connect with tradition.
- Make Ahead: Prepare the dough and filling in advance for stress-free assembling and baking later.
What Makes It Stand Out
What truly sets homemade butter tarts apart from other desserts is their rich history and cultural significance. Hailing from Canada, these tarts have been cherished for generations, often associated with family gatherings and special occasions. The beauty of this recipe lies in its simplicity, yet it offers endless opportunities for customization, allowing you to experiment with different flavor combinations as you discover what you love most.
From the smooth, buttery texture of the filling to the delicate crunch of the edges, every aspect of these tarts is designed to delight your taste buds. Whether you prefer your filling gooey or set, the choice lies in how long you bake them, allowing you to create a personalized dessert experience everyone will love.
Ingredients for Homemade Butter Tarts
Complete Ingredient List with Measurements
- 1 cup unsalted butter, softened
- 1 cup brown sugar, packed
- 1 cup corn syrup
- 2 large eggs
- 1 teaspoon vanilla extract
- 1 cup raisins or pecans (optional)
- 1 1/2 cups all-purpose flour
- 1/2 teaspoon salt
Substitutes and Alternatives
If you have dietary restrictions or allergies, don’t worry—there are many substitutions you can make to whip up delicious homemade butter tarts. For those needing a vegan option, you can substitute the eggs with flaxseed meal mixed with water, and replace the butter with plant-based margarine.
Need a gluten-free option? Simply swap the all-purpose flour with a gluten-free flour blend. You can also experiment with different sweeteners, such as maple syrup or agave nectar, to cater to your preferences. Remember, substituting ingredients might alter the taste and texture slightly, so feel free to adjust as per your liking.
How to Make Homemade Butter Tarts – Step-by-Step Directions
Step 1 – Prepare Ingredients
Start by gathering your ingredients to streamline the process. Softening the butter will help it cream nicely with the brown sugar. Measure out your corn syrup, eggs, and any optional extras like raisins or pecans to ensure everything is ready when you need it.
Step 2 – Cook the Base
Preheat your oven to 375°F (190°C). In a large mixing bowl, cream together the softened unsalted butter and packed brown sugar until the mixture is light and fluffy. This should take about 2–3 minutes using an electric mixer, or a little longer by hand. The airy texture will help create a wonderful flaky crust.
Step 3 – Combine Wet Ingredients
Next, stir in the corn syrup, eggs, and vanilla extract to your creamed mixture. Mix until well combined, ensuring that everything is smoothly integrated. This mixture is the foundation of your filling, so feel free to taste it—yum!
Step 4 – Add Optional Mix-Ins
If you want to add a twist to your homemade butter tarts, now is the time to fold in your optional raisins or chopped pecans. These additions bring a delightful texture and flavor contrast to the sweet filling.
Step 5 – Prepare the Dough
Now, in another bowl, combine the all-purpose flour and salt. Gradually add this dry mixture to the wet mixture until just combined. The dough should come together without overworking it, leading to a flaky crust. If the dough feels too sticky, you can refrigerate it for about 30 minutes.
Step 6 – Roll Out and Cut the Dough
Flour your work surface and roll the dough out until it’s about 1/4 inch thick. Use a round cutter or glass to cut out circles that will fit into your greased muffin tin. This should yield around 12–16 circles depending on the size.
Step 7 – Fit the Dough into Muffin Tin
Carefully fit each circle into the cups of your muffin tin. Gently press down to ensure they mold to the shape. These will be the adorable shells that hold your filling.
Step 8 – Fill with Butter Tart Mixture
Spoon the buttery filling into each prepared shell, filling them about two-thirds full. Be careful not to overfill, as they will puff up slightly while baking.
Step 9 – Bake to Perfection
Place the muffin tin in your preheated oven and bake for 15–20 minutes, or until the filling is set, and the edges of the crust are a lovely golden brown. A toothpick inserted in the filling should come out clean to ensure they are perfectly baked.
Step 10 – Cool and Serve
Once baked, remove the tin from the oven and allow the tarts to cool in the pan for about 10 minutes. Then transfer them to a wire rack to cool completely before serving. These homemade butter tarts are best enjoyed slightly warm but can be stored for later.
Serving Suggestions for Homemade Butter Tarts
Best Occasions to Serve This Dish
Homemade butter tarts are versatile and can be served on various occasions. They are perfect for holiday gatherings, family reunions, or as a sweet ending to a cozy dinner. Their charm makes them ideal for potlucks or bake sales, sure to impress everyone who tries them.
What to Serve With It
Pair your homemade butter tarts with a scoop of vanilla ice cream for an indulgent dessert experience. A side of fresh fruit can also add a pop of color and freshness to the plate. Alternatively, enjoy them with a warm cup of tea or coffee for a delightful afternoon treat.
How to Store Homemade Butter Tarts Properly
Best Storage Practices
Once cooled, store homemade butter tarts in an airtight container at room temperature for up to 3 days. If you need to keep them longer, refrigerate them, where they can last up to a week. Just be sure to allow them to come to room temperature before serving for the best flavor and texture.
Reheating and Freezing Tips
To reheat homemade butter tarts, place them in a preheated oven at 350°F (175°C) for about 10 minutes, or until warm. If you wish to freeze them, wrap each tart individually in plastic wrap, then place them in a freezer bag. They can maintain their quality for up to 3 months. To enjoy, simply thaw them overnight in the refrigerator before reheating.
Tips & Tricks for Homemade Butter Tarts
Mistakes to Avoid
- Overmixing the Dough: This can lead to tough, chewy crusts instead of the desired flaky texture.
- Incorrect Filling Level: Filling too high can lead to overflow during baking.
- Inadequate Cooling Time: Cutting into the tarts too soon can cause the filling to spill out. Allow them to cool completely.
- Skipping the Rolling Step: Make sure to roll out the dough; it ensures uniform thickness for even baking.
- Not Adjusting Baking Time: Keep an eye on your tarts as ovens can vary significantly in temper—bake just until golden brown.
Extra Tips for Better Results
- For a deeper flavor, consider browning the butter before using it in the recipe.
- Experiment with flavored extracts, such as almond or maple, for a unique twist.
- Add a pinch of cinnamon or nutmeg to the filling for a warm spice note.
- Always use fresh ingredients for the best results, particularly the eggs and dairy.
Recipe Variations of Homemade Butter Tarts
Creative Twists
Get creative with your homemade butter tarts by incorporating different flavors. For a chocolate twist, add chocolate chips to the filling for a rich, sweet surprise. You could also try a citrus version by adding lemon or orange zest to brighten the flavor. Another option is to swirl in caramel before baking for an added decadent touch.
Dietary Adjustments
For a vegan version, substitute flax eggs and plant-based butter. A gluten-free option can easily be made with gluten-free flour. Dairy-free variations can use almond or coconut milk for richness while avoiding dairy. These adjustments ensure everyone can enjoy the pleasure of homemade butter tarts.
Conclusion about Homemade Butter Tarts
Homemade butter tarts are a quintessential sweet treat that offers the perfect blend of nostalgia and flavor. Not only are they simple to make, but the satisfaction that comes from baking them from scratch is incomparable. Whether you enjoy them at a family gathering, share them with friends, or keep them all to yourself, these tarts promise to create happy moments with every bite. So gather your ingredients and experience the thrill of making your own delicious homemade butter tarts today!
FAQs about Homemade Butter Tarts
Can I make homemade butter tarts in advance?
Absolutely! You can prepare the dough and filling ahead of time and assemble them right before baking. This makes it easy to enjoy fresh tarts even during busy times.
How should I store leftover homemade butter tarts?
Store leftover tarts in an airtight container at room temperature for up to three days or in the refrigerator for up to a week.
Can I freeze homemade butter tarts?
Yes, homemade butter tarts freeze well. Wrap them individually and place them in a freezer-safe bag. They can last up to three months in the freezer.
What’s the best way to reheat leftover homemade butter tarts?
Reheat them in a preheated oven at 350°F (175°C) for about 10 minutes until warmed through.
Can I substitute brown sugar with white sugar?
While you can use white sugar, brown sugar adds a richer flavor. For best results, stick to brown sugar for that classic taste.
Do homemade butter tarts need to be refrigerated?
They can be kept at room temperature for 2-3 days, but refrigerating them can extend their shelf life to about a week.
Is it necessary to pre-bake the tart shells?
This recipe doesn’t require pre-baking, as the filling sets beautifully during the baking time.
Can I use a different sweetener for the filling?
Yes, you can substitute corn syrup with maple syrup or agave nectar; however, it may change the flavor and consistency slightly.
What’s the best way to serve homemade butter tarts?
They are best served slightly warm but can also be delicious at room temperature. Pairing with ice cream or a dollop of whipped cream enhances the experience.
Can I add more filling than recommended?
It’s best to fill them about two-thirds full to avoid spills while baking. Over-filling can cause issues during the baking process.

Homemade Butter Tarts
Ingredients
For the Tarts
- 1 cup unsalted butter, softened
- 1 cup brown sugar, packed
- 1 cup corn syrup
- 2 large eggs
- 1 teaspoon vanilla extract
- 1 cup raisins or pecans (optional) For optional mix-ins
- 1.5 cups all-purpose flour
- 0.5 teaspoon salt


Instructions
Preparation
- Gather your ingredients to streamline the process.
- Preheat your oven to 375°F (190°C).
- In a large mixing bowl, cream together the softened unsalted butter and packed brown sugar until light and fluffy.
Mixing
- Stir in the corn syrup, eggs, and vanilla extract until well combined.
- Fold in optional mix-ins like raisins or chopped pecans if desired.
Dough Preparation
- In another bowl, combine the all-purpose flour and salt. Gradually add this dry mixture to the wet mixture until just combined.
- Roll the dough out to about 1/4 inch thick and cut out circles for your muffin tin.
Assembling Tarts
- Fit each circle into the cups of your greased muffin tin.
- Spoon the buttery filling into each prepared shell, filling them about two-thirds full.
Baking
- Bake in the preheated oven for 15–20 minutes, or until filling is set and edges of crust are golden brown.
- Allow the tarts to cool for about 10 minutes in the pan before transferring them to a wire rack.