
This post may contain affiliate links. As an Amazon Associate, I earn from qualifying purchases at no extra cost to you.
Table of Contents
🍴 Top Kitchen Essentials You'll Love


Introduction to Burnt Honey Pie
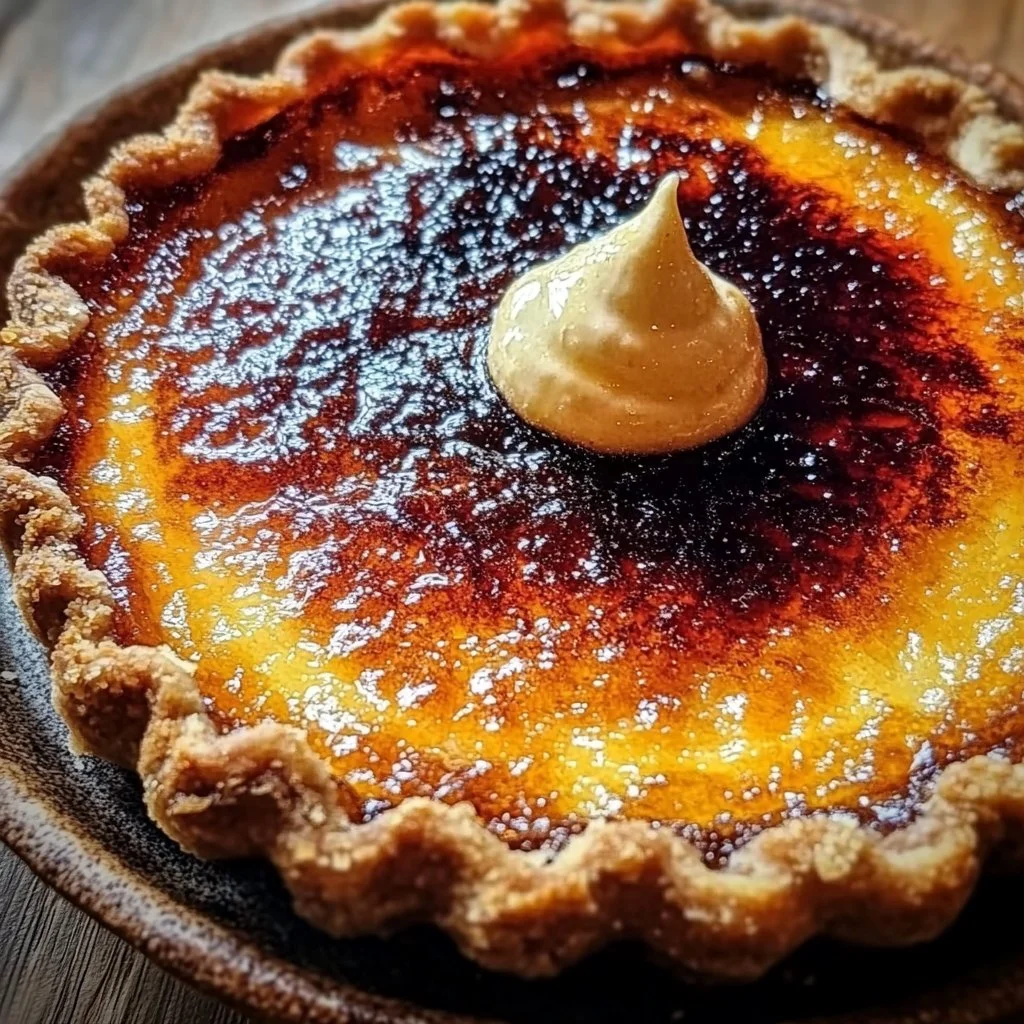
Have you ever tasted something that made you pause, closed your eyes, and transport you to a different place? That’s the magic of Burnt Honey Pie. It’s not your average dessert; it’s a decadent experience that brings together the deep, rich flavor of burnt honey with the creamy smoothness of custard filling. This pie isn’t just about sweetness; it’s about complexity, contrasting flavors, and a texture that delicately melts in your mouth.
What makes Burnt Honey Pie a standout dessert? For starters, it’s surprisingly simple to make yet packs an extraordinary flavor punch that leaves everyone wanting more. The process of caramelizing honey introduces a nutty, toasted flavor that elevates this dessert to new heights. It’s perfect for cozy family gatherings, formal dinners, or even a spontaneous treat for yourself after a long day.
Are you ready to impress your friends and family with a dessert that looks as breathtaking as it tastes? With an easy-to-follow method and common ingredients, Burnt Honey Pie is a recipe you’ll return to time and time again. Not only will you savor every bite, but you’ll also bask in the compliments that come your way when you serve this gorgeous pie. Let’s dive deeper into what makes this dessert so special!
Key Benefits of Burnt Honey Pie
Why You’ll Love This Recipe
- Rich Flavor: The deep caramel notes of burnt honey make every slice a heavenly treat.
- Simple Ingredients: With just a handful of common pantry staples, it’s approachable for home bakers.
- Impressive Presentation: The golden-brown pie with its smooth filling looks stunning on any table.
- Versatile: Enjoy it on its own, or serve it with whipped cream, fruit, or chocolate sauce for extra indulgence.
- Perfect for Any Occasion: Whether it’s a holiday dinner or a casual get-together, this pie shines in any setting.
- Easy to Customize: You can adjust the recipe with different spices or toppings to cater to your taste.
What Makes It Stand Out
Burnt Honey Pie is truly unique because it transforms a candy-like sweetness into a sophisticated flavor profile. The burnt honey process adds an incredible depth that many desserts lack. This recipe stands tall against traditional pies and desserts, combining influences from various cuisines while maintaining its identity.
Not only does this pie taste extraordinary, but it’s also a fantastic conversation starter. Imagine serving it and explaining how you caramelized the honey to create those rich flavors; it’s an artistic endeavor that everyone will appreciate. Moreover, the customization options allow you to infuse your personality into the pie, making it a true reflection of your culinary style.
Ingredients for Burnt Honey Pie
Complete Ingredient List with Measurements
- 1 cup honey
- 1 1/2 cups heavy cream
- 3 large eggs
- 1/4 cup granulated sugar
- 1 teaspoon vanilla extract
- 1/4 teaspoon salt
- 1 pre-made pie crust (9 inches)
- 2 tablespoons unsalted butter, melted
- 1 tablespoon cornstarch
Substitutes and Alternatives
If you have allergies or dietary restrictions, don’t fret. There are several easy swaps to modify the Burnt Honey Pie recipe. For example, you can use maple syrup instead of honey to keep the sweetness while imparting a different flavor. If you need a dairy-free option, consider using coconut cream in place of heavy cream, giving your pie a delightful tropical twist.
For those who are vegan, the eggs can be swapped with a mixture of ground flaxseed and water, creating a custard-like consistency. Granulated sugar can also be replaced with coconut sugar or a sugar substitute like Stevia, making this dessert friendlier for those watching their sugar intake. Just keep in mind that some substitutes may alter the flavor slightly, but they can still result in a delicious pie.
How to Make Burnt Honey Pie – Step-by-Step Directions
Step 1 – Prepare Ingredients
Start by gathering all your ingredients on the counter. Make sure your eggs and cream are at room temperature, as this helps in achieving a smooth filling. Preheat your oven to 350°F (175°C), so it’s ready when you’re done preparing the pie.
Step 2 – Cook the Base
In a medium saucepan, add the honey and place it over medium heat. Stir gently and allow it to heat until it bubbles, transforming from a viscous liquid to a deep amber hue. This process should take about 10 minutes. Watch closely to avoid burning the honey; you want that rich, nutty flavor without the bitterness that comes from overcooking.
Step 3 – Combine Cream and Sugar Mixture
In a mixing bowl, whisk together the heavy cream, eggs, granulated sugar, vanilla extract, and salt. Blend well until the mixture is completely homogeneous, ensuring there are no lumps. This is the creamy base that will envelop the burnt honey.
Step 4 – Incorporate the Burnt Honey
Carefully pour the burnt honey into your cream mixture while whisking continuously. The goal here is to combine the two without cooking the eggs. You should be able to see the honey swirling into the cream, creating a mesmerizing golden hue.
Step 5 – Add Butter and Cornstarch
Once the honey and cream are well mixed, it’s time to add the melted unsalted butter and cornstarch. Continue whisking until the mixture is completely smooth and free of clumps. The butter adds richness, while the cornstarch helps stabilize the filling and ensures it sets perfectly.
Step 6 – Pour Into Pie Crust
Take your pre-made pie crust and carefully pour the filling into it. Use a spatula to smooth the top, ensuring an even layer. The mixture will be liquid, so move with care to avoid spills.
Step 7 – Bake the Pie
Place the filled pie crust in the preheated oven. Bake for about 35–40 minutes. You’ll know it’s done when the edges are set, but the center still has a slight jiggle. Keep an eye on it toward the end of baking to prevent overcooking.
Step 8 – Cool at Room Temperature
Once baked, remove the pie from the oven and let it cool at room temperature for about an hour. This cooling period allows the filling to firm up a little more before chilling.
Step 9 – Refrigerate
To enhance the flavors and ensure a pristine texture, refrigerate the pie for at least 2 hours before serving. This step is crucial as it allows the custard to set completely, making it easier to slice.
Step 10 – Serve and Enjoy
When ready to serve, cut slices of the Burnt Honey Pie and garnish with a dollop of whipped cream or a drizzle of honey if desired. Enjoy this delicate dessert while it’s chilled; every bite is a delightful celebration of flavors.
Serving Suggestions for Burnt Honey Pie
Best Occasions to Serve This Dish
Burnt Honey Pie is an excellent choice for both formal and casual events. Whether you’re hosting a holiday dinner, a birthday celebration, or an intimate gathering with friends, this pie will undoubtedly steal the spotlight. Its unique flavor profile and stunning appearance make it a memorable dessert for any occasion.
Don’t hesitate to bring it to potlucks or family reunions either. This pie is an instant conversation starter that showcases your baking skills and creativity. With its rich and delightful flavor, everyone will be talking about the pie long after the meal is over.
What to Serve With It
Pair your Burnt Honey Pie with a variety of accompaniments to elevate the dessert experience. A light drizzle of honey adds an extra layer of sweetness, while fresh fruits like berries or poached pears provide acidity and freshness.
Consider serving with a dollop of whipped cream, which adds a light and airy texture that balances the richness of the pie. A scoop of vanilla ice cream also offers a delightful contrast and keeps things cool and creamy. For those who enjoy a more complex flavor, a sprinkling of sea salt over the whipped cream can truly enhance the sweetness of the pie.
How to Store Burnt Honey Pie Properly
Best Storage Practices
To store Burnt Honey Pie properly, keep it covered in the refrigerator. Use plastic wrap or aluminum foil to protect it from drying out and to keep other odors at bay. This pie is best consumed within 3-4 days, as the filling can gradually lose its textures, becoming less creamy over time.
If you have leftovers, consider slicing individual pieces before storing them. This will make it easy to grab a slice whenever you want a sweet treat without exposing the entire pie to air each time.
Reheating and Freezing Tips
If you’d like to enjoy Burnt Honey Pie warm, you can reheat individual slices in the microwave for about 15-20 seconds. Be cautious not to overheat, as this can alter the filling’s creamy texture.
For long-term storage, Burnt Honey Pie can be frozen. Wrap it tightly in plastic wrap, then in foil to prevent freezer burn. When you’re ready to enjoy frozen leftovers, thaw in the fridge overnight before serving. The thawing process will maintain the pie’s structure and flavor, allowing you to savor that delicious taste again.
Tips & Tricks for Burnt Honey Pie
Mistakes to Avoid
1 – Not Watching the Honey Closely
Honey can go from perfect to burnt in seconds, so keep a close eye on it. Stir occasionally to prevent uneven coloring or burning.
2 – Skipping the Cooling Step
Allowing the pie to cool before refrigerating is essential. This helps the filling set properly and prevents a watery texture when serving.
3 – Overbaking the Pie
Avoid overbaking by checking for jiggle in the center. It should be slightly wobbly when you take it out of the oven, ensuring a custard-like texture.
4 – Using Cold Ingredients
Cold cream and eggs can result in a lumpy filling. Ensure all ingredients are at room temperature for a smoother mixture.
5 – Neglecting to Whisk Continuously
When adding burnt honey to the cream mixture, continuous whisking is crucial to prevent cooking the eggs and achieving a lumpy consistency.
Extra Tips for Better Results
To enhance the flavor of your Burnt Honey Pie, consider adding spices like cinnamon or nutmeg to the filling. These warm spices complement the honey beautifully and add depth to the overall flavor.
For presentation, consider garnishing with candied nuts or a scattering of edible flowers for a chic look. A light dusting of cocoa powder or powdered sugar can make it even more visually appealing while adding a touch of sweetness.
Recipe Variations of Burnt Honey Pie
Creative Twists
1 – Citrus Burst
Incorporate citrus zest, like orange or lemon, into the filling to add a refreshing zing. This brightens the flavors, making the pie even more appealing during warm weather.
2 – Chocolate Swirl
Add melted chocolate into the mix before pouring it into the pie crust for a rich chocolate-honey hybrid dessert. This variation is perfect for chocolate lovers.
3 – Nutty Addition
Fold in finely chopped nuts, such as pecans or walnuts, into the filling. The nuts add a delightful crunch, contrasting beautifully with the smooth texture of the pie.
4 – Spiced Pumpkin Honey Pie
During fall, incorporate pumpkin puree and pumpkin spice into your filling for a seasonal twist that merges the flavors of pumpkin pie with the unique burnt honey essence.
Dietary Adjustments
For a vegan Burnt Honey Pie, use maple syrup instead of honey, and replace eggs with flaxseed meals mixed with water. Swap heavy cream with coconut cream for a deliciously tropical take.
If you’re aiming for gluten-free options, consider using a gluten-free pie crust or even making a crust out of ground almonds or oats. Always check the ingredient label to ensure it meets your dietary needs, particularly for pre-made products.
Conclusion about Burnt Honey Pie
Burnt Honey Pie is not just a dessert; it’s an experience that marries flavor and simplicity in the most delicious way. With its unique burnt honey flavor, creamy custard, and versatile pairings, this pie has a place at every gathering. Whether you’re a seasoned baker or just starting, the straightforward steps will guide you in crafting a masterpiece that delights the palate.
So why not treat yourself and those you love to the exquisite taste of Burnt Honey Pie? The next time you’re looking to impress at a dinner party or simply craving something sweet, remember this recipe. The compliments from family and friends will be worth every bit of time you spent baking!
FAQs about Burnt Honey Pie
What makes Burnt Honey Pie unique?
Burnt Honey Pie stands out due to its rich caramel flavor sourced from burnt honey, which adds depth and complexity compared to regular sweet pies.
Can I use different sweeteners?
Yes, you can substitute honey with maple syrup or agave syrup for a different flavor profile while still achieving sweetness.
How can I tell when the pie is done?
Look for the edges to be set while the center remains slightly jiggly. It will firm up as it cools.
Can I make this pie ahead of time?
Absolutely! This pie can be made a day ahead and refrigerated, allowing the flavors to meld beautifully.
What is the best way to store leftovers?
Store leftovers in the fridge, tightly covered in plastic wrap or foil. It’s best consumed within 3-4 days.
Can I freeze Burnt Honey Pie?
Yes, you can freeze it. Wrap it tightly and store it in the freezer. Thaw in the fridge before serving.
What do I serve with Burnt Honey Pie?
Consider serving with whipped cream, fresh fruit, or a drizzle of honey. Ice cream also pairs wonderfully.
Can I customize this recipe?
Definitely! You can add spices, nuts, or even chocolate for creative twists that suit your taste preferences.

Burnt Honey Pie
Ingredients
For the Custard Filling
- 1 cup honey Caramelized for depth of flavor.
- 1.5 cups heavy cream Use dairy-free coconut cream for a lactose-free option.
- 3 large eggs Use a flaxseed meal mixture for a vegan alternative.
- 0.25 cup granulated sugar Coconut sugar can be used as a substitute.
- 1 teaspoon vanilla extract
- 0.25 teaspoon salt
- 2 tablespoons unsalted butter, melted
- 1 tablespoon cornstarch


Instructions
Preparation
- Gather all ingredients on the counter. Ensure eggs and cream are at room temperature.
- Preheat your oven to 350°F (175°C).
Cooking the Honey
- In a medium saucepan, heat the honey over medium heat, stirring gently until it bubbles and turns amber, about 10 minutes.
Mixing the Filling
- In a mixing bowl, whisk together heavy cream, eggs, sugar, vanilla, and salt until smooth.
- Carefully pour the burnt honey into the cream mixture while whisking continuously to avoid cooking the eggs.
- Add the melted butter and cornstarch, whisking until smooth.
Baking
- Pour the filling into the pre-made pie crust, smoothing the top.
- Bake for 35-40 minutes, until edges are set but center jiggles slightly.
- Let the pie cool at room temperature for about one hour.
- Refrigerate the pie for at least 2 hours before serving.
Serving
- Cut slices of the Burnt Honey Pie and garnish with whipped cream or a drizzle of honey.
- Enjoy chilled, celebrating the exquisite flavors.