
This post may contain affiliate links. As an Amazon Associate, I earn from qualifying purchases at no extra cost to you.
Table of Contents
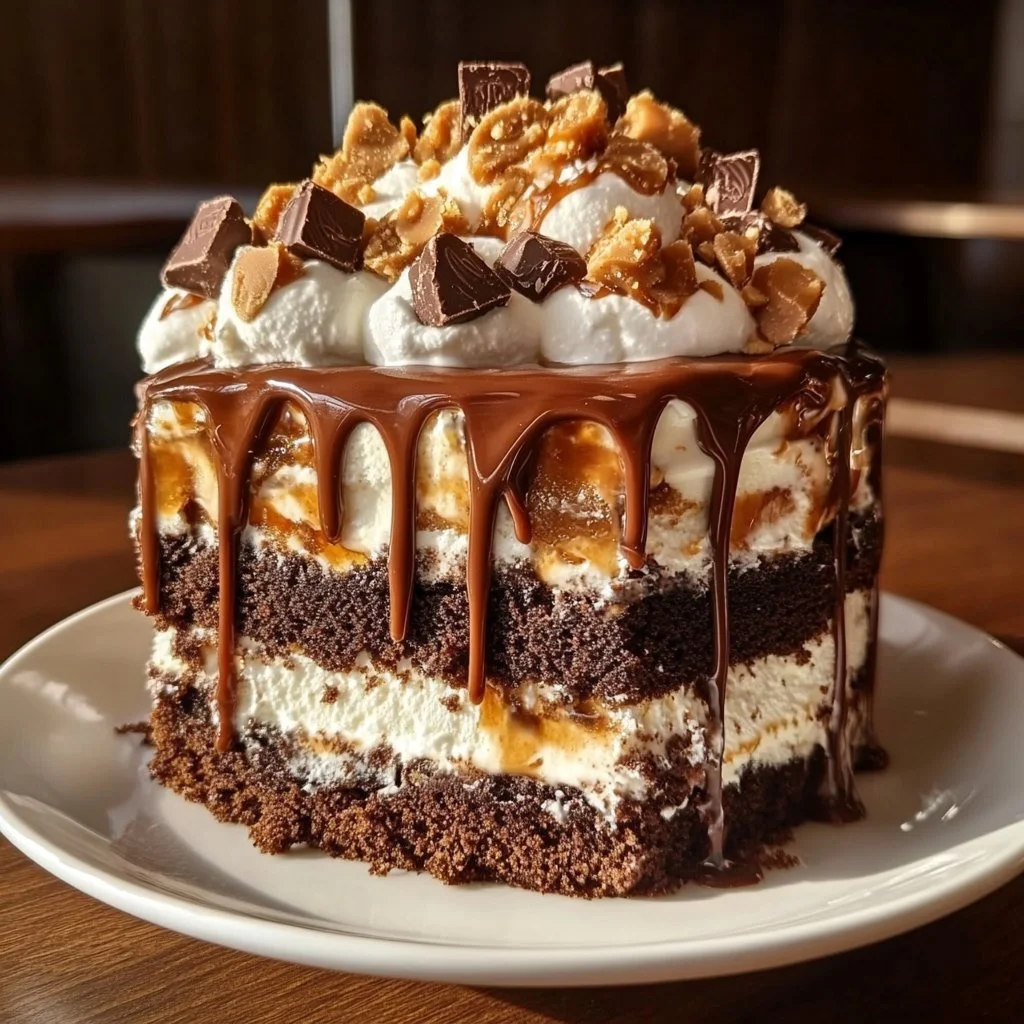
Have you ever craved a dessert that brings together the rich, chocolatey goodness of cake with the delightful creaminess of ice cream? Look no further than the Reese’s Ice Cream Sundae Cake. This indulgent treat is not only a feast for the eyes, but it also delivers an explosion of flavors that will please any crowd. With layers of chocolate cake, creamy vanilla ice cream, and smooth peanut butter, this cake is an irresistible concoction that you’ll find hard to resist.
Why is the Reese’s Ice Cream Sundae Cake so special? For starters, it combines the timeless favorite flavors of chocolate and peanut butter, topped with a traditional sundae twist that the whole family will adore. Imagine the excitement on your loved ones’ faces when they dig into a slice of this luscious cake, revealing the frozen ice cream layers hidden within. It’s a showstopper for birthdays, holidays, or any celebration—and the best part? It’s incredibly easy to make!
This recipe stands out because it can be tailored to accommodate preferences. Whether you’re a die-hard chocolate fan, a peanut butter lover, or simply someone who enjoys a delicious dessert, this cake ticks all the boxes. It’s versatile enough to suit various occasions, making it a reliable choice for gatherings where desserts matter. You might be wondering, “How can I make this cake my own?” Well, with a few clever changes in ingredients or presentation, you can turn this cake into your signature dessert.
Aside from its delicious flavor, another great aspect of the Reese’s Ice Cream Sundae Cake is its impressive simplicity. Even if you’re new to baking or are short on time, this recipe allows you to create a delightful offering with minimal fuss. The cake mix does most of the heavy lifting, giving you more time to relax and enjoy with family and friends. Ready to learn more about this fabulous dessert? Let’s dive into what makes this classic so irresistible.
🍴 Top Kitchen Essentials You'll Love


Key Benefits of Reese’s Ice Cream Sundae Cake
- Incredible Flavor: Rich chocolate and creamy peanut butter pair perfectly, creating a decadent dessert experience.
- Simplicity: Using a cake mix streamlines preparation, making it accessible for bakers of all skill levels.
- Versatility: You can incorporate various mix-ins and toppings to customize it to your taste.
- Family Appeal: This cake is sure to please kids and adults alike, making it ideal for gatherings.
- Perfect for Celebrations: It’s visually stunning and delicious, perfect for birthdays, holidays, or simply any day you fancy a treat.
What Makes It Stand Out
The Reese’s Ice Cream Sundae Cake stands out not just for its flavors but for its presentation as well. Layering cake, ice cream, and toppings creates a stunning visual effect that looks impressive on any dessert table. It’s sure to be the highlight of any meal, drawing everyone in with its tempting layers.
Customization is a significant feature of this recipe. You can mix and match according to your cravings, whether it’s adding crushed nuts, different ice cream flavors, or even a drizzle of caramel. The choices are endless, allowing you to make this dessert uniquely yours.
The occasions for serving this cake are varied and abundant. Whether it’s a special birthday celebration, a summer get-together, or a simple family dinner, this cake fits right in and makes the event feel like a celebration. Its refreshing ice cream layers are perfect for warming weather, while the chocolate cake brings comfort in any season.
Ingredients for Reese’s Ice Cream Sundae Cake
Here’s what you’ll need to whip up this delicious Reese’s Ice Cream Sundae Cake:
- 1 box chocolate cake mix
- 2 cups vanilla ice cream
- 1 cup smooth peanut butter
- 1 cup chopped Reese’s cups
- Whipped cream (for topping)
- Chocolate syrup (for drizzling)
This ingredient list is straightforward and includes easily accessible items. If you’re looking to elevate its taste even more, consider using high-quality chocolate or natural peanut butter. Pairing fresh toppings can also enhance the overall experience.
Substitutes and Alternatives
If you have dietary restrictions or are looking for alternatives, there are plenty of ways to swap out ingredients. For gluten-free options, use a certified gluten-free chocolate cake mix and ensure that your peanut butter and toppings are gluten-free as well.
For those seeking a lower-sugar option, consider using a sugar-free cake mix along with a natural sweetener in place of peanut butter or ice cream. Dairy-free alternatives are also easy to find; opt for coconut or almond milk-based ice creams and nut butters without added sugar to keep the recipe delicious yet diet-friendly.
How to Make Reese’s Ice Cream Sundae Cake – Step-by-Step Directions
Step 1 – Prepare Ingredients
Gather all your ingredients and ensure they’re at room temperature. This will help in mixing the cake batter more easily and creating better texture.
Step 2 – Cook the Base
Preheat your oven and prepare the chocolate cake mix as per package instructions. Once mixed, pour it into a greased cake pan and bake according to the recommended time until a toothpick inserted comes out clean.
Step 3 – Cool the Cake
After baking, remove the cake from the oven and let it cool completely on a wire rack. This step is crucial; it ensures that when you slice the cake, it won’t crumble and will hold its layers well.
Step 4 – Slice the Cake
Once completely cooled, carefully cut the cake horizontally in half to create two equal layers. Use a serrated knife for clean cuts, making sure to hold the cake steady as you slice through.
Step 5 – Layer with Peanut Butter
Spread a generous layer of smooth peanut butter on top of the bottom layer of the cake. This will serve as a delightful adhesive between the cake and ice cream.
Step 6 – Add Vanilla Ice Cream
Using a spatula, spoon a layer of vanilla ice cream over the peanut butter. Make sure to spread it evenly, ensuring it reaches the edges of the cake layer.
Step 7 – Sprinkle Reese’s Cups
Before placing the second layer of cake, sprinkle some chopped Reese’s cups over the ice cream, pushing them slightly into the ice cream for added texture and flavor.
Step 8 – Repeat Layering
Carefully place the second layer of chocolate cake on top. Repeat the process with peanut butter, ice cream, and more Reese’s cups, following the same pattern as before.
Step 9 – Top it Off
Once fully layered, dollop generous amounts of whipped cream over the top of the final layer. You can either pipe it on for a decorative look or use a spatula for a more rustic appearance.
Step 10 – Drizzle and Freeze
Finally, drizzle chocolate syrup generously over the whipped cream and let it cascade down the sides. Place the entire cake in the freezer for several hours to let it set properly before serving.
Serving Suggestions for Reese’s Ice Cream Sundae Cake
Best Occasions to Serve This Dish
The Reese’s Ice Cream Sundae Cake is perfect for almost any gathering. Birthdays become extra special with this cake at the center, and summer parties benefit from its refreshing layers. It’s equally lovely during festive gatherings or as a casual family dessert.
What to Serve With It
- Fresh Fruits: Berries or bananas make great complements, adding a fresh contrast to the rich cake.
- Ice Cream Scoops: Serve with extra scoops of vanilla or chocolate ice cream on the side.
- Beverages: Milkshakes, iced coffee, or even a sweet dessert wine can enhance the experience.
How to Store Reese’s Ice Cream Sundae Cake Properly
To keep your Reese’s Ice Cream Sundae Cake fresh, store it in the freezer in an airtight container. This will protect it from freezer burn while keeping its texture intact.
If you plan to eat it within a few days, a covered cake platter works fine. Just make sure to keep it in the coldest part of your freezer, ideally below 0°F.
Reheating and Freezing Tips
Thaw the cake in the refrigerator when ready to eat. Avoid microwaving; this could compromise the cake and ice cream layers. Instead, let it sit at room temperature for about 10 to 15 minutes to soften slightly before slicing and serving.
Tips & Tricks for Reese’s Ice Cream Sundae Cake
Mistakes to Avoid
- Not Cooling the Cake Completely: Make sure it’s entirely cooled before slicing; otherwise, it may crumble.
- Skip Over Measuring: Accurate measurements ensure consistent flavor and texture.
- Ice Cream Too Soft: Letting ice cream soften too much before layering can lead to a messy cake.
- Rushing the Freezing: Give it enough time to set properly in the freezer for the best texture when served.
- Ignoring Toppings: Not adding enough toppings can make the cake taste less indulgent.
Extra Tips for Better Results
- Use high-quality chocolate and peanut butter for a richer taste.
- Experiment with various toppings, like crushed nuts or caramel sauce, for an exciting twist.
- Consider drizzling the chocolate syrup just before serving for a striking presentation.
Recipe Variations of Reese’s Ice Cream Sundae Cake
Creative Twists
- Nutty Delight: Incorporate finely chopped nuts into the cake mix for added texture and flavor.
- Flavored Ice Cream: Swap vanilla ice cream for chocolate, cookies and cream, or even mint chocolate chip for a unique spin.
- Fruity Surprise: Add layers of fruit, like strawberries or bananas, between the cake and ice cream for a refreshing burst.
Dietary Adjustments
For a vegan version, use a plant-based cake mix combined with almond milk, a dairy-free ice cream, and a nut butter without additives. Gluten-free cake mixes are also widely available, making it easier for guests with dietary restrictions to enjoy this dessert.
Conclusion about Reese’s Ice Cream Sundae Cake
In conclusion, the Reese’s Ice Cream Sundae Cake brings joy and satisfaction to any dessert table. Its combination of chocolate cake, smooth peanut butter, and creamy vanilla ice cream creates a harmonious balance of flavors. This recipe is not only simple but also versatile, allowing you to customize it to your liking.
If you’re searching for an enjoyable dessert to impress friends and family, this cake is the answer. Its playful layers of indulgence will make special occasions unforgettable and transform everyday meals into celebrations. Don’t wait—try this recipe today and see how it can become a cherished favorite for all ages!
FAQs about Reese’s Ice Cream Sundae Cake
Can I prepare it ahead of time?
Yes, you can assemble the cake a day in advance and store it in the freezer until ready to serve.
Can I freeze it?
Absolutely! This cake freezes well and can last for up to two months in the freezer.
How long does it last?
When properly stored in the freezer, it can last several weeks, but it’s best enjoyed within one to two weeks for optimal flavor.
What are the best substitutions?
You can substitute chocolate cake mix with vanilla or any other flavor, and use alternative ice creams or nut butter based on dietary needs.
Is this recipe family-friendly?
Yes! The Reese’s Ice Cream Sundae Cake is a hit among both kids and adults.
Can I make it gluten-free?
Certainly! Use a gluten-free chocolate cake mix and check that other ingredients are gluten-free.
How can I make it more chocolatey?
Try adding chocolate chips to the cake mix or using chocolate ice cream instead of vanilla.
Can I decorate it differently?
Yes! Get creative with toppings; try fruit, different chocolates, or themed decorations for holidays.
What if I don’t like peanut butter?
You can replace the peanut butter with other nut butters or leave it out entirely, adding more ice cream instead.
How should I serve it?
Slice it with a warm knife for cleaner cuts, and serve immediately after cutting for the best texture.
Decadent Ice Cream Sundae Cake
Equipment
- Mixing Bowl
- Cake Pan
- Spatula
- Knife
- Freezer-safe Container
Ingredients
Main Ingredients
- 1 box chocolate cake mix prepared according to package instructions
- 2 cups vanilla ice cream slightly softened
- 1 cup smooth peanut butter
- 1 cup chopped Reese’s cups
- whipped cream for topping
- chocolate syrup for drizzling


Instructions
- Preheat your oven and prepare the chocolate cake mix according to the package instructions. Bake until a toothpick inserted comes out clean.
- Let the cake cool completely on a wire rack. This ensures clean slices and prevents melting during layering.
- Once cooled, carefully slice the cake horizontally into two even layers using a serrated knife.
- Spread a layer of smooth peanut butter over the bottom cake layer, then top it with a layer of vanilla ice cream. Sprinkle chopped Reese’s cups on top.
- Place the second cake layer on top and repeat the process with peanut butter, ice cream, and Reese’s cups.
- Top the cake with whipped cream and drizzle with chocolate syrup for a decadent finish.
- Freeze the assembled cake for at least 4 hours (or overnight) until fully set before serving.