
This post may contain affiliate links. As an Amazon Associate, I earn from qualifying purchases at no extra cost to you.
Table of Contents
🍴 Top Kitchen Essentials You'll Love


Introduction to Key Lime Pie Bars
Are you looking for a dessert that brings a taste of sunshine to your table? Look no further than Key Lime Pie Bars. These delightful treats embody the perfect balance of sweet and tangy flavors that can brighten up any occasion. Whether you’re hosting a gathering, celebrating a birthday, or simply satisfying a craving, these bars are an irresistible option.
What makes Key Lime Pie Bars unique is their incredible flavor profile combined with a refreshing twist. The creamy filling is infused with zesty Key lime juice and zest, creating a refreshing treat that embodies the essence of summer. Not only are they delicious, but they are also surprisingly easy to prepare. With minimal ingredients and simple steps, you can whip up a batch in no time.
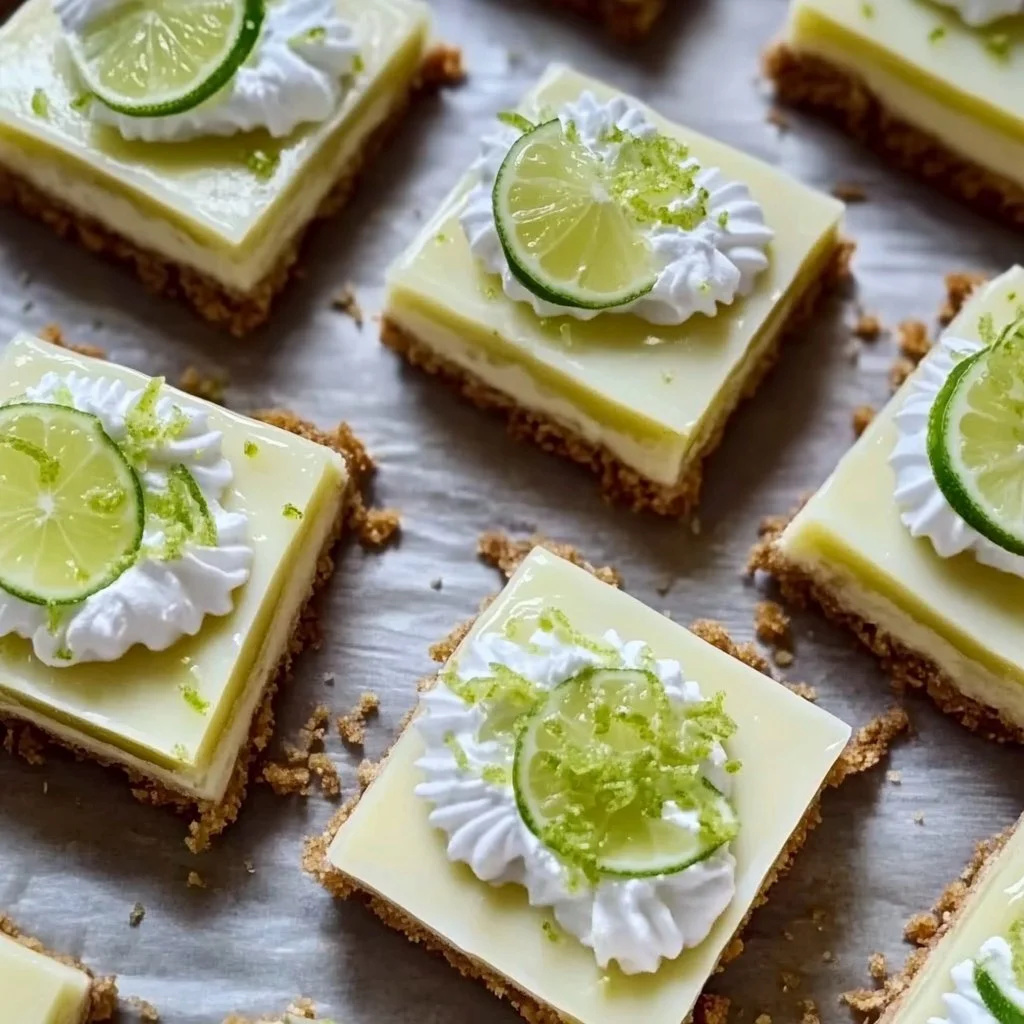
These bars are not just a dessert; they’re an experience. Each square offers a burst of flavor that transports you to a tropical paradise with every bite. The buttery graham cracker crust perfectly complements the smooth filling, making for a texture contrast that elevates this dessert to new heights. If you’ve been searching for a sweet treat that everyone will rave about, Key Lime Pie Bars might just be your answer.
Key Benefits of Key Lime Pie Bars
Why You’ll Love This Recipe
- Refreshing balance of sweet and tart flavors.
- Easy preparation with minimal ingredients.
- Perfect for summer gatherings or special occasions.
- Can be made in advance for convenient entertaining.
- Versatile dessert that appeals to both kids and adults.
- Deliciously creamy texture with a crunchy crust.
What Makes It Stand Out
Key Lime Pie Bars stand out because of their delightful combination of flavors and textures. The rich and creamy filling, enhanced by the zesty lime, creates a taste sensation that’s hard to forget. Unlike traditional pie, these bars are easy to serve and can be enjoyed with your hands, making them perfect for parties or picnics.
Customization is another aspect that makes this recipe brilliant. You can adjust the sweetness or tartness to your liking, ensuring that each batch of Key Lime Pie Bars can be uniquely yours. They’re also a fantastic choice for various occasions, from summer barbecues to holiday parties or simply as a refreshing dessert to brighten your day.
Ingredients for Key Lime Pie Bars
Complete Ingredient List with Measurements
- 1 1/2 cups graham cracker crumbs
- 1/2 cup unsalted butter, melted
- 1/4 cup granulated sugar
- 2 (8 oz) packages cream cheese, softened
- 1 cup powdered sugar
- 1/2 cup Key lime juice
- 1 tablespoon Key lime zest
- 1 teaspoon vanilla extract
- Whipped cream (for topping)
Substitutes and Alternatives
If you have dietary restrictions or preferences, there are several substitutes you can use in this Key Lime Pie Bars recipe. For a gluten-free option, simply choose gluten-free graham cracker crumbs. If you prefer a dairy-free version, consider using a non-dairy cream cheese substitute that is available in most grocery stores.
In terms of sweetness, you can replace granulated sugar with coconut sugar or a sugar substitute like stevia or erythritol, especially if you’re watching your sugar intake. Adjusting the amount of lime juice can also help you find the perfect balance of tartness that suits your taste.
How to Make Key Lime Pie Bars – Step-by-Step Directions
Step 1 – Prepare Ingredients
Begin by gathering all your ingredients. Ensure the cream cheese is softened to room temperature for easy mixing. Preheat your oven to 350°F (175°C) to get it ready for the crust.
Step 2 – Cook the Base
In a mixing bowl, combine the graham cracker crumbs, melted butter, and granulated sugar. Mix well until crumbs are evenly coated. Press this mixture into the bottom of a greased 9×9-inch baking dish to form a compact crust.
Step 3 – Bake the Crust
Place the baking dish in the preheated oven and bake for about 10 minutes. The crust should be golden brown and fragrant. Remove from the oven and allow it to cool while preparing the filling.
Step 4 – Make the Cream Cheese Filling
In a separate bowl, beat the softened cream cheese and powdered sugar together until smooth and creamy. This will take about 2-3 minutes. Scrape the sides of the bowl to ensure everything mixes well.
Step 5 – Add Lime Ingredients
Next, add the Key lime juice, Key lime zest, and vanilla extract to the cream cheese mixture. Beat until fully combined and smooth. The mixture should be light and fluffy.
Step 6 – Pour and Spread the Filling
Pour the creamy Key lime filling over the cooled graham cracker crust. Use a spatula to spread it evenly across the surface.
Step 7 – Chill the Bars
Cover the baking dish with plastic wrap and refrigerate for at least 4 hours or overnight. This chilling time is crucial for the bars to set properly and achieve the perfect texture.
Step 8 – Slice the Bars
Once set, remove the bars from the refrigerator. Using a sharp knife, cut them into squares. Clean the knife between cuts for neat edges.
Step 9 – Serve with Whipped Cream
Serve each square topped with a dollop of whipped cream. This adds an extra layer of creaminess that complements the tangy filling beautifully.
Step 10 – Enjoy
Dig in and savor your homemade Key Lime Pie Bars. Share them with friends and family, and watch them disappear in no time!
Serving Suggestions for Key Lime Pie Bars
Best Occasions to Serve This Dish
These Key Lime Pie Bars are ideal for summer gatherings, barbecues, and outdoor picnics. Their refreshing flavor makes them a popular choice for hot days. They also make a delightful dessert for birthdays or any festive occasion, adding a tropical vibe to the celebration.
What to Serve With It
Pair these bars with fresh fruit, such as berries or tropical fruits, to enhance the flavor experience. A scoop of vanilla ice cream or a side of coconut sorbet would also complement the tanginess. For beverages, serve with iced tea, lemonade, or a light cocktail to keep the tropical theme going.
How to Store Key Lime Pie Bars Properly
Best Storage Practices
To keep your Key Lime Pie Bars fresh, store them in the refrigerator in an airtight container. They can generally last for up to a week, maintaining their flavor and texture. Make sure to cover them well to prevent any absorption of other odors from the fridge.
Reheating and Freezing Tips
These bars are best enjoyed cold, so reheating is usually not necessary. However, if you’d like to enjoy them slightly warmed, you can let them sit at room temperature for 15-20 minutes. If you need to freeze them, wrap individual pieces in plastic wrap and then place them in a freezer-safe container to avoid freezer burn. They can last about 2-3 months in the freezer.
Tips & Tricks for Key Lime Pie Bars
Mistakes to Avoid
- Not softening the cream cheese: Make sure the cream cheese is at room temperature for a smooth filling.
- Overbaking the crust: Monitor the crust closely to avoid it becoming too hard and dry.
- Skipping the chilling time: Allowing the bars to set properly ensures the ideal texture.
- Not pressing the crust firmly: Pressing the crust gives it stability and a nice texture.
- Using regular limes instead of Key limes: For an authentic taste, use real Key limes if possible.
Extra Tips for Better Results
Experiment with adding a little extra lime zest for a bolder flavor. You can also make a simple lime glaze to drizzle over the top before serving for added presentation. Consider garnishing with lime slices or fresh mint for extra color.
Recipe Variations of Key Lime Pie Bars
Creative Twists
- Mango Key Lime Bars: Add pureed mango to the filling for a tropical twist.
- Coconut Key Lime Bars: Incorporate unsweetened shredded coconut into the crust for added texture and flavor.
- Chocolate Drizzle: Top the bars with chocolate sauce for a decadent chocolate-lime combination.
Dietary Adjustments
For a vegan version, use coconut cream instead of cream cheese and a dairy-free butter substitute. Ensure your graham crackers are vegan-friendly. For a gluten-free adaptation, select gluten-free graham crackers and ensure other ingredients meet dietary needs.
Conclusion about Key Lime Pie Bars
In summary, Key Lime Pie Bars are an ideal dessert for anyone looking to impress friends and family without spending hours in the kitchen. Their vibrant flavor and creamy texture make them a standout choice that appeals to a wide audience. Not only are these bars easy to make, but they can also be enjoyed on various occasions, making them a versatile addition to your recipe repertoire. Whether you’re basking in the summer sun or celebrating a special event, these bars are sure to delight anyone who takes a bite. Give this recipe a try, and enjoy the refreshing zest of Key Lime Pie Bars at your next gathering!
FAQs about Key Lime Pie Bars
1 – Can I make Key Lime Pie Bars ahead of time?
Yes, these bars can be made a day or two in advance, making them a great choice for gatherings.
2 – How long do Key Lime Pie Bars last in the fridge?
They typically last about a week in the refrigerator if stored properly in an airtight container.
3 – Can I freeze Key Lime Pie Bars?
Absolutely! You can freeze them for 2-3 months. Just be sure to wrap them well to avoid freezer burn.
4 – What should I do if my filling is too runny?
If your filling turns out runny, it might need more chilling time. Make sure to let it set in the refrigerator for the recommended time.
5 – Can I adjust the sweetness of the bars?
Yes, you can add more or less sugar based on your personal taste preferences.
6 – Are Key Limes necessary for this recipe?
While regular limes can be used, true Key limes provide a unique flavor that enhances the bars.
7 – Can I use another type of crust?
Yes, you can experiment with different crusts like Oreo or almond flour crusts for a gluten-free option.
8 – How can I make this recipe vegan?
Substitute cream cheese with a non-dairy option and use a vegan butter alternative for the crust.
9 – What can I serve alongside Key Lime Pie Bars?
Consider pairing them with fresh fruit, coconut sorbet, or a dollop of whipped cream for extra creaminess.
10 – Do I need to use a springform pan?
No, a standard 9×9-inch baking dish works perfectly for this recipe without the need for a springform pan.

Key Lime Pie Bars
Ingredients
For the crust
- 1.5 cups graham cracker crumbs Can substitute with gluten-free graham cracker crumbs for a GF version.
- 0.5 cups unsalted butter, melted Use dairy-free butter for a dairy-free version.
- 0.25 cups granulated sugar Substitute with coconut sugar for a different sweetness.
For the filling
- 16 oz cream cheese, softened (2 packages) Dairy-free cream cheese can be used as a substitute.
- 1 cups powdered sugar Adjust to taste if you want more or less sweetness.
- 0.5 cups Key lime juice Freshly squeezed for the best flavor.
- 1 tablespoon Key lime zest More zest can be added for a bolder flavor.
- 1 teaspoon vanilla extract Pure vanilla extract is preferred.
- to taste Whipped cream (for topping) Use dairy-free whipped cream for a dairy-free version.


Instructions
Preparation
- Begin by gathering all your ingredients.
- Preheat your oven to 350°F (175°C) for the crust.
- In a mixing bowl, combine graham cracker crumbs, melted butter, and granulated sugar. Mix until crumbs are evenly coated.
- Press the mixture into the bottom of a greased 9×9-inch baking dish.
Baking
- Bake the crust in the preheated oven for about 10 minutes until golden brown and fragrant.
- Remove from the oven and let cool.
Filling
- In a bowl, beat the softened cream cheese and powdered sugar until smooth (about 2-3 minutes).
- Add the Key lime juice, zest, and vanilla extract. Beat until fully combined.
- Pour the Key lime filling over the cooled crust and spread it evenly.
Chilling and Serving
- Cover with plastic wrap and refrigerate for at least 4 hours or overnight to set.
- Once set, cut into squares and serve topped with whipped cream.
- Enjoy your homemade Key Lime Pie Bars!