
This post may contain affiliate links. As an Amazon Associate, I earn from qualifying purchases at no extra cost to you.
Table of Contents
🍴 Top Kitchen Essentials You'll Love


Introduction to Magic Candy Cane Cookies
When the holiday season rolls around, there’s nothing quite like the sweet aroma of freshly baked cookies filling your home. Among the myriad of festive treats that grace our tables, the Magic Candy Cane Cookies stand out with their whimsical, cheerful design and delightful peppermint flavor. But what exactly makes these cookies so special and irresistible?
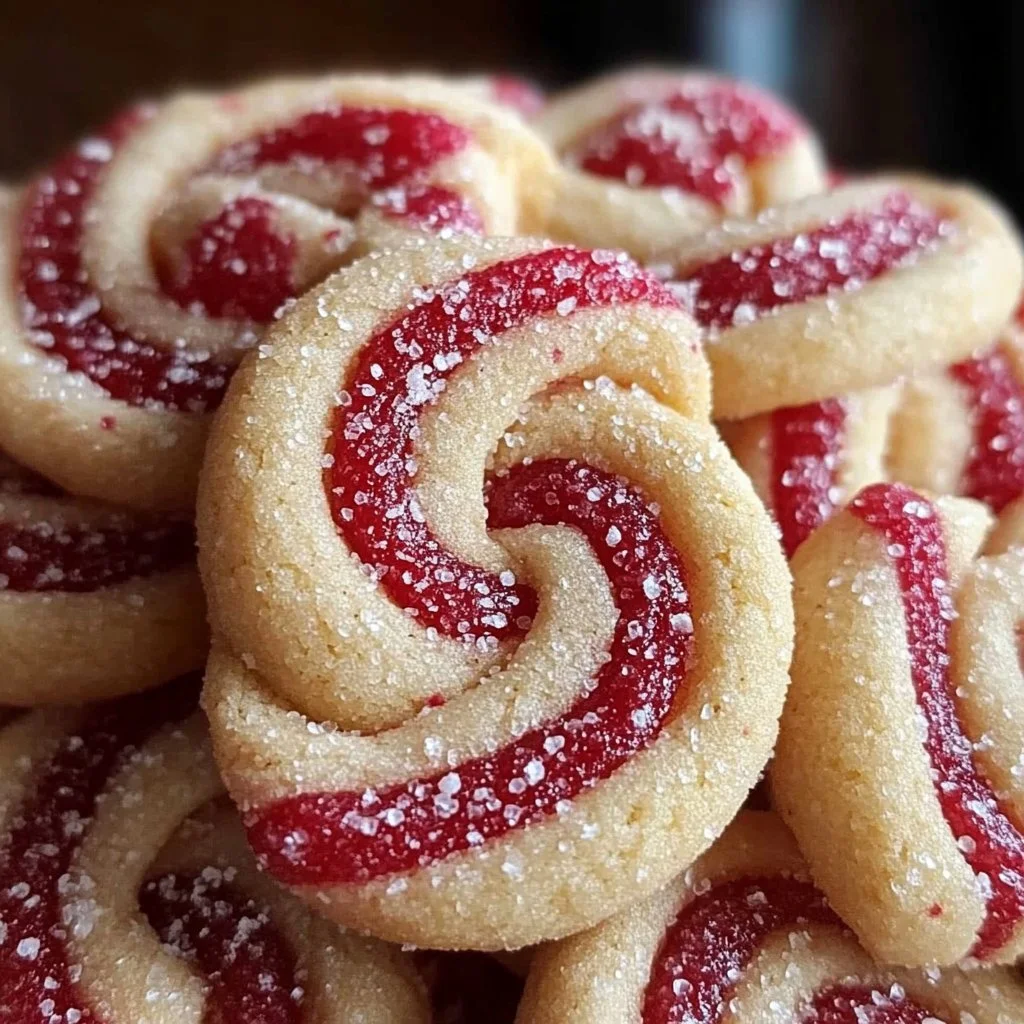
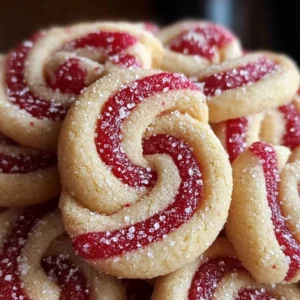
Imagine making a batch of cookies that not only tastes good but also looks like a piece of art. The classic red-and-white twists mimic the iconic candy canes we associate with Christmas and wintertime cheer. These cookies elevate your holiday baking, bringing joy not just to your palate but also to your eyes. Plus, the addition of peppermint extract introduces a refreshing minty flavor that dances on your tongue, making each bite a celebration.
What truly sets Magic Candy Cane Cookies apart is their uniqueness. Not only are they easy to prepare, but they also invite creativity. You can play around with the color intensity, shape, and even the size. They are perfect for creating memorable moments—think baking with loved ones, decorating together, or packaging them as homemade gifts for friends and family.
In today’s fast-paced world, recipes like Magic Candy Cane Cookies offer a delightful escape. They remind us of the joys of homemade treats, where every bite carries a sense of nostalgia and warmth. So why not roll up your sleeves, gather your ingredients, and embark on a baking adventure that promises delicious rewards?
Key Benefits of Magic Candy Cane Cookies
Why You’ll Love This Recipe
- Delicious Flavor: The combination of buttery sweetness and peppermint notes creates a festive flavor explosion.
- Simplicity: Easy to follow, this recipe makes baking approachable for everyone, from novices to seasoned bakers.
- Eye-Catching Design: The striking candy cane appearance transforms ordinary cookies into holiday showstoppers.
- Versatility: Modify the color or flavor to fit your personal style—ideal for any festive gathering.
- Great for Gifting: Beautifully packaged, these cookies make delightful gifts for friends, family, or holiday parties.
- Memorable Experience: Baking together can foster connections, creating new holiday traditions.
What Makes It Stand Out
Magic Candy Cane Cookies capture the spirit of the holiday season through their design and flavor. Unlike standard sugar cookies, the peppermint infusion gives them a distinct twist that is universally loved. These cookies can serve as a canvas for creativity; different decorations or colored dough can enhance their visual appeal, ensuring you can tailor them to suit your occasion.
These cookies are a hit for holiday parties, family gatherings, and as a festive treat for kids. With their vibrant colors and playful shape, they quickly become a topic of conversation. But beyond their visual charm, they embody the comfort and warmth of homemade treats, making them a necessary addition to your holiday baking lineup.
Ingredients for Magic Candy Cane Cookies
Complete Ingredient List with Measurements
- 225 g unsalted butter, softened
- 120 g powdered sugar
- 1 large egg, at room temperature
- 1 teaspoon vanilla extract
- 0.5 teaspoon peppermint extract
- 315 g all-purpose flour
- 0.5 teaspoon salt
- Red gel food coloring
Substitutes and Alternatives
If you’re seeking alternatives due to allergies or dietary preferences, don’t worry; there are options. For those with dairy restrictions, coconut oil or vegan butter can easily replace unsalted butter in the recipe. If gluten is a concern, consider using gluten-free all-purpose flour which should yield a similar texture.
For egg-free variants, you can substitute the egg with a flaxseed meal mixture—mix one tablespoon of flaxseed meal with three tablespoons of water, let it sit until it thickens, and use it as a binding agent.
How to Make Magic Candy Cane Cookies – Step-by-Step Directions
Step 1 – Prepare Ingredients
Begin by gathering all your ingredients. This includes measuring out the softened butter, powdered sugar, and other essential components. Ensure your butter is at room temperature for easy mixing.
Step 2 – Cook the Base
In a bowl, beat the softened butter with the powdered sugar until the mixture is smooth and fluffy. This step typically takes about 2-3 minutes with an electric mixer.
Step 3 – Add Eggs and Extracts
Mix in the large egg, followed by the vanilla extract and peppermint extract. Beat until fully combined; this typically takes another minute.
Step 4 – Combine Dry Ingredients
In a separate bowl, whisk together the all-purpose flour and salt. Gradually add this dry mixture to the wet ingredients, mixing until a soft dough forms. You’ll know it’s ready when the dough holds together without being sticky.
Step 5 – Divide the Dough
Once your dough comes together, divide it in half. One half will remain uncolored, while you tint the other with red gel food coloring. Mix thoroughly to achieve your desired shade.
Step 6 – Chill the Dough
Wrap each portion of dough in plastic wrap and place it in the refrigerator to chill for at least 1 hour. This will help the dough firm up, making it easier to roll.
Step 7 – Preheat the Oven
While the dough chills, preheat your oven to 180°C (350°F). This step is vital as it ensures your cookies bake evenly.
Step 8 – Roll the Dough
After chilling, remove the dough from the fridge. Roll equal portions of red and white dough into thin ropes. Aim for about 10-15 cm long to mimic traditional candy canes.
Step 9 – Shape the Cookies
Twist together a red and white rope, then bend one end to form the iconic candy cane shape. Place the shaped dough on a parchment-lined baking sheet, ensuring they are spaced appropriately.
Step 10 – Bake the Cookies
Bake the cookies in the preheated oven for 8 to 10 minutes, or until set but not browned. Allow them to cool on trays before serving, ensuring they retain their shape.
Serving Suggestions for Magic Candy Cane Cookies
Best Occasions to Serve This Dish
Magic Candy Cane Cookies are ideal for holiday occasions. Whether it’s Christmas, a winter party, or a festive family gathering, these cookies bring cheer and delight to all who taste them. They’re perfect for cookie exchanges or as a centerpiece for dessert tables.
What to Serve With It
These cookies pair wonderfully with hot beverages like cocoa, coffee, or tea. For a festive touch, serve them alongside whipped cream or peppermint-flavored ice cream for a delicious dessert experience.
How to Store Magic Candy Cane Cookies Properly
Best Storage Practices
To keep your Magic Candy Cane Cookies fresh, store them in an airtight container at room temperature. If you want to keep them longer, consider refrigerating them, where they can last for about a week.
Reheating and Freezing Tips
If you’ve made a larger batch and want to freeze them, ensure they are completely cool before placing them in a freezer-safe bag. Layer with parchment paper to prevent sticking. To thaw, simply remove them from the freezer and let sit at room temperature for about 30 minutes before enjoying.
Tips & Tricks for Magic Candy Cane Cookies
Mistakes to Avoid
- Overmixing: Be careful not to overmix your dough, as this can lead to tough cookies.
- Improper Chilling: Don’t skip chilling the dough; it’s crucial for shaping.
- Incorrect Baking Time: Keep an eye on your cookies to prevent overbaking—they should not brown too much.
- Coloring Issues: Use gel food coloring for vibrant colors; liquid food coloring may alter the dough’s texture.
- Inconsistent Sizes: Roll your dough evenly to ensure uniform baking times.
Extra Tips for Better Results
Consider adding crushed peppermint candies on top of your cookies before baking for an extra festive crunch. You might also want to experiment with various extracts, such as almond or vanilla, to create a different flavor profile that complements the peppermint.
Recipe Variations of Magic Candy Cane Cookies
Creative Twists
- Chocolate Twist: Add cocoa powder to one portion of the dough for a chocolate version of Magic Candy Cane Cookies, creating a delicious chocolate-and-peppermint combination.
- Sprinkle Toppings: Enhance your cookies after shaping them by adding festive colored sprinkles before baking. This adds a delightful crunch and an extra pop of color.
- Filled Version: Make a sandwich cookie with peppermint frosting in the center for a rich, creamy indulgence.
Dietary Adjustments
For a vegan version, replace the egg with a flaxseed meal mixture, and use vegan butter. For gluten-free cookies, swap out regular flour for a gluten-free blend, ensuring the dough maintains its right consistency.
Conclusion about Magic Candy Cane Cookies
Magic Candy Cane Cookies are not just delicious treats; they embody the spirit of the holiday season. Their beautiful appearance and delightful flavor make them perfect for any celebration, inviting both whispers of nostalgia and new traditions. As you gather your loved ones to bake these festive wonders, you create shared moments filled with laughter and joy. The ease of making this recipe makes it accessible for bakers of all levels, ensuring that anyone can join in on the fun. This holiday season, why not indulge in Magic Candy Cane Cookies? They are bound to become a treasured recipe in your household and a joyous addition to your holiday cheer.
FAQs about Magic Candy Cane Cookies
Can I make Magic Candy Cane Cookies ahead of time?
Yes, you can prepare the dough in advance and refrigerate it for up to a week. You can also freeze the shaped cookies before baking them.
What’s the best way to store Magic Candy Cane Cookies?
Store them in an airtight container at room temperature for up to a week. For longer storage, freeze them in a freezer-safe bag.
Can I use a different flavor extract?
Absolutely! While the traditional recipe uses peppermint extract, feel free to experiment with almond or other flavors to customize the taste.
How do I prevent the cookies from spreading while baking?
Ensure your butter is softened and not melted. Chilling the dough will also help the cookies maintain their shape during baking.
What adjustments can I make for allergies?
You can substitute butter with dairy-free margarine, and for eggs, use a flaxseed meal mixture. Gluten-free flour can replace all-purpose flour.
How do I freeze the cookies properly?
Allow the cookies to cool completely, then place them in a freezer-safe container with layers of parchment paper between cookies to prevent sticking.
Can I add chocolate to the cookie dough?
Yes! Incorporating cocoa powder or chocolate chips can create a scrumptious chocolate variation of Magic Candy Cane Cookies.
How long do baked cookies last?
Baked Magic Candy Cane Cookies can last about a week at room temperature in an airtight container, or a couple of months if properly frozen.
What can I serve with Magic Candy Cane Cookies?
These cookies pair well with hot cocoa, coffee, or peppermint-flavored ice cream for a festive dessert treat.
Do I need to decorate them?
Decorating is optional; the cookies are beautiful as is. However, adding icing or sprinkles can enhance their festive appeal.
Magic Candy Cane Cookies
Ingredients
For the cookie dough
- 225 g unsalted butter, softened Ensure it’s at room temperature
- 120 g powdered sugar
- 1 large egg, at room temperature
- 1 teaspoon vanilla extract
- 0.5 teaspoon peppermint extract
- 315 g all-purpose flour Use gluten-free alternative if needed
- 0.5 teaspoon salt
- 1 pack Red gel food coloring For coloring the dough


Instructions
Preparation
- Gather all ingredients, ensuring butter is softened.
- Beat softened butter and powdered sugar until smooth and fluffy (2-3 minutes).
- Mix in the egg, vanilla extract, and peppermint extract until fully combined (about 1 minute).
- In a separate bowl, whisk together flour and salt before gradually mixing it into the wet ingredients until a soft dough forms.
- Divide the dough in half. Leave one half uncolored and tint the other with red gel food coloring. Mix until desired shade is achieved.
- Wrap each portion of dough in plastic wrap and chill in the refrigerator for at least 1 hour.
- Preheat your oven to 180°C (350°F).
- Roll equal portions of red and white dough into thin ropes about 10-15 cm long and twist them together.
- Shape each twisted rope into a candy cane by bending one end.
- Place shaped cookies on a parchment-lined baking sheet with appropriate spacing.
- Bake cookies for 8-10 minutes or until set but not browned. Cool on trays before serving.