

This post may contain affiliate links. As an Amazon Associate, I earn from qualifying purchases at no extra cost to you.
Table of Contents
🍴 Top Kitchen Essentials You'll Love


Introduction to Mulberry Jam
Have you ever come across a fruit that captures the essence of summer in every luscious bite? If you haven’t yet tried making Mulberry Jam, you’re in for a delightful treat. This simple recipe transforms ripe mulberries into a delicious preserve that is perfect for spreading on toast, adding to desserts, or even using as a topping for yogurt. It’s not just a jam; it’s a spoonful of joy that brings back fond memories of picking berries under the warm sun.
What makes this recipe for Mulberry Jam truly special is its stunning color and rich flavor. Mulberries, with their juicy and slightly tart profile, lend themselves beautifully to this jam, creating a delightful balance that is both sweet and tangy. Imagine waking up to the inviting aroma of homemade jam wafting through your kitchen – there’s something undeniably satisfying about preparing it from scratch.
The charm of Mulberry Jam lies not only in its taste but also in its simplicity. With just a few ingredients and straightforward steps, you’ll be able to whip up a batch in no time. No need for complicated processes or fancy equipment; just your trusty pot and a little love. So why not gather some ripe mulberries and embark on a delicious adventure? After all, homemade preserves are the perfect way to celebrate seasonal fruit.
But that’s not all. Making Mulberry Jam is an opportunity to unleash your creativity in the kitchen. You can customize it to suit your taste, whether that means adding a hint of spice or experimenting with different sweeteners. The versatility of this jam also means you can enjoy it in various ways, making it a delightful addition to your culinary repertoire. Whether you’re looking to impress guests at a brunch or simply want to indulge in a sweet treat, Mulberry Jam fits the bill.
Key Benefits of Mulberry Jam
- Rich Flavor: Offers a perfect blend of sweetness and tartness.
- Simple Recipe: Easy to follow, requiring minimal ingredients.
- Versatile Usage: Can be used in desserts, on breakfast items, or even in marinades.
- Nutrient-Rich: Packed with vitamins and antioxidants from mulberries.
- Preserving Tradition: A homemade way to enjoy seasonal fruits and preserve their taste.
- Creative Customization: Easily tailored by adding spices or adjusting sweetness levels.
What Makes It Stand Out
Mulberry Jam stands out in the world of preserves for several reasons. Firstly, it celebrates the unique flavor profile of mulberries, a fruit often overshadowed by more common options like strawberries or blueberries. This jam allows you to showcase mulberries in their full glory, making them the star of your culinary creation.
Secondly, the process of making Mulberry Jam is incredibly rewarding. With just a few steps, you can transform fresh fruit into a luxurious treat that captures the essence of summer. The recipe is highly adaptable, meaning you can cater it to your personal taste preferences with ease. Whether you prefer a sweeter jam or a thicker consistency, this recipe provides a foundation for you to build upon.
Finally, homemade Mulberry Jam serves as a wonderful gift option. Nothing says “I care” quite like a jar of delicious jam made with love. Whether for birthdays, holidays, or just because, sharing your Mulberry Jam can brighten someone’s day and introduce them to the pleasures of homemade preserves.
Ingredients for Mulberry Jam
Complete Ingredient List with Measurements
- 2 cups ripe mulberries
- 1 cup sugar
- 1 tablespoon lemon juice
- 1 packet fruit pectin (optional, for thicker jam)
Substitutes and Alternatives
If you’re concerned about sugar content, you can easily swap the granulated sugar with honey or maple syrup. However, keep in mind that the taste and consistency might vary slightly.
For those with dietary restrictions, use a sugar substitute that suits your needs, such as agave nectar for a vegan option. If you’re looking for a pectin-free version, simply extend the cooking time to encourage the jam to thicken naturally. This way, you can still enjoy a delightful batch of Mulberry Jam while adhering to your dietary preferences.
How to Make Mulberry Jam – Step-by-Step Directions
Step 1 – Prepare Ingredients
Begin by gathering all your ingredients. Ensure that your mulberries are fresh, ripe, and cleaned thoroughly. Remove any stems or leaves, and gently wash the berries to remove dirt. Having everything ready will make the cooking process smoother and more enjoyable.
Step 2 – Cook the Base
In a large pot, combine the prepared mulberries, sugar, and lemon juice. The lemon juice is critical as it not only adds flavor but also helps in setting the jam. Gently mash the mulberries with a fork or potato masher, just enough to break them and release their juices.
Step 3 – Heat the Mixture
Set your pot over medium heat and bring the mixture to a gentle boil. Keep stirring frequently to prevent the mixture from sticking to the bottom of the pot. As it heats, you’ll notice the mulberries releasing more juices, creating a beautiful and fragrant base for your jam.
Step 4 – Add Pectin (Optional)
If you’re using fruit pectin for a thicker consistency, this is the time to add it in. Stir it well into the mixture and continue cooking according to the package instructions. If you’re opting for a pectin-free version, be patient and let the mixture simmer until it thickens on its own.
Step 5 – Check for Doneness
After simmering for about 20-30 minutes, it’s time to check the consistency of your Mulberry Jam. Use a spoon to drop a little of the mixture onto a cold plate. If it holds its shape and firms up as it cools, it’s ready to be removed from the heat.
Step 6 – Prepare Jars for Storage
While the jam is cooking, prepare your jars. Make sure they are clean and sterilized to prevent any contamination. You can do this by placing them in boiling water for a few minutes or running them through a dishwasher cycle.
Step 7 – Fill the Jars
Once the jam is ready, carefully pour it into the sterilized jars. Fill each jar almost to the top, leaving a small space (about half an inch) to allow for expansion as it cools.
Step 8 – Seal and Cool
Immediately seal the jars with lids. Allow them to cool at room temperature for a couple of hours before storing them in the refrigerator, or proceed with canning for longer-term storage.
Serving Suggestions for Mulberry Jam
Best Occasions to Serve This Dish
Mulberry Jam shines at breakfast tables, where it can be spread on fresh toast, croissants, or pancakes. It’s perfect for summer brunches, adding a touch of homemade charm to your gatherings. Serve it alongside a cheese platter at parties or as an accompaniment to savory dishes like grilled meats.
What to Serve With It
Pair Mulberry Jam with cream cheese for a delightful bagel topping. Consider it alongside ice cream for a unique sundae or stir it into yogurt for a sweet twist. It also complements cheese beautifully, so think of serving it with a selection of cheeses for a tasty hors d’oeuvre.
How to Store Mulberry Jam Properly
Best Storage Practices
To keep your Mulberry Jam fresh, store it in the refrigerator if you plan on using it within a few weeks. Ensure the jars are tightly sealed to prevent air from getting in. For longer storage, you can also process the jars in a boiling water bath to create a vacuum seal.
Reheating and Freezing Tips
If you need to thaw frozen Mulberry Jam, simply place it in the refrigerator overnight. For quick reheating, use the microwave, but be sure to warm it in short increments, stirring to avoid hot spots. Avoid boiling your jam again after storage, as this can alter the texture and flavor.
Tips & Tricks for Mulberry Jam
Mistakes to Avoid
1 – Not Cleaning Mulberries Properly: Be sure to remove all dirt and debris from berries before cooking, as this can affect the flavor.
2 – Overcooking: Keep a close eye on cooking times; overcooked jam can turn dark and caramelize.
3 – Skipping the Lemon Juice: Lemon juice is critical for flavor and preservation; don’t leave it out!
4 – Ignoring Texture Tests: Always conduct the plate test to check the thickness before removing from heat.
5 – Underestimating Jar Preparation: Always sterilize jars properly to ensure your jam lasts longer without spoilage.
Extra Tips for Better Results
Use ripe but not overripe mulberries for the best quality and flavor. Consider adding a pinch of cinnamon or vanilla extract for an extra flavor boost. For an appealing presentation, you can also place small labels on your jars with the date and type of jam.
Recipe Variations of Mulberry Jam
Creative Twists
1 – Spicy Mulberry Jam: Add a pinch of cayenne or chopped jalapeños for a sweet heat twist.
2 – Herb-Infused: Steep fresh herbs like thyme or mint while cooking for a refreshing experience.
3 – Citrus Medley: Blend in orange or lime zest for added depth and brightness.
4 – Mixed Berry Jam: Combine mulberries with other berries like raspberries or blackberries for a delightful medley.
Dietary Adjustments
For a vegan version, simply use a plant-based sweetener instead of sugar. To make this jam gluten-free, no adjustments are needed, as all ingredients are naturally gluten-free. Keep substitutions simple to ensure the best results while catering to dietary preferences.
Conclusion about Mulberry Jam
Making Mulberry Jam is about celebrating the exquisite flavor of mulberries and the joy of creating something delicious from scratch. This homemade preserve allows you to connect with seasonal fruit in a special way, transforming it into a delectable treat that can be enjoyed in countless ways.
Whether you choose to spread it on your morning toast or use it as a topping for desserts, the rich, sweet-tart flavor of your Mulberry Jam is sure to bring smiles. Plus, with its simple preparation process, anyone can master it with ease. Don’t miss out on the chance to savor this delightful jam and share it with friends and family. It’s a wonderful way to make lasting memories over something truly special.
FAQs about Mulberry Jam
How long can I store homemade Mulberry Jam?
Homemade Mulberry Jam can be stored in the fridge for 2-3 weeks. If canned properly, it can last for up to a year.
Can I make Mulberry Jam without pectin?
Yes, you can make Mulberry Jam without pectin. Just cook it longer to achieve the desired thickness.
What’s the best way to thaw frozen Mulberry Jam?
The best way to thaw frozen Mulberry Jam is by placing it in the refrigerator overnight. Alternatively, you can use a microwave on low settings.
Can I substitute sugar in this recipe?
Yes, you can substitute sugar with honey, agave syrup, or a sugar alternative, just note that taste and consistency may vary.
How do I know when my jam is ready?
Your jam is ready when it holds its shape on a cold plate and thickens slightly as it cools.
What if my Mulberry Jam is too runny?
If your jam turns out runny, you can re-cook it by adding another packet of pectin and simmering until it reaches the desired thickness.
Can I use frozen mulberries for this recipe?
Frozen mulberries can be used, although fresh ones provide a better flavor. Just allow them to thaw and drain excess liquid beforehand.
Is Mulberry Jam gluten-free?
Yes, Mulberry Jam is naturally gluten-free as it contains no wheat or gluten-containing ingredients.
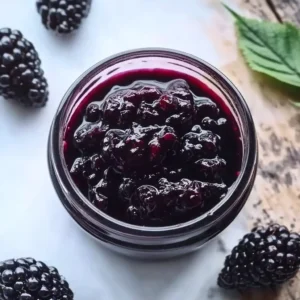
Mulberry Jam
Ingredients
Main Ingredients
- 2 cups ripe mulberries Fresh and ripe for best flavor
- 1 cup sugar Can be substituted with honey or maple syrup
- 1 tablespoon lemon juice Adds flavor and helps with jam setting
- 1 packet fruit pectin Optional, for thicker jam


Instructions
Preparation
- Gather all ingredients, ensuring mulberries are fresh and cleaned.
Cooking the Jam
- In a large pot, combine the prepared mulberries, sugar, and lemon juice.
- Mash the mulberries gently to release their juices.
- Set the pot over medium heat and bring the mixture to a gentle boil, stirring frequently.
- If using, add the fruit pectin and stir well according to package instructions.
- Simmer for 20-30 minutes until the mixture thickens.
- Perform a spoon test on a cold plate to check for consistency.
Jar Preparation
- Sterilize jars by placing them in boiling water or running through a dishwasher cycle.
- Fill sterilized jars with the jam, leaving half an inch of space at the top.
- Seal jars with lids and allow cooling.