
This post may contain affiliate links. As an Amazon Associate, I earn from qualifying purchases at no extra cost to you.
Table of Contents
🍴 Top Kitchen Essentials You'll Love


Introduction to No Bake Pumpkin Cheesecake Cones
Have you ever craved a dessert that perfectly blends creamy, sweet, and seasonal flavors? The No Bake Pumpkin Cheesecake Cones deliver just that and more! This delightful treat is not only easy to prepare but also incredibly satisfying. Imagine indulging in a rich, velvety pumpkin cheesecake filling nestled within a crispy cone—what’s not to love?
This recipe stands out for its simplicity and the ease with which it can be customized. Whether you make these for a festive gathering or just a treat for yourself, the No Bake Pumpkin Cheesecake Cones will surely impress. Their perfect blend of flavors truly brings autumn to life in every bite. These cones are a delicious way to celebrate the season and offer a unique twist on traditional pumpkin desserts.
The beauty of No Bake Pumpkin Cheesecake Cones lies in their versatility. You can serve them for Thanksgiving, Halloween parties, or even as a cozy family dessert after dinner. They require minimal effort and can be prepared in just a short amount of time, making them a favorite for busy bakers. Plus, they invite creativity—swap out ingredients and add personal touches to create your perfect version of these luscious cones!
Key Benefits of No Bake Pumpkin Cheesecake Cones
Why You’ll Love This Recipe
- Rich Flavor: The combination of cream cheese and pumpkin puree creates a delightful, creamy texture.
- No Baking Required: Save time and energy with this no-bake dessert.
- Easy to Customize: Make them your own by adding toppings or changing the flavors.
- Perfect for Fall: Capture the essence of autumn with pumpkin spice and warm flavors.
- Fun Presentation: Serving in cones adds a playful twist to your dessert table.
- Quick to Prepare: Ready in under 30 minutes, these cones are perfect for last-minute guests.
What Makes It Stand Out
What truly makes the No Bake Pumpkin Cheesecake Cones stand out is their whimsical presentation. Unlike traditional cheesecakes, serving this dessert in cones combines convenience with fun. It invites everyone to enjoy their dessert in a new and delightful way. The creamy filling paired with the crispy cones is a match made in dessert heaven.
You can also customize these cones according to your palate. Want to add a dash of chocolate? Sprinkle some crushed cookies on top? The possibilities are endless, making each cone a unique experience. Moreover, they store well in the fridge, letting you prepare them ahead and share the joy whenever you wish!
Ingredients for No Bake Pumpkin Cheesecake Cones
Complete Ingredient List with Measurements
- 1 cup cream cheese, softened
- 1 cup pumpkin puree
- 1/2 cup powdered sugar
- 1 teaspoon vanilla extract
- 1 teaspoon pumpkin pie spice
- Crispy cones
Substitutes and Alternatives
If you have dietary restrictions or allergies, there are several easy substitutes you can make. For a dairy-free version, consider using vegan cream cheese as a base. Pumpkin puree is naturally gluten-free, so those with gluten sensitivities can enjoy this recipe without worry. If you’re looking to cut down on sugar, you may replace powdered sugar with a sugar alternative suitable for baking.
Additionally, you can swap out the pumpkin pie spice for a blend of cinnamon, nutmeg, and ginger if you’re in a pinch. Tailoring the recipe to fit your dietary needs makes the No Bake Pumpkin Cheesecake Cones an inclusive dessert option suitable for everyone at the table!
How to Make No Bake Pumpkin Cheesecake Cones – Step-by-Step Directions
Step 1 – Prepare Ingredients
Gather all your ingredients and let the cream cheese sit at room temperature for about half an hour until softened. This will ensure a creamy filling without lumps.
Step 2 – Mix the Filling
In a mixing bowl, combine the softened cream cheese, pumpkin puree, powdered sugar, vanilla extract, and pumpkin pie spice. Using an electric mixer, blend the ingredients until they achieve a smooth and creamy consistency. This should take about 2-3 minutes.
Step 3 – Taste and Adjust
Take a moment to taste the filling. If you’d like a sweeter flavor, consider adding a little more powdered sugar. For those who love bold spices, an extra pinch of pumpkin pie spice can elevate the filling’s flavors.
Step 4 – Spoon into Cones
Using a spoon or piping bag, gently fill the crispy cones with the pumpkin cheesecake mixture. Be sure to fill each cone generously for a satisfying bite!
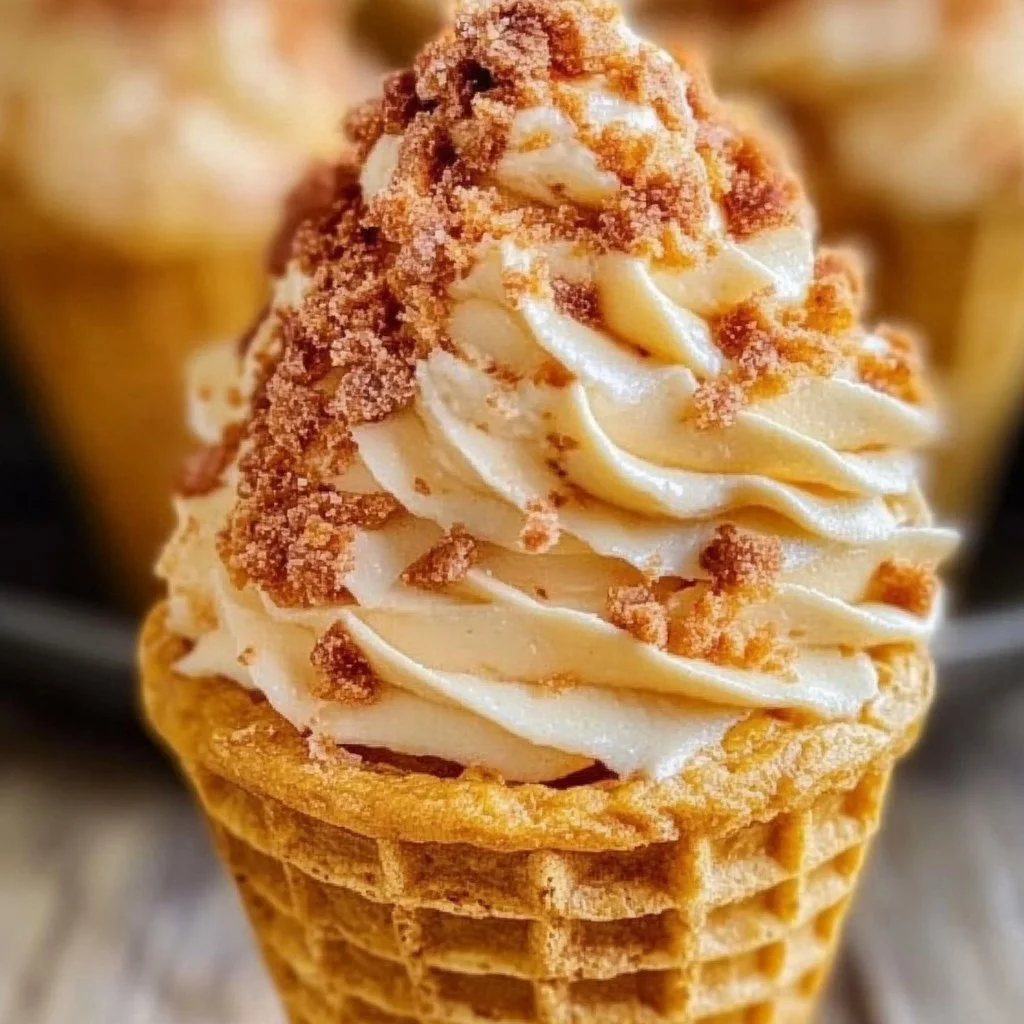
Step 5 – Decorate (Optional)
If you want to elevate your No Bake Pumpkin Cheesecake Cones even further, consider topping them with whipped cream and a sprinkle of cinnamon or crushed graham crackers for added texture. This step is optional but highly recommended for a beautiful finish.
Step 6 – Serve Immediately or Chill
You can serve the cones right away if you’re in a hurry. However, for the best texture, consider chilling them in the fridge for about 30 minutes. This allows the filling to set and makes them even creamier.
Step 7 – Presentation
For added flair, place the filled cones in a tall glass or a cone holder. This makes for an eye-catching display on your dessert table.
Step 8 – Enjoy!
Your No Bake Pumpkin Cheesecake Cones are now ready to be enjoyed! Dig in and savor the rich, creamy filling with the perfect crunch of the cone.
Serving Suggestions for No Bake Pumpkin Cheesecake Cones
Best Occasions to Serve This Dish
These delightful cones are perfect for a variety of occasions. Host a fall gathering or Thanksgiving dinner and serve them as a light, fun dessert. They also fit perfectly on a Halloween table for trick-or-treaters or as an after-dinner treat when entertaining friends during cozy evenings.
What to Serve With It
To complement your No Bake Pumpkin Cheesecake Cones, consider serving them with a cup of hot coffee or spiced cider. For a delightful contrast, some fresh fruits like apple slices or pears make a wonderful side. You can also add a dollop of whipped cream on top of the cones as an optional addition for extra decadence.
How to Store No Bake Pumpkin Cheesecake Cones Properly
Best Storage Practices
To keep your No Bake Pumpkin Cheesecake Cones fresh, store them in an airtight container in the refrigerator. They should be consumed within a few days, ideally before the cones start to get soggy from the filling. If you’ve made a large batch, consider keeping the filling and cones separate until you’re ready to serve.
Reheating and Freezing Tips
These cones are best enjoyed chilled, so no reheating is necessary. If you prepare the filling ahead of time, freeze it in a suitable container, and thaw in the fridge overnight before serving. However, it’s not recommended to freeze the filled cones, as the cones might lose their crunch.
Tips & Tricks for No Bake Pumpkin Cheesecake Cones
Mistakes to Avoid
- Not Softening the Cream Cheese: Ensure your cream cheese is properly softened to achieve a creamy texture; otherwise, lumps will form.
- Overmixing: Avoid mixing too long once combined, as this can introduce air into the filling and affect the texture.
- Skipping the Taste Test: Always taste your filling before serving; adjustments can enhance the flavor significantly.
- Using Stale Cones: Ensure your cones are fresh to maintain their crispiness.
- Filling Too Early: If filled too early, the cones may become soggy; fill them close to serving time.
Extra Tips for Better Results
- Experiment with Flavors: Try adding different spices or extracts like almond or maple to make the filling unique.
- Make it Seasonal: Add toppings that reflect the season, like candied nuts or autumn-themed sprinkles.
- Add Texture: Incorporate elements like toffee bits or crushed cookies for added crunch.
Recipe Variations of No Bake Pumpkin Cheesecake Cones
Creative Twists
- Chocolate Pumpkin Cheesecake Cones: Mix melted chocolate into the filling for a rich chocolatey twist on the classic flavor.
- Caramel Drizzle: Add a drizzle of caramel sauce on top of the cones for an indulgent touch.
- Mini Versions: Create mini cones for a bite-sized treat that’s perfect for parties and gatherings.
Dietary Adjustments
For those with dairy or gluten restrictions, explore alternatives like almond or coconut cream for a dairy-free option. Use gluten-free cones for an entirely gluten-free dessert experience!
Conclusion about No Bake Pumpkin Cheesecake Cones
No Bake Pumpkin Cheesecake Cones are a fantastic way to indulge in the flavors of fall without the hassle of baking. Their creamy, spiced filling wrapped in a crispy cone offers an exciting twist on traditional desserts. Whether you’re hosting a festive gathering or simply treating yourself, these cones are versatile, easy to make, and incredibly delicious. The simplicity of the recipe paired with the option for customization makes it a hit for any occasion. So, gather your ingredients and dive into this indulgent and fun treat today—your taste buds will thank you!
FAQs about No Bake Pumpkin Cheesecake Cones
Can I make No Bake Pumpkin Cheesecake Cones ahead of time?
You can prepare the filling in advance and store it in the refrigerator for up to 3 days. Fill the cones right before serving for the best texture.
How long can I store No Bake Pumpkin Cheesecake Cones?
Store filled cones in an airtight container in the fridge for up to 2-3 days. They are best enjoyed fresh to keep the cones from getting soggy.
What should I do if the filling is too thick?
If your filling is too thick, you can mix in a little milk or cream to achieve a smoother consistency.
Can I freeze the No Bake Pumpkin Cheesecake filling?
Yes, you can freeze the filling in an airtight container. Just be sure to thaw it in the refrigerator before using it.
How can I make these cones healthier?
You can substitute the powdered sugar with a healthier sweetener like honey or agave for a more natural sweetening option.
What other toppings can I use?
Feel free to get creative with toppings! Consider using crushed nuts, chocolate shavings, or a drizzle of melted chocolate for extra flair.
Are these suitable for kids?
Absolutely! Kids often love the fun presentation and the creamy, sweet filling. Just keep an eye on the cones; they can be a bit messy!
Can I use store-bought pumpkin puree?
Yes, store-bought pumpkin puree works wonderfully. Just ensure it’s 100% pumpkin without added sugars or spices.

No Bake Pumpkin Cheesecake Cones
Ingredients
For the Cheesecake Filling
- 1 cup cream cheese, softened Make sure the cream cheese is at room temperature.
- 1 cup pumpkin puree Use 100% pumpkin puree without additives.
- ½ cup powdered sugar Can substitute with a sugar alternative for lower sugar option.
- 1 teaspoon vanilla extract Enhances the flavor profile.
- 1 teaspoon pumpkin pie spice Can be substituted with cinnamon, nutmeg, and ginger.
For Serving
- 6 pieces Crispy cones Use fresh cones to maintain crispiness.


Instructions
Preparation
- Gather all your ingredients and let the cream cheese sit at room temperature for about half an hour until softened.
- In a mixing bowl, combine the softened cream cheese, pumpkin puree, powdered sugar, vanilla extract, and pumpkin pie spice. Blend until smooth.
- Taste the filling and adjust sweetness or spice as desired.
Assembly
- Using a spoon or piping bag, fill the crispy cones with the pumpkin cheesecake mixture generously.
- Optional: Top with whipped cream and a sprinkle of cinnamon or crushed graham crackers for added texture.
Serving
- Serve immediately or chill in the fridge for about 30 minutes before serving for a creamy texture.
- For presentation, place filled cones in a tall glass or cone holder.
Enjoyment
- Your No Bake Pumpkin Cheesecake Cones are ready to be enjoyed! Savor the mix of the creamy filling with the crispy cone.