

This post may contain affiliate links. As an Amazon Associate, I earn from qualifying purchases at no extra cost to you.
Table of Contents
🍴 Top Kitchen Essentials You'll Love


Introduction to No-Bake Strawberry Fudge Squares
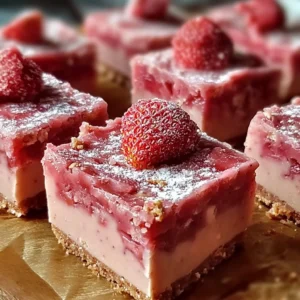
Looking for a delightful treat that combines the sweetness of strawberries with the creamy decadence of fudge? You are in the right place! No-Bake Strawberry Fudge Squares are not just any dessert; they are a mouthwatering, festive delight that can be enjoyed year-round. Imagine a rich, creamy base brimming with strawberry flavor, set atop a crunchy biscuit crust. Who wouldn’t want to indulge in that?
What makes this recipe special is its ease and the fact that it requires no baking—an absolute win for those busy days! With simple ingredients including white chocolate, strawberries, and condensed milk, the preparation is quick and straightforward. This is a dessert that even those new to cooking can master, making it a perfect choice for family gatherings, picnics, or an afternoon treat.
But what about flavor? Each bite is a burst of strawberry goodness softened by the creamy white chocolate, making it an irresistible combination. The No-Bake Strawberry Fudge Squares also allow for customization. Whether you want to use fresh strawberries or freeze-dried ones, this dessert adapts to your preferences.
In a world full of complicated recipes, it’s refreshing to see one that emphasizes simplicity without compromising on taste. So why not impress your friends and family with a treat that is both beautiful and easy to make? You will find that once you try this No-Bake Strawberry Fudge Squares recipe, it will become a staple in your collection.
Key Benefits of No-Bake Strawberry Fudge Squares
Why You’ll Love This Recipe
- Delicious Flavor: The combination of strawberries and white chocolate creates a symphony of flavors that complement each other beautifully.
- Easy Preparation: With no baking required, this recipe is perfect for beginners and busy cooks alike.
- Versatile: You can tweak it with different fruits or mix-ins to suit your preferences.
- Perfect for Sharing: These squares are easy to cut into portion sizes, making them ideal for parties and gatherings.
- Quick to Chill: Refrigeration takes just a few hours, so you’re never left waiting long for dessert.
- Eye-Catching Presentation: The vibrant pink hues from the strawberries make them visually appealing.
What Makes It Stand Out
The No-Bake Strawberry Fudge Squares stand out for their originality and simplicity. Unlike traditional fudge-making that requires time-consuming processes and precise temperatures, this recipe offers a straightforward approach. It allows even novice bakers to create gourmet treats without fear of failure.
Moreover, the ability to customize the fudge according to seasons and availability of ingredients gives it a unique edge. Want a lighter version for summer? You can use fresh strawberries. Craving something more intense? Freeze-dried strawberries will add that strong, concentrated flavor.
Whether it’s a birthday celebration, a family reunion, or just a cozy night in, these squares can adapt to any occasion. They are as perfect for a picnic as they are for a holiday gathering, ensuring that they will remain a mainstay in your dessert repertoire.
Ingredients for No-Bake Strawberry Fudge Squares
Complete Ingredient List with Measurements
- 7 oz digestive biscuits or graham crackers, finely crushed
- 3.5 oz unsalted butter, melted
- 7 oz white chocolate chips or chopped white chocolate
- 14 oz sweetened condensed milk (1 can)
- 1.75 oz freeze-dried strawberries, ground to fine powder (or 3.5 oz fresh strawberries, puréed and strained)
- 1 tsp pure vanilla extract
- Pinch of salt
- 1-2 drops pink or red gel food coloring (optional)
- Fresh strawberry slices (for garnish)
- Extra freeze-dried strawberry pieces or coarse sugar crystals (for garnish)
Substitutes and Alternatives
If you have dietary restrictions or allergies to certain ingredients in the No-Bake Strawberry Fudge Squares, you can easily find substitutes. For instance, if you’re gluten-sensitive, look for gluten-free biscuits to use as your base. Nut butters can also replace melted butter for a different base flavor.
If dairy is a concern, consider using dairy-free white chocolate chips and coconut milk in place of sweetened condensed milk. For those who want a lower-calorie option, substituting some of the sweetened condensed milk with a low-sugar alternative will also work. These adjustments ensure that everyone can enjoy this delicious treat!
How to Make No-Bake Strawberry Fudge Squares – Step-by-Step Directions
Step 1 – Prepare Ingredients
Start by gathering all your ingredients. If using fresh strawberries, wash and purée them, then strain to remove seeds. Crush your biscuits or graham crackers finely to ensure even mixing and texture in the crust.
Step 2 – Prepare the Pan
Line an 8-inch square baking pan with parchment paper. Make sure to leave a 1-inch overhang on two sides; this will help with easy removal later.
Step 3 – Make the Crust
In a large bowl, combine the finely crushed biscuits and melted butter. Mix thoroughly until all crumbs are moistened and the mixture holds together when pressed.
Step 4 – Press and Chill Crust
Firmly press the crumb mixture into the prepared pan in an even layer. Use a flat-bottomed glass or measuring cup for an even surface, and chill in the refrigerator for 10 minutes to set.
Step 5 – Melt Chocolate Base
In a medium heatproof bowl, add white chocolate chips and the sweetened condensed milk. Set this bowl over a saucepan filled with simmering water, creating a double boiler effect. Stir gently until the chocolate is completely melted and the mixture is smooth.
Step 6 – Add Strawberry Flavor
Remove the bowl from heat. Stir in the ground freeze-dried strawberry powder (or strained purée), pure vanilla extract, pinch of salt, and food coloring if desired. Mix until fully combined and the color is uniform.
Step 7 – Assemble the Fudge
Pour the strawberry fudge mixture over the chilled crust. Use a spatula to spread the mixture evenly into all corners of the pan.
Step 8 – Chill Until Firm
Cover the pan loosely with plastic wrap and refrigerate for a least 2-3 hours. You want the fudge layer to be firm to the touch.
Step 9 – Cut and Serve
Once firm, lift the fudge out of the pan using the parchment overhang. Place it on a cutting board, and slice into 16 squares using a sharp knife. Wipe the blade clean between cuts for neat servings.
Step 10 – Garnish and Enjoy
To serve, garnish each square with fresh strawberry slices or additional freeze-dried strawberry pieces as desired. These squares are best served chilled or at room temperature, slightly softened.
Serving Suggestions for No-Bake Strawberry Fudge Squares
Best Occasions to Serve This Dish
These No-Bake Strawberry Fudge Squares are incredibly versatile, making them suitable for any occasion. They shine at summer picnics, providing a refreshing dessert on warm days. Their beautiful presentation also makes them a hit at birthday parties or holiday gatherings.
If you’re hosting a casual get-together, slice them into bite-sized pieces to serve as finger food. They also make excellent gifts when wrapped in a decorative box, perfect for holidays or thank-you gestures.
What to Serve With It
Pair these fudge squares with a variety of beverages for an enhanced dessert experience. A cold glass of milk perfectly complements the sweet and creamy nature of the squares. For a more adult twist, serve them with sparkling wine or a fruity cocktail.
If you feel adventurous, scooping ice cream or whipped cream onto the side provides a delightful texture contrast. Fresh berries alongside or a drizzle of raspberry sauce can also elevate the visual appeal and flavor.
How to Store No-Bake Strawberry Fudge Squares Properly
Best Storage Practices
To ensure the longevity of your No-Bake Strawberry Fudge Squares, proper storage is key. Keep them in an airtight container in the refrigerator. They should last for about 5-7 days, retaining their freshness and flavor during this time.
For a longer-term solution, you can freeze the squares. Just make sure to wrap them tightly in plastic wrap and then place them in an airtight freezer bag. Properly stored, they can last up to three months in the freezer.
Reheating and Freezing Tips
When you’re ready to enjoy your frozen No-Bake Strawberry Fudge Squares, the best approach is to let them thaw in the refrigerator overnight. This helps retain their texture and flavor. If you’re in a hurry, you can leave them at room temperature for about an hour before serving.
If you want to serve them warm, you can place the squares in a microwave-safe dish and heat them in short increments, but take care not to melt them completely!
Tips & Tricks for No-Bake Strawberry Fudge Squares
Mistakes to Avoid
- Using Melted Chocolate Immediately: Allow the melted chocolate to cool slightly before mixing in other ingredients. Hot chocolate can affect the texture.
- Not Pressing the Crust Firmly: Make sure to firmly compress the crust into the pan; this prevents it from crumbling when you cut the squares.
- Skipping the Chilling Time: Be patient and let the fudge set properly in the fridge. Rushing this step leads to a softer fudge that may not hold its shape.
- Overmixing: When adding your strawberry flavor, mix just until combined. Overmixing can lead to a grainy texture.
- Using Low-Quality Ingredients: Higher quality white chocolate and fresh strawberries will enhance the flavor and overall experience.
Extra Tips for Better Results
To enhance the flavor and visual appeal of your No-Bake Strawberry Fudge Squares, consider adding a layer of chocolate drizzle on top before serving. A simple mixture of melted chocolate drizzled over the squares adds elegance.
For a deeper strawberry flavor, try infusing your condensed milk with fresh strawberries. Heat the milk gently with sliced strawberries and then strain it before combining with the melted chocolate.
Recipe Variations of No-Bake Strawberry Fudge Squares
Creative Twists
- Chocolate Peanut Butter Swirl: Add a layer of creamy peanut butter on top of the fudge before it sets for a delicious contrast of flavors.
- Coconut Twist: Incorporate shredded coconut into the crust for a tropical flair. You can also top with toasted coconut for texture.
- Mixed Berry Fudge: Experiment with a mix of different freeze-dried berries like raspberries and blueberries for a colorful and unique taste.
Dietary Adjustments
For those following vegan diets, use plant-based white chocolate chips and coconut condensed milk or a homemade version made with coconut and sweetener. Gluten-free biscuits can easily replace traditional ones to cater to gluten-sensitive individuals.
By considering these adjustments, you can make your No-Bake Strawberry Fudge Squares inclusive for everyone, ensuring that no one has to miss out on this delicious treat.
Conclusion about No-Bake Strawberry Fudge Squares
The No-Bake Strawberry Fudge Squares are more than just a treat; they are a delightful combination of flavors and textures that can be enjoyed by everyone. This recipe brings the joy of cooking without the complexity, making it an excellent choice for both novice and experienced cooks.
With a simple preparation process and the ability to customize based on preferences, this dessert is bound to become a seasonal favorite. Not only does it look stunning, but it also satisfies any sweet tooth, offering a refreshingly fruity taste that invites second helpings.
So whether you’re preparing for a special occasion or simply want to indulge yourself, give these No-Bake Strawberry Fudge Squares a try. You might just find your new go-to recipe!
FAQs about No-Bake Strawberry Fudge Squares
Can I make No-Bake Strawberry Fudge Squares ahead of time?
Yes, you can prepare these squares one to two days in advance. Just store them covered in the refrigerator until you’re ready to serve.
How do I store leftover No-Bake Strawberry Fudge Squares?
Keep them in an airtight container in the refrigerator for up to a week. You can also freeze them for longer storage.
Can I use fresh strawberries instead of freeze-dried?
Absolutely! If using fresh strawberries, purée and strain them to remove seeds before mixing into the fudge.
How long do No-Bake Strawberry Fudge Squares need to chill?
They should chill in the refrigerator for at least 2-3 hours until firm.
Can I use different types of chocolate?
Yes, you can substitute white chocolate with milk or dark chocolate for a different flavor profile.
What’s the best way to cut the squares?
Use a sharp knife and clean the blade between cuts for the best results.
Can I add other flavors to the fudge?
Absolutely! You can infuse different extracts like almond or hazelnut for a fun twist.
How do I thaw frozen No-Bake Strawberry Fudge Squares?
Transfer them to the refrigerator overnight to thaw slowly, or let them sit at room temperature for about an hour.
Is this recipe gluten-free?
You can make the recipe gluten-free by using gluten-free biscuits or graham crackers in the crust.
What can I serve with these fudge squares?
Pair them with a scoop of vanilla ice cream, fresh berries, or a drizzle of chocolate sauce for an extra treat!
No-Bake Strawberry Fudge Squares
Ingredients
For the crust
- 7 oz digestive biscuits or graham crackers, finely crushed You can use gluten-free biscuits if needed.
- 3.5 oz unsalted butter, melted Nut butters can be used for a different base flavor.
For the fudge
- 7 oz white chocolate chips or chopped white chocolate Use dairy-free chocolate for a vegan option.
- 14 oz sweetened condensed milk (1 can) Coconut milk can serve as a dairy alternative.
- 1.75 oz freeze-dried strawberries, ground to fine powder (or 3.5 oz fresh strawberries, puréed and strained) Fresh strawberries can be used when in season.
- 1 tsp pure vanilla extract
- 1 pinch salt
- 1-2 drops pink or red gel food coloring (optional) Use if you want a more vibrant color.
For garnish


Instructions
Preparation
- Gather all your ingredients. If using fresh strawberries, wash and purée them, then strain to remove seeds.
- Crush your biscuits or graham crackers finely to ensure even mixing and texture in the crust.
Make the crust
- In a large bowl, combine the finely crushed biscuits and melted butter. Mix thoroughly until all crumbs are moistened.
- Press the crumb mixture into the prepared pan in an even layer and chill in the refrigerator for 10 minutes to set.
Prepare the fudge
- Melt the white chocolate chips with the sweetened condensed milk in a medium heatproof bowl set over simmering water, stirring until smooth.
- Remove the bowl from heat and stir in the ground freeze-dried strawberry powder, vanilla extract, salt, and food coloring, mixing until fully combined.
Assemble and chill
- Pour the strawberry fudge mixture over the chilled crust and spread it evenly.
- Cover loosely with plastic wrap and refrigerate for at least 2-3 hours until firm.
Serving
- Lift the fudge out of the pan using the parchment overhang, place on a cutting board, and slice into 16 squares.
- Garnish with fresh strawberry slices and additional freeze-dried strawberry pieces.