
This post may contain affiliate links. As an Amazon Associate, I earn from qualifying purchases at no extra cost to you.
Table of Contents
🍴 Top Kitchen Essentials You'll Love


Introduction about Spooky Ghost Brown Butter Pumpkin Cookies
Are you ready to take your fall baking to the next level? Picture this: warm, chewy cookies that are not just delicious but also delightfully decorated to bring a smile to anyone who sees them. Welcome to the world of Spooky Ghost Brown Butter Pumpkin Cookies! These whimsical treats are perfect for Halloween gatherings or just a cozy night in with friends and family.
But what makes these cookies so special? Is it the rich flavor of brown butter, the comforting taste of pumpkin, or the simple joy of decorating them into gooey little ghosts? The answer is all of the above! This recipe combines the best of seasonal ingredients with a playful twist, making it not just a treat but an experience to enjoy. So gather your ingredients and let’s dive into baking these enchanting and spooky cookies you will love!
Key Benefits of Spooky Ghost Brown Butter Pumpkin Cookies
Why you’ll love this recipe
- Delicious Flavor: The combination of brown butter and pumpkin gives these cookies a rich, nutty taste that is simply irresistible.
- Easy to Make: You don’t need to be a professional baker to whip up these cookies; the steps are straightforward and perfect for beginners!
- Quick Baking Time: You can have these cookies ready in no time, making them a great choice for impromptu gatherings.
- Family-Friendly Fun: The ghostly decoration offers a fun activity for kids and adults alike, perfect for family bonding.
- Seasonal Appeal: Pumpkin is the star ingredient that celebrates the essence of fall.
- Customizable: You can easily adjust the flavors or decorations to make them fit any occasion.
What makes it stand out
What sets these Spooky Ghost Brown Butter Pumpkin Cookies apart from the usual pumpkin cookie recipes is the brown butter technique. Brown butter, with its nutty flavor profile, elevates these cookies to a whole new level, creating a depth of flavor that’s hard to beat. Plus, their playful ghostly appearance adds a unique charm that makes them ideal for Halloween treats or seasonal gatherings.
Additionally, these cookies aren’t just your typical sweet snacks; they cater to all ages, making them a hit at parties or cozy family dinners. The gentle sweetness balanced with the nutty flavor of brown butter makes these cookies a delightful experience for your taste buds!
Ingredients for Spooky Ghost Brown Butter Pumpkin Cookies
Complete ingredient list with measurements
To make these magical cookies, gather the following ingredients:
For the Cookie Dough:
- 1 cup unsalted butter (brown it for enhanced flavor!)
- 1 cup pumpkin puree
- 1 cup brown sugar
- 1/2 cup granulated sugar
- 1 large egg
- 2 teaspoons vanilla extract
- 2 1/2 cups all-purpose flour
- 1 teaspoon baking powder
- 1 teaspoon baking soda
- 1 teaspoon pumpkin pie spice
- 1/2 teaspoon salt
For Decorating:
- 1 cup white chocolate chips or melting wafers
- 1 cup black candy melts
- Piping bag or ziplock bag
Substitutes and alternatives
If you need to make adjustments for allergies or preferences, here are a few alternatives:
- Butter: Use vegan butter for a dairy-free option.
- Pumpkin Puree: Substitute with applesauce for a different flavor profile.
- Flour: For gluten-free cookies, you can use a 1:1 gluten-free flour blend.
- Chocolate: You can replace white chocolate with dark chocolate or carob chips, depending on your taste.
How to Make Spooky Ghost Brown Butter Pumpkin Cookies – Step-by-Step Directions
Step 1 – Prep your workspace and ingredients
Before you start, take a moment to organize your workspace. Gather all your ingredients and tools, including mixing bowls, a whisk, a cookie scoop, and baking sheets lined with parchment paper. Having everything ready makes the baking process smoother!
Step 2 – Brown the butter
In a saucepan, melt your butter over medium heat. Keep an eye on it, stirring frequently, until it becomes golden brown and gives off a nutty aroma, which usually takes about 5-7 minutes. Be careful not to burn it! Once browned, remove it from heat and let it cool slightly.
Step 3 – Mix the wet ingredients
In a large mixing bowl, combine the browned butter with pumpkin puree, brown sugar, granulated sugar, the egg, and vanilla extract. Use a whisk to blend everything together until it’s smooth and creamy.
Step 4 – Combine the dry ingredients
In another bowl, whisk together the flour, baking powder, baking soda, pumpkin pie spice, and salt. This ensures that the leavening agents are evenly distributed throughout the flour.
Step 5 – Combine wet and dry mixtures
Slowly add the dry ingredients to the wet ingredients, mixing with a spatula or wooden spoon. Combine until just mixed; don’t overdo it. The dough should be slightly sticky.
Step 6 – Chill the dough
Cover the bowl with plastic wrap and place it in the refrigerator for about 30 minutes. Chilling allows the flavors to meld and helps with the texture of the cookies, making them less likely to spread while baking.
Step 7 – Preheat the oven
While the dough chills, preheat your oven to 350°F (175°C). This ensures that your cookies will bake evenly and come out beautifully.
Step 8 – Scoop and bake the cookies
Using a medium cookie scoop, portion out the dough onto your prepared baking sheets, spacing them a few inches apart. Bake for about 10-12 minutes, or until the edges are slightly golden and the centers are set. Remove from the oven and allow them to cool completely on a wire rack.
Step 9 – Melt the white chocolate
While your cookies are cooling, melt the white chocolate in a microwave-safe bowl in 30-second intervals, stirring in between until smooth. Be careful to avoid overheating!
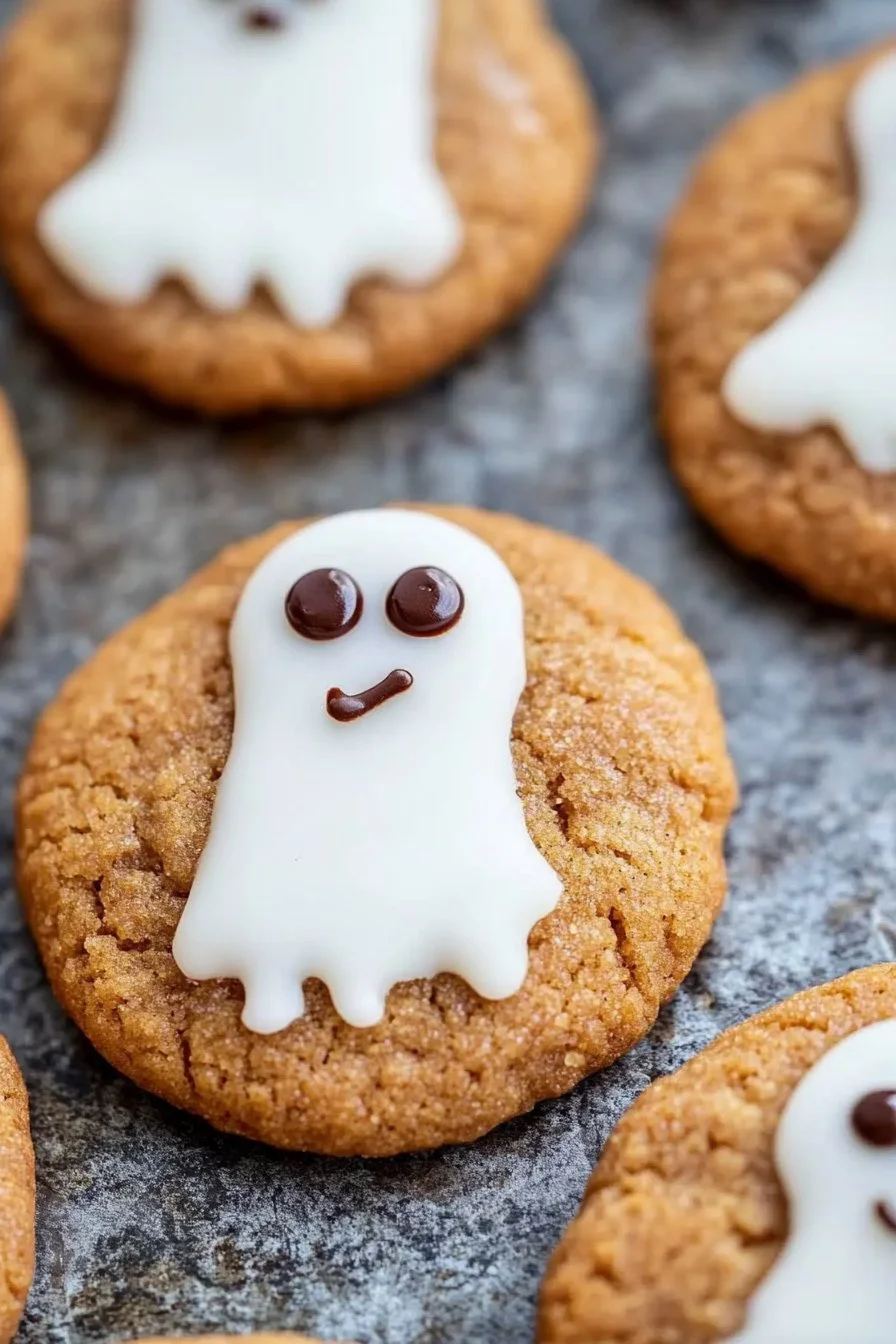
Step 10 – Decorate the cookies
Once the cookies are completely cool, spoon a small dollop of the melted white chocolate onto each cookie. Using the back of a small spoon, gently drag down to form the shape of a ghost. Allow the white chocolate to harden at room temperature.
Now it’s time to melt the black candy melts and pour them into a piping bag. Pipe small dots to create eyes and a mouth on each ghost. Once finished, let the candy melts dry completely, and then your Spooky Ghost Brown Butter Pumpkin Cookies are ready to enjoy!
Serving Suggestions for Spooky Ghost Brown Butter Pumpkin Cookies
Best occasions to serve this dish
These cookies are not just for Halloween, even though they’re perfect for trick-or-treaters! Here are some great occasions to serve them:
- Halloween parties
- Fall gatherings or harvest festivals
- Family movie nights with a spooky theme
- School bake sales
- Thanksgiving dessert tables
What to serve with it
Pair your cookies with these delicious options to enhance the experience:
Beverages:
- Apple cider
- Pumpkin spice latte
- Hot chocolate
Toppings:
- Vanilla ice cream
- Whipped cream
- Caramel drizzle
Sides:
- Fresh fruit (especially apples or pears)
- Cheese platter for a sweet and savory contrast
Storing Spooky Ghost Brown Butter Pumpkin Cookies Properly
Best storage practices
To keep those delicious cookies fresh, store them in an airtight container at room temperature. They will last for about 4–5 days. If you live in a humid area, you might want to refrigerate them to prolong their freshness.
Reheating and freezing tips
Freezing: You can freeze the cookies before or after decorating. Place them in a single layer in a freezer-safe container with parchment paper between layers, and they’ll last up to 3 months.
Thawing: To enjoy later, simply take them out of the freezer and let them thaw at room temperature.
Reheating: If you prefer warm cookies, you can pop them in the microwave for about 10-15 seconds. Just be careful not to overheat and dry them out!
Tips & Tricks for Spooky Ghost Brown Butter Pumpkin Cookies
Mistakes to avoid
- Burnt Butter: Always keep an eye on the butter as it browns; burnt butter can ruin the flavor of your cookies.
- Overmixing: Mix only until combined when adding the dry ingredients. Overmixing can lead to dense cookies.
- Warm Cookies: Let your cookies cool completely before decorating; warm cookies can lead to melted decorations!
Extra tips for better results
- Practice Decorating: If you’re unsure about decorating the cookies, practice your ghost shapes on a piece of parchment paper first.
- Add Texture: Consider mixing in some chopped nuts or chocolate chips for a surprise crunch!
- Experiment with Spices: Feel free to adjust spices. Add more cinnamon or even a pinch of nutmeg to customize the flavor to your liking.
Recipe Variations of Spooky Ghost Brown Butter Pumpkin Cookies
Creative twists
- Add-Ins: Include semi-sweet chocolate chips or crushed candy corn for added sweetness and texture.
- Seasonal Flavors: Swapping in warm spices like nutmeg or ginger can create a different seasonal cookie.
- Holiday Spins: Change decorations for various holidays! Use red and green candy melts for Christmas or pastel colors for Easter.
Dietary adjustments
- Gluten-Free: Replace regular flour with a gluten-free blend to make a gluten-free version.
- Dairy-Free: Use coconut cream in place of butter for a dairy-free option, and select dairy-free chocolate.
- Vegan: Substitute the egg with flaxseed meal or unsweetened applesauce to create a vegan-friendly treat.
Conclusion about Spooky Ghost Brown Butter Pumpkin Cookies
In a nutshell, the Spooky Ghost Brown Butter Pumpkin Cookies combine the beloved flavors of fall with a playful decoration that brings delight to every occasion. They are easy to prepare, have a delightful flavor profile, and are perfect for sharing with loved ones. Whether you’re hosting a Halloween party, enjoying a family movie night, or simply craving a tasty treat, these cookies are the perfect solution.
I encourage you to give this recipe a try! Not only will you enjoy the process of baking and decorating, but you’ll also be treated to the most delicious cookies that everyone will love. Don’t forget to share your creations and feedback with friends and family, and most importantly, enjoy every bite of these spooky delights!
FAQs about Spooky Ghost Brown Butter Pumpkin Cookies
What if it doesn’t turn out right?
Don’t stress! Baking can sometimes be tricky. If the cookies are too dry, check your flour measurements, and perhaps consider adding a bit more pumpkin puree for moisture. If they spread too much, chilling the dough longer can help keep their shape.
Can I prepare it ahead of time?
Absolutely! You can prepare the cookie dough up to 2 days in advance and keep it refrigerated. You can also freeze the dough for up to 3 months—just shape it into balls and freeze them before baking.
What are the best ingredient substitutions?
For most ingredients, there are great substitutes! For instance, if you’re out of pumpkin puree, you can use applesauce or mashed banana. For the flour, a gluten-free blend works well if you have dietary restrictions.
How long can it be stored?
In an airtight container at room temperature, these cookies will last about 4-5 days. If you want to keep them for longer, consider freezing them!
Can I use store-bought dough or crust?
While this recipe is all about homemade goodness, you could certainly use store-bought dough if you want to save time. Just be sure to decorate them to look like spooky ghosts!
Is this recipe kid-friendly or family-appropriate?
Yes! This recipe is perfect for family baking. Kids will love both making and decorating the cookies, and they are a hit among all age groups.
Can I make this recipe allergen-free?
Absolutely! With a few swaps, you can make these cookies gluten-free, dairy-free, and even vegan. Just ensure you have the right substitutes ready when you start baking!
Spooky Ghost Brown Butter Pumpkin Cookies
Ingredients
For the Cookie Dough
- 1 cup unsalted butter Brown it for enhanced flavor!
- 1 cup pumpkin puree
- 1 cup brown sugar
- ½ cup granulated sugar
- 1 large egg
- 2 teaspoons vanilla extract
- 2 ½ cups all-purpose flour
- 1 teaspoon baking powder
- 1 teaspoon baking soda
- 1 teaspoon pumpkin pie spice
- ½ teaspoon salt
For Decorating
- 1 cup white chocolate chips or melting wafers
- 1 cup black candy melts
- 1 piping bag or ziplock bag


Instructions
Preparation
- Prep your workspace and ingredients by organizing mixing bowls, a whisk, a cookie scoop, and baking sheets lined with parchment paper.
- In a saucepan, melt your butter over medium heat until it becomes golden brown and gives off a nutty aroma (about 5-7 minutes). Let it cool slightly.
- In a large mixing bowl, combine the browned butter with pumpkin puree, brown sugar, granulated sugar, egg, and vanilla extract. Blend until smooth and creamy.
- In another bowl, whisk together the flour, baking powder, baking soda, pumpkin pie spice, and salt.
- Slowly add the dry ingredients to the wet ingredients, mixing until just combined.
- Cover the bowl with plastic wrap and chill the dough in the refrigerator for about 30 minutes.
- Preheat your oven to 350°F (175°C).
- Using a medium cookie scoop, portion out the dough onto prepared baking sheets, spacing them a few inches apart.
- Bake for about 10-12 minutes or until the edges are slightly golden and the centers are set. Allow them to cool completely on a wire rack.
- Melt the white chocolate in a microwave-safe bowl in 30-second intervals, stirring until smooth.
- Once cookies are cool, spoon melted white chocolate onto each cookie to form a ghost shape. Allow to harden.
- Melt black candy melts and pour into a piping bag. Pipe eyes and mouth onto each ghost.