

This post may contain affiliate links. As an Amazon Associate, I earn from qualifying purchases at no extra cost to you.
Table of Contents
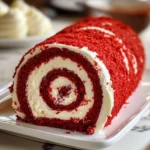
What comes to mind when you think of a delightful dessert that combines festive colors, rich flavors, and a touch of elegance? For many, the answer is the delectable Red Velvet Cake Roll. This glorious creation brings together the classic appeal of red velvet cake and the whimsical charm of a rolled sponge cake. It’s not just a treat; it’s a celebration on a plate. Have you ever thought about how a dessert can brighten up any occasion? The Red Velvet Cake Roll does just that, transforming everyday moments into something special.
Imagine biting into a soft, velvety cake filled with creamy, sweet indulgence. Doesn’t that sound tempting? The beauty of this recipe lies in its simplicity and versatility. New bakers can easily tackle this challenge, while seasoned chefs can enjoy the artistic process of creating it. Wouldn’t it be rewarding to master such a dessert that everyone adores? Indeed, the Red Velvet Cake Roll is a crowd-pleaser, perfect for birthdays, holidays, or just because.
But what makes this recipe so exceptional? It’s the perfect balance of flavors and textures. The classic hint of cocoa in the cake pairs beautifully with the sweet, tangy cream cheese filling. As you serve up slices of this cake roll, it not only satisfies sweet cravings but also becomes a centerpiece that sparks conversations and smiles. Are you ready to bake this beautiful dessert that combines the nostalgic taste of red velvet with a fun and modern twist? You won’t regret diving into this sweet adventure.
🍴 Top Kitchen Essentials You'll Love


Key Benefits of Red Velvet Cake Roll
Why should you consider making the Red Velvet Cake Roll? Here are a few benefits that make this recipe truly special:
- Flavorful Delight: The combination of cocoa, buttermilk, and cream cheese creates a rich, satisfying flavor profile that is simply irresistible.
- Simple Steps: With easy-to-follow instructions, even beginners can enjoy making this delightful treat.
- Versatile Occasion: From birthdays to holiday gatherings, this dessert fits seamlessly into any celebration and appeals to all ages.
- Customizable: Feel free to add your spin, whether it’s different fillings, toppings, or decorations. The possibilities are endless!
- Stunning Presentation: The vibrant red color and swirled filling make it a showstopper dessert that steals the spotlight.
- Great for Sharing: The roll can be easily sliced into portions, perfect for sharing with family and friends.
What Makes It Stand Out
The Red Velvet Cake Roll stands out for its originality. Unlike traditional cakes, this rolled version provides a striking visual while offering the same beloved flavors. It’s a modern twist on a classic dessert, keeping things fresh and exciting in the kitchen.
Customization is another highlight. You can play around with different fillings, such as adding chocolate ganache or fruit preserves. Consider making it gluten-free or vegan to accommodate dietary needs while still enjoying a beloved dessert. Whether it’s an upscale dinner party or a casual family gathering, this cake roll is always a hit.
Ingredients for Red Velvet Cake Roll
Completing a Red Velvet Cake Roll requires a set of classic ingredients that come together to create a masterpiece.
- 3 large eggs
- 1 cup granulated sugar
- 1 teaspoon vanilla extract
- 1 cup all-purpose flour
- 1/4 cup unsweetened cocoa powder
- 1/2 teaspoon baking powder
- 1/4 teaspoon salt
- 1/2 cup buttermilk
- 1 tablespoon red food coloring
- 1 cup cream cheese, softened
- 1/2 cup powdered sugar
- 1/2 teaspoon vanilla extract (for filling)
- 1/2 cup heavy cream
The ingredients work well together. The red food coloring is particularly essential, giving this cake its signature bright hue.
Substitutes and Alternatives
If you’re looking to swap any ingredients for dietary needs or allergies, you have options. For those with dairy intolerances, you can use dairy-free alternatives in place of buttermilk and cream cheese. For example, mix almond milk with a bit of vinegar to create a dairy-free substitute for buttermilk.
If you need a gluten-free option, substitute all-purpose flour with a gluten-free flour blend. Adjust your baking powder and ensure all other ingredients are gluten-free. This versatility makes the Red Velvet Cake Roll accessible to more people, allowing everyone to enjoy a slice.
How to Make Red Velvet Cake Roll – Step-by-Step Directions
Step 1 – Prepare Ingredients
Start by gathering all your ingredients. It’s essential to have everything laid out to ensure a smooth baking process. This recipe requires minimal preparation, so it’s easy to start your baking journey.
Step 2 – Cook the Base
Preheat your oven to 350°F (175°C). Greasing and lining a baking sheet with parchment paper will help your cake roll come out easily later on. It’s crucial for achieving that perfect roll without sticking.
Step 3 – Beat Eggs and Sugar
In a large bowl, beat the eggs and sugar together. Aim for a pale and frothy mixture, which typically takes about 3-5 minutes. This step is essential for creating a light cake texture.
Step 4 – Mix in Vanilla
Once your eggs and sugar are ready, stir in the vanilla extract. Combining these flavors early on helps create a more cohesive taste in every bite.
Step 5 – Prepare Dry Ingredients
In a separate bowl, whisk together the all-purpose flour, cocoa powder, baking powder, and salt. This step ensures that your dry ingredients are evenly mixed, preventing any lumps from forming in the batter.
Step 6 – Combine Wet and Dry Mixtures
Gradually add the dry ingredients to the wet egg mixture, alternating with the buttermilk and red food coloring. Mix gently until just combined. Avoid over-mixing, as this could lead to a dense cake roll.
Step 7 – Spread the Batter
Pour the batter onto the prepared baking sheet. Use a spatula to spread it evenly across the pan to ensure uniform baking. This helps achieve an even rise and a beautifully rounded roll.
Step 8 – Bake
Place the baking sheet in the oven and bake for about 15-20 minutes. Keep an eye out; you’ll know it’s done when a toothpick inserted in the center comes out clean.
Step 9 – Cool and Roll
Remove the cake from the oven and let it cool for a few minutes. Carefully roll the cake in the parchment paper while it’s still warm. This will help it retain its shape as it cools completely. Let it rest for about 30 minutes.
Step 10 – Prepare the Filling
While your cake cools, prepare the filling. In a large bowl, beat the cream cheese, powdered sugar, and vanilla extract until smooth and creamy. This filling is the star of the roll, so make sure it’s well-mixed.
Step 11 – Whip the Cream
In another bowl, whip the heavy cream until soft peaks form. Gently fold this whipped cream into the cream cheese mixture. This step adds lightness to the filling, making it perfectly spreadable.
Step 12 – Fill and Roll Again
After the cake has cooled completely, unroll it carefully. Spread the cream cheese filling evenly across the surface. Now, re-roll the cake tightly, using the parchment paper as a guide. Chill the rolled cake in the refrigerator for at least an hour before serving.
Serving Suggestions for Red Velvet Cake Roll
Best Occasions to Serve This Dish
The Red Velvet Cake Roll is suitable for various occasions. Whether it’s a birthday party or a festive holiday dinner, it fits seamlessly into any celebration. Imagine presenting this striking dessert to your guests, who are bound to be impressed by both its appearance and flavor.
For cozy family gatherings, the charm of this dessert can bring everyone together around the table. It’s a sweet way to create lasting memories with loved ones, and nothing beats the joy of sharing a delicious treat.
What to Serve With It
- Fresh Berries: Serve alongside strawberries or raspberries for a refreshing contrast.
- Ice Cream: Pair with vanilla or chocolate ice cream for an extra indulgence.
- Whipped Cream: A dollop of whipped cream on the side enhances the experience.
- Coffee or Tea: Enjoy with a warm cup of coffee or tea to balance the sweetness.
- Fruit Sauce: A drizzle of fruit sauce, like raspberry or mango, can elevate the flavors.
How to Store Red Velvet Cake Roll Properly
Best Storage Practices
To keep your Red Velvet Cake Roll fresh, it’s best to store it in an airtight container in the refrigerator. This helps maintain its texture and flavor. Proper storage can keep it delicious for up to a week.
If you plan on enjoying leftovers later, consider wrapping the cake roll tightly in plastic wrap before placing it in the container. This extra layer ensures it stays moist and doesn’t absorb other odors from the fridge.
Reheating and Freezing Tips
If you want to freeze it, slice the roll into individual pieces and wrap them tightly in plastic wrap. Then place them in a freezer-safe container. You can enjoy these frozen treats for up to three months.
To thaw, simply transfer the slices to the refrigerator overnight. If you prefer to serve it chilled, let it sit at room temperature for about 15 minutes after taking it out of the fridge before enjoying.
Tips & Tricks for Red Velvet Cake Roll
Mistakes to Avoid
- Overmixing Batter: This can lead to a dense cake. Mix just until combined.
- Skipping Parchment Paper: Always line your pan; otherwise, the cake may stick.
- Not Cooling Completely: Rolling a hot cake can cause it to break. Ensure it is completely cool.
- Filling Overload: Use the right amount of filling. Too much can lead to a messy roll.
- Skipping Chill Time: Chilling helps the cake set and makes it easier to slice.
Extra Tips for Better Results
Try adding a splash of almond extract for an extra layer of flavor. Additionally, consider garnishing with mini chocolate chips or sprinkles for a fun touch. Lastly, experiment with different fillings; a chocolate ganache or fruit filling can add delightful surprises.
Recipe Variations of Red Velvet Cake Roll
Creative Twists
- Chocolate Hazelnut: Substitute the cream cheese filling with chocolate hazelnut spread for a nutty twist.
- Coconut: Add shredded coconut to the filling for a tropical flavor.
- Berry Bliss: Incorporate real berry purees into the cream cheese filling for a burst of fruitiness.
- Mint Choco: Mix mint extract into the filling for a refreshing mint chocolate version.
Dietary Adjustments
For a vegan version, replace eggs with flaxseed meal and use non-dairy substitutes. For a gluten-free twist, use almond flour or coconut flour instead of all-purpose flour. These adjustments allow everyone to enjoy this delightful treat without compromising on taste.
Conclusion about Red Velvet Cake Roll
The Red Velvet Cake Roll is not just a dessert; it’s a culinary masterpiece that combines rich flavors with beautiful presentation. Making this delightful roll is an experience that can be enjoyed by bakers at any skill level. Your family and friends will be thrilled to indulge in this creamy, flavor-packed dessert that brightens any occasion.
With its versatile nature, the Red Velvet Cake Roll can be customized to fit various dietary needs while still satisfying everyone’s sweet tooth. Don’t miss out on the joy of creating this cake roll that captures hearts and taste buds alike. So what are you waiting for? Grab your ingredients and embark on this sweet adventure; your taste buds will thank you!
FAQs about Red Velvet Cake Roll
Can I prepare it ahead of time?
Yes! You can prepare and freeze it ahead of time. It keeps well in the fridge for up to a week.
Can I freeze it?
Absolutely! Wrap it tightly and store it in the freezer. Enjoy it within three months for the best flavor.
How long does it last?
When stored properly in the fridge, the Red Velvet Cake Roll lasts about a week.
What are the best substitutions?
You can use gluten-free flour for a gluten-free version and almond milk vinegar for buttermilk.
Is this recipe family-friendly?
Definitely! Its delicious flavors and fun roll design are sure to please both kids and adults.
Can I add extra toppings?
Yes! Feel free to top with fresh fruit, chocolate drizzle, or whipped cream to enhance the presentation.
What’s the best way to serve it?
Slice it neatly and serve chilled with a dollop of whipped cream and fresh berries.
Can I use a different filling?
Certainly! Try alternating fillings like chocolate ganache, fruit preserves, or even a mint-flavored cream.
Is it difficult to make?
Not at all! With clear directions, this recipe is straightforward and enjoyable for bakers of all skill levels.
What’s the origin of Red Velvet Cake?
The Red Velvet Cake has Southern roots, often associated with special occasions and celebrations.
Red Velvet Cake Roll
Ingredients
For the Cake
- 3 large eggs
- 1 cup granulated sugar
- 1 teaspoon vanilla extract
- 1 cup all-purpose flour
- ¼ cup unsweetened cocoa powder
- ½ teaspoon baking powder
- ¼ teaspoon salt
- ½ cup buttermilk Dairy-free option available
- 1 tablespoon red food coloring Essential for signature color
For the Filling
- 1 cup cream cheese, softened Dairy-free option available
- ½ cup powdered sugar
- ½ teaspoon vanilla extract (for filling)
- ½ cup heavy cream


Instructions
Preparation
- Start by gathering all your ingredients.
- Preheat your oven to 350°F (175°C) and grease a baking sheet, lining it with parchment paper.
- In a large bowl, beat the eggs and granulated sugar together until pale and frothy, which takes about 3-5 minutes.
- Stir in the vanilla extract.
- In a separate bowl, whisk together the all-purpose flour, cocoa powder, baking powder, and salt.
- Gradually add the dry ingredients to the wet mixture, alternating with the buttermilk and red food coloring until just combined.
- Pour the batter onto the prepared baking sheet and spread evenly.
- Bake for about 15-20 minutes, or until a toothpick inserted in the center comes out clean.
Cooling and Filling
- Let the cake cool for a few minutes, then roll it in the parchment paper while still warm.
- Let it rest for about 30 minutes.
- Prepare the filling by beating the cream cheese, powdered sugar, and vanilla extract until smooth.
- In another bowl, whip the heavy cream until soft peaks form and gently fold it into the cream cheese mixture.
- Unroll the cooled cake carefully, spread the cream cheese filling evenly, and re-roll tightly.
- Chill the rolled cake in the refrigerator for at least an hour before serving.