
This post may contain affiliate links. As an Amazon Associate, I earn from qualifying purchases at no extra cost to you.
Table of Contents
🍴 Top Kitchen Essentials You'll Love


Introduction about Red Velvet Cheesecake Brownies Recipe
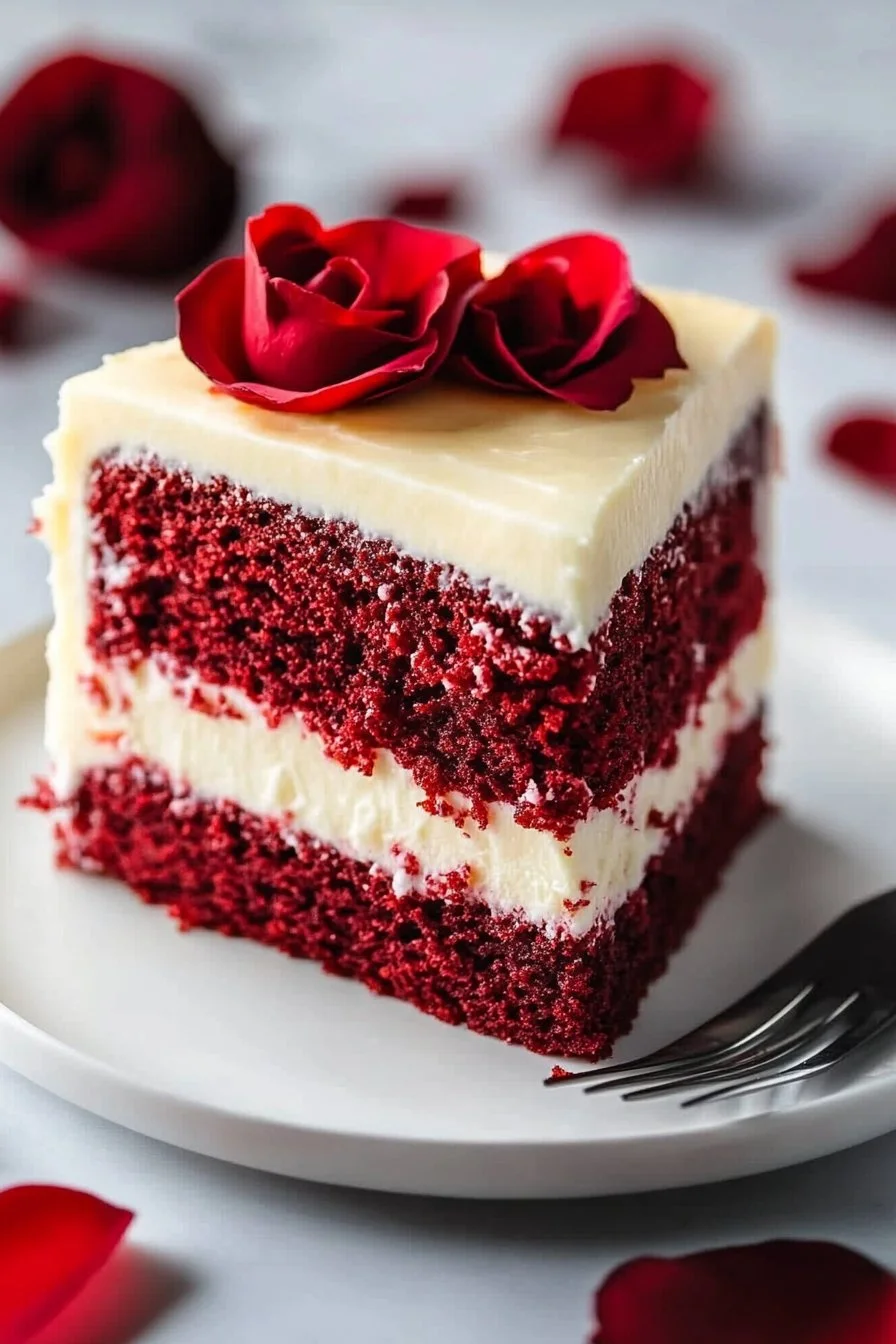
Are you looking for a dessert that’s both decadent and visually stunning? The Red Velvet Cheesecake Brownies Recipe is just what you need! This delightful treat combines the rich flavors of red velvet with the creamy richness of cheesecake, creating an indulgent dessert that’s perfect for any occasion. Have you ever wished to impress your friends or family with something truly special? Well, with these brownies, you can!
Imagine sinking your fork into a fudgy brownie, the vibrant red hue peeking through the creamy cheesecake layer. Not only are these brownies a feast for the eyes, but they also tantalize your taste buds with their velvety texture and delightful chocolatey undertones. It’s a unique twist on traditional brownies that will leave everyone asking for seconds!
Whether you’re celebrating a birthday, hosting a gathering, or just treating yourself, this Red Velvet Cheesecake Brownies Recipe is both simple to make and incredibly satisfying. Plus, you don’t need to be a professional baker to pull this off! For more baking tips, you can check out this guide on baking basics.
Key Benefits of Red Velvet Cheesecake Brownies Recipe
Why you’ll love this recipe
- Decadent Flavor: The combination of red velvet and cheesecake creates a rich taste experience.
- Easy to Make: With straightforward ingredients and simple steps, anyone can make these brownies.
- Family-Friendly: This recipe is perfect for dessert lovers of all ages.
- Stunning Presentation: The striking colors make these brownies visually appealing for any occasion.
- Budget-Friendly: Only a few staple ingredients are needed to create this impressive dessert.
- Great for Sharing: These brownies cut nicely into squares, making them perfect for parties or potlucks.
What makes it stand out
What sets this recipe apart is its ability to merge two classic desserts into one scrumptious treat. Red velvet has an undeniable charm, often associated with celebrations and special events. When paired with cheesecake, it becomes an irresistible combination that caters to diverse palates.
Moreover, the versatility of this recipe allows for endless customization. You can add white chocolate chips for extra sweetness or incorporate festive sprinkles for holidays. Perfect for cozy family dinners or lively gatherings, these brownies are a seasonal favorite, enhancing the joy of dessert-making.
Ingredients for Red Velvet Cheesecake Brownies Recipe
Complete ingredient list with measurements
For the Red Velvet Brownies:
- 1/2 cup unsalted butter, melted
- 1 cup granulated sugar
- 2 large eggs
- 1 teaspoon vanilla extract
- 1 tablespoon red food coloring
- 1 tablespoon cocoa powder
- 3/4 cup all-purpose flour
- 1/4 teaspoon salt
For the Cheesecake Layer:
- 8 oz cream cheese, softened
- 1/4 cup granulated sugar
- 1 large egg
- 1/2 teaspoon vanilla extract
Substitutes and alternatives
If you have dietary restrictions or preferences, here are some common swaps you can consider:
- Butter: Use coconut oil or vegan butter for a dairy-free option.
- Sugar: Substitute with brown sugar or a sugar alternative like Stevia.
- Eggs: Applesauce or flaxseeds mixed with water can replace eggs for a vegan version.
- Flour: Gluten-free all-purpose flour can be used for a gluten-free option.
How to Make Red Velvet Cheesecake Brownies Recipe – Step-by-Step Directions
Step 1 – Prep your workspace and ingredients
Before you dive into mixing, ensure your kitchen is ready. Gather all your ingredients, measuring cups, and bowls. Preheat your oven to 350°F (175°C) to get it nice and hot. Line an 8×8-inch baking pan with parchment paper, letting it hang over the edges for easy removal later.
Step 2 – Prepare the Red Velvet Brownie Batter
In a large mixing bowl, combine the melted butter and granulated sugar. Whisk them together until they’re smooth and well blended. Next, add the eggs one at a time. Mix in the vanilla extract and red food coloring until the color is uniform. It should be a vibrant red!
Step 3 – Add the dry ingredients
Sift in the cocoa powder, all-purpose flour, and salt into the wet ingredients. Using a spatula, gently fold the dry mixture into the wet ingredients. Be cautious not to overmix; you want a smooth batter without lumps.
Step 4 – Make the Cheesecake Layer
In another mixing bowl, beat the softened cream cheese with granulated sugar until the mixture is creamy. Incorporate the egg and vanilla extract, blending until there are no lumps. The mixture should be thick and smooth, perfect to layer on top of the brownies.
Step 5 – Assemble the Brownies
Now it’s time for assembly! Pour about 3/4 of the red velvet brownie batter into your prepared baking pan. Spread it evenly using a spatula to ensure a consistent base. Then, carefully pour the cheesecake layer over the brownie mixture, using the spatula to spread it gently to the edges.
Step 6 – Create the marbled effect
Drop spoonfuls of the remaining red velvet batter on top of the cheesecake layer. Using a knife or toothpick, swirl the red velvet batter through the cheesecake layer to create a beautiful marbled effect. Don’t overdo it; you still want to see those vibrant swirls!
Step 7 – Bake to perfection
Place your baking pan in the preheated oven and bake for 30-35 minutes. You’ll know it’s ready when the center is set, and a toothpick inserted comes out mostly clean, perhaps with a few moist crumbs clinging to it.
Step 8 – Cool and prepare for slicing
Once baked, allow the brownies to cool completely in the pan on a wire rack. For even cleaner cuts, chill the brownies in the refrigerator for at least 30 minutes before slicing them into squares.
Step 9 – Serve and enjoy your treats
Slice the brownies into squares and serve them on a platter. You could even top them with a dollop of whipped cream or a drizzle of chocolate sauce for that extra indulgence!
Serving Suggestions for Red Velvet Cheesecake Brownies Recipe
Best occasions to serve this dish
These Red Velvet Cheesecake Brownies are fantastic for various occasions. Here are a few ideas:
- Birthday Parties: They make an eye-catching centerpiece dessert.
- Holidays: Perfect for Christmas or Valentine’s Day, adding a festive touch to your dessert table.
- Potlucks: Easy to transport and share, delighting friends and family alike.
- Movie Nights: A luscious treat for cozy evenings at home.
What to serve with it
To enhance your dessert experience, consider pairing these brownies with:
- Beverages: Rich coffee or a glass of milk complements the sweetness beautifully.
- Sauces: A drizzle of homemade chocolate or caramel sauce can elevate the flavors.
- Toppings: Topped with berries, whipped cream, or a scoop of ice cream for an indulgent treat.
Storing Red Velvet Cheesecake Brownies Recipe Properly
Best storage practices
To keep your brownies fresh, store them in an airtight container in the refrigerator. They’ll maintain their flavor and texture for up to a week. If you want to keep them longer, you can freeze them for up to three months. Just remember to wrap them well in plastic wrap and place them in a freezer-safe container.
Reheating and freezing tips
When it comes to reheating, the best method is to use the microwave. Warm them in 10-15 second intervals until they’re to your desired temperature. If frozen, allow them to thaw in the refrigerator overnight before reheating. Avoid using the oven for reheating, as they might become too dry.
Tips & Tricks for Red Velvet Cheesecake Brownies Recipe
Mistakes to avoid
- Overmixing the batter: This can lead to tough brownies, so mix gently.
- Not cooling before slicing: Allowing them to cool ensures clean cuts.
- Using too much food coloring: Stick to the recommended amount for perfect color without affecting flavor.
Extra tips for better results
- Adjust the sweetness: If you prefer less sweetness, reduce the sugar slightly.
- Add-ins: Consider adding chocolate chips or nuts for added texture.
- Experiment with flavors: Incorporate orange zest or a hint of almond extract for unique twists.
Recipe Variations of Red Velvet Cheesecake Brownies Recipe
Creative twists
Feel free to get creative with your brownies:
- Seasonal Flavors: Add pumpkin spice for a fall-themed brownie or peppermint extracts for a festive touch.
- Cheesecake Swirls: Instead of just cream cheese, mix in some white chocolate for a sweeter cheesecake layer.
- Themed Colors: For holidays, switch the food coloring to match seasonal colors.
Dietary adjustments
Tweaking this recipe for dietary needs is simple:
- Vegan: Use flax egg substitutes and a plant-based cream cheese.
- Gluten-Free: Swap the all-purpose flour for a gluten-free blend.
- Low-Sugar: Use sugar alternatives to suit your dietary preferences.
Conclusion about Red Velvet Cheesecake Brownies Recipe
In summary, the Red Velvet Cheesecake Brownies Recipe serves as a perfect dessert for any occasion, combining ease, flavor, and visual appeal. These brownies not only satisfy your sweet tooth but also bring joy and delight to those who indulge in them. So why not gather your ingredients and give it a try? I’d love to hear about your experience, whether you try this recipe as is or add your special twist.
For more delicious recipes, don’t miss our guide on how to bake the perfect brownies.
FAQs about Red Velvet Cheesecake Brownies Recipe
What if it doesn’t turn out right?
If your brownies don’t turn out as expected, don’t worry! Baking can be tricky. If they are too dry, you may have overbaked them. For future bakes, check a few minutes earlier. Remember, a toothpick should come out with a few moist crumbs, not clean.
Can I prepare it ahead of time?
Absolutely! You can prepare the batter a day in advance. Just store it in the fridge before baking. Once they’re baked, they can also be made ahead and stored as described above.
What are the best ingredient substitutions?
Common substitutes include using coconut oil for butter, sugar alternatives like coconut sugar for granulated sugar, and applesauce instead of eggs.
How long can it be stored?
Store your brownies in an airtight container in the fridge for up to a week or freeze them for up to three months.
Can I use store-bought dough or crust?
While this recipe is based on homemade components, you could use pre-made brownie mix to save time if you’re really pressed.
Is this recipe kid-friendly or family-appropriate?
Yes, these brownies are perfect for kids and families! The vibrant color and delicious cream cheese layer are often a hit for dessert lovers of all ages.
Can I make this recipe allergen-free?
Definitely! With the right substitutes, such as dairy-free cream cheese and gluten-free flour, you can make these brownies suitable for various dietary needs, allowing everyone to enjoy this delectable treat!
Red Velvet Cheesecake Brownies
Ingredients
For the Red Velvet Brownies
- ½ cup unsalted butter, melted
- 1 cup granulated sugar
- 2 large eggs
- 1 teaspoon vanilla extract
- 1 tablespoon red food coloring
- 1 tablespoon cocoa powder
- ¾ cup all-purpose flour
- ¼ teaspoon salt
For the Cheesecake Layer
- 8 oz cream cheese, softened
- ¼ cup granulated sugar
- 1 large egg
- ½ teaspoon vanilla extract


Instructions
Preparation
- Preheat your oven to 350°F (175°C) and line an 8×8-inch baking pan with parchment paper.
Make the Red Velvet Brownie Batter
- In a large mixing bowl, combine the melted butter and granulated sugar, whisking until smooth.
- Add eggs one at a time, then add vanilla extract and red food coloring, mixing until uniform.
Add the Dry Ingredients
- Sift in cocoa powder, flour, and salt into the wet mixture, and gently fold until just combined.
Make the Cheesecake Layer
- In another bowl, beat cream cheese and granulated sugar until creamy. Add egg and vanilla extract, blending until smooth.
Assemble the Brownies
- Pour 3/4 of the red velvet batter into the prepared pan and spread evenly.
- Pour cheesecake layer over the brownie batter and spread gently to the edges.
Create Swirls
- Drop spoonfuls of the remaining red velvet batter on top of the cheesecake, then swirl with a knife to create a marbled effect.
Bake
- Bake for 30-35 minutes until the center is set and a toothpick comes out with a few moist crumbs.
Cool and Slice
- Allow brownies to cool completely in the pan, then refrigerate for at least 30 minutes before slicing.
Serve
- Slice into squares and serve, optionally topping with whipped cream or chocolate sauce.