

This post may contain affiliate links. As an Amazon Associate, I earn from qualifying purchases at no extra cost to you.
Table of Contents
🍴 Top Kitchen Essentials You'll Love


Introduction to Valentine’s Day Cake Pops
Valentine’s Day is a celebration of love, affection, and sweet moments shared with those who hold a special place in our hearts. Amidst the roses and heartfelt notes, there’s something uniquely charming about creating delightful treats to share with loved ones. Enter the Valentine’s Day Cake Pops – a joyfully delicious way to express your feelings! Imagine a moist cake mixed with creamy frosting, rolled into bite-sized balls, and adorned with festive decorations. Doesn’t that sound thrilling for your taste buds?
What makes this recipe for Valentine’s Day Cake Pops stand out is its simplicity and versatility. You can use any cake flavor your heart desires, making it a perfect way to showcase personal tastes. Moreover, the process of decorating these cake pops with sprinkles and designs allows for creativity to shine, making each pop a unique work of art.
The best part is that making Valentine’s Day Cake Pops provides a wonderful opportunity to spend time with family and friends in the kitchen. Whether you’re hosting a party, working on a Valentine’s Day gift, or simply treating yourself, this recipe caters to all. Different flavors, colors, and toppings enable you to personalize these cake pops and make them truly special. So, gather your loved ones, and let’s whip up some enchanting Valentine’s Day Cake Pops that are sure to impress!
Key Benefits of Valentine’s Day Cake Pops
Why You’ll Love This Recipe
- Delectable Flavor Variety: Choose from an array of cake flavors to match your preferences and those of your loved ones.
- Simple Preparation: The straightforward steps make it easy for anyone to create these sweet treats.
- Perfect for Any Occasion: Besides Valentine’s Day, they can be enjoyed at birthdays, weddings, or casual get-togethers.
- Creative Outlet: Decorating allows you to express individuality and creativity with colors and toppings.
- Customizable for All Diets: Easily adaptable to cater to dietary restrictions and preferences like gluten-free or vegan.
- Fun Activity: It’s a fantastic way to engage children or friends, making memories in the kitchen.
What Makes It Stand Out
Valentine’s Day Cake Pops are not your average dessert. Their versatility is one of their standout features, allowing endless possibilities for flavors and decorations. You can create a combination that resonates with the theme of love while appealing to personal tastes.
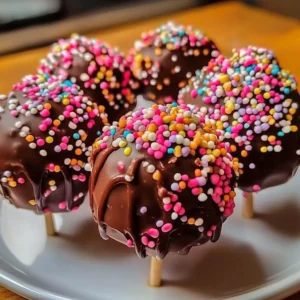
They also bring a whimsical joy to celebrations. Instead of serving traditional slices of cake, cake pops create a playful atmosphere, inviting guests to indulge while mingling. Whether decorated with classic red and pink sprinkles, shimmering gold for an elegant touch, or colorful patterns for a fun twist, these pops are sure to draw attention and spark conversation.
Ingredients for Valentine’s Day Cake Pops
Complete Ingredient List with Measurements
- 1 box of cake mix (any flavor, e.g., chocolate, vanilla, red velvet)
- 1 can of frosting (matching flavor, optional flavors can be combined)
- Chocolate coating (melting chocolate or chocolate chips)
- Sprinkles (various colors and shapes for decoration)
- Lollipop sticks
Substitutes and Alternatives
If you have specific dietary restrictions, there are several alternatives you can consider. For example, if you’re gluten-sensitive, choose a certified gluten-free cake mix.
For a vegan option, use a plant-based cake mix and vegan frosting. Always check labels to ensure all ingredients meet your dietary needs. Additionally, you might opt for dairy-free chocolate coatings for those avoiding dairy in their diet.
How to Make Valentine’s Day Cake Pops – Step-by-Step Directions
Step 1 – Prepare Ingredients
Start by gathering all your ingredients and tools. You’ll want to have your cake mix, frosting, chocolate coating, sprinkles, and lollipop sticks ready at hand. Preheat your oven according to the package instructions for the cake mix.
Step 2 – Cook the Base
Prepare the cake batter as stated on the cake mix box. Pour it into a prepared baking dish and bake until a toothpick inserted in the center comes out clean. Allow the cake to cool completely on a wire rack afterwards.
Step 3 – Crumble the Cake
Once the cake is cooled, crumble it into a large bowl using your fingers. The crumbles should be fine and consistent but be cautious not to over-process into powder.
Step 4 – Mix in the Frosting
Add the frosting to the crumbled cake and mix thoroughly until the mixture is well combined. You’ll want a sticky consistency that holds when shaped.
Step 5 – Roll into Balls
Start taking small portions of the cake mixture and roll them into balls, about 1 inch in diameter. Ensure they are compact so they can hold their shape.
Step 6 – Chill the Cake Balls
Place the rolled balls onto a baking sheet lined with parchment paper. Insert lollipop sticks into the center of each ball and chill them in the refrigerator for about 30 minutes. This helps firm them up and prevents the sticks from falling out when dipped.
Step 7 – Melt the Chocolate Coating
In a microwave-safe bowl, melt the chocolate coating according to package instructions. Stir it until smooth and free of lumps.
Step 8 – Dip Each Cake Pop
Take each cake pop from the fridge and dip it into the melted chocolate. Make sure it’s completely coated. Allow any excess to drip off.
Step 9 – Add Sprinkles
While the chocolate coating is still wet, quickly sprinkle your chosen decorations over the pop. This will help the sprinkles stick to the chocolate.
Step 10 – Let Them Set
Place the decorated cake pops upright in a styrofoam block or stand. Allow them to harden until the chocolate has completely set, which should take about 30 minutes.
Serving Suggestions for Valentine’s Day Cake Pops
Best Occasions to Serve This Dish
Valentine’s Day Cake Pops are a delightful treat for a variety of occasions. Obviously, they’re ideal for Valentine’s Day celebrations where you want to spread love and joy.
However, these pops can also shine at birthday parties, baby showers, or even weddings, making them a hit among guests of all ages. Their small, bite-sized nature makes them easy to serve and enjoy at any gathering.
What to Serve With It
You can pair Valentine’s Day Cake Pops with an assortment of beverages. Hot chocolate, coffee, or even a glass of sparkling wine can compliment the sweetness of the pops beautifully.
For additional delights, consider serving them alongside fresh fruits or cheese platters to create a diverse dessert table.
How to Store Valentine’s Day Cake Pops Properly
Best Storage Practices
Storing your Valentine’s Day Cake Pops properly will ensure they stay fresh. After the chocolate on the pops has set, you can store them in an airtight container at room temperature for about 3-5 days.
If you need to keep them longer, refrigeration is an option, though it may slightly alter the texture of the chocolate coating.
Reheating and Freezing Tips
If you want to keep them for an extended time, freezing is a great option. Wrap each cake pop in plastic wrap individually and place them in a freezer-safe container. They can last for up to 3 months in the freezer.
To thaw the cake pops, leave them at room temperature for about 30 minutes before serving. Avoid microwaving them, as it can ruin the chocolate coating.
Tips & Tricks for Valentine’s Day Cake Pops
Mistakes to Avoid
- Overbaking the Cake: Ensure you don’t bake the cake longer than instructed to maintain moisture.
- Not Cooling Properly: Allow the cake to cool completely. Otherwise, the mixture may become too wet.
- Too Much Frosting: Use just enough frosting to bind the cake, as too much can make the pops soggy.
- Skipping the Chill Time: Chilling the cake balls is crucial for keeping their shape while dipping.
- Not Coating Well: Ensure each pop is thoroughly coated in chocolate for the best flavor and aesthetic.
- Skipping Decorations: Take the time to add sprinkles, as they enhance the presentation and taste.
Extra Tips for Better Results
For a burst of flavor, consider adding flavor extracts like almond or vanilla to the cake mixture. Use colorful chocolates for dipping to make the desserts visually appealing, adjusting the color palette for different themes.
Experiment with different shaped sprinkles or edible glitter to elevate the presentation even more to suit any occasion.
Recipe Variations of Valentine’s Day Cake Pops
Creative Twists
For a unique spin, try using different flavor combinations like red velvet cake with cream cheese frosting, or chocolate cake with peanut butter frosting. Each choice will provide a delightful explosion of flavors.
Alternatively, add a layer of melted white chocolate over the dark chocolate coating for a stunning visual and different taste experience.
Dietary Adjustments
If you need to cater to vegan guests, swap standard butter and frosting for plant-based alternatives. Also consider gluten-free cake mix for gluten-intolerant friends, ensuring everyone can enjoy these treats.
Conclusion about Valentine’s Day Cake Pops
In conclusion, making Valentine’s Day Cake Pops is not just about whipping together a dessert; it’s about sharing love, creativity, and joy with others. This easy and customizable recipe allows for endless possibilities, whether you’re indulging in a delicious treat or crafting unique gifts for someone special. The balance of moist cake and robust frosting, all enveloped in rich chocolate and decorated with joyful sprinkles, embodies the very essence of heartfelt celebrations.
The process of making these cake pops can be a delightful bonding experience, offering fun moments in the kitchen with family and friends. Whether for a love-struck partner, your children, or even yourself, these Valentine’s Day Cake Pops are a sweet and charming way to spread joy. Dive into this delightful recipe, and you’ll surely leave a trail of happiness, one cake pop at a time.
FAQs about Valentine’s Day Cake Pops
How long do Valentine’s Day Cake Pops last?
Valentine’s Day Cake Pops can last about 3-5 days at room temperature. If stored in the fridge, they may last longer but can slightly change texture.
Can I freeze Valentine’s Day Cake Pops?
Yes, you can freeze them for up to 3 months. Wrap each pop in plastic wrap and store them in a freezer-safe container.
What if I don’t have lollipop sticks?
If you lack lollipop sticks, you can place the formed cake balls directly into mini cupcake liners instead for serving.
How can I make them more festive?
You can use colored chocolate melts and a wide variety of sprinkles to make your cake pops festive for various occasions.
Can I make them ahead of time?
Absolutely! You can make them a few days in advance and store them in an airtight container until you’re ready to serve.
What flavors work best for the cake?
All cake flavors can work beautifully! Popular choices include chocolate, vanilla, or red velvet, depending on your preference.
What are some creative decorations for cake pops?
Consider adding edible glitter, themed sprinkles, or even writing messages with melting chocolate on the pops.
Can I use homemade frosting instead?
Yes, homemade frosting can be a delicious alternative. Just make sure it’s thick enough to hold the cake mixture together.
How do I prevent the pops from falling off the stick?
Ensure the cake balls are chilled before dipping. This helps them firm up and hold onto the stick firmly.
Is there a way to make them healthier?
You can use whole grain cake mix, reduce sugar in the frosting, or opt for natural sweeteners to make a healthier version.
Valentine’s Day Cake Pops
Ingredients
Cake Base
- 1 box box of cake mix (any flavor, e.g., chocolate, vanilla, red velvet)
- 1 can can of frosting (matching flavor, optional flavors can be combined)
Coating and Decorations
- 1 cup chocolate coating (melting chocolate or chocolate chips)
- 1 cup sprinkles (various colors and shapes for decoration)
- 12 pieces lollipop sticks


Instructions
Preparation
- Gather all your ingredients and tools, including cake mix, frosting, chocolate coating, sprinkles, and lollipop sticks. Preheat your oven according to the package instructions for the cake mix.
Cooking
- Prepare the cake batter as per the cake mix instructions. Pour it into a prepared baking dish and bake until a toothpick inserted in the center comes out clean. Allow the cake to cool completely on a wire rack.
- Once cooled, crumble the cake into a large bowl using your fingers, being careful not to over-process it into powder.
- Add the frosting to the crumbled cake and mix thoroughly until a sticky consistency forms that holds when shaped.
- Roll small portions of the mixture into balls, about 1 inch in diameter, ensuring they are compact.
- Place the rolled balls onto a lined baking sheet, insert lollipop sticks into each, and chill them in the refrigerator for approximately 30 minutes.
- Melt the chocolate coating in a microwave-safe bowl according to instructions, stirring until smooth.
- Dip each chilled cake pop into the melted chocolate coating, ensuring they are fully covered. Allow excess to drip off.
- While the chocolate is still wet, add your chosen sprinkles for decoration.
- Place the decorated pops upright in a styrofoam block or stand and let them harden for about 30 minutes.