
This post may contain affiliate links. As an Amazon Associate, I earn from qualifying purchases at no extra cost to you.
Table of Contents
🍴 Top Kitchen Essentials You'll Love


Introduction to Valentine’s Day Gender Reveal Cake
Are you preparing for a special occasion and looking for a unique idea? The Valentine’s Day Gender Reveal Cake is not your average dessert; it’s a delightful blend of celebration and suspense, perfect for announcing the gender of your baby. This cake combines light, fluffy layers with vibrant colors, turning dessert into a moment of joy and anticipation.
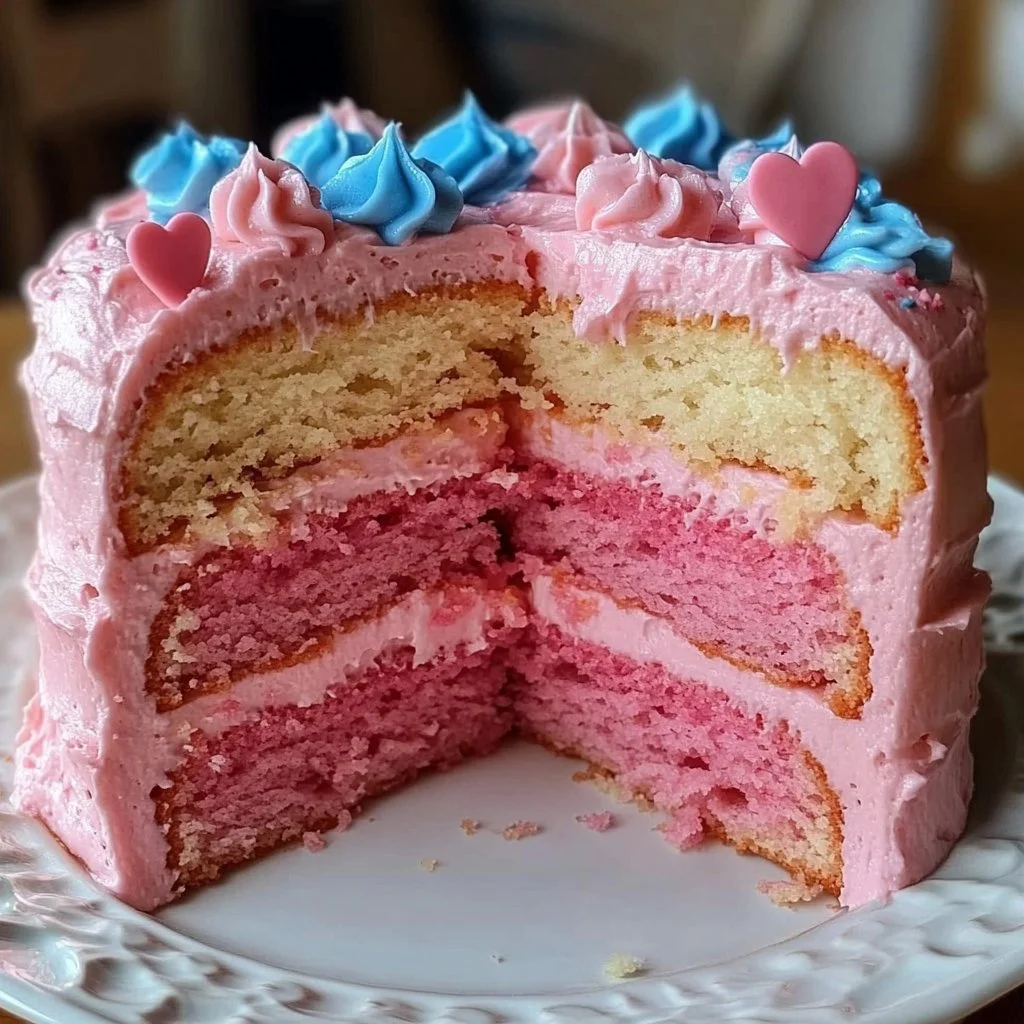
What truly sets this recipe apart is its duality. You’re not just baking a cake; you’re creating an experience that will be remembered by everyone involved. Picture the excited faces as the first slice reveals either a pink or blue center, signaling the baby’s gender in the most delicious way possible. This cake is more than just a treat; it’s a heartfelt symbol of all the love and anticipation surrounding the new addition to your family.
The beautiful balance of sweetness, lightness, and rich frosting makes this a cake that’s sure to be enjoyed by guests of all ages. Plus, the process of making the Valentine’s Day Gender Reveal Cake is easy, allowing even novice bakers to join in on the fun. Why settle for a simple cupcake or a store-bought dessert when you can create an irresistible centerpiece that tastes as great as it looks?
This cake offers an exciting twist to the traditional dessert, allowing for personalization with colors, designs, and flavors that can reflect the parents’ preferences. So, if you’re ready to impress family and friends with something truly special, let’s dive into how to make this fabulous Valentine’s Day Gender Reveal Cake!
Key Benefits of Valentine’s Day Gender Reveal Cake
Why You’ll Love This Recipe
- Delicious Flavor: A perfect sweet balance that everyone will enjoy.
- Visual Appeal: The surprise color inside creates stunning presentation.
- Easy to Make: Step-by-step directions that anyone can follow.
- Customizable: Easily adjust flavors and colors to fit any occasion.
- Perfect for Celebrations: Ideal for gender reveal parties or Valentine’s Day gatherings.
- Memorable Experience: Creates memorable moments during the celebration.
What Makes It Stand Out
The Valentine’s Day Gender Reveal Cake brings a unique experience to any gathering. Its blend of surprise and sweetness creates a buzz of excitement, making it the centerpiece of festivities. While traditional cakes are enjoyed for their taste, this cake offers something beyond flavor—it’s about the shared moment of revelation and joy.
The ability to customize the colors and decorations means you can make this cake truly yours. From pastel pink and blue to vibrant shades, the choices are endless. You can even personalize it further by incorporating different flavors or fillings, allowing for a wide variety of options to fit your vision for the perfect celebration.
Ingredients for Valentine’s Day Gender Reveal Cake
Complete Ingredient List with Measurements
- 2 cups all-purpose flour
- 1 ½ cups sugar
- ½ cup unsalted butter, softened
- 1 cup milk
- 3 ½ teaspoons baking powder
- 1 teaspoon vanilla extract
- ½ teaspoon salt
- 3 large eggs
- Pink food coloring
- Blue food coloring
- Frosting (buttercream or cream cheese)
Substitutes and Alternatives
If you have dietary restrictions or preferences, you can easily swap some ingredients. For dairy-free options, substitute unsweetened almond milk for regular milk and vegan butter in place of unsalted butter. If you’re aiming for a gluten-free version, simply replace the all-purpose flour with a gluten-free flour blend, ensuring it includes a binding agent.
For those who want a healthier cake, consider reducing the sugar by substituting half with applesauce or using a natural sweetener like honey or maple syrup instead. The taste may vary slightly, but the end goal of creating a delicious Valentine’s Day Gender Reveal Cake remains achievable.
How to Make Valentine’s Day Gender Reveal Cake – Step-by-Step Directions
Step 1 – Prepare Ingredients
Start by gathering all the ingredients on your countertop. This ensures you have everything ready for a smooth baking experience. Preheat your oven to 350°F (175°C) and grease and flour two 9-inch round cake pans to prevent sticking.
Step 2 – Cook the Base
In a large mixing bowl, cream together the softened butter and sugar until it achieves a light and fluffy consistency. This should take about 3-4 minutes. Next, add in the eggs one at a time, mixing thoroughly after each addition to ensure they are well incorporated.
Step 3 – Adding Liquid Ingredients
Once the eggs are combined, pour in the milk and vanilla extract. Stir until everything is blended smoothly, creating a creamy mixture that sets the stage for your batter.
Step 4 – Combine Dry Ingredients
In a separate bowl, mix together the flour, baking powder, and salt. Gradually add this dry mixture into the wet ingredients case, stirring gently until just combined. Be careful not to overmix, as this could lead to a denser cake.
Step 5 – Divide and Color the Batter
Divide the batter between two mixing bowls. Add pink food coloring to one bowl and blue food coloring to the other. Stir until you achieve your desired shades, ensuring the colors are vibrant and evenly mixed.
Step 6 – Pour and Bake
Pour the pink batter into one of the prepared cake pans and the blue batter into the second. Place them in the preheated oven and bake for 25-30 minutes. You’ll know they are ready when a toothpick inserted into the center comes out clean.
Step 7 – Cool the Cakes
Once baked, allow the cakes to cool in their pans for about 10 minutes. Then carefully turn them out onto wire racks to cool completely. This cooling step is crucial for preventing your frosting from melting when applied later.
Step 8 – Frost the Cake
Once the cakes are completely cool, it’s time to stack and frost. Place one layer on a serving plate and spread a generous amount of frosting on top. Layer the second cake on top and apply frosting around the sides and top. Feel free to get creative with your decoration!
Step 9 – Final Touches
For a personal touch, consider adding decorations that match your theme, such as fondant hearts, edible glitter, or themed toppers. The final presentation should be as appealing as the taste.
Serving Suggestions for Valentine’s Day Gender Reveal Cake
Best Occasions to Serve This Dish
The Valentine’s Day Gender Reveal Cake is perfect for gender reveal parties, Valentine’s Day gatherings, or baby showers. It sparks joy by combining the sweetness of a delicious cake with the thrill of finding out the gender of your baby, making it an unforgettable part of the event.
Another great opportunity to serve this cake is at family gatherings or celebrations where love and family are central themes. Birthdays, anniversaries, or even just a regular weekend celebration become elevated with this show-stopping dessert.
What to Serve With It
Pair your Valentine’s Day Gender Reveal Cake with a side of fresh berries or ice cream to add a delightful contrast to the sweetness of the cake. Drinks like sparkling lemonade, champagne, or even coffee work beautifully along with the cake, enhancing the overall taste experience.
Let’s not forget vibrant decorations and themed decor around the cake that echo your gender reveal colors. Doing so will create a visually stunning display that complements the cake perfectly.
How to Store Valentine’s Day Gender Reveal Cake Properly
Best Storage Practices
To keep your Valentine’s Day Gender Reveal Cake fresh, store it in an airtight container at room temperature if you plan to consume it within a couple of days. If you need to store it for longer, refrigerate it, ensuring you cover it well to avoid drying out.
For extended storage, consider freezing the cake. Wrap each layer tightly in plastic wrap and then in aluminum foil to prevent freezer burn. This method can keep the cake fresh for up to three months.
Reheating and Freezing Tips
When you’re ready to enjoy the cake after freezing, simply transfer it to the refrigerator to thaw overnight. For a fresh-out-of-the-oven taste, consider lightly warming individual slices in the microwave for about 10-15 seconds, ensuring they don’t become too hot.
If the cake is frosted, it’s best to let it come to room temperature before serving. This keeps the frosting from becoming too stiff and allows the flavors to shine through.
Tips & Tricks for Valentine’s Day Gender Reveal Cake
Mistakes to Avoid
1 – Overmixing the Batter: This can lead to a dense cake rather than a light and fluffy one. Mix just until combined.
2 – Not Prepping the Pans: Skipping greasing and flouring can lead to sticking. Ensure your pans are properly prepared.
3 – Underbaking: Always check with a toothpick for doneness. A slightly underbaked cake can collapse as it cools.
4 – Ignoring Temperature: Make sure all ingredients are at room temperature for consistent mixing.
5 – Skipping Color Tests: Always mix a small drop of food coloring first to ensure the desired shade before committing to your entire batch.
Extra Tips for Better Results
To elevate the flavor, incorporate a hint of almond extract along with the vanilla. For added texture, consider folding in some mini chocolate chips or crushed nuts into the batter. These enhancements can further set your Valentine’s Day Gender Reveal Cake apart from the rest. Don’t shy away from experimenting with layered fillings for added surprise!
Recipe Variations of Valentine’s Day Gender Reveal Cake
Creative Twists
1 – Flavor Variations: Instead of vanilla, experiment with lemon or almond for your cake base. Each flavor brings its unique twist and can enhance the overall cake experience.
2 – Filling Options: Consider filling the cake layers with jam, fruit puree, or flavored buttercream to add a burst of flavor in each bite.
3 – Color Swirls: Instead of dividing the batter, you could create a marble effect by swirling the pink and blue batters together before pouring them into the pans, making for an artistic presentation.
4 – Gluten-Free Twist: Use coconut flour or almond flour for a gluten-free version that retains delicious flavor and texture.
Dietary Adjustments
For a vegan option, replace the eggs with flax eggs (1 tablespoon of flaxseed meal mixed with 2.5 tablespoons of water equals one egg) and use non-dairy alternatives for the butter and milk. For a sugar-free variation, consider using erythritol or stevia in place of sugar, but ensure you test the sweetness level for your taste.
Conclusion about Valentine’s Day Gender Reveal Cake
Baking the Valentine’s Day Gender Reveal Cake is more than just completing a recipe; it’s about creating cherished memories and special moments with loved ones. This cake combines the excitement of a gender reveal party with the joy of baking, offering a delicious treat for everyone involved. Its light and fluffy texture, combined with stunning colors, make it an ideal centerpiece at any celebration.
With easy preparation steps, customizable flavors, and the opportunity to inject personal creativity, this cake promises to bring smiles and happy tears as parents discover the gender of their child. So gather your ingredients, get your loved ones involved, and create moments that will linger in your hearts—because nothing says love and anticipation quite like the Valentine’s Day Gender Reveal Cake.
FAQs about Valentine’s Day Gender Reveal Cake
Can I make this cake ahead of time?
Yes, you can bake the cake layers a day or two in advance. Just store them properly covered until you’re ready to frost and serve.
How do I store leftover cake?
Store leftover cake in an airtight container at room temperature for two days or refrigerate for longer freshness.
Can I freeze the cake?
Absolutely! Wrap each layer tightly in plastic wrap and foil before freezing. It can last up to three months in the freezer.
What if I don’t have food coloring?
If you don’t have food coloring, you can use natural alternatives like beet juice for pink or blueberry puree for blue.
Is this cake suitable for different dietary needs?
Yes! This recipe can be adapted for gluten-free, dairy-free, and vegan diets with appropriate substitutions.
What type of frosting works best?
Buttercream or cream cheese frosting are both great options for this cake, adding sweetness and creaminess that complement the flavors.
How can I determine the cake’s doneness?
Check for doneness by inserting a toothpick into the center of the cake. If it comes out clean, the cake is done.
Can I decorate the cake in advance?
You can decorate the cake several hours ahead of time, but keep it covered or in a cool place to prevent drying.
What are some serving suggestions?
Pair the cake with fresh fruit, ice cream, or whipped cream to enhance its delicious flavor during serving.
How can I avoid a dry cake?
Ensure not to overbake the cake and keep an eye on it towards the end of the baking time for the best results.

Valentine’s Day Gender Reveal Cake
Ingredients
Cake Ingredients
- 2 cups all-purpose flour
- 1.5 cups sugar
- 0.5 cups unsalted butter, softened
- 1 cup milk Can substitute with almond milk for dairy-free option.
- 3.5 teaspoons baking powder
- 1 teaspoon vanilla extract
- 0.5 teaspoon salt
- 3 large eggs Can replace with flax eggs for vegan option.
- Pink food coloring
- Blue food coloring
- Frosting (buttercream or cream cheese)


Instructions
Preparation
- Gather all the ingredients on your countertop and preheat your oven to 350°F (175°C). Grease and flour two 9-inch round cake pans.
Mixing the Batter
- In a large mixing bowl, cream together the softened butter and sugar until light and fluffy, about 3-4 minutes.
- Add the eggs one at a time, mixing thoroughly after each addition.
- Pour in the milk and vanilla extract, stirring until smoothly blended.
- In a separate bowl, mix flour, baking powder, and salt. Gradually add this to the wet mixture, stirring gently until just combined.
Coloring the Batter
- Divide the batter between two bowls. Add pink food coloring to one bowl and blue to the other, stirring until colors are vibrant.
Baking
- Pour the pink batter into one prepared pan and the blue batter into the other. Bake for 25-30 minutes, or until a toothpick inserted comes out clean.
Cooling and Frosting
- Allow cakes to cool in the pans for 10 minutes before transferring them to wire racks to cool completely.
- Once cool, stack the layers with frosting in between and around the sides. Decorate creatively.