
This post may contain affiliate links. As an Amazon Associate, I earn from qualifying purchases at no extra cost to you.
Table of Contents
🍴 Top Kitchen Essentials You'll Love


Introduction to Valentine’s Day Heart-Shaped Cakes
Valentine’s Day is not just about flowers and hearts; it is about the sweet gestures that express love. One of those delightful gestures can certainly be found in the form of Valentine’s Day Heart-Shaped Cakes. Have you ever thought about how a beautifully crafted cake can bring a smile to your loved one’s face? This recipe takes ordinary cake and transforms it into an extraordinary surprise, perfect for celebrating love in a unique way.
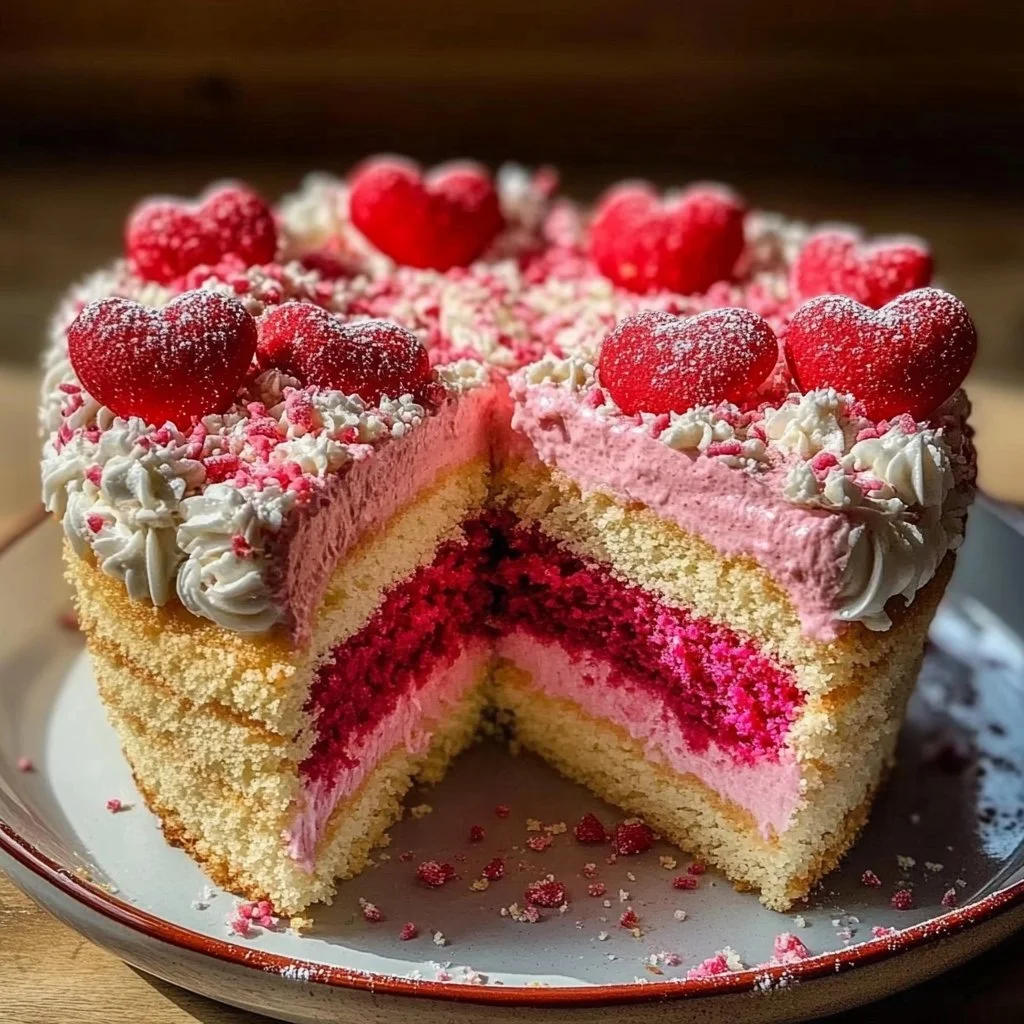
What makes Valentine’s Day Heart-Shaped Cakes so special? It’s the combination of flavors and the thoughtfulness behind presenting a cake that is not only delicious but visually stunning as well. The heart shape alone symbolizes affection, making it an ideal treat for the occasion. The moist texture and the sweetness of the cake, combined with the colors red and pink, evoke the spirit of love while appealing to one’s aesthetic senses.
Making Valentine’s Day Heart-Shaped Cakes is quite easy, especially when you follow this straightforward recipe. With simple ingredients that you likely already have in your kitchen, you can create something that looks professionally made without having to be a master baker. Whether you are surprising a partner, celebrating with family, or even indulging in a little self-love, this recipe is an inviting way to mark the occasion.
In addition to being easy and delicious, these heart-shaped cakes can be personalized to your taste. You can choose different flavors, add fillings, or even craft your own signature icing. The sky is the limit when it comes to decorating them, making it a great activity to share with friends or family. So, let’s dive into this delightful adventure of baking Valentine’s Day Heart-Shaped Cakes.
Key Benefits of Valentine’s Day Heart-Shaped Cakes
Why You’ll Love This Recipe
- Easy to make with simple ingredients you likely have at home.
- Beautiful heart shape perfect for Valentine’s Day celebrations.
- moist and flavorful cake that can be customized to your liking.
- A delightful way to express your feelings through food.
- Perfect for sharing with loved ones or enjoying solo.
What Makes It Stand Out
Valentine’s Day Heart-Shaped Cakes stand out because they capture the essence of the holiday. The heart shape symbolizes love, and the bright colors resonate with affection and passion, making it more than just a dessert. Additionally, the ability to customize the flavors or the decorations allows each individual to create a cake that tells their own unique love story.
This recipe can easily be adapted for various occasions, too. Whether you’re celebrating an anniversary, a birthday, or simply an ordinary day that deserves a sprinkle of joy, heart-shaped cakes can be an uplifting centerpiece that brings everyone together. So, don your apron, and get ready to create something special!
Ingredients for Valentine’s Day Heart-Shaped Cakes
Complete Ingredient List with Measurements
- 2 cups all-purpose flour
- 1 ½ cups granulated sugar
- ½ cup unsalted butter, softened
- 1 cup milk
- 3 ½ teaspoons baking powder
- 1 teaspoon vanilla extract
- ½ teaspoon salt
- 3 large eggs
- Red and pink food coloring
- Icing for decoration
Substitutes and Alternatives
For those who have allergies or specific dietary needs, there are several substitutions you can consider. If you are gluten-sensitive, you can swap the all-purpose flour for a gluten-free flour blend. For a dairy-free version, opt for almond milk or coconut milk as a milk substitute and substitute the butter with a plant-based alternative.
If you fancy experimenting further, try using coconut sugar instead of granulated sugar for a more natural sweetness. Other flavor additions, such as almond or lemon extract, can provide a unique twist to the standard vanilla flavor. Tailoring the recipe to suit your dietary requirements or taste preferences allows you to enjoy Valentine’s Day Heart-Shaped Cakes without compromise.
How to Make Valentine’s Day Heart-Shaped Cakes – Step-by-Step Directions
Step 1 – Prepare Ingredients
Start by gathering all your ingredients and measuring them out. This ensures a smooth baking process. Preheat your oven to 350°F (175°C) and grease and flour your heart-shaped cake pans to prepare them for the batter.
Step 2 – Cook the Base
In a large bowl, cream together the softened butter and granulated sugar until the mixture is light and fluffy, this should take about 3–5 minutes. Once done, add in the eggs, one at a time, mixing well after each addition. Then, stir in the vanilla extract for flavor.
Step 3 – Combine Dry Ingredients
In another bowl, combine the all-purpose flour, baking powder, and salt. Mixing the dry ingredients separately helps ensure that the baking powder is evenly distributed when added to the wet mixture.
Step 4 – Mix Wet and Dry Ingredients
Gradually add the dry mixture to the creamed butter and sugar, alternating with the milk. Mix until just combined; be careful not to overmix, as this can lead to dense cakes. The batter should be smooth and slightly thick.
Step 5 – Color the Batter
Divide the batter evenly into two bowls. Tint one bowl with red food coloring and the other with pink. Stir gently until the colors reach the desired shades. This step adds a fun and festive touch to your Valentine’s Day Heart-Shaped Cakes.
Step 6 – Pour Into Cake Pans
Pour the red batter into one heart-shaped cake pan and the pink batter into the other. Spread the batter evenly using a spatula to ensure even baking. Filling the pans to about two-thirds full is ideal to allow for rising during baking.
Step 7 – Bake in the Oven
Carefully place both cake pans in the preheated oven. Bake for approximately 25-30 minutes. To test for doneness, insert a toothpick into the center of the cakes; it should come out clean. If there’s batter stuck to it, give it a few more minutes.
Step 8 – Cool the Cakes
Once baked, remove the pans from the oven and let the cakes cool in their pans for about 10 minutes. This allows them to set before you turn them out onto a wire rack to cool completely.
Step 9 – Layer the Cakes
Once the cakes are completely cooled, layer them by placing the red cake on the bottom and topping it with the pink one. Use icing to stick them together and provide a decorative finish.
Step 10 – Decorate
Frost the layers with your favorite icing and get creative with decorations! Use sprinkles, edible glitter, or even fresh fruits to embellish your Valentine’s Day Heart-Shaped Cakes and make them truly stand out.
Serving Suggestions for Valentine’s Day Heart-Shaped Cakes
Best Occasions to Serve This Dish
Valentine’s Day Heart-Shaped Cakes are a fantastic treat for many occasions. The most obvious is, of course, Valentine’s Day itself, where sharing sweet treats can add a romantic touch to the day. However, they also suit anniversaries, birthdays, bridal showers, or even a casual gathering with friends and family.
Each event can be made more special with a personal touch, whether it involves customizing the flavors or themes with special messages or decorations that embody the occasion. The heart shape inherently invites joy and sharing.
What to Serve With It
While Valentine’s Day Heart-Shaped Cakes can stand alone as a magical dessert, consider pairing them with fresh strawberries or raspberries to enhance the fruity flavors. A scoop of vanilla or strawberry ice cream can also complement the sweetness, adding creamy richness.
If you want to elevate the experience, a drizzle of chocolate sauce or a dollop of whipped cream can take it over the top. These pairings not only beautify the plate but also add different flavors and textures, appealing to every palate.
How to Store Valentine’s Day Heart-Shaped Cakes Properly
Best Storage Practices
To preserve the freshness of your Valentine’s Day Heart-Shaped Cakes, it’s crucial to store them correctly. If the cakes are frosted, place them in an airtight container at room temperature if you plan to consume them within a day or two. If you need to store them for longer, consider refrigerating them in the same manner.
For unfrosted cakes, simply wrap them tightly in plastic wrap and store them in the fridge. This helps maintain moisture and prevents them from drying out.
Reheating and Freezing Tips
If you have leftover cakes, they can be frozen for future enjoyment. Wrap the cakes tightly in plastic wrap and then in aluminum foil to prevent freezer burn. They can last in the freezer for up to three months.
When ready to enjoy, let them thaw overnight in the refrigerator or at room temperature for a few hours. To reheat, simply use a microwave in short intervals until warm; be careful not to overheat to avoid a dry texture.
Tips & Tricks for Valentine’s Day Heart-Shaped Cakes
Mistakes to Avoid
- Overmixing the batter: This can lead to tough cakes. Only mix until ingredients are just combined.
- Not cooling the cakes fully: Avoid icing warm cakes, as this can cause the icing to melt and slide off.
- Using expired ingredients: Always check expiration dates, especially with baking powder and eggs.
Extra Tips for Better Results
For added flavor, consider adding chocolate chips to the batter or infusing your milk with vanilla beans. Also, to enhance the decoration, use vibrant food coloring and experiment with different icing techniques, such as swirling or piping.
Keep your cakes moist by slightly underbaking them; they will continue to cook from residual heat once removed from the oven.
Recipe Variations of Valentine’s Day Heart-Shaped Cakes
Creative Twists
- Chocolate Lovers: Replace half of the all-purpose flour with cocoa powder for a rich chocolate version.
- Red Velvet: Create a red velvet cake by adding cocoa powder and buttermilk for flavor and color.
- Funfetti: Add colorful sprinkles to the batter for a festive surprise when slicing.
Dietary Adjustments
To make the cakes vegan, substitute eggs with flax eggs and replace the milk with plant-based milk. For a gluten-free version, use gluten-free all-purpose flour instead of regular flour and remain mindful of the baking powder.
Conclusion about Valentine’s Day Heart-Shaped Cakes
Baking Valentine’s Day Heart-Shaped Cakes is not just about the final product but also about the process of creating something with love and passion. This cake serves as the perfect symbol for the celebration of romance, affection, and joy. The moist, fluffy texture combined with the visually appealing heart shape and vibrant colors makes it an irresistible treat not only for Valentine’s Day but for any occasion that calls for a sweet celebration.
Moreover, the ease of preparation allows everyone, regardless of baking experience, to partake in this delightful culinary adventure. By following this recipe, you not only get to indulge in a delicious dessert but also create memories with loved ones that will last long after the last slice has been savored. So gather your ingredients, fire up the oven, and let the magic of baking bring warmth into your heart and home.
FAQs about Valentine’s Day Heart-Shaped Cakes
Can I make this cake ahead of time?
Absolutely! You can bake the cakes in advance and store them in the fridge or freeze them. Just frost them prior to serving.
How do I store leftover cakes?
Keep leftover cakes in an airtight container at room temperature for a maximum of two days or refrigerated for longer freshness.
What can I substitute for eggs in this recipe?
You can use flax eggs or applesauce as egg replacements for a vegan version of the cake.
Can I freeze this cake?
Yes, wrap the cakes tightly and freeze for up to three months. Thaw before serving and enjoy!
How can I enhance the flavor of the cake?
Consider adding almond extract or lemon zest to elevate flavor profiles.
What’s the best way to decorate the cakes?
You can use buttercream frosting, whipped cream, or even ganache, topped with fruits or sprinkles for a fun touch.
Is this recipe suitable for gluten-free diets?
Yes, simply substitute the all-purpose flour with a gluten-free flour blend to enjoy this cake without gluten.
How long does this cake stay fresh?
When stored properly, the cake can remain fresh for 2-3 days at room temperature or longer when refrigerated.
Can I make mini heart-shaped cakes with this recipe?
Yes, use mini heart-shaped pans instead of standard ones for adorable smaller cakes perfect for gatherings.
What type of icing works best for decorating?
A simple buttercream icing is ideal, as it holds shape well and can be easily flavored and colored.

Valentine’s Day Heart-Shaped Cakes
Ingredients
For the Cake Batter
- 2 cups all-purpose flour Can be substituted with gluten-free flour
- 1.5 cups granulated sugar Coconut sugar can be used as an alternative
- 0.5 cups unsalted butter, softened Use plant-based alternative for dairy-free
- 1 cups milk Almond or coconut milk can be used as a substitute
- 3.5 teaspoons baking powder
- 1 teaspoon vanilla extract Add other extracts for flavor variations
- 0.5 teaspoon salt
- 3 large eggs Substitute with flax eggs for a vegan version
- to taste Red and pink food coloring Used to color the batter
- as needed Icing for decoration Buttercream or whipped cream are good options


Instructions
Preparation
- Preheat oven to 350°F (175°C) and grease and flour heart-shaped cake pans.
- Gather and measure all ingredients.
Making the Batter
- Cream together softened butter and granulated sugar until light and fluffy (3-5 minutes).
- Add eggs one at a time, mixing well after each addition, then stir in vanilla extract.
- In another bowl, combine the flour, baking powder, and salt.
- Gradually add the dry ingredients to the wet mixture, alternating with milk, until just combined.
- Divide the batter into two bowls and tint one with red and the other with pink food coloring.
Baking
- Pour the red batter into one cake pan and the pink batter into the other, filling them about two-thirds full.
- Bake for 25-30 minutes, testing for doneness with a toothpick.
- Let the cakes cool in their pans for 10 minutes, then transfer to a wire rack to cool completely.
Assembling and Decorating the Cakes
- Layer the cooled cakes with the red cake on the bottom and the pink one on top, using icing to hold them together.
- Frost and decorate with your favorite icing and additional embellishments like sprinkles or fruits.