
This post may contain affiliate links. As an Amazon Associate, I earn from qualifying purchases at no extra cost to you.
Table of Contents
The holiday season is filled with joy, and nothing embodies that spirit quite like baking. If you’re searching for a delightful addition to your holiday spread, look no further than the Winter Wonderland Christmas Cake: 5 Reasons You’ll Adore It. This cake is not only beautifully festive but also easy to make and irresistibly delicious. Imagine a soft, fluffy cake that melts in your mouth, surrounded by fluffy frosting and decorated with charming snowflakes. Doesn’t that sound perfect for your holiday gatherings?
Baking can be an intimate experience, evoking memories, traditions, and the warmth of loved ones. The Winter Wonderland Christmas Cake will fill your kitchen with an enchanting aroma, evoking memories of wintery nights spent cozying up with family. Whether you’re a seasoned baker or a beginner in the kitchen, this recipe offers a simple route to dessert nirvana. Just picture cutting into a moist, fluffy cake, revealing its rich layers and inviting frosting. Can you already feel the holiday magic?
This cake is special not just for its taste, but also for its versatility. It’s not only equipped to become a centerpiece at your holiday feast, but it can also be made for various occasions throughout the winter season. Best of all, it caters to a broad range of palates, making it an appealing option for family gatherings. If you’re ready to elevate your holiday baking game, let’s dive deeper into why the Winter Wonderland Christmas Cake will quickly become a favorite.
🍴 Top Kitchen Essentials You'll Love


Key Benefits of Winter Wonderland Christmas Cake: 5 Reasons You’ll Adore It
Why You’ll Love This Recipe
- Delicious Flavor: A harmonious blend of buttery texture and sweet vanilla makes every bite a delight.
- Easy to Make: The straightforward steps ensure both novice and experienced bakers can enjoy this recipe.
- Visual Appeal: Its gorgeous presentation adds a festive touch to any holiday table.
- Customizable: Whether you love rich chocolate or fresh fruits, you can easily adapt this cake to your liking.
- Family-Friendly Fun: Baking together creates lasting memories, making this perfect for family bonding time.
What Makes It Stand Out
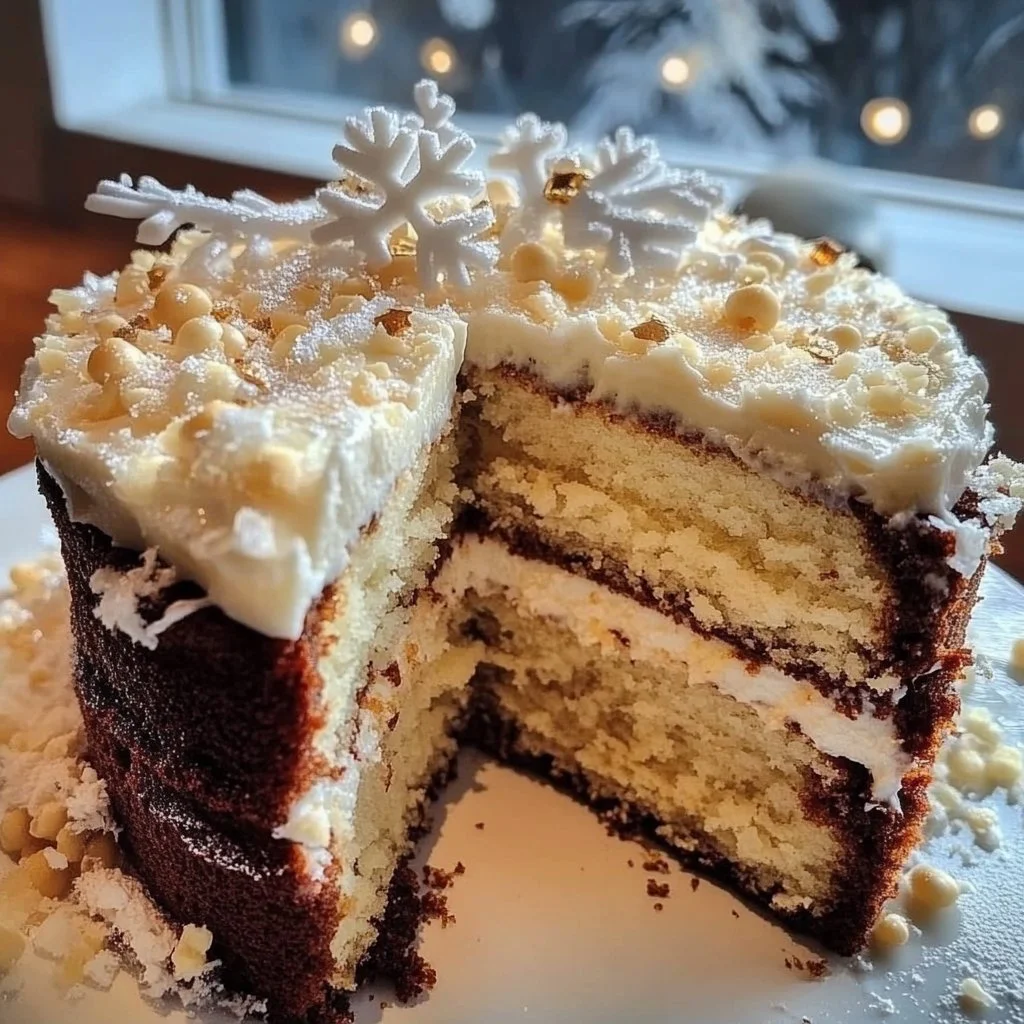
The Winter Wonderland Christmas Cake has that magical quality that sets it apart from other holiday desserts. With its luscious buttercream and decorative snowflakes, it not only pleases the palate but tantalizes the eyes too. This creativity invites you to give your own personal touch by choosing flavors or decorations that resonate with you.
Moreover, this cake is versatile enough for numerous occasions. While it’s undoubtedly perfect for Christmas, it can also shine at birthdays or winter celebrations. With a few simple tweaks, this recipe can take on a life of its own, tailoring it to whatever event you may be planning.
Ingredients for Winter Wonderland Christmas Cake: 5 Reasons You’ll Adore It
Complete Ingredient List with Measurements
- 2 cups all-purpose flour
- 1 cup sugar
- 1 cup unsalted butter, softened
- 4 large eggs
- 1 cup milk
- 2 teaspoons baking powder
- 1 teaspoon vanilla extract
- 1/2 teaspoon salt
- 2 cups powdered sugar
- 3 tablespoons milk for frosting
- Decorative snowflakes (optional)
Each ingredient plays a crucial role in achieving the perfect balance of flavor and texture. For example, the unsalted butter adds creaminess, while the baking powder helps achieve that delightful rise.
Substitutes and Alternatives
If you’re concerned about dietary needs or allergies, swapping ingredients is quite simple. You can use gluten-free flour in place of all-purpose flour or replace regular sugar with coconut sugar for a lower glycemic index option.
For creating a dairy-free version, substituting the unsalted butter with a plant-based alternative and using almond or soy milk will work perfectly. This adaptability makes the Winter Wonderland Christmas Cake versatile for almost any dietary requirement.
How to Make Winter Wonderland Christmas Cake: 5 Reasons You’ll Adore It – Step-by-Step Directions
Step 1 – Prepare Ingredients
Gather all your ingredients and measure them out beforehand. This step streamlines the process and ensures nothing is forgotten.
Step 2 – Preheat the Oven
Preheat your oven to 350°F (175°C). Getting the temperature right from the start ensures an even bake.
Step 3 – Prepare the Cake Pans
Grease and flour two 9-inch round cake pans. This prevents the cakes from sticking and makes for an easy release.
Step 4 – Cream Butter and Sugar
In a bowl, cream together the softened butter and sugar until light and fluffy. This usually takes about 3-5 minutes and is crucial for the cake’s texture.
Step 5 – Add the Eggs
Add the eggs one by one, beating well after each addition. This helps incorporate air and ensures a rich, moist cake.
Step 6 – Mix in Vanilla Extract
Next, mix in the vanilla extract, which adds a warm, inviting flavor to your cake batter.
Step 7 – Combine Dry Ingredients
In another bowl, combine the flour, baking powder, and salt. Whisking these together evenly distributes the leavening agent.
Step 8 – Alternate Dry Ingredients and Milk
Gradually add the dry mixture to the creamed butter and sugar, alternating with the milk. Start and end with flour to ensure proper incorporation.
Step 9 – Pour Batter into Pans
Divide the batter evenly between the two prepared pans. Smooth the tops with a spatula for a flat surface.
Step 10 – Bake the Cakes
Bake in the preheated oven for 25-30 minutes or until a toothpick inserted in the center comes out clean. Keep an eye on them as baking times can vary with different ovens.
Step 11 – Cool the Cakes
Once baked, let the cakes cool completely in the pans for about 10 minutes. Then, turn them out onto wire racks to cool completely before frosting.
Step 12 – Prepare the Frosting
To make the frosting, mix the powdered sugar with milk until you achieve a smooth and spreadable consistency. Adjust as needed.
Step 13 – Frost the Cooled Cakes
Once the cakes are completely cool, frost the top of one layer, place the second layer on top, and frost the sides and top.
Step 14 – Decorate (Optional)
For a seasonal touch, add decorative snowflakes on top. They give a whimsical look that’s fitting for the Winter Wonderland theme.
Serving Suggestions for Winter Wonderland Christmas Cake: 5 Reasons You’ll Adore It
Best Occasions to Serve This Dish
The Winter Wonderland Christmas Cake is perfect for holiday parties, family gatherings, or winter birthdays. Its festive appearance and delightful taste make it a star attraction on any table. You can even serve it at cozy winter nights, topped with hot cocoa for a matching seasonal delight.
What to Serve With It
- Hot chocolate or eggnog
- Coffee or tea
- Fresh fruit like berries or citrus slices
- Ice cream or whipped cream
Each of these pairings adds to the overall experience, making each bite of cake an indulgent pleasure.
How to Store Winter Wonderland Christmas Cake Properly
Best Storage Practices
To keep your Winter Wonderland Christmas Cake fresh, store it in an airtight container in the fridge. This will maintain its moisture and flavor for several days.
If you’d like to savor it later, you can also wrap the cake tightly in plastic wrap and place it in the freezer. Just ensure it’s properly sealed to avoid freezer burn.
Reheating and Freezing Tips
When reheating, you can place a slice in the microwave for about 15-20 seconds. For frozen cake, let it thaw in the fridge overnight for optimum taste and texture.
Tips & Tricks for Winter Wonderland Christmas Cake: 5 Reasons You’ll Adore It
Mistakes to Avoid
- Overmixing the batter: This can result in a tougher cake rather than a light and fluffy one.
- Not measuring ingredients accurately: Use proper measuring cups for dry and wet ingredients to ensure correct ratios.
- Forgetting to preheat the oven: Always preheat your oven for optimal baking results.
- Skipping the cooling phase: Attempting to frost a warm cake can melt your frosting and lead to a messy finish.
- Not checking doneness: Always use a toothpick to check if the cakes are fully baked to avoid a gooey center.
Extra Tips for Better Results
- Add flavor hints: Try incorporating citrus zest or spices like nutmeg for added depth.
- Use quality ingredients: High-quality butter and vanilla will elevate the flavor profile of the cake tremendously.
- Creative decorations: Add edible glitter or fresh berries for added flair and seasonal aesthetics.
Recipe Variations of Winter Wonderland Christmas Cake: 5 Reasons You’ll Adore It
Creative Twists
- Chocolate Version: Incorporate cocoa powder to create a chocolate cake twist perfect for chocolate lovers.
- Fruit Infusion: Add shredded coconut or dried fruits into the mix for a more tropical take on the traditional recipe.
- Spiced Variation: Elevate the holiday spirit by infusing cinnamon or ginger into the batter for a warming flavor.
Dietary Adjustments
You can easily adapt this recipe to suit different diets. For a vegan take, try flaxseed meal for eggs, coconut oil for butter, and plant-based milk. For gluten-free, simply use flour blends that suit your needs.
Conclusion about Winter Wonderland Christmas Cake: 5 Reasons You’ll Adore It
The Winter Wonderland Christmas Cake is a festive delight perfect for celebrating the season. This sweet treat combines flavor and charm, making it an undeniable hit with friends and family. Its easy preparation ensures that anyone can whip it up, creating an inviting and cozy atmosphere. So gather your loved ones, pull out those mixing bowls, and let the magic of baking bring everyone together. The Winter Wonderland Christmas Cake promises not just to be a dessert but an experience full of joy and warmth.
FAQs about Winter Wonderland Christmas Cake: 5 Reasons You’ll Adore It
Can I prepare it ahead of time?
Yes! This cake can be baked a day in advance. Just store it properly in the fridge until you’re ready to frost.
Can I freeze it?
Absolutely. The cake can be frozen for up to three months. Just ensure it’s well-wrapped to maintain its flavor.
How long does it last?
Stored in the fridge, the cake can last for about a week if properly sealed.
What are the best substitutions?
You can use gluten-free flour or dairy-free milk options as substitutes based on dietary needs.
Is this recipe family-friendly?
Definitely! It’s simple enough for kids to help with, leading to some enjoyable quality time in the kitchen.
Can I decorate it differently?
Of course! Use your creativity to add fruits, chocolate shavings, or colorful sprinkles for a fun twist.
Is it possible to make mini cakes?
Yes, you can use small round pans to create adorable mini versions of the cake.
What should I do if it’s too dry?
Ensure you don’t overbake. If it happens, consider adding a drizzle of syrup before serving for moisture.
Can I add layers?
You can absolutely enhance this cake with additional layers! Adding fruit preserves or ganache between layers would be delightful.
What’s the secret to a perfectly fluffy cake?
Creaming the butter and sugar well is key. Make sure they are light and fluffy to create that airy texture inside your cake.
Winter Wonderland Christmas Cake
Ingredients
For the Cake
- 2 cups all-purpose flour Can substitute with gluten-free flour.
- 1 cup sugar Regular or coconut sugar for a lower glycemic index.
- 1 cup unsalted butter, softened Use plant-based alternative for dairy-free version.
- 4 large eggs Can substitute with flaxseed meal for vegan option.
- 1 cup milk Substitute with almond or soy milk for dairy-free.
- 2 teaspoons baking powder
- 1 teaspoon vanilla extract
- ½ teaspoon salt
For the Frosting
- 2 cups powdered sugar
- 3 tablespoons milk for frosting Adjust for desired consistency.
For Decoration
- optional Decorative snowflakes For a festive touch.


Instructions
Preparation
- Gather all ingredients and measure them out beforehand.
- Preheat your oven to 350°F (175°C).
- Grease and flour two 9-inch round cake pans.
Mixing and Baking
- In a bowl, cream together the softened butter and sugar until light and fluffy (about 3-5 minutes).
- Add eggs one by one, beating well after each addition.
- Mix in the vanilla extract.
- In another bowl, combine flour, baking powder, and salt.
- Gradually add the dry mixture to the creamed butter and sugar, alternating with the milk.
- Divide the batter evenly between the prepared pans and smooth the tops.
- Bake for 25-30 minutes or until a toothpick comes out clean.
Cooling and Frosting
- Let the cakes cool in the pans for about 10 minutes, then turn them out onto wire racks.
- To make the frosting, mix powdered sugar with milk to desired consistency.
- Once the cakes are cool, frost the top of one layer, place the second layer on top, and frost the sides.
Decoration
- For a seasonal touch, add decorative snowflakes on top.