
This post may contain affiliate links. As an Amazon Associate, I earn from qualifying purchases at no extra cost to you.
Table of Contents
🍴 Top Kitchen Essentials You'll Love


Introduction to Red Velvet Snowballs
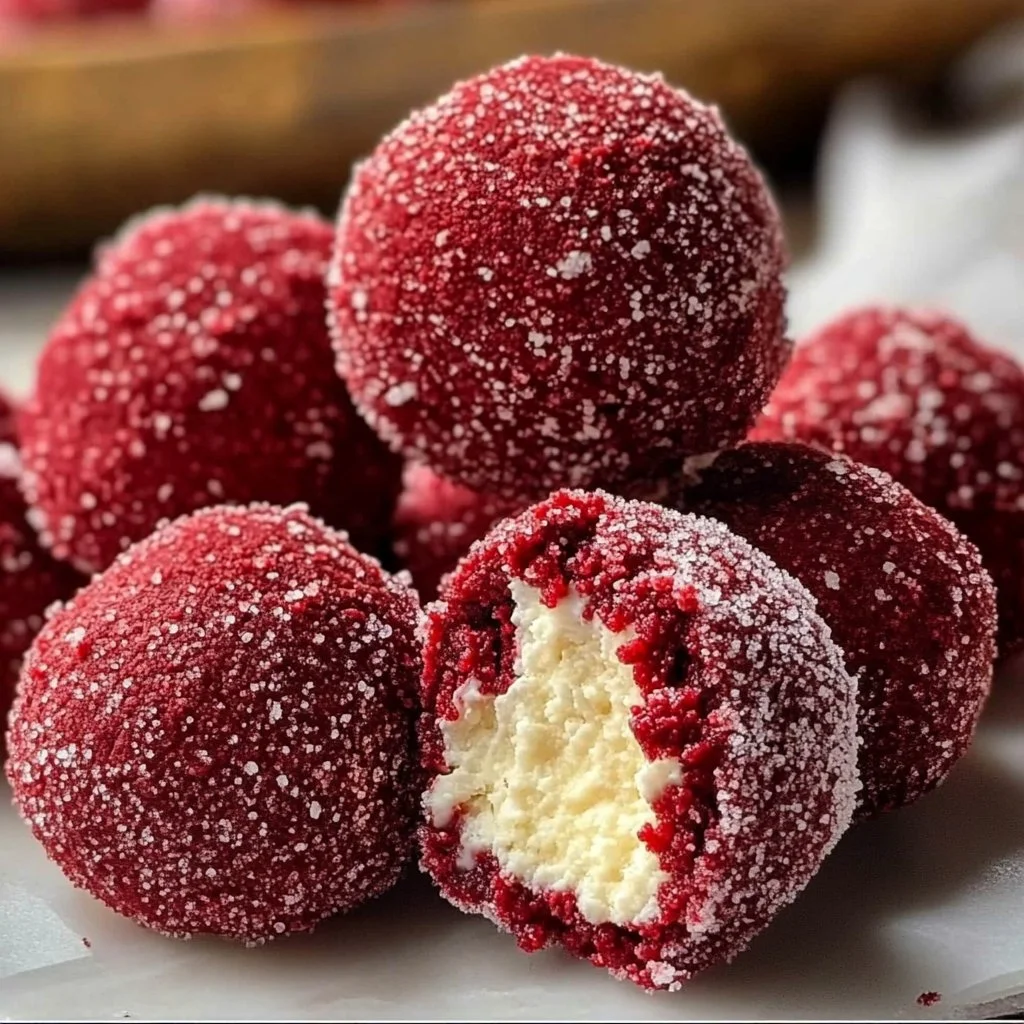
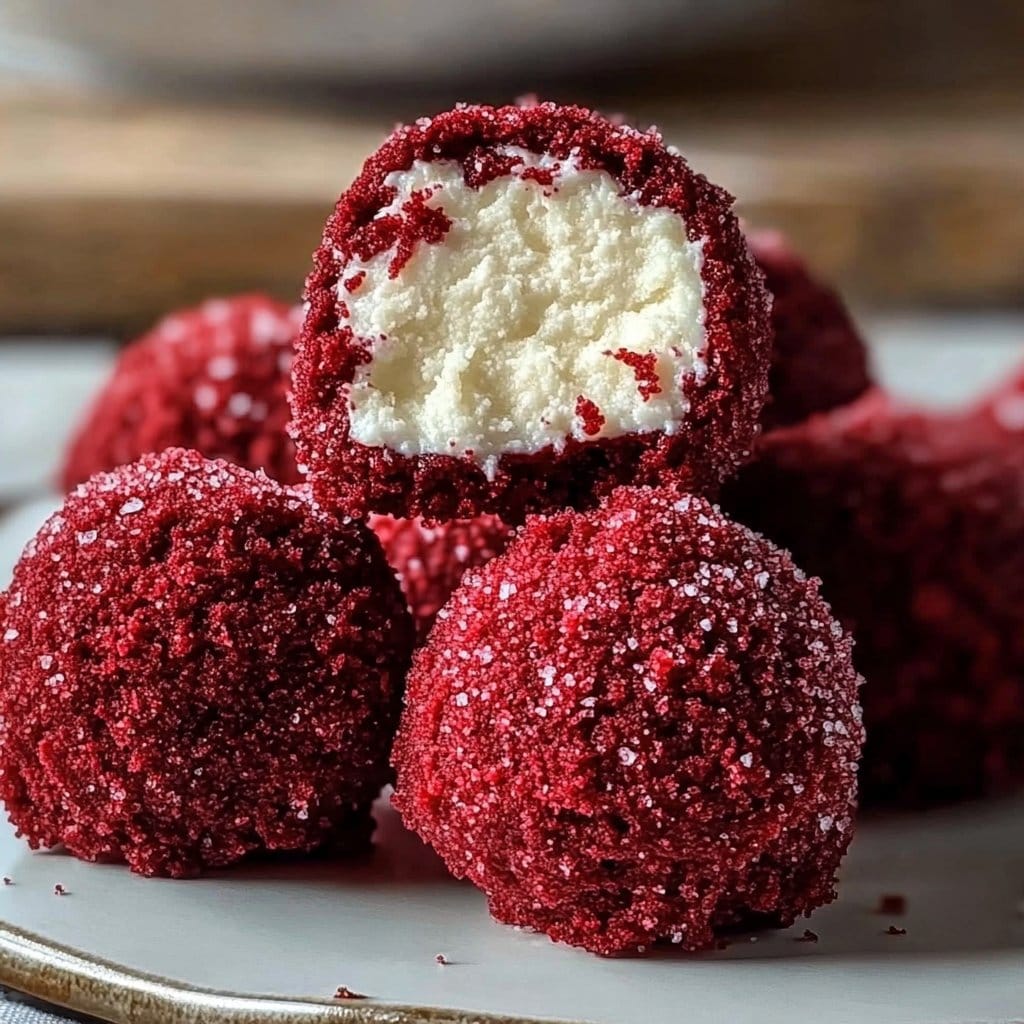
Are you ready to delight your taste buds with a festive treat? The Red Velvet Snowballs are not just cookies; they embody holiday cheer and culinary creativity. Imagine soft, chewy cookies kissed with rich cocoa and a vibrant red hue, dusted with a layer of powdered sugar to create that snowy finish. But what truly sets these cookies apart? It’s their unique combination of flavors and textures that makes them utterly irresistible.
When you take a bite, the tender, buttery cookie melts in your mouth, while the rich cocoa adds depth and chocolatey goodness. The red food coloring not only adds visual appeal but also transforms these cookies into a holiday centerpiece. With the sweet surprise of powdered sugar enveloping each snowball, you’re left craving more after each delightful morsel.
Whether you’re celebrating a special occasion or just want to brighten your day with a batch of homemade goodness, making Red Velvet Snowballs is a fantastic choice. It’s fast, easy, and the outcome is nothing short of delicious. Picture yourself in the kitchen, whisking together ingredients and rolling dough into perfect little spheres. The warm, sweet aroma wafting through your home will surely draw friends and family in, eager to taste these delightful treats.
So, why not bring a touch of joy to your kitchen? Let’s dive into the world of Red Velvet Snowballs, where every bite is a celebration of flavor!
Key Benefits of Red Velvet Snowballs
Why You’ll Love This Recipe
- Flavor Explosion: The rich cocoa balances perfectly with the sweetness, creating a unique taste profile.
- Easy to Make: With straightforward steps, anyone can whip up these delightful cookies.
- Great for Sharing: Perfectly fun-sized, they make wonderful gifts or party favors.
- Versatile: Dress them up for holidays or keep them simple for everyday enjoyment.
- Visually Stunning: Their vibrant red color makes them an eye-catching addition to any dessert table.
- Comforting Treat: The soft, chewy texture provides a cozy and satisfying experience.
What Makes It Stand Out
What makes Red Velvet Snowballs truly distinctive is their ability to offer a classic taste with a modern twist. Most traditional Red Velvet cakes are baked deep into layers, but these cookies simplify the process without sacrificing flavor. Additionally, they can be easily customized to suit various preferences and dietary needs.
These delightful cookies are perfect for any occasion, from festive gatherings to casual afternoon snacks. Imagine serving these at a birthday party, holiday celebration, or even a cozy family night—their unique presentation and taste leave a lasting impression. With endless possibilities for decorations and additions, you can tweak this recipe to make it your own.
Ingredients for Red Velvet Snowballs
Complete Ingredient List with Measurements
- 2 ½ cups all-purpose flour
- ½ cup cocoa powder
- 1 teaspoon baking powder
- ½ teaspoon salt
- 1 cup unsalted butter, softened
- 1 cup granulated sugar
- ½ cup brown sugar, packed
- 1 large egg
- 1 tablespoon red food coloring
- 1 teaspoon vanilla extract
- Powdered sugar for dusting
Substitutes and Alternatives
If you’re looking for alternatives due to allergies or dietary restrictions, there are a few easy swaps you can make in the Red Velvet Snowballs recipe. For instance, if you have a gluten sensitivity, you can substitute all-purpose flour with a 1:1 gluten-free flour blend.
For a dairy-free option, consider using vegan butter or coconut oil in place of unsalted butter. If you’re vegan, you can replace the egg with a flax egg (1 tablespoon ground flaxseed mixed with 2.5 tablespoons water) for similar binding properties. These substitutions keep the recipe accessible without compromising the signature taste of these delicious cookies.
How to Make Red Velvet Snowballs – Step-by-Step Directions
Step 1 – Prepare Ingredients
Begin by gathering all your ingredients. Ensure the butter is at room temperature for easy mixing. Pre-measure your dry ingredients to streamline the process.
Step 2 – Cook the Base
Preheat your oven to 350°F (175°C). In a medium bowl, whisk together the all-purpose flour, cocoa powder, baking powder, and salt. Set this mixture aside for later.
Step 3 – Cream the Sugars and Butter
In a large mixing bowl, cream together the softened unsalted butter, granulated sugar, and brown sugar until the mixture is light and fluffy. This will take about 3-4 minutes using a hand mixer.
Step 4 – Add Wet Ingredients
Beat in the large egg, followed by the red food coloring and vanilla extract. Mix until everything is well combined and the batter has an even color.
Step 5 – Combine the Mixtures
Gradually add the flour mixture to the wet ingredients. Mix on low speed until fully combined, taking care not to overmix. The dough will be thick and slightly sticky.
Step 6 – Form the Cookies
Using your hands, scoop out portions of the dough and roll them into balls, about 1 inch in diameter. Place these dough balls on a baking sheet lined with parchment paper, leaving a bit of space between each one.
Step 7 – Bake
Bake in the preheated oven for 10-12 minutes, or until the edges of the cookies are firm but the center remains soft. Watch them closely to avoid overbaking.
Step 8 – Dust with Powdered Sugar
Once the Red Velvet Snowballs are out of the oven, let them cool for about 5 minutes. While they’re still warm, roll them in powdered sugar to create that snowy effect.
Step 9 – Allow to Cool Completely
Transfer the cookies to a wire rack and let them cool completely before serving. This will help them firm up a bit and make them easier to handle.
Serving Suggestions for Red Velvet Snowballs
Best Occasions to Serve This Dish
Red Velvet Snowballs are perfect for all occasions. Their festive red hue makes them especially suitable for holidays such as Christmas, Valentine’s Day, or even birthdays. You can showcase them at dessert tables, potlucks, or seasonal gatherings. Their charming appearance and delightful flavor create a memorable experience for anyone who tries them.
What to Serve With It
These cookies can be enjoyed on their own or paired with a variety of beverages. Consider serving them alongside a warm cup of coffee, hot chocolate, or tea for a cozy treat. You can also complement them with ice cream or whipped cream for an indulgent dessert.
How to Store Red Velvet Snowballs Properly
Best Storage Practices
To keep your Red Velvet Snowballs fresh, store them in an airtight container at room temperature. They will stay delicious for about 3-5 days. For long-term storage, consider freezing them for up to three months. Just ensure they are fully cooled before wrapping them tightly.
Reheating and Freezing Tips
If you freeze them, allow the Red Velvet Snowballs to thaw at room temperature for a few hours when you’re ready to enjoy them again. To warm them up, pop them in the microwave for about 10-15 seconds, which will refresh their soft texture.
Tips & Tricks for Red Velvet Snowballs
Mistakes to Avoid
- Overmixing Dough: This can lead to dense cookies. Mix just until combined to maintain lightness.
- Not Measuring Ingredients Accurately: Baking is a science, so ensure your measurements are precise.
- Skipping Cooling Time: Letting cookies cool before handling ensures they don’t break and helps them set properly.
- Overbaking: Keep an eye on the cookies. They continue to bake on the sheet after being taken out.
- Using Cold Butter: Butter should be softened to incorporate air into the dough for better texture.
- Not Rolling in Powdered Sugar While Warm: This helps the sugar stick and creates a lovely snowball effect.
Extra Tips for Better Results
For extra flavor, consider adding chocolate chips or chopped nuts to the dough. This can enhance the texture and make the cookies more indulgent. Additionally, try varying the amount of red food coloring to achieve your desired color intensity.
Recipe Variations of Red Velvet Snowballs
Creative Twists
- Cream Cheese Filling: You can add a surprise cream cheese filling to the center for an added tangy contrast.
- Mint Infusion: Incorporate a few drops of mint extract for a refreshing variation that pairs wonderfully with chocolate.
- Nutty Surprise: Add chopped walnuts or pecans into the dough for an extra crunch.
Dietary Adjustments
Creating a vegan version of Red Velvet Snowballs can be achieved by substituting vegan butter and using a flax egg instead of a traditional egg. For a gluten-free alternative, replace the all-purpose flour with a gluten-free flour blend, ensuring that the rest of the ingredients are also compliant.
Conclusion about Red Velvet Snowballs
In the landscape of sweet treats, Red Velvet Snowballs shine brightly as a delightful option for any baker looking to impress. These cookies encapsulate everything we love about festive desserts—their stunning color, rich flavor, and delightful presentation make them a must-try. Whether for a holiday celebration or an everyday treat, crafting these cookies guides you through a fun process that ends with irresistible sweetness.
Sharing these Red Velvet Snowballs with friends and family is sure to elicit smiles and compliments alike. With each bite, you’re creating more than just a treat; you’re crafting memories. So gather your ingredients, follow the steps, and prepare to make treats that will leave everyone asking for seconds.
FAQs about Red Velvet Snowballs
How long do Red Velvet Snowballs stay fresh?
They can stay fresh in an airtight container at room temperature for about 3-5 days.
Can I freeze Red Velvet Snowballs?
Yes, you can freeze the cookies. Make sure they’re fully cooled, then store them in an airtight container for up to three months.
What happens if I overbake the cookies?
Overbaking can lead to hard, dry cookies. It’s best to take them out when they are set around the edges but still soft in the middle.
Can I substitute the egg in this recipe?
Absolutely! You can use a flax egg as a substitute for a vegan option. Just mix 1 tablespoon of ground flaxseed with 2.5 tablespoons of water.
Is there a gluten-free option for this recipe?
Yes, instead of all-purpose flour, you can use a gluten-free flour blend to make this recipe gluten-free.
What is the best way to store these cookies?
Store them in an airtight container at room temperature or freeze them for longer storage.
Can I add nuts to this recipe?
Yes, adding chopped nuts like walnuts or pecans can enhance the texture and flavor of the cookies.
How can I make these cookies visually appealing?
You can drizzle melted white chocolate on top or sprinkle colored sugar along with the powdered sugar for a festive touch.

Red Velvet Snowballs
Ingredients
Main Ingredients
- 2.5 cups all-purpose flour can substitute with gluten-free flour for a gluten-free option
- 0.5 cups cocoa powder
- 1 teaspoon baking powder
- 0.5 teaspoon salt
- 1 cup unsalted butter, softened can substitute with vegan butter for a dairy-free option
- 1 cup granulated sugar
- 0.5 cups brown sugar, packed
- 1 large egg can substitute with a flax egg for vegan option
- 1 tablespoon red food coloring adjust to desired color intensity
- 1 teaspoon vanilla extract
- Powdered sugar for dusting for the snowy finish


Instructions
Preparation
- Gather all your ingredients and ensure the butter is at room temperature for easy mixing. Pre-measure your dry ingredients to streamline the process.
Mixing the Ingredients
- Preheat your oven to 350°F (175°C).
- In a medium bowl, whisk together the all-purpose flour, cocoa powder, baking powder, and salt. Set this mixture aside.
- In a large mixing bowl, cream together the softened unsalted butter, granulated sugar, and brown sugar until light and fluffy, about 3-4 minutes.
- Beat in the egg, followed by the red food coloring and vanilla extract, mixing until well combined.
- Gradually add the flour mixture to the wet ingredients, mixing on low speed until fully combined.
Forming the Cookies
- Using your hands, scoop out portions of the dough and roll them into 1 inch diameter balls.
- Place the dough balls on a baking sheet lined with parchment paper, leaving space between each.
Baking
- Bake in the preheated oven for 10-12 minutes, or until the edges are firm but the center remains soft.
Finishing Touch
- Allow the cookies to cool for about 5 minutes before rolling them in powdered sugar.
- Transfer to a wire rack and let cool completely before serving.