
Table of Contents
Introduction about Spooky Halloween Sugar Cookie Bars
Are you ready to embark on a delightful baking adventure this Halloween? Imagine a treat that combines the sweet buttery goodness of sugar cookies with a spooky twist, perfect for the festive season. Allow me to introduce you to Spooky Halloween Sugar Cookie Bars—a fun and simple recipe that will leave everyone wanting more!
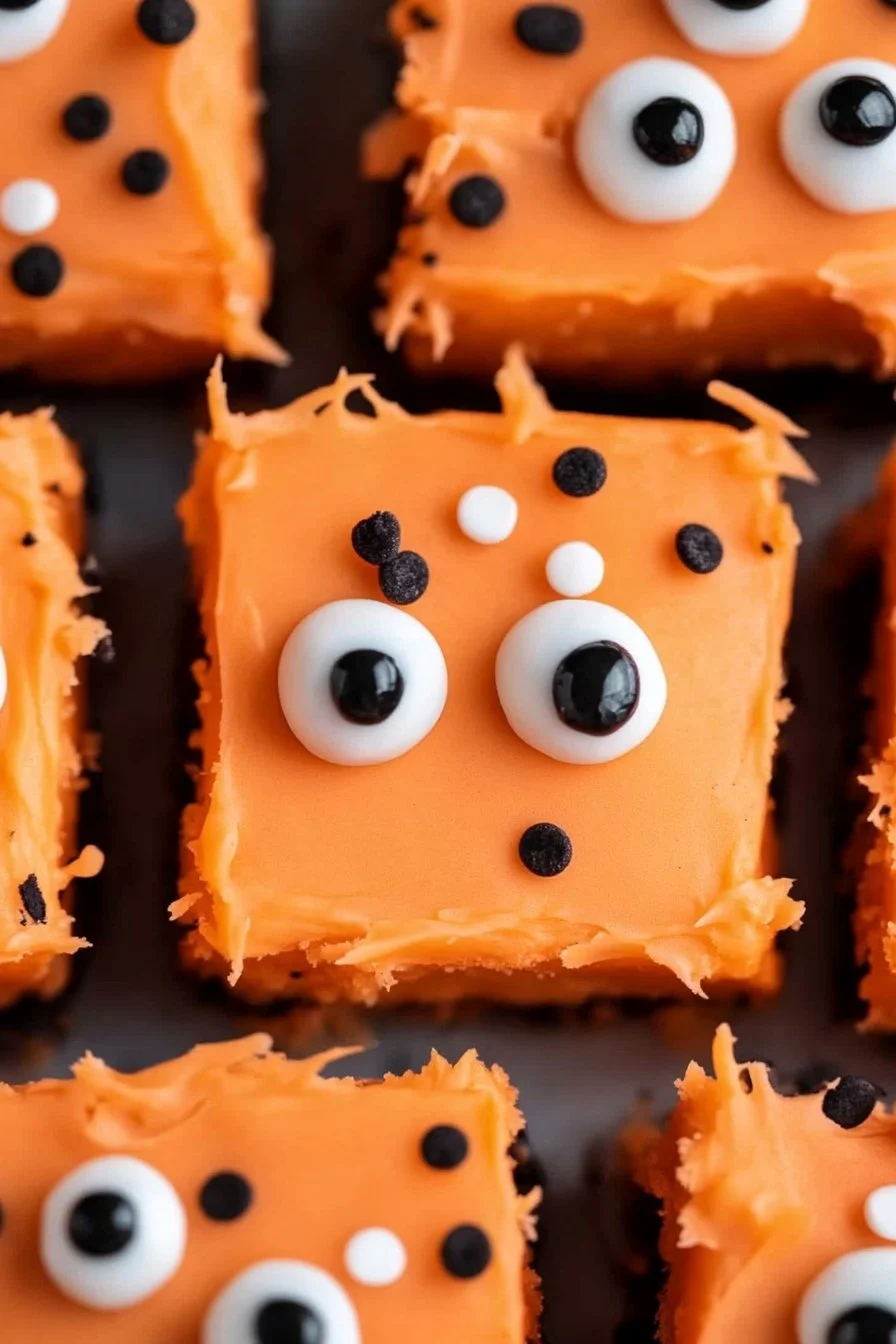
With this recipe, you’ll create deliciously soft and chewy cookie bars, topped with a creamy frosting and adorned with colorful spooky sprinkles and Halloween eyeball candies. It’s the perfect treat for your Halloween gatherings, parties, or even a cozy evening spent at home. But why stop there? These sugar cookie bars are so versatile; they can easily be enjoyed any time of the year.
What makes Spooky Halloween Sugar Cookie Bars stand out? They’re incredibly easy to make, require minimal ingredients, and can be prepared in no time. Plus, baking these bars turns your kitchen into a delightful haven filled with the sweet aroma of freshly baked cookies. So, gather your ingredients, and let’s whip up a spooky sensation that your friends and family will adore!
Key Benefits of Spooky Halloween Sugar Cookie Bars
Why You’ll Love This Recipe
When it comes to Halloween treats, Spooky Halloween Sugar Cookie Bars offer a plethora of benefits that you’ll absolutely love!
- Irresistible Flavor: With a rich buttery taste and a creamy frosting, these bars are sure to be a hit.
- Simple Preparation: No need for fancy techniques; if you can mix and bake, you can make these bars!
- Quick to Make: Get them in the oven in just a few minutes, making them perfect for last-minute Halloween plans.
- Family-Friendly: This recipe is great for baking with kids. They’ll love decorating the bars!
- Customizable: Jazz them up with your favorite Halloween-themed toppings and make them your own.
- Perfect for Any Occasion: While they shine during Halloween, these bars can fit into any festive celebration!
What Makes It Stand Out
What truly sets Spooky Halloween Sugar Cookie Bars apart from other desserts is their versatility and appeal. You can create a stunning dessert without spending hours in the kitchen, making them an excellent choice for busy parents and party hosts alike.
Additionally, the seasonal use of spooky decorations gives your baking a fun and festive flair. From vibrant sprinkles to fun eyeball candies, there’s a creativity factor that not only makes these bars visually appealing, but also adds a dash of excitement for kids and adults alike. You can easily customize these bars for different occasions or dietary preferences, ensuring that everyone can join in on the fun!
Ingredients for Spooky Halloween Sugar Cookie Bars
Complete Ingredient List with Measurements
Getting the right ingredients is essential for the perfect Spooky Halloween Sugar Cookie Bars. Here’s everything you’ll need:
For the Cookie Layer:
- 1/2 cup butter (softened)
- 1/2 cup granulated sugar
- 2 tablespoons brown sugar
- 1 large egg
- 2 teaspoons vanilla extract
- 1/4 teaspoon almond extract (optional)
- 1/2 teaspoon baking powder
- 1 cup all-purpose flour
- 3 tablespoons cornstarch
- 1/4 teaspoon salt
For the Frosting:
- 4 tablespoons butter (softened, salted or unsalted)
- 1 cup powdered sugar
- 1 teaspoon vanilla extract
- 3 tablespoons heavy cream
Toppings:
- Spooky sprinkles
- Halloween eyeball candies
Substitutes and Alternatives
It’s always handy to know about substitutes, especially for those with dietary restrictions:
- Butter: You can use coconut oil or vegan butter for a dairy-free option.
- Granulated Sugar: Substitute with coconut sugar or stevia for a healthier twist.
- Flour: Almond flour or a gluten-free flour blend works for gluten-free options.
- Cream: Use a non-dairy milk or coconut whipped cream as an alternative for the frosting if you’re avoiding dairy.
How to Make Spooky Halloween Sugar Cookie Bars – Step-by-Step Directions
Step 1 – Prep Your Workspace and Ingredients
Before diving into the baking process, let’s get everything organized.
- Preheat your oven to 350°F (175°C). This temperature is perfect for creating a soft and chewy texture.
- Gather all your ingredients and measuring tools. Having everything on hand makes the process smoother.
- Line a baking pan (approximately 9×9 inches) with parchment paper. This ensures easy removal of the bars.
Step 2 – Prepare the Base or Crust
Now, let’s start creating the cookie layer.
- In a mixing bowl, beat together the softened butter, granulated sugar, and brown sugar until creamy.
- Add in the egg and vanilla extract, and mix until well combined. If you’re using almond extract, add it now.
- In another bowl, whisk together the flour, cornstarch, baking powder, and salt.
- Gradually add the dry mixture to the wet mixture, stirring until just combined—don’t over mix!
Step 3 – Spread the Cookie Dough
Your batter is looking delicious! Now it’s time to spread it in the pan.
- Take your cookie dough and evenly spread it into the prepared baking pan.
- Press it down gently using a spatula or your hands until it forms an even layer.
- This will create a smooth base for the frosting later!
Step 4 – Bake the Cookie Bars
Time to bake!
- Place the baking pan in your preheated oven.
- Bake for 12-15 minutes or until the edges are lightly golden and a toothpick inserted comes out clean.
- Keep an eye on them, as baking times can vary depending on your oven.
Step 5 – Cool the Cookie Layer
Once your cookie bars are baked, it’s essential to let them cool.
- Remove the baking pan from the oven and place it on a wire rack.
- Allow the cookie layer to cool completely in the pan before frosting. This prevents melting and makes frosting easier.
Step 6 – Prepare the Frosting
While the bars cool, let’s whip up the delicious frosting!
- In a mixing bowl, combine the softened butter and powdered sugar.
- Add the vanilla extract and heavy cream.
- Beat on high speed until it’s light, fluffy, and spreadable. Adjust with more cream or sugar for desired consistency.
Step 7 – Frost the Cookie Bars
Now comes the fun part—decorating!
- Once the cookie layer is fully cooled, use a spatula to spread the frosting evenly over the top.
- Be generous! Don’t hesitate to add more frosting if you love it.
Step 8 – Add the Spooky Decorations
Let’s bring these bars to life with some festive flair.
- Sprinkle spooky sprinkles all over the frosted surface as the final touch.
- Arrange Halloween eyeball candies for an extra fright and fun!
- For best results, allow the frosting to set for about 30 minutes before slicing.
Step 9 – Slice and Serve
Your Spooky Halloween Sugar Cookie Bars are now ready!
- Using a sharp knife, carefully cut the bars into squares or rectangles.
- Serve on a platter and watch your guests’ faces light up!
Step 10 – Enjoy
Finally, take a moment to enjoy your spooky creation!
- These bars are best enjoyed fresh, but they’re still delicious the next day.
- Make sure to store any leftovers properly (we’ll discuss that next).
Serving Suggestions for Spooky Halloween Sugar Cookie Bars
Best Occasions to Serve This Dish
Spooky Halloween Sugar Cookie Bars are perfect for a variety of occasions:
- Halloween parties
- School events or bake sales
- Family movie night
- Autumn gatherings or potlucks
- Anytime you want a sweet treat!
What to Serve with It
To elevate your Halloween treat experience, consider pairing these bars with:
Drinks:
- Pumpkin spice latte
- Spooky punch (think blood-red fruit punch)
- Hot chocolate with whipped cream
Toppings and Dips:
- Cream cheese frosting for an extra treat
- Vanilla ice cream or whipped cream on the side
- Caramel sauce drizzled on top
Side Dishes:
- Fruit skewers for a refreshing contrast
- Cheese platter for a savory balance
Storing Spooky Halloween Sugar Cookie Bars Properly
Best Storage Practices
To keep your Spooky Halloween Sugar Cookie Bars fresh:
- Store them in an airtight container at room temperature for up to 5 days.
- If you have leftovers, you can refrigerate them for a longer shelf life, up to a week.
- Make sure to separate the layers with parchment paper if stacking to prevent sticking.
Reheating and Freezing Tips
If you’d like to enjoy these bars later:
Freezing: Wrap each bar individually in plastic wrap, then place them in a freezer-safe container or bag. They can be stored in the freezer for up to 3 months.
Thawing: To thaw, simply remove from the freezer and let sit at room temperature for a couple of hours.
Reheating: If you prefer warm bars, place them in the microwave for a few seconds. Be careful not to overheat as they can become tough.
Tips & Tricks for Spooky Halloween Sugar Cookie Bars
Mistakes to Avoid
When making Spooky Halloween Sugar Cookie Bars, keep these common pitfalls in mind:
- Overmixing the Dough: Mix until just combined; this keeps the bars tender.
- Underbaking: Make sure they are baked through for the perfect texture; a slightly underbaked bar can result in a gooey mess.
- Skipping the Cool Time: Frosting warm bars can lead to a melted, messy topping.
Extra Tips for Better Results
Want to ensure your bars are a hit? Here are some handy tips:
- Chill Your Ingredients: If your butter is too soft, chill it slightly before mixing. This helps with the texture.
- Use Quality Vanilla: Pure vanilla extract yields better flavor than imitation.
- Decorate Creatively: Get your kids involved in the decoration process for a fun family activity!
Recipe Variations of Spooky Halloween Sugar Cookie Bars
Creative Twists
Get creative with your Spooky Halloween Sugar Cookie Bars by adding:
- Chips or Nuts: Mix in chocolate chips, butterscotch chips, or chopped nuts for extra flavor and texture.
- Seasonal Flavors: Try adding pumpkin spice or cinnamon for a fall twist.
- Different Extracts: Swap almond extract for other flavors like peppermint or lemon for unique variations.
Dietary Adjustments
No one should miss out on the fun. Making these bars suitable for various diets is easy:
- Gluten-Free: Use a gluten-free flour blend in place of all-purpose flour.
- Dairy-Free: Substitute vegan butter and almond milk for a dairy-free version.
- Vegan: Replace the egg with a flax egg (1 tablespoon ground flaxseed + 2.5 tablespoons water) and use non-dairy alternatives.
Conclusion about Spooky Halloween Sugar Cookie Bars
In summary, Spooky Halloween Sugar Cookie Bars are an easy, delicious treat that adds festive joy to any occasion. With their simple preparation, delightful flavor, and stunning appearance, they are sure to be a crowd-pleaser. Whether you enjoy them at a Halloween party or as a cozy family dessert, they are a must-try!
Take the plunge, gather your ingredients, and bake these delightful bars. I promise you won’t regret it! Once you’ve made them, feel free to share your thoughts or variations in the comments. Happy baking!
FAQs about Spooky Halloween Sugar Cookie Bars
What if it doesn’t turn out right?
Don’t worry! If your bars don’t bake perfectly, it could be due to oven temperature or ingredient ratios. If they are too tough, it may have been overmixed or overbaked. If they’re too gooey, they might need more baking time. Adjusting these factors will help improve the outcome next time!
Can I prepare it ahead of time?
Absolutely! You can prepare the dough and freeze it for later use. Alternatively, you can bake the bars a day in advance and refrigerate them until you’re ready to frost and serve.
What are the best ingredient substitutions?
Common substitutions for allergies or preferences include using coconut oil instead of butter, gluten-free flour in place of all-purpose flour, and almond milk instead of heavy cream for the frosting.
How long can it be stored?
The bars can be stored in an airtight container at room temperature for up to 5 days or in the fridge for about a week. If frozen, they can last up to 3 months.
Can I use store-bought dough or crust?
Yes, if you’re in a pinch! Store-bought refrigerated cookie dough can be used for the base. Just follow the baking time on the package for best results.
Is this recipe kid-friendly or family-appropriate?
Absolutely! This recipe is perfect for children, and they can have fun decorating their spooky bars with sprinkles and candies.
Can I make this recipe allergen-free?
Yes! With a few modifications, you can make these bars gluten-free, dairy-free, and vegan by using substitutes for flour, butter, and eggs.

Spooky Halloween Sugar Cookie Bars
Ingredients
For the Cookie Layer
- ½ cup butter (softened)
- ½ cup granulated sugar
- 2 tablespoons brown sugar
- 1 large egg
- 2 teaspoons vanilla extract
- ¼ teaspoon almond extract (optional)
- ½ teaspoon baking powder
- 1 cup all-purpose flour
- 3 tablespoons cornstarch
- ¼ teaspoon salt
For the Frosting
- 4 tablespoons butter (softened, salted or unsalted)
- 1 cup powdered sugar
- 1 teaspoon vanilla extract
- 3 tablespoons heavy cream
Toppings
- spooky sprinkles
- Halloween eyeball candies
Instructions
Preparation
- Preheat your oven to 350°F (175°C).
- Gather all ingredients and measuring tools.
- Line a baking pan (approximately 9×9 inches) with parchment paper.
Prepare the Base or Crust
- In a mixing bowl, beat together the softened butter, granulated sugar, and brown sugar until creamy.
- Add the egg and vanilla extract, and mix until well combined.
- In another bowl, whisk together the flour, cornstarch, baking powder, and salt.
- Gradually add the dry mixture to the wet mixture, stirring until just combined.
Spread the Cookie Dough
- Take your cookie dough and evenly spread it into the prepared baking pan.
- Press it down gently using a spatula or your hands until it forms an even layer.
Bake the Cookie Bars
- Place the baking pan in your preheated oven.
- Bake for 12-15 minutes or until edges are lightly golden.
Cool the Cookie Layer
- Remove the baking pan from the oven and place it on a wire rack.
- Allow the cookie layer to cool completely in the pan.
Prepare the Frosting
- In a mixing bowl, combine the softened butter and powdered sugar.
- Add the vanilla extract and heavy cream.
- Beat on high speed until light, fluffy, and spreadable.
Frost the Cookie Bars
- Once the cookie layer is fully cooled, spread the frosting evenly over the top.
Add the Spooky Decorations
- Sprinkle spooky sprinkles over the frosted surface.
- Arrange Halloween eyeball candies on top.
Slice and Serve
- Carefully cut the bars into squares or rectangles.
- Serve on a platter.
Enjoy
- These bars are best enjoyed fresh or stored properly in an airtight container.