

This post may contain affiliate links. As an Amazon Associate, I earn from qualifying purchases at no extra cost to you.
Table of Contents
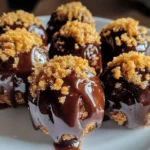
Are you ready for a sweet indulgence that combines the rich flavor of chocolate, the crunch of candy, and the taste of nostalgia? If so, you’re in for a treat with these Easy Butterfinger Balls! This recipe captures the essence of the beloved Butterfinger candy bars in a delightful, bite-sized form. Whether you’re hosting a party, looking for a fun family activity, or simply craving something sweet, these little balls of joy are the answer.
Imagine the first bite: the outer layer of smooth chocolate gives way to the creamy peanut butter and the crunchy goodness of Butterfinger candy. It’s a taste sensation that will leave you wanting more! Not only are they easy to make, but they also require minimal ingredients and effort. That’s why our Easy Butterfinger Balls have become a favorite for those looking to whip up something delicious without spending hours in the kitchen.
What makes these Easy Butterfinger Balls truly special is their versatility. You can mix them up with various toppings or even swap ingredients based on dietary needs. Plus, they are an absolute hit with kids and adults alike. Have you ever made a dessert that the whole family devoured in minutes? With these balls, you might just experience that joyful moment. So, let’s explore why making Easy Butterfinger Balls should definitely be on your to-do list!
🍴 Top Kitchen Essentials You'll Love


Key Benefits of Easy Butterfinger Balls
Why You’ll Love This Recipe
- Flavor Explosion: The combination of peanut butter, chocolate, and Butterfinger is simply irresistible!
- Simplicity: With just a few ingredients, making these balls is a breeze.
- Family-Friendly: Everyone from kids to grandparents will love these sweet treats.
- Versatile: Customize them with different toppings or flavors for variety.
- Quick to Prepare: Whip these up in no time and watch them disappear!
- Perfect for Any Occasion: Great for parties, holidays, or just because you feel like it!
What Makes It Stand Out
What sets these Easy Butterfinger Balls apart is their originality. Unlike typical cookie or cake recipes, these balls bring a new twist to dessert. They have that coveted crunch that replicates the iconic Butterfinger experience. You can also customize the chocolate coating with different types of chocolate or sprinkles.
These Easy Butterfinger Balls are perfect for any occasion, whether a birthday party, holiday gathering, or simply an after-school snack. They are easy to transport and serve, making them ideal treats for potlucks or picnics.
Ingredients for Easy Butterfinger Balls
Complete Ingredient List with Measurements
To make Easy Butterfinger Balls, you need the following ingredients:
- 1 cup crushed Butterfinger candy bars
- 1 cup creamy peanut butter
- 2 cups powdered sugar
- 1 cup chocolate chips
- 1 tablespoon vegetable oil
These ingredients combine to create a delightful balance of flavors and textures, making every bite unforgettable.
Substitutes and Alternatives
If you have dietary restrictions or allergies, don’t worry! There are several substitutes you can use. For those who are allergic to peanuts, almond or sunflower butter works well as alternatives. You could also swap the Butterfinger for a similar candy such as Reese’s Pieces or Crush’d Whoppers to maintain that essential crunch.
If you’re looking for a lower-sugar option, consider using sugar-free chocolate chips and reducing the powdered sugar amount slightly. There’s always room to adapt the recipe to suit your needs!
How to Make Easy Butterfinger Balls – Step-by-Step Directions
Step 1 – Prepare Ingredients
Start by gathering all your ingredients. Having everything ready will make the process go smoothly. Measure out the crushed Butterfinger, peanut butter, powdered sugar, chocolate chips, and vegetable oil.
Step 2 – Cook the Base
In a large mixing bowl, combine the crushed Butterfinger bars, creamy peanut butter, and powdered sugar. Mix everything together until fully blended. The mixture should come together into a thick, dough-like consistency.
Step 3 – Roll Into Balls
Once your mixture is well combined, roll small portions of it into balls, roughly 1 inch in diameter. Place the formed balls on a baking sheet lined with parchment paper. This will help prevent sticking.
Step 4 – Freeze the Balls
Place the baking sheet in the freezer and let the balls freeze for about 30 minutes. This gives them time to firm up, making them easier to dip in chocolate later.
Step 5 – Melt the Chocolate
While your balls are chilling, grab a microwave-safe bowl and add the chocolate chips and vegetable oil. Microwave in 30-second intervals, stirring in between, until the chocolate is smooth and melted.
Step 6 – Dip the Balls
Once the balls are frozen, it’s time to dip! Using a fork, carefully dip each ball into the melted chocolate, ensuring they are fully coated. Allow any excess chocolate to drip off before placing them back on the parchment-lined sheet.
Step 7 – Set the Chocolate
Put the chocolate-covered balls back in the refrigerator. Allow them to chill until the chocolate hardens, which typically takes about 30 minutes.
Step 8 – Serve and Enjoy
Once the chocolate is set, your Easy Butterfinger Balls are ready to be served! You can enjoy them right away or store them for later.
Serving Suggestions for Easy Butterfinger Balls
Best Occasions to Serve This Dish
These Easy Butterfinger Balls shine at parties. Serve them as dessert at birthday celebrations, holiday gatherings, or casual get-togethers. Their bite-sized nature makes them perfect for mingling guests.
You can also prepare them for movie nights or family gatherings. They make a delicious treat while enjoying some quality time with loved ones.
What to Serve With It
- Ice Cream: Vanilla or chocolate ice cream makes a delightful addition.
- Coffee or Tea: Pair your balls with a warm beverage for a comforting experience.
- Fruits: Fresh strawberries or blueberries balance out the sweetness.
- Whipped Cream: Drizzle some over your plate for added decadence.
How to Store Easy Butterfinger Balls Properly
Best Storage Practices
To keep your Easy Butterfinger Balls fresh, store them in an airtight container in the fridge. They will stay tasty for about a week. If you prefer, you can also freeze them for later enjoyment.
Make sure to separate layers with parchment paper if stacking to prevent sticking.
Reheating and Freezing Tips
These Easy Butterfinger Balls don’t require reheating, but if you want the chocolate to be slightly melty, you can microwave them for a few seconds. If you decide to freeze, simply allow them to thaw in the fridge before serving.
Tips & Tricks for Easy Butterfinger Balls
Mistakes to Avoid
- Overmixing: Be careful not to overmix the ingredients after adding the powdered sugar, as it can make the dough too tough.
- Skipping the Freezing Step: Don’t skip freezing, as this helps them hold their shape during dipping.
- Using Low-Quality Chocolate: Invest in good chocolate for dipping; it makes a big difference in taste.
- Not Coating Evenly: Make sure to coat each ball thoroughly so that every bite is evenly flavorful.
- Too Much Chocolate: Allow excess chocolate to drip off to prevent clumps.
Extra Tips for Better Results
Enhance your Easy Butterfinger Balls by experimenting with toppings. Consider drizzling melted white chocolate on top or adding crushed nuts for extra crunch. Presenting them in festive liners can also add an inviting touch for party settings.
Recipe Variations of Easy Butterfinger Balls
Creative Twists
- Nutty Variations: Mix in some chopped nuts or nut extracts for a richer flavor.
- Different Candies: Swap out Butterfinger with crushed Oreos or Snickers to create unique variations.
- Coconut Bliss: Add shredded coconut to the mix for a tropical twist.
- Flavorful Dips: Use different types of chocolate for coating, like dark chocolate or milk chocolate with sea salt.
Dietary Adjustments
You can create a vegan version by substituting peanut butter with a plant-based alternative and using dairy-free chocolate. For gluten-free options, ensure the candy bars used are gluten-free to avoid any cross-contamination.
Conclusion about Easy Butterfinger Balls
In conclusion, Easy Butterfinger Balls are a delicious treat that brings fun and indulgence to any gathering. Their fantastic combination of flavors and textures is sure to delight everyone who tries them. You’ll love how simple they are to prepare, making them perfect for both seasoned bakers and beginners.
With their versatile nature and the option to customize, Easy Butterfinger Balls can adapt to any occasion. They hold a nostalgic charm that makes them a delightful experience. So why wait? Gather your ingredients and get ready to impress your friends and family with these easy and tasty treats!
FAQs about Easy Butterfinger Balls
Can I prepare it ahead of time?
Absolutely! You can prepare these Easy Butterfinger Balls a day in advance and store them in the fridge until serving.
Can I freeze it?
Yes, they can be frozen! Store them in an airtight container and enjoy them later.
How long does it last?
When stored properly in the fridge, they will last for about a week.
What are the best substitutions?
For peanut allergies, use sunbutter or almond butter. You can also substitute milk chocolate chips with dark or white chocolate.
Is this recipe family-friendly?
Definitely! Kids love them, and they are a fun treat to make together with the family.
Can I use a different candy bar?
Certainly! Feel free to experiment with different candy bars to suit your preferences.
What’s the best way to serve them?
Serve chilled on a platter or in individual cupcake liners for a fun presentation.
How do I know when they are set?
The chocolate should feel firm and no longer sticky to the touch when the balls are fully set.
Are these gluten-free?
Yes, just ensure that the candy bar you are using is gluten-free.
Can I add more ingredients?
Sure! Feel free to incorporate more flavors or toppings as you like to customize your Easy Butterfinger Balls.
Easy Butterfinger Balls
Ingredients
Main Ingredients
- 1 cup crushed Butterfinger candy bars
- 1 cup creamy peanut butter
- 2 cups powdered sugar
- 1 cup chocolate chips
- 1 tablespoon vegetable oil


Instructions
Preparation
- Start by gathering all your ingredients. Measure out the crushed Butterfinger, peanut butter, powdered sugar, chocolate chips, and vegetable oil.
- In a large mixing bowl, combine the crushed Butterfinger bars, creamy peanut butter, and powdered sugar. Mix everything together until fully blended into a thick, dough-like consistency.
- Roll small portions of the mixture into balls, roughly 1 inch in diameter, and place them on a baking sheet lined with parchment paper.
- Place the baking sheet in the freezer and let the balls freeze for about 30 minutes to firm up.
- In a microwave-safe bowl, add the chocolate chips and vegetable oil. Microwave in 30-second intervals, stirring in between, until the chocolate is smooth and melted.
- Using a fork, dip each frozen ball into the melted chocolate, ensuring they are fully coated, and allow excess chocolate to drip off before placing them back on the parchment-lined sheet.
- Put the chocolate-covered balls back in the refrigerator to chill until the chocolate hardens, which typically takes about 30 minutes.
Serving
- Once the chocolate is set, your Easy Butterfinger Balls are ready to be served!