
This post may contain affiliate links. As an Amazon Associate, I earn from qualifying purchases at no extra cost to you.
Table of Contents
🍴 Top Kitchen Essentials You'll Love


Introduction to Canned Black Eyed Peas
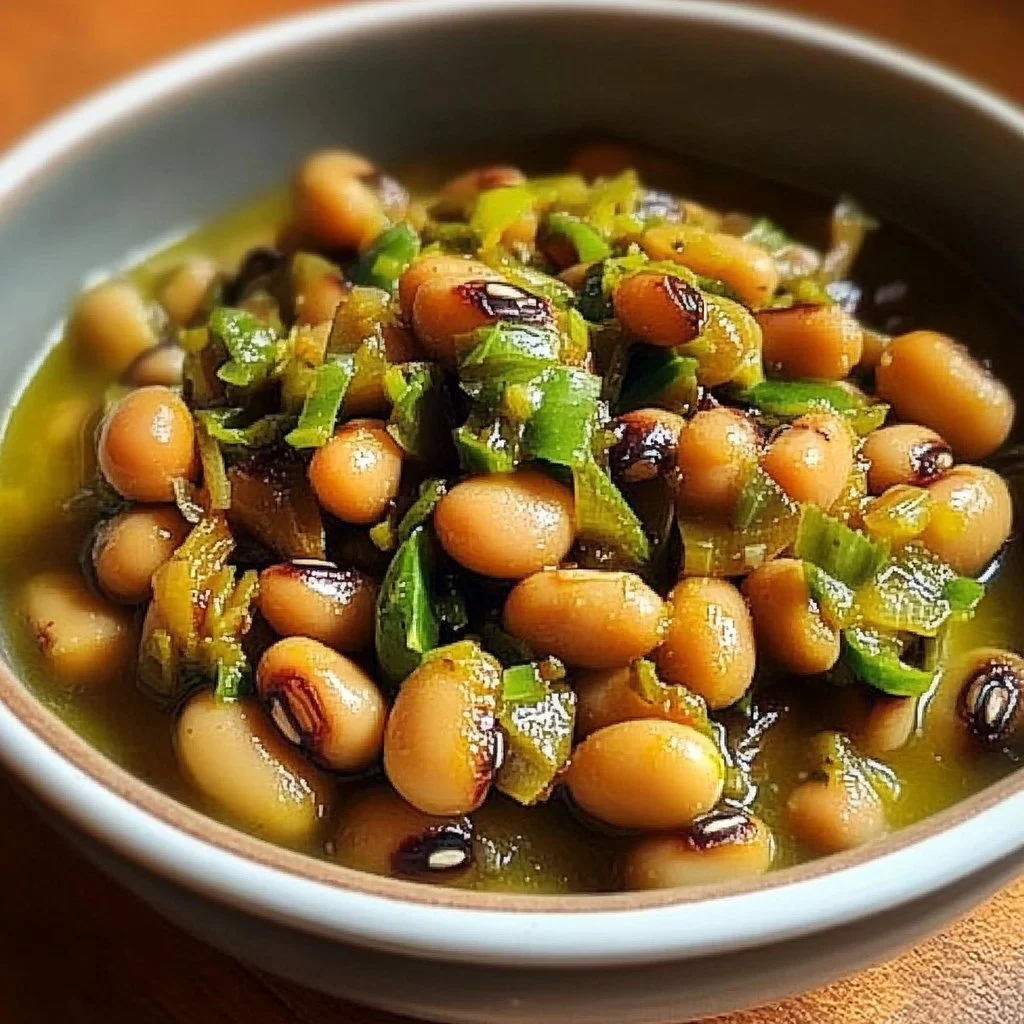
Have you ever found yourself staring into your pantry, looking for something quick, delicious, and nutritious to whip up? If you’ve got a couple of cans of black-eyed peas on hand, you’re in luck! The recipe for Canned Black Eyed Peas is not only straightforward but also packs a flavorful punch that will impress even the pickiest eaters.
This dish combines earthy black-eyed peas with aromatic onions and garlic, all simmered in a savory vegetable broth. It’s a recipe that’s rooted in traditional Southern cooking, often reserved for special occasions like New Year’s Day, symbolizing good luck for the year ahead. However, these peas are incredibly versatile and can be enjoyed year-round.
What makes this recipe stand out is its simplicity. With just a handful of ingredients, you can create a wholesome meal in less than 30 minutes. Who doesn’t love a dish that’s both quick to make and satisfying? Just imagine the enticing aroma wafting through your kitchen as the onions sauté and the flavors meld together.
Whether you’re looking for a meat-free main dish, a side for grilled meats, or a hearty addition to your salads, Canned Black Eyed Peas fits the bill perfectly. So, let’s dive into this delightful dish that celebrates flavor and convenience!
Key Benefits of Canned Black Eyed Peas
- Quick and Easy: Ready in under 30 minutes!
- Nutritious: Packed with protein, fiber, and vitamins.
- Versatile: Works as a side or main dish.
- Flavorful: Smoky paprika and fresh garlic bring depth.
- Customizable: Easily adaptable based on preferences and dietary needs.
- Budget-Friendly: Canned goods are often affordable and accessible.
What Makes It Stand Out
Canned Black Eyed Peas is one of those recipes that effortlessly combines flavor with practicality. The dish is not only quick to prepare but also allows for plenty of customization. Want it spicier? Add in some red pepper flakes or diced jalapeños. Prefer a cheesier experience? A sprinkle of feta or cheddar on top can elevate the dish beautifully.
This recipe is perfect for family gatherings or casual weeknight dinners. You can present it as part of a Southern-themed meal or serve it on its own as a light dish. The balance of textures, from creamy beans to crunchy onion, keeps each bite exciting, making it a crowd-pleaser for all occasions.
Ingredients for Canned Black Eyed Peas
Complete Ingredient List with Measurements
- 2 cans black-eyed peas, drained and rinsed
- 1 tablespoon olive oil
- 1 small onion, chopped
- 2 cloves garlic, minced
- 1 teaspoon smoked paprika
- 1 teaspoon salt
- 1/2 teaspoon black pepper
- 1 cup vegetable broth
- 2 tablespoons chopped fresh parsley (optional)
Substitutes and Alternatives
If you’re looking for alternatives due to allergies or dietary preferences, there are plenty of options. For instance, if you’re allergic to onions, you can skip them entirely or replace them with shallots. Garlic powder can be used as a substitute for fresh garlic if that’s what you have on hand.
You can also switch the vegetable broth for chicken broth if you’re not strictly keeping it vegetarian. For those avoiding olive oil, any neutral oil like canola or sunflower will work just as well.
How to Make Canned Black Eyed Peas – Step-by-Step Directions
Step 1 – Prepare Ingredients
Start by gathering all your ingredients. Drain and rinse the black-eyed peas under cold water to remove the excess sodium. Chop the onion and mince the garlic. Having everything prepped ahead will make the cooking process much smoother.
Step 2 – Cook the Base
In a large skillet, heat the olive oil over medium heat. Once hot, add the chopped onion and sauté for about 5 minutes until it’s softened and translucent. This step will create a fragrant base for your dish.
Step 3 – Add Garlic
Stir in the minced garlic and continue to cook for another minute. Be careful not to let it burn—garlic cooks quickly and should be aromatic and slightly golden, not brown.
Step 4 – Incorporate Spices
Next, add the drained black-eyed peas to the skillet. Sprinkle in the smoked paprika, salt, and black pepper. Stir well to combine everything, allowing the spices to coat the peas evenly.
Step 5 – Add Liquid
Pour in the vegetable broth and give everything a good stir. The broth will create a nice sauce for the peas to absorb the flavors.
Step 6 – Simmer the Dish
Increase the heat slightly to bring the mixture to a simmer. Once you see bubbles breaking the surface, reduce the heat to low. Let it simmer for about 10-15 minutes, stirring occasionally. You’re looking for the dish to be heated through and slightly thickened.
Step 7 – Final Touches
After cooking, taste and adjust the seasoning if necessary. If you desire more salt or pepper, now is the time to add it.
Step 8 – Garnish and Serve
If you’re using fresh parsley, sprinkle it on top just before serving. This will add a lovely color and fresh flavor to your dish. Serve warm and enjoy!
Serving Suggestions for Canned Black Eyed Peas
Best Occasions to Serve This Dish
Canned Black Eyed Peas is ideal for a variety of settings. It’s a fantastic addition to any Southern-themed dinner party or a potluck where you want to leave a lasting impression. This dish is also perfect for busy weeknights when you need something quick yet delightful for your family.
Another great occasion to serve this dish is during celebrations like New Year’s Eve, where eating black-eyed peas is thought to bring prosperity and good fortune for the year ahead.
What to Serve With It
You can pair Canned Black Eyed Peas with a host of other dishes! Enjoy it as a side with grilled meats such as chicken or pork. For a lighter meal, serve it alongside a fresh garden salad or some cornbread. Consider enjoying it with a dollop of sour cream or avocado slices for added creaminess.
How to Store Canned Black Eyed Peas Properly
Best Storage Practices
To store leftover Canned Black Eyed Peas, allow the dish to cool completely before transferring it to an airtight container. It can stay in the refrigerator for about 3 to 4 days. Always ensure that you reheat only the amount you plan to eat to keep the rest of the dish safe.
Reheating and Freezing Tips
Reheating is simple: just warm the peas in a pot over medium heat, adding a splash of water or extra broth if it looks too dry. If you want to store it longer, Canned Black Eyed Peas can be frozen. Place it in a freezer-friendly container and it should last for up to 3 months. To thaw, simply move it to the fridge a day before you plan to eat it or heat straight from frozen, adjusting the cooking time as needed.
Tips & Tricks for Canned Black Eyed Peas
Mistakes to Avoid
1 – Not rinsing the peas: Always rinse your black-eyed peas to cut down on sodium and improve flavor.
2 – Burning the garlic: Be mindful not to cook the garlic for too long; it should be fragrant but not browned.
3 – Overcrowding the skillet: Make sure the peas can be stirred easily. Overcrowding can lead to uneven heating.
4 – Skipping the broth: Adding broth is crucial for flavor; don’t skip it for a dry dish.
5 – Ignoring seasoning: Taste before serving! Adjust spices according to your palate.
Extra Tips for Better Results
For added layers of flavor, you could include diced bell peppers or carrots when sautéing the onions. These will add color and nutrition, giving your dish a fresh twist. Consider topping with crumbled bacon or a drizzle of hot sauce for an extra kick!
Recipe Variations of Canned Black Eyed Peas
Creative Twists
1 – Spicy Southwestern Version: Add diced tomatoes and jalapeños to the beans for a zesty kick. Top with avocado and cilantro to enhance the flavors.
2 – Creamy Version: Stir in a splash of coconut milk or a dollop of cream cheese for a creamy texture that pairs beautifully with the peas.
3 – Mediterranean Style: Add olives, feta cheese, and chopped cucumbers to the mix for a fresh, tangy twist that’s perfect as a hearty salad.
Dietary Adjustments
For a vegan version, ensure all ingredients are plant-based, which Canned Black Eyed Peas typically are! For gluten-free eaters, this recipe naturally fits—just be sure your broth is certified gluten-free as well.
Conclusion about Canned Black Eyed Peas
If you’re searching for a quick, nutritious meal that’s bursting with flavor, Canned Black Eyed Peas should be at the top of your list. This recipe’s simplicity doesn’t compromise on taste, making it an ideal choice for any occasion. Whether you’re handling a busy weeknight or looking to impress guests, this dish shines brightly in its execution and adaptability.
Its rich history and the symbolism of good luck make it even more special. By preparing Canned Black Eyed Peas, you’re not just making a meal; you’re creating a dish with tradition and substance. So why not give this recipe a try? You’ll discover that even canned ingredients can lead to a homemade masterpiece!
FAQs about Canned Black Eyed Peas
How long can I store Canned Black Eyed Peas in the fridge?
You can store them for about 3 to 4 days in the fridge in an airtight container.
Can I freeze leftover Canned Black Eyed Peas?
Yes, Canned Black Eyed Peas can be frozen in a freezer-friendly container for up to 3 months.
What if I don’t have vegetable broth?
If you don’t have vegetable broth, you can use chicken broth or just water with a bit of extra seasoning.
Can I make Canned Black Eyed Peas ahead of time?
Absolutely! You can prepare the dish ahead of time and reheat it when you’re ready to serve.
Are there any low-sodium options available?
Yes, look for low-sodium canned black-eyed peas and low-sodium vegetable broth to reduce salt intake.
What can I serve with Canned Black Eyed Peas?
It’s delicious on its own or served alongside grilled meats, cornbread, or a fresh garden salad.
How do I spice up my Canned Black Eyed Peas?
Consider adding red pepper flakes, hot sauce, or even diced jalapeños for a spicy kick!
Can I use dried black-eyed peas instead?
Yes, just make sure to cook them properly before using them in this recipe.
Is this recipe vegan-friendly?
Yes, Canned Black Eyed Peas can easily accommodate a vegan diet; just make sure to use a plant-based broth.
How do I reheat leftover Canned Black Eyed Peas?
Reheat in a pot over medium heat, adding a splash of water or broth if needed to maintain moisture.
Canned Black Eyed Peas
Ingredients
Main ingredients
- 2 cans black-eyed peas, drained and rinsed
- 1 tablespoon olive oil
- 1 small onion, chopped
- 2 cloves garlic, minced
- 1 teaspoon smoked paprika
- 1 teaspoon salt
- ½ teaspoon black pepper
- 1 cup vegetable broth Can use chicken broth for non-vegetarian option
- 2 tablespoons chopped fresh parsley Optional garnish


Instructions
Preparation
- Gather all your ingredients. Drain and rinse the black-eyed peas under cold water to remove the excess sodium. Chop the onion and mince the garlic.
Cooking Base
- In a large skillet, heat the olive oil over medium heat. Add the chopped onion and sauté for about 5 minutes until softened and translucent.
Adding Garlic
- Stir in the minced garlic and cook for another minute, being careful not to burn it.
Adding Spices
- Add the drained black-eyed peas to the skillet. Sprinkle in the smoked paprika, salt, and black pepper, and stir well to combine.
Including Liquid
- Pour in the vegetable broth and give everything a good stir.
Simmering
- Increase the heat to bring the mixture to a simmer. Once it bubbles, reduce the heat to low and let it simmer for about 10-15 minutes, stirring occasionally.
Final Touches
- Taste and adjust the seasoning if necessary.
Garnishing
- Sprinkle fresh parsley on top before serving. Serve warm and enjoy!