
This post may contain affiliate links. As an Amazon Associate, I earn from qualifying purchases at no extra cost to you.
Table of Contents
As Halloween approaches, the air fills with excitement and anticipation. The costumes, decorations, and especially the food play a big part in the festivities. Have you ever thought about serving a dish that not only tastes amazing but also brings a touch of fun to your table? That’s exactly what these Cheesy Halloween Breadstick Bones offer!
Imagine gathering around with family and friends, dipping warm, cheesy breadsticks shaped like bones into marinara sauce. Doesn’t that sound delightful? With their spooky shape and gooey cheesy goodness, these breadsticks are perfect for Halloween parties, family dinners, or even a cozy movie night. The best part? They’re incredibly easy to make!
In the following sections, we’ll dive deep into this recipe’s key benefits, a complete ingredient list, step-by-step instructions, and more. Let’s get cooking!
🍴 Top Kitchen Essentials You'll Love


Key Benefits of Cheesy Halloween Breadstick Bones
Why You’ll Love This Recipe
- Taste Explosion: The combination of warm bread with gooey cheese and zesty marinara is mind-blowing.
- Easy to Make: With just a few ingredients, you can whip this up quickly, even on busy days.
- Perfect for Sharing: These breadsticks are great for parties, serving as a fun finger food everyone can enjoy.
- Family-Friendly: Kids will love helping shape these bones and of course, eating them!
- Customizable: You can modify the recipe for different tastes and dietary restrictions easily.
- Seasonally Themed: Perfect for Halloween but tasty enough to enjoy year-round!
What Makes It Stand Out
These Cheesy Halloween Breadstick Bones aren’t just delicious; they also redefine party food. The spooky bone shape adds a fun element that kids and adults can both appreciate. Plus, the simplicity of the recipe makes it accessible for novice cooks, while its versatility allows you to experiment with flavors.
Whether you’re hosting a Halloween bash or just want to bring some festive flair to snack time, these breadsticks will impress. Add your creative spin by incorporating seasonal ingredients or spices to surprise your taste buds!
Ingredients for Cheesy Halloween Breadstick Bones
Complete Ingredients List
To make your Cheesy Halloween Breadstick Bones, you will need the following ingredients:
- All-purpose flour (for dusting)
- 1 pound pizza dough
- 2 tablespoons unsalted butter (melted)
- ½ cup grated Parmesan cheese
- 1 cup shredded mozzarella cheese
- Marinara sauce (for dipping)
Substitutes and Alternatives
If you have specific dietary needs or preferences, consider these options:
- Gluten-Free: Use gluten-free pizza dough.
- Dairy-Free: Substitute with vegan cheese alternatives.
- Plant-Based: Create a vegan version by using dairy-free butter and cheese.
- Reduced Fat: Choose reduced-fat cheese options if you’re looking for a lighter version.
How to Make Cheesy Halloween Breadstick Bones – Step-by-Step Directions
Step 1 – Prep Your Workspace and Ingredients
Start by gathering all the required ingredients and tools. Preheat your oven to 375°F and line two baking sheets with parchment paper. This will ensure your breadsticks don’t stick to the pans.
Step 2 – Shape the Dough
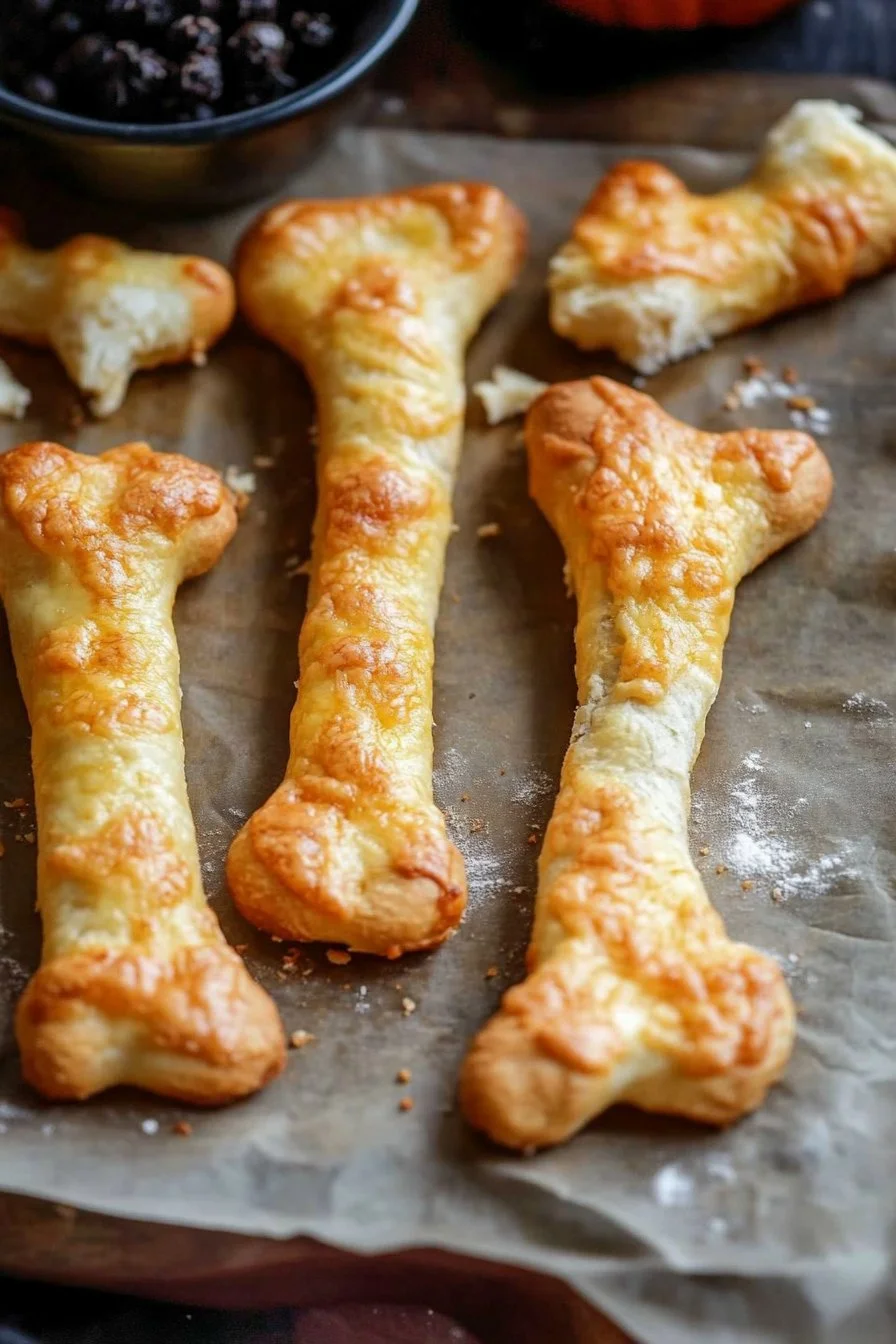
Take your pound of pizza dough and divide it into 10 equal portions. Roll each piece into a rope approximately 8 inches long. For that special bone look, make the ends of each rope a little thicker than the middle, giving it the perfect spooky anatomy!
Step 3 – Snip the Ends
Using kitchen scissors, make two small cuts (about 1 inch deep) on both ends of the dough ropes. Gently pull and stretch these cut pieces apart. This creates the effect of the bone’s ends, and trust me—it adds to the fun!
Step 4 – Brush with Butter
Melt the unsalted butter in the microwave or on the stove. With a pastry brush, generously coat each breadstick with the melted butter. This will give your breadsticks a beautiful golden color and enhance their flavor.
Step 5 – Sprinkle with Cheese
Sprinkle the grated Parmesan cheese evenly over the tops of the buttered breadsticks. This not only adds flavor but also gives them a delicious crunch.
Step 6 – Bake the Breadsticks
Place the baking sheets in the preheated oven and bake the breadsticks for about 15 minutes. Keep an eye on them; you want them to turn golden but not burn.
Step 7 – Add the Mozzarella
After 15 minutes, take the breadsticks out of the oven. Sprinkle shredded mozzarella cheese generously over each breadstick. It’s the melty cheese that’ll make these a hit!
Step 8 – Final Bake
Return the breadsticks to the oven and bake for another 5 to 7 minutes, or until the mozzarella cheese is completely melted and bubbly. Your kitchen will smell heavenly!
Step 9 – Cool and Serve
Once out of the oven, allow the breadsticks to cool slightly before serving. They are best enjoyed warm and paired with marinara sauce for dipping.
Step 10 – Enjoy!
Gather your friends and family around, serve your Cheesy Halloween Breadstick Bones, and dive into the spooktacular fun!
Serving Suggestions for Cheesy Halloween Breadstick Bones
Best Occasions to Serve This Dish
- Halloween Parties: A fun, themed dish that fits perfectly with the spooky atmosphere.
- Family Game Nights: Pair them with board games to keep everyone munching happily.
- Movie Marathons: A great snack to enjoy during a fright-night movie session.
- School Events: Easy to pack for potlucks or bake sales.
What to Serve with It
- Dipping Sauces: Marinara sauce, ranch dressing, or garlic butter complement the breadsticks beautifully.
- Beverages: Pair with apple cider, pumpkin spice lattes, or a light beer for the adults.
- Side Salads: A fresh salad can balance out the comforting cheesy breadsticks nicely.
Storing Cheesy Halloween Breadstick Bones Properly
Best Storage Practices
To ensure your Cheesy Halloween Breadstick Bones stay fresh:
- Refrigerate: Store in an airtight container in the fridge if you have leftovers. They’ll last for up to 3 days.
- Freezing: For longer storage, freeze the unsalted breadsticks after fully baked. They can last for up to 2 months.
Reheating and Freezing Tips
- Reheating: To reheat, place them in the oven at 350°F for 10 minutes. This keeps them crispy.
- Thawing: If frozen, let them thaw in the fridge overnight before reheating to avoid sogginess.
Tips & Tricks for Cheesy Halloween Breadstick Bones
Mistakes to Avoid
- Too Much Flour: Don’t over-flour the dough during shaping, which can lead to dry breadsticks.
- Not Snipping Enough: Ensure your cuts on the ends are deep enough to create the bone’s shape.
- Overbaking: Keep a close eye during the last few minutes to avoid burning the cheese.
Extra Tips for Better Results
- Experiment with Cheese: Try different combinations of cheeses, like cheddar or pepper jack, for a kick.
- Season the Dough: Mix in herbs or spices (such as garlic powder or Italian seasoning) into your dough for added flavor.
- Make Them Ahead: You can prep the dough a day in advance and store it in the fridge, shaping and baking them the next day.
Recipe Variations of Cheesy Halloween Breadstick Bones
Creative Twists
- Add herbs: Incorporate fresh or dried herbs like rosemary or thyme into the dough for an aromatic twist.
- Spice it up: Add chopped jalapeños for a spicy kick or sprinkle crushed red pepper flakes on top.
- Flavor changes: Season the butter with garlic powder, or use garlic-infused olive oil before brushing.
Dietary Adjustments
- Gluten-Free: Use gluten-free pizza dough for a delicious option that caters to those avoiding gluten.
- Vegan Options: Choose dairy-free cheese and butter alternatives to make a delectable vegan treat.
- Low-Carb Version: Use cauliflower dough for a lighter, low-carb replica of this recipe.
Conclusion about Cheesy Halloween Breadstick Bones
As you’ve seen throughout this article, Cheesy Halloween Breadstick Bones are more than just a festive treat; they are all about good times shared with family and friends. With their cheesy goodness and whimsical bone shape, they are sure to be a talking point at any gathering.
Not only are they simple to prepare, but they also allow for creativity and are adaptable to various dietary needs. Whether you serve them at Halloween or any time of the year, they are bound to please any crowd.
Try making these delightfully spooky breadsticks, and don’t forget to share your thoughts and photos with friends. Happy cooking!
FAQs about Cheesy Halloween Breadstick Bones
What if it doesn’t turn out right?
No worries! If your breadsticks don’t look perfect, remember that they still taste great. You can always shape them into fun, abstract forms if shaping wasn’t as successful.
Can I prepare it ahead of time?
Absolutely! You can prepare the dough and shape the breadsticks in advance. Just keep them covered in the fridge and bake them just before you plan to serve.
What are the best ingredient substitutions?
Some great substitutions include gluten-free dough, vegan cheese, or even different spices to cater to taste preferences or dietary restrictions.
How long can it be stored?
When properly stored in an airtight container, the breadsticks can last up to 3 days in the fridge or 2 months in the freezer.
Can I use store-bought dough or crust?
Yes! Store-bought pizza dough is a perfect shortcut if you’re short on time. Just make sure it’s the kind that can be rolled out.
Is this recipe kid-friendly or family-appropriate?
Absolutely! Kids will enjoy helping shape the dough and, of course, eating the delicious breadsticks.
Can I make this recipe allergen-free?
Yes! By using allergen-free alternatives, such as gluten-free dough and dairy-free cheese, you can create a delicious allergen-free version of these breadsticks.
Now that you have everything you need to whip up these Cheesy Halloween Breadstick Bones, it’s time to gather your ingredients and start baking—your spooky snack adventure awaits!

Cheesy Halloween Breadstick Bones
Ingredients
Main Ingredients
- 1 pound pizza dough Use gluten-free dough as a substitute if needed.
- 2 tablespoons unsalted butter Melted for brushing.
- ½ cup grated Parmesan cheese For topping.
- 1 cup shredded mozzarella cheese For topping.
- Marinara sauce For dipping.
- All-purpose flour For dusting.


Instructions
Preparation
- Preheat your oven to 375°F and line two baking sheets with parchment paper.
- Divide the pizza dough into 10 equal pieces and roll each into an 8-inch long rope.
- Make two cuts on both ends of each rope to create a bone shape.
Assembly
- Brush each breadstick with melted butter and sprinkle with Parmesan cheese.
- Bake for 15 minutes until golden.
- Sprinkle shredded mozzarella over each breadstick and bake for an additional 5-7 minutes until melted.
Serving
- Allow to cool slightly before serving with marinara sauce.