

This post may contain affiliate links. As an Amazon Associate, I earn from qualifying purchases at no extra cost to you.
Table of Contents
🍴 Top Kitchen Essentials You'll Love


Introduction to Chia Seed Jam
Have you ever craved something sweet and spreadable that doesn’t compromise your wellness goals? Look no further than Chia Seed Jam, a delightful and nutritious alternative to traditional jams. This simple, homemade recipe not only tantalizes your taste buds but also provides essential nutrients. By harnessing the natural sweetness of seasonal fruits, Chia Seed Jam delivers a burst of flavor in every spoonful.
One of the beautiful aspects of Chia Seed Jam is its versatility. Whether you’re slathering it on warm toast, swirling it into yogurt, or using it as a filling for pastries, its uses are endless. Have you considered how easy it is to whip up your own jam with just a handful of ingredients? No added preservatives, no artificial flavors—just pure, wholesome goodness that you can feel good about consuming.
We all love that perfect blend of sweet and tangy, and Chia Seed Jam brings this harmony to your table. The tiny chia seeds not only thicken the jam but also contribute a delightful texture reminiscent of traditional preserves. Plus, they offer a nutritional boost packed with omega-3 fatty acids, fiber, and antioxidants.
In just a few simple steps, you can make your own batch of Chia Seed Jam and customize it to match your tastes. Ready to dive into the incredible world of homemade jams? Let’s explore why this recipe is so special and how to create your own delicious Chia Seed Jam!
Key Benefits of Chia Seed Jam
Why You’ll Love This Recipe
- Simple Ingredients: Made with just a few pantry staples.
- Healthy Choice: Packed with fiber, omega-3s, and antioxidants.
- Versatile Uses: Perfect as a spread, topping, or yogurt mix-in.
- Quick to Make: Prepare your Chia Seed Jam in under 20 minutes.
- Customizable Flavors: Tailor it to your preferences with different fruits and sweeteners.
- No Preservatives: Enjoy a wholesome, homemade alternative to store-bought jams.
What Makes It Stand Out
Chia Seed Jam stands out for its originality and ease. Unlike store-bought options loaded with sugar and preservatives, this recipe empowers you to control the ingredients. Create a jam that showcases the flavors of your favorite berries, all while benefitting from the nutritional aspects of chia seeds.
The best part? You can easily customize Chia Seed Jam to suit seasonal fruits available in your area. Imagine a strawberry version in the summer or a comforting blueberry jam in the colder months! Each experience can be unique, making it perfect for any occasion.
Ingredients for Chia Seed Jam
Complete Ingredient List with Measurements
- 2 cups fresh berries (choose from raspberries, strawberries, or blueberries)
- 2 tablespoons chia seeds
- 2-3 tablespoons natural sweetener (honey, maple syrup, or agave syrup)
- 1 tablespoon lemon juice (optional)
Substitutes and Alternatives
If you’re concerned about allergies or dietary preferences, there are several substitutes for the ingredients in Chia Seed Jam. For sweeteners, you can substitute honey with agave syrup for a vegan-friendly option. Maple syrup adds a unique flavor while still being a great natural sweetener.
For those who may have berry allergies, you can consider using other fruits such as peaches or even apples. Experimenting with different fruits not only provides diversity in flavor but also enhances the nutritional profile of your jam. The optional lemon juice, while not necessary, serves to brighten the flavor and balance the sweetness. Don’t hesitate to modify the recipe based on what you have available!
How to Make Chia Seed Jam – Step-by-Step Directions
Step 1 – Prepare Ingredients
Begin by gathering all your ingredients together. Wash the fresh berries thoroughly to remove any dirt or pesticides. If you’re using larger fruits like strawberries, slice them into smaller pieces for easier mashing. Measure out your chia seeds, sweetener, and optional lemon juice as well.
Step 2 – Cook the Base
In a small saucepan, combine the cleaned berries and your chosen sweetener over medium heat. Cook gently for about 5-7 minutes, using a fork to mash the berries as they heat. You’ll notice the fruits start to release their juices, creating a wonderful fragrant mixture.
Step 3 – Add Chia Seeds
Once the fruit mixture is bubbling and fragrant, stir in the chia seeds and optional lemon juice. This is where the magic happens! Bring the mixture back to a simmer, stirring well to evenly distribute the chia seeds.
Step 4 – Simmer and Thicken
Continue cooking for an additional 5 minutes while stirring frequently. You’ll start to see the mixture thicken as the chia seeds absorb the liquid from the fruit. The texture should become jam-like but feel free to cook it a bit longer if you prefer a thicker consistency.
Step 5 – Cool Down
After cooking, remove the saucepan from heat and let the Chia Seed Jam cool. This cooling time allows the seeds to continue thickening the jam. If you find the consistency too runny after cooling, return it to the heat for a few more minutes.
Step 6 – Transfer to Jar
Once the jam has cooled sufficiently, carefully transfer it to a clean jar or airtight container. Use a spatula to scrape out every last drop, ensuring you don’t waste any of this delicious creation.
Step 7 – Refrigerate
Seal the jar tightly and place it in the refrigerator. The jam can be enjoyed immediately, but it’s best after chilling for a few hours or overnight. Store it in the fridge where it should keep well for about one to two weeks.
Step 8 – Enjoy!
Now that your homemade Chia Seed Jam is ready, it’s time to enjoy it! Spread it on toast, swirl it into your morning yogurt, or use it as a filling for pastries— the options are endless!
Serving Suggestions for Chia Seed Jam
Best Occasions to Serve This Dish
Chia Seed Jam is perfect for breakfast or a light snack. It’s also a fantastic addition to brunch gatherings or afternoon tea sessions. Both kids and adults will love discovering new ways to enjoy this versatile recipe. It’s not just breakfast food; it works perfectly in desserts and baking, too.
What to Serve With It
Pair Chia Seed Jam with fresh bread or toast for a classic treat. It also makes a fabulous topping for pancakes, waffles, or even ice cream. Serve it alongside a charcuterie board for a sweet contrast or mix it into smoothies for an extra flavor boost.
How to Store Chia Seed Jam Properly
Best Storage Practices
To enjoy maximum freshness, store your Chia Seed Jam in an airtight container in the fridge. Be sure to use a clean spoon each time you scoop out the jam to prevent contamination. It’s also possible to freeze the jam if you want to keep it longer; just make sure to leave some space in the container for expansion.
Reheating and Freezing Tips
When you’re ready to use frozen Chia Seed Jam, simply transfer it to the fridge to thaw overnight or place it in a microwave-safe container for a quick defrost. If using the microwave, stir occasionally to heat it evenly. To enjoy it warm, heating for about 15 seconds should do the trick!
Tips & Tricks for Chia Seed Jam
Mistakes to Avoid
1 – Using Overripe Fruit: Selecting overly ripe berries may lead to a jam that is too runny. Use perfectly fresh berries for the best texture.
2 – Not Mashing Enough: If you don’t mash the fruit sufficiently, your jam could end up with large pieces of fruit rather than a smooth consistency.
3 – Ignoring Timing: Cooking the jams for too long can cause them to lose their fresh flavor. Keep a close watch on the cooking time.
4 – Skipping Lemon Juice: Neglecting the lemon juice can result in a jam that tastes overly sweet. The acidity adds a lovely balance.
5 – Forgetting to Cool: Skipping the cooling step means the jam won’t thicken properly, so be patient!
Extra Tips for Better Results
Try using an immersion blender for a smoother texture if you prefer a more uniform jam. For added flavor, consider infusing the jam with spices like cinnamon or vanilla. Don’t be afraid to experiment with flavors—mix different fruits for a unique variation!
Recipe Variations of Chia Seed Jam
Creative Twists
If you love Chia Seed Jam, you’ll be excited by the creative variations you can try! One idea is to create a tropical twist by using mango and coconut milk, adding a bit of shredded coconut for texture. Another delicious option is to incorporate herbs like mint or basil into your jam for a refreshing twist.
Dietary Adjustments
For those following special diets, Chia Seed Jam can easily be adapted. It’s already vegan and gluten-free, making it suitable for many preferences. Use cane sugar or fruit purees to cater to various dietary needs while keeping the recipe delicious.
Conclusion about Chia Seed Jam
Chia Seed Jam not only tastes fantastic but is also wonderfully simple to make. With its blend of natural flavors and health benefits, it’s an ideal choice for anyone looking to elevate their breakfast or snacks. This recipe gives you control over ingredients, allowing you to create a product free from artificial sugars and preservatives.
By choosing fresh, seasonal fruits and experimenting with your own flavors, you can make Chia Seed Jam that perfectly suits your taste buds. Whether you’re trying it for the first time or looking to perfect your technique, this recipe is a delightful addition to your culinary repertoire. So, step into your kitchen and start creating your own delicious, homemade Chia Seed Jam today!
FAQs about Chia Seed Jam
How long can I store Chia Seed Jam?
Chia Seed Jam can typically be stored in the refrigerator for about one to two weeks.
Can I freeze Chia Seed Jam?
Yes, you can freeze Chia Seed Jam! Just ensure you leave enough space in the container for expansion during freezing.
What fruits work best for Chia Sed Jam?
Almost any fresh fruit can be used. Popular options include strawberries, blueberries, raspberries, or blackberries.
How do I know when my jam is the right consistency?
The jam should thicken while cooling, and you can check texture by running a spoon through it; it should hold its shape without running.
Can I use frozen fruits for Chia Sed Jam?
Yes, you can use frozen fruits. Just keep in mind that the cook time may need some adjustment as they may release more liquid than fresh fruits.
What sweeteners can I use?
You can use honey, maple syrup, agave syrup, or even stevia for a low-calorie option. Choose according to your dietary preferences.
Is Chia Sed Jam gluten-free?
Yes, Chia Sed Jam is naturally gluten-free, making it suitable for those with gluten allergies or sensitivities.
Can I make Chia Sed Jam ahead of time?
Absolutely! Chia Sed Jam can be made in advance and stored in the refrigerator for easy breakfasts or snacks throughout the week.
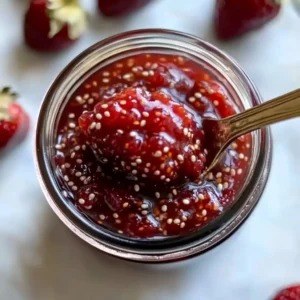
Chia Seed Jam
Ingredients
Fruits
- 2 cups fresh berries (raspberries, strawberries, or blueberries) Select your preferred berries.
Sweeteners & Flavoring
- 2 tablespoons chia seeds
- 2-3 tablespoons natural sweetener (honey, maple syrup, or agave syrup) Adjust based on sweetness preference.
- 1 tablespoon lemon juice (optional) Adds acidity and balances sweetness.


Instructions
Preparation
- Gather all your ingredients together. Wash the fresh berries thoroughly and slice larger fruits like strawberries into smaller pieces.
Cooking
- In a small saucepan, combine the cleaned berries and your chosen sweetener over medium heat. Cook gently for about 5-7 minutes, mashing the berries with a fork.
- Once the fruit mixture is bubbling, stir in the chia seeds and optional lemon juice. Bring back to a simmer, stirring well.
- Continue cooking for an additional 5 minutes while stirring frequently until the mixture thickens to a jam-like consistency.
Cooling & Storing
- Remove from heat and let cool to continue thickening. If too runny after cooling, return to heat.
- Transfer the jam to a clean jar or airtight container. Seal tightly and refrigerate.
Serving
- Enjoy your homemade Chia Seed Jam on toast, yogurt, or pastries. Store in the fridge for 1-2 weeks.