

This post may contain affiliate links. As an Amazon Associate, I earn from qualifying purchases at no extra cost to you.
Table of Contents
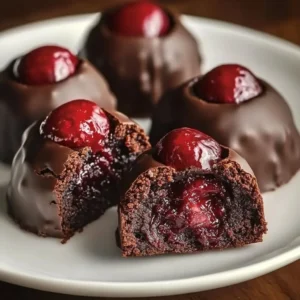
When you’re craving something sweet, few treats can compete with the delightful indulgence of Chocolate Covered Cherry Brownie Bombs. Imagine sinking your teeth into a gooey brownie, only to encounter a burst of cherry filling that complements the rich chocolate perfectly. Doesn’t that sound heavenly? This recipe embodies the best of both worlds: moist brownie and the tart sweetness of cherries.
What makes Chocolate Covered Cherry Brownie Bombs even more appealing is their simplicity. You don’t need to be a master baker to whip these up. With just a few ingredients and straightforward steps, you can create a dessert that impresses everyone. Whether it’s a casual family gathering or a festive celebration, these little brownie bombs make for the perfect treat to share, or even to keep all to yourself. Who could resist that combination of flavors?
Let’s not forget the versatility of this recipe. You can customize it in countless ways. Add nuts for an extra crunch, or try different fillings. Each of these tiny cakes can be unique, reflecting your personality and creativity. The beauty of Chocolate Covered Cherry Brownie Bombs is not just in their taste but also in their adaptability.
Now, who wouldn’t want to make a dessert that brings chocolate lovers and cherry enthusiasts together? It’s about time you treat your taste buds to something exciting. Dive into this rich, decadent experience with these delightful brownie bombs. You’ll find yourself wondering how you ever lived without them. Let’s get started!
🍴 Top Kitchen Essentials You'll Love


Key Benefits of Chocolate Covered Cherry Brownie Bombs
Why do people keep coming back for more of these delightful brownie bombs? Here are some reasons that make Chocolate Covered Cherry Brownie Bombs a must-try.
Irresistible Flavor: The combination of rich chocolate and sweet cherries creates a flavor profile that is simply out of this world.
Easily Adaptable: Whether you want a gluten-free version or prefer dark chocolate, this recipe can be tailored to suit your needs.
Quick To Prepare: With just a few easy steps, you can have these delicious treats ready in no time.
Perfect for Sharing: These brownie bombs look fantastic on any dessert table, making them perfect for parties and gatherings.
Fun to Make: Get the whole family involved in grouping the brownie bombs—there’s something enjoyable about creating something so delicious together.
What Makes It Stand Out
Chocolate Covered Cherry Brownie Bombs aren’t your average brownie. They combine the classic taste of brownies with a fruity flair that sets them apart. The surprise cherry filling gives a playful twist that leaves everyone wanting more.
Customization is another exciting aspect of this recipe. Want to add a dash of almond extract or swap cherries for another fruit? The possibilities are endless.
These delightful treats are perfect for various occasions—birthday parties, holidays, or simply as a midweek pick-me-up. No matter the event, they are sure to leave a lasting impression.
Ingredients for Chocolate Covered Cherry Brownie Bombs
To prepare Chocolate Covered Cherry Brownie Bombs, gather the following ingredients:
- 1 box brownie mix: Choose your favorite brand for a quick and easy base.
- 1/4 cup vegetable oil: This keeps the brownies moist and fudgy.
- 2 large eggs: They help bind the ingredients together.
- 1 cup cherries (pitted and chopped): Fresh or frozen, these provide the signature flavor.
- 1 cup chocolate chips: Use semi-sweet or dark chocolate for an indulgent touch.
- 1 cup cherry filling or pie filling: This can be homemade or store-bought for convenience.
- 1 cup chocolate for melting (for coating): Choose a quality chocolate for the best results.
- Sprinkles or chopped nuts (for decoration, optional): These add a fun and festive finishing touch.
Substitutes and Alternatives
Are you following a specific diet or have allergies? No worries! There are plenty of substitutes you can use for Chocolate Covered Cherry Brownie Bombs.
For a gluten-free option, use a gluten-free brownie mix. You can also switch out the vegetable oil for coconut oil to add a subtle tropical flavor while staying heart-healthy.
If you’re avoiding eggs, you can replace them with a flaxseed mixture—mix one tablespoon of flaxseed meal with three tablespoons of water and let sit for a few minutes. This creates a great egg substitute that binds well.
How to Make Chocolate Covered Cherry Brownie Bombs – Step-by-Step Directions
Step 1 – Prepare Ingredients
Start by gathering all your ingredients. Preheat your oven according to the brownie mix instructions, and grease a muffin tin to prevent sticking.
Step 2 – Cook the Base
In a large bowl, mix the brownie mix with the vegetable oil and eggs. Stir until everything is well combined and no dry mix is visible.
Step 3 – Fill Muffin Tin
Pour a small amount of the brownie batter into each muffin cup, just enough to cover the bottom. Aim for about one-third full.
Step 4 – Add Cherry Filling
Place a spoonful of cherry filling in the center of each filled cup. This hidden surprise will make every bite exciting!
Step 5 – Cover With Batter
Top the cherry filling with more brownie batter. Make sure to completely cover the filling. This helps the cherries bake into the brownie.
Step 6 – Bake
Carefully place the muffin tin in the preheated oven. Bake as per the instructions on the brownie mix box, typically around 20-25 minutes. A toothpick should come out with moist crumbs.
Step 7 – Cool Completely
Once baked, take the muffin tin out and let it cool completely. This will help the brownie bomb set and make it easier to remove from the tin.
Step 8 – Melt the Chocolate
While the brownie bombs are cooling, melt the chocolate for coating. You can use a microwave in short intervals or a double boiler for an even melt.
Step 9 – Dip Each Bomb
Once the brownie bombs have cooled, dip each one into the melted chocolate. Make sure to coat them thoroughly for an irresistible finish.
Step 10 – Decorate and Set
Place the coated brownie bombs on a cooling rack. Top them with sprinkles or chopped nuts for an extra fun touch. Let the chocolate set before serving.
Serving Suggestions for Chocolate Covered Cherry Brownie Bombs
Best Occasions to Serve This Dish
Chocolate Covered Cherry Brownie Bombs are incredibly versatile. Serve them at birthday parties for a delightful dessert that kids and adults will love.
They also make fantastic holiday treats, especially around Valentine’s Day. The cherry filling gives a romantic twist perfect for sharing with loved ones.
You can even add them to a dessert buffet at weddings or festive gatherings. Their bite-sized nature makes them easy to grab and enjoy.
What to Serve With It
To complement your Chocolate Covered Cherry Brownie Bombs, consider the following options:
- Vanilla ice cream: A scoop of creamy vanilla will balance the richness of the brownies beautifully.
- Coffee or Espresso: The robust flavors of coffee contrast nicely with the sweetness of chocolate.
- Milk: A classic pairing, especially for kids or those who love a nostalgic touch.
- Fresh fruit: A side of fresh berries or even more cherries adds a light and refreshing element.
How to Store Chocolate Covered Cherry Brownie Bombs Properly
Best Storage Practices
To keep your Chocolate Covered Cherry Brownie Bombs fresh, store them in an airtight container. They can last for about 3-5 days at room temperature.
For longer storage, keep them in the refrigerator, where they can last for about a week. Just remember to bring them back to room temperature before serving for the best taste experience.
Reheating and Freezing Tips
If you want to enjoy your brownie bombs later, they can also be frozen. Wrap each one in plastic wrap, and then place them in a freezer-safe bag. They can last up to three months in the freezer.
When you’re ready to enjoy them, allow the brownie bombs to thaw at room temperature. If you prefer them warm, you can microwave each for about 10-15 seconds to rejuvenate the melted chocolate coating.
Tips & Tricks for Chocolate Covered Cherry Brownie Bombs
Mistakes to Avoid
- Overmixing the Batter: This can lead to dry brownies. Mix until just combined.
- Not Greasing the Muffin Tin: It’s essential for easy removal. Don’t skip this step!
- Using Cold Ingredients: Room-temperature eggs and oil help the batter combine better.
- Filling over 2/3 Full: Overfilling can cause the brownie bombs to overflow.
- Rushing the Cooling Process: Allow time for cooling to set the flavor and texture.
Extra Tips for Better Results
For even better results, sprinkle a pinch of sea salt over the melted chocolate coating. This contrast enhances the flavors.
Consider adding a splash of vanilla extract to the brownie batter for an aromatic touch. You can also experiment with flavored chocolate for coating, such as dark, milk, or white chocolate to create variety.
Recipe Variations of Chocolate Covered Cherry Brownie Bombs
Creative Twists
Nutty Chocolate Bombs: Add chopped walnuts or pecans into the brownie batter for extra crunch and flavor.
Lemon Cherry Bombs: Use lemon curd instead of cherry filling for a tangy twist that beautifully contrasts with the chocolate.
Spicy Chocolate: Add a pinch of cayenne or cinnamon to the brownie batter for a warm twist that enhances the chocolate flavor.
Dietary Adjustments
For a vegan version, use a vegan brownie mix and substitute the eggs with a flaxseed mixture or applesauce. Additionally, use dairy-free chocolate for coating.
If you require a gluten-free option, choose a certified gluten-free brownie mix and enjoy the same delicious flavor without the worry.
Conclusion about Chocolate Covered Cherry Brownie Bombs
If you’re looking for a sweet treat that’s as delightful to make as it is to eat, Chocolate Covered Cherry Brownie Bombs are a perfect choice. Their luscious chocolate shell conceals a gooey brownie filled with cherry goodness. Every bite is an invitation to savor the beautiful blend of flavors and textures.
So, why wait? Gather your ingredients, roll up your sleeves, and indulge in the sheer joy of creating these little brownie bombs. They’re bound to be a hit at any gathering and will transform your dessert experience. Share them with friends and family or keep them all to yourself—you deserve it!
FAQs about Chocolate Covered Cherry Brownie Bombs
Can I prepare it ahead of time?
Absolutely! You can make these brownie bombs a day in advance. Just store them properly in an airtight container.
Can I freeze it?
Yes, they freeze well. Wrap each one individually and store them in a freezer-safe bag.
How long does it last?
Stored at room temperature, they can last about 3-5 days. In the refrigerator, they can last up to a week.
What are the best substitutions?
You can use a gluten-free brownie mix or substitute eggs with flaxseed or applesauce for vegan options.
Is this recipe family-friendly?
Definitely! Both kids and adults love the combination of chocolate and cherry, making it a family favorite.
Can I modify the filling?
Yes! Feel free to swap cherries for another fruit filling—be it raspberry, strawberry, or even lemon curd.
What can I do if I over-bake them?
If you notice they are dryer than expected, drizzle a bit of chocolate sauce over the top, or serve them with ice cream.
Can I make these without a muffin tin?
While a muffin tin is ideal, you could use a baking dish and cut them into squares after baking, though they won’t be as fun-sized.
What if the chocolate coating hardens too quickly?
Keep the chocolate over low heat as you dip, or use a little coconut oil to alter the consistency for easier dipping.
Are Chocolate Covered Cherry Brownie Bombs suitable for events?
Absolutely! They are perfect for parties, potlucks, and celebrations, easily impressing guests with their delightful looks and taste.
Decadent Chocolate Covered Cherry Brownie Bombs
Equipment
- Muffin tin
- Mixing Bowls
- Spatula
- Microwave or double boiler
- Cooling rack
Ingredients
- 1 box brownie mix any brand
- ¼ cup vegetable oil
- 2 large eggs
- 1 cup cherries pitted and chopped
- 1 cup cherry pie filling or homemade cherry filling
- 1 cup chocolate chips semi-sweet or dark
- 1 cup melting chocolate for coating
- sprinkles or chopped nuts for decoration


Instructions
- Preheat the oven as directed on the brownie mix box. Grease a muffin tin lightly.
- In a mixing bowl, combine brownie mix, vegetable oil, and eggs. Stir until well mixed.
- Pour a small amount of brownie batter into each muffin cup, filling about one-third of the way.
- Add a spoonful of cherry filling into the center of each muffin cup.
- Cover the cherry filling with more brownie batter until the cups are about two-thirds full.
- Bake for 20–25 minutes, or until a toothpick inserted comes out with moist crumbs. Do not overbake.
- Remove from the oven and allow the brownie bombs to cool completely in the tin.
- While cooling, melt the chocolate for coating using a microwave in short bursts or a double boiler.
- Dip each cooled brownie bomb into the melted chocolate, coating completely.
- Place on a cooling rack and top with sprinkles or chopped nuts. Let the chocolate set before serving.