

This post may contain affiliate links. As an Amazon Associate, I earn from qualifying purchases at no extra cost to you.
Table of Contents
🍴 Top Kitchen Essentials You'll Love


Introduction to Chocolate Hazelnut Cake Filling
Imagine a cake that brings joy, warmth, and a touch of decadence. The Chocolate Hazelnut Cake Filling is not just a filling; it’s an experience that tantalizes the taste buds. This delightful concoction combines rich chocolate, creamy textures, and the nutty crunch of toasted hazelnuts. Have you ever dreamed of creating a cake that becomes the star of the dessert table? With this homemade filling, you’ll be well on your way to impressing friends and family.
What makes this recipe so special? It’s the balance of flavors and textures that come together effortlessly. The melted chocolate creates a rich base, while the heavy cream adds a luscious creaminess. Butter contributes to the overall smoothness, and the star of the show—the toasted hazelnuts—adds that perfect touch of crunch. Baking can often seem daunting, but this recipe is easy enough for beginners while offering a gourmet taste.
Why limit the delectable joy of chocolate to just one layer? The Chocolate Hazelnut Cake Filling not only pairs perfectly with various cake types but can also be used as a delightful spread or dip. Whether you’re hosting a lavish birthday party, a cozy family dinner, or simply indulging in a sweet craving, this filling is versatile enough to shine on any occasion.
As you embark on this culinary adventure, you’ll find that the Chocolate Hazelnut Cake Filling not only elevates cakes but also inspires creativity. So grab your mixing bowl and let’s get started on crafting this delicious treat that promises to bring smiles and satisfied taste buds all around.
Key Benefits of Chocolate Hazelnut Cake Filling
Why You’ll Love This Recipe
- Decadent chocolate flavor that pleases any chocolate lover.
- Simple, easy-to-follow steps make for stress-free baking.
- Versatile enough to be used in various desserts.
- Nutty crunch from toasted hazelnuts adds texture.
- Can be made ahead of time for convenient baking.
- Perfect for special occasions or a delightful everyday treat.
What Makes It Stand Out
The Chocolate Hazelnut Cake Filling stands out due to its unique blend of flavors that elevate any dessert. It’s crafted with a balance that combines richness and nuttiness, making it a crowd favorite. You can customize this filling to suit various tastes or dietary restrictions, ensuring that everyone can partake in the indulgence.
Creative bakers can utilize the Chocolate Hazelnut Cake Filling in numerous ways, from being the star in layer cakes to healthy sweet dips for fruits. It’s an exceptional addition to your dessert repertoire that you’ll want to use again and again.
Ingredients for Chocolate Hazelnut Cake Filling
Complete Ingredient List with Measurements
- 1 cup melted chocolate (bittersweet or semisweet)
- 1 cup heavy cream
- 1/2 cup unsalted butter (softened)
- 1/2 cup toasted hazelnuts (chopped)
Substitutes and Alternatives
If you have allergens or dietary preferences, several substitutions can be made. For a dairy-free version, consider using coconut cream instead of heavy cream and a non-dairy butter alternative. If you’re looking for a lower-sugar option, opt for dark chocolate with no added sugar, which can enhance the flavor without sacrificing sweetness.
For those allergic to hazelnuts, consider unique alternatives such as toasted almonds or pecans for a similar crunch. Just remember to adjust the quantity to achieve the desired taste and texture while ensuring everyone can enjoy this delicious filling.
How to Make Chocolate Hazelnut Cake Filling – Step-by-Step Directions
Step 1 – Prepare Ingredients
Start by gathering all your ingredients. You’ll need melted chocolate, heavy cream, softened butter, and toasted hazelnuts. Ensure your chocolate is fully melted and smooth, which will be crucial for achieving the right texture in your Chocolate Hazelnut Cake Filling.
Step 2 – Cook the Base
In a mixing bowl, combine the melted chocolate, heavy cream, and softened butter. The best way to achieve a harmonious blend is to whisk these ingredients together thoroughly until they are smooth and well combined. This process is vital, as a well-mixed base creates the ultimate creamy filling.
Step 3 – Add Hazelnuts
Once your chocolate mixture is smooth, stir in the chopped toasted hazelnuts. This addition will give your Chocolate Hazelnut Cake Filling the desired crunch, so make sure they are evenly distributed throughout the mixture.
Step 4 – Allow to Cool
Now it’s time to let your mixture cool. Pour it into a bowl and set it aside. Allow it to cool at room temperature until it reaches a spreadable consistency. Be patient—it’s worth the wait for that perfect texture.
Step 5 – Check Consistency
As the filling cools, check its consistency. It should be thick but still spreadable. If it’s too runny, give it more time to cool. You can also place it in the refrigerator for a quicker cooling process if you’re in a hurry.
Step 6 – Use as Desired
Once your Chocolate Hazelnut Cake Filling has reached the ideal consistency, it’s ready to use! You can fill your layers of cake, use it as a dip with fruits, or even spread it on toast. Let your creativity lead the way.
Step 7 – Final Touches
If desired, you can enhance the filling by adding a pinch of salt or a splash of vanilla extract during the mixing process. This twist can elevate the flavor even further and add a personal touch to your dessert.
Step 8 – Storage Preparation
If you’re not using the filling right away, transfer it to an airtight container. This will help maintain the freshness and flavor of your Chocolate Hazelnut Cake Filling until you are ready to use it.
Step 9 – Chill If Needed
Remember that chilling this filling can thicken it even more. If you prefer a firmer texture, feel free to refrigerate further until it reaches your preferred consistency.
Step 10 – Enjoy!
Now it’s time to savor the results of your efforts. Use the Chocolate Hazelnut Cake Filling generously in your desserts and enjoy all the compliments that await!
Serving Suggestions for Chocolate Hazelnut Cake Filling
Best Occasions to Serve This Dish
The Chocolate Hazelnut Cake Filling shines during special occasions such as birthdays, anniversaries, or holiday gatherings. Its rich flavor and impressive presentation make it a delightful addition to any celebration. Moreover, considering using it in an everyday dessert can elevate a seemingly simple cake into something extraordinary.
For casual gatherings, serve it in a dip format alongside fresh fruits or cookies for a treat that’s sure to impress your guests.
What to Serve With It
The versatility of the Chocolate Hazelnut Cake Filling makes it a great companion for various desserts. Pair it with vanilla ice cream, drizzle it over pancakes, or use it between layers of a chocolate cake. The possibilities are endless, and the filling can easily transform any simple dessert into an exceptional treat.
How to Store Chocolate Hazelnut Cake Filling Properly
Best Storage Practices
When it comes to storing the Chocolate Hazelnut Cake Filling, airtight containers are your friend. Place the cooled filling in a container and refrigerate it. Properly stored, it will last for about a week. If you need to keep it longer, consider freezing it.
Reheating and Freezing Tips
For those moments when you want to enjoy your Chocolate Hazelnut Cake Filling but it’s too cold to spread, simply place it in the microwave for 10-15 seconds to bring it back to a more spreadable state. If frozen, allow it to thaw in the refrigerator overnight before using it. Avoid microwaving directly from frozen, as it can cause uneven melting.
Tips & Tricks for Chocolate Hazelnut Cake Filling
Mistakes to Avoid
1 – Using cold ingredients: Always ensure your butter and cream are at room temperature for the best blend.
2 – Overheating chocolate: Melt your chocolate gently to avoid burning it, which can lead to bitterness.
3 – Not allowing the filling to cool: Skipping the cooling step can create a filling that is too runny to use effectively.
4 – Under-mixing: Ensure everything is well combined to achieve a silky smooth texture in your filling.
5 – Not toasting hazelnuts: Skipping the toasting process means missing out on added flavor and texture that enhances the filling.
Extra Tips for Better Results
For extra flavor, try adding a dash of espresso powder to the chocolate mixture. The espresso enhances the chocolate flavor, making it even richer. Additionally, consider finely grinding some of the hazelnuts before incorporation for an even more delectable texture that infuses the filling.
Recipe Variations of Chocolate Hazelnut Cake Filling
Creative Twists
For those adventurous souls, consider adding flavors such as orange zest or a splash of liqueur for an adult twist. Alternatively, swapping out regular chocolate for white chocolate can give a completely different and delicious chocolate hazelnut experience. You might also explore adding a layer of raspberry jam for a fruity contrast that complements the filling beautifully.
Dietary Adjustments
If you’re seeking a vegan version, swap heavy cream for coconut milk and choose vegan butter to maintain consistency. There are also many gluten-free options for cakes and desserts that can pair with the Chocolate Hazelnut Cake Filling. Adjustments can be made to accommodate various dietary needs without sacrificing flavor.
Conclusion about Chocolate Hazelnut Cake Filling
In summary, the Chocolate Hazelnut Cake Filling is a must-try addition to your baking repertoire. Its rich, chocolatey flavor combined with the crunch of hazelnuts caters to every chocolate lover’s dream. Not only is it easy to make, but it also delivers versatility that can adapt to multiple desserts. From cakes to dips, there’s no limit to how you can enjoy this delightful filling. So gather your ingredients, channel your inner baker, and create this delicious concoction that promises joy and satisfaction in every bite.
FAQs about Chocolate Hazelnut Cake Filling
1 – Can I make the filling ahead of time?
Absolutely! You can prepare the Chocolate Hazelnut Cake Filling a day in advance and store it in the refrigerator until you’re ready to use it.
2 – How do I store leftover filling?
Keep any leftover filling in an airtight container in the fridge for up to a week. Make sure to let it cool completely before sealing.
3 – Can I freeze the filling for later use?
Yes! The Chocolate Hazelnut Cake Filling freezes well. Just remember to let it thaw in the refrigerator before using.
4 – How can I adjust the sweetness of the filling?
To adjust the sweetness, you can use dark chocolate with lower sugar content or reduce the amount of melted chocolate in the recipe.
5 – What can I use instead of hazelnuts?
You can substitute hazelnuts with toasted almonds or pecans if you have nut allergies or prefer different flavors.
6 – Is this filling suitable for gluten-free cakes?
Yes! The Chocolate Hazelnut Cake Filling is inherently gluten-free, making it a great addition to gluten-free desserts.
7 – How long can the filling sit out at room temperature?
It’s best to avoid leaving the filling out for more than two hours to ensure its safety and freshness.
8 – Can I use this filling for cupcakes?
Absolutely! The Chocolate Hazelnut Cake Filling can be used as a filling for cupcakes, adding a delightful surprise inside.
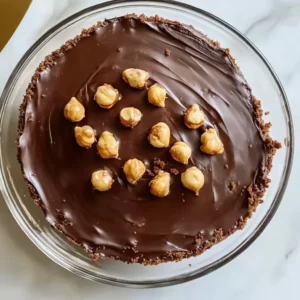
Chocolate Hazelnut Cake Filling
Ingredients
Filling Ingredients
- 1 cup melted chocolate (bittersweet or semisweet) Ensure the chocolate is fully melted and smooth.
- 1 cup heavy cream Can substitute with coconut cream for a dairy-free version.
- ½ cup unsalted butter (softened) Bring butter to room temperature for best blending.
- ½ cup toasted hazelnuts (chopped) Alternatives include toasted almonds or pecans for nut-free options.


Instructions
Preparation
- Gather all your ingredients: melted chocolate, heavy cream, softened butter, and toasted hazelnuts.
- In a mixing bowl, combine the melted chocolate, heavy cream, and softened butter, whisking until smooth.
- Stir in the chopped toasted hazelnuts until evenly distributed.
- Let the mixture cool at room temperature until it reaches a spreadable consistency.
Final Steps
- Check the consistency; it should be thick but still spreadable. Refrigerate for faster cooling if necessary.
- Use the filling as desired: layer in cakes, dip with fruits, or spread on toast.
- Transfer any leftovers to an airtight container for storage, refrigerating it for up to a week.
- To reheat, microwave the filling for 10-15 seconds if needed.