

This post may contain affiliate links. As an Amazon Associate, I earn from qualifying purchases at no extra cost to you.
Table of Contents
There’s something magical about the holiday season. The twinkling lights, the sounds of carolers, and the rich aroma of baked goods wafting through the air create an atmosphere of joy and warmth. Among all these delightful aspects, indulge your taste buds with a treat that brings everyone together: Chocolate Truffles – Christmas Edition: 3 Steps to Joyful Delights. This simple yet exquisite recipe promises to make your holiday gatherings more special and memorable.
Have you ever experienced the joy of biting into a smooth, rich chocolate truffle? When you create these homemade delights, you can share this experience with your friends and family. What’s more, the process is remarkably easy! Within just a few steps, you can create something that looks luxurious but does not require any prior baking skills. Imagine impressing your loved ones with funny anecdotes while you present them with a plateful of homemade chocolate truffles.
The beauty of this recipe lies in its simplicity. With just a few ingredients, you can craft something delicious that can be enjoyed by all ages. Chocolate Truffles – Christmas Edition: 3 Steps to Joyful Delights make the perfect gift, dessert, or indulgent snack. They can be made in large batches, so you can even prepare them to share at parties or events. Best of all, the combination of dark chocolate and creamy filling makes them utterly irresistible.
Another fascinating aspect of this recipe is its versatility. You can customize the truffles as you like, adding flavors or coatings to match your preferences. Plus, they make for a perfect holiday gift, beautifully packaged in a festive box or jar. Can you imagine how delighted your friends will be to receive a homemade gift from you? Not only will they savor the truffles, but they’ll also appreciate the personal touch that comes with homemade treats.
There’s something comforting about bringing family together in the kitchen during the holidays. Making Chocolate Truffles – Christmas Edition: 3 Steps to Joyful Delights provides an opportunity to bond and create lasting memories. Whether you’re cooking with your children, siblings, or friends, sharing this experience of crafting delicious chocolates fosters a sense of belonging and joy.
So why not dive into the world of chocolate truffles and bring a touch of sweet happiness to your holiday celebrations?
🍴 Top Kitchen Essentials You'll Love


Key Benefits of Chocolate Truffles – Christmas Edition: 3 Steps to Joyful Delights
Why You’ll Love This Recipe
- Irresistibly Delicious: The blend of dark chocolate and cream creates a rich mouthfeel that everyone will love.
- Simple Process: Easily make these truffles in just three straightforward steps, even if you’re a novice in the kitchen.
- Versatile Flavor Options: Customizable with various toppings and flavors, so everyone can find their favorite.
- Perfect for Gifting: Beautifully packaged chocolate truffles make excellent holiday gifts that show you care.
- Family-Friendly Fun: Involve the whole family in the cooking process for memorable bonding moments.
What Makes It Stand Out
Chocolate Truffles – Christmas Edition: 3 Steps to Joyful Delights stand out because of their originality. These heavenly bites go beyond ordinary chocolates with their silky texture and rich flavor profile. The classic combination of dark chocolate and cream creates a decadent experience that sweeps you off your feet.
Customization is another standout feature. You can easily infuse different flavors like peppermint, orange zest, or even espresso to make these treats your own. This flexibility ensures that no two batches need to be the same, catering to every palate and festive theme you might have in mind.
The occasions for enjoying these truffles are endless. Whether during holiday dinners, gift exchanges, or cozy movie nights, they are a delightful treat to share. Creating an elegant dessert that fits seamlessly into a festive gathering is a win-win for any host.
Ingredients for Chocolate Truffles – Christmas Edition: 3 Steps to Joyful Delights
Complete Ingredient List with Measurements
- 8 oz dark chocolate – use high-quality chocolate for the best results.
- 1/2 cup heavy cream – this adds creaminess and richness.
- 1 tsp vanilla extract – enhances the chocolate flavor.
- Cocoa powder for dusting – provides a classic finish.
- Optional: chopped nuts or sprinkles – add flair and texture.
Substitutes and Alternatives
If you need to cater to certain dietary needs or preferences, don’t worry! You can often swap ingredients while maintaining the recipe’s integrity. For instance, if you’re looking for a dairy-free option, consider using coconut cream or almond milk instead of heavy cream.
For those who prefer a sweeter truffle, you can substitute semi-sweet chocolate for dark chocolate. This adjustment alters the flavor profile to suit different tastes. Additionally, if you want to create a dessert for special diets, look for gluten-free cocoa powder and nuts to maintain a safe and delicious treat.
How to Make Chocolate Truffles – Christmas Edition: 3 Steps to Joyful Delights – Step-by-Step Directions
Step 1 – Prepare Ingredients
Begin by gathering all your ingredients. Chop the dark chocolate into small pieces and set them aside in a heatproof bowl. This makes it easier for the chocolate to melt evenly when combined with warm cream.
Step 2 – Cook the Base
In a saucepan, heat the heavy cream over medium heat. You want it just to start simmering, not boiling. Once you see small bubbles forming, take it off the heat and pour it over the chopped chocolate. This heat will begin the melting process.
Step 3 – Let it Sit
Allow the chocolate and cream mixture to sit for about two minutes. This resting period helps the chocolate soften adequately before you stir it.
Step 4 – Stir Until Smooth
After the two minutes, use a spatula to gently stir the mixture until you achieve a uniform, silky texture. If there are still lumps, return it to low heat briefly while stirring to help them melt away.
Step 5 – Add Flavor
Once the chocolate mixture is smooth, add the vanilla extract. Mix it well to ensure the flavor is evenly distributed. This step is crucial for enhancing the overall chocolate taste.
Step 6 – Refrigerate the Mixture
Transfer the mixture to the fridge and allow it to chill for about two hours. This refrigeration period will enable the chocolate to firm up, making it easier to scoop into truffles.
Step 7 – Scoop the Truffles
After chilling, take the mixture out of the fridge. Using a melon baller or your hands, scoop out small portions of the chocolate mixture. Roll them gently between your palms to form small balls.
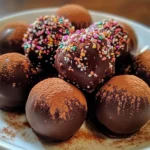
Step 8 – Roll in Cocoa Powder
Pour cocoa powder, chopped nuts, or sprinkles into shallow bowls. Roll each chocolate ball in your choice of coating to give it an appealing finish.
Step 9 – Place on a Baking Sheet
Once coated, place the truffles on a baking sheet lined with parchment paper. This ensures they won’t stick and makes for easy cleanup.
Step 10 – Refrigerate to Set
Refrigerate the truffles for an additional 30 minutes to ensure they hold their shape. Once set, they are ready to serve or package as gifts.
Serving Suggestions for Chocolate Truffles – Christmas Edition: 3 Steps to Joyful Delights
Best Occasions to Serve This Dish
Chocolate Truffles – Christmas Edition: 3 Steps to Joyful Delights are perfect for various occasions. They shine at holiday parties, where guests appreciate a sweet treat after a festive meal. Imagine the delight of offering these delectable bites as a treat at your next family gathering.
These truffles are also a beautiful addition to any dessert table. Their elegant appearance makes them an ideal centerpiece alongside other holiday desserts like pies and cakes. Hosting a game night? These truffles will bring a sense of extravagance to the casual setting.
What to Serve With It
Consider pairing Chocolate Truffles – Christmas Edition: 3 Steps to Joyful Delights with the following treats:
- Coffee or Espresso – The rich flavors of chocolate blend well with a hot cup of coffee.
- Hot Chocolate – Who doesn’t love an extra chocolatey indulgence during winter months?
- Dessert Wines – Sweet dessert wines complement the flavors of the truffles perfectly.
- Seasonal Fruit – Fresh fruit like strawberries or raspberries adds a refreshing touch.
How to Store Chocolate Truffles – Christmas Edition: 3 Steps to Joyful Delights Properly
Best Storage Practices
To keep your Chocolate Truffles – Christmas Edition: 3 Steps to Joyful Delights fresh, store them in an airtight container in the refrigerator. This will help maintain their texture and prevent them from absorbing any odors from the fridge.
If you’re planning to enjoy them later, consider layering them between sheets of parchment to prevent sticking. They typically last for about a week in the fridge, but I doubt they’ll last that long!
Reheating and Freezing Tips
If you want to extend their shelf life, you can also freeze truffles. Place them in an airtight container and freeze for up to three months. When you’re ready to enjoy them, transfer them to the refrigerator for a few hours to thaw gently. Avoid microwaving, as the truffles can lose their smooth texture.
Tips & Tricks for Chocolate Truffles – Christmas Edition: 3 Steps to Joyful Delights
Mistakes to Avoid
- Not Using Quality Chocolate: Cheap chocolate can result in inferior taste. Always opt for high-quality ingredients to enhance flavor.
- Overheating the Cream: Boiling the cream can alter the texture of the truffles. Keep it just below boiling point.
- Skipping Refrigeration: Be patient! Skipping the chilling step makes it harder to scoop and shape the truffles.
- Overmixing the Chocolate: Stir gently to avoid incorporating too much air, which can affect the texture.
- Not Rolling Quickly: Allowing the chocolate mixture to sit too long after chilling can make it difficult to roll into balls.
Extra Tips for Better Results
- Temperature Matters: If your kitchen is warm, consider chilling the mixture before scooping to maintain the right consistency.
- Experiment with Flavors: Try different extracts such as almond or peppermint for a holiday twist.
- Presentation is Key: Use decorative papers or boxes when gifting to make your truffles even more attractive.
Recipe Variations of Chocolate Truffles – Christmas Edition: 3 Steps to Joyful Delights
Creative Twists
- Peppermint Delight: Add crushed peppermint candy to the chocolate mixture for a refreshing holiday flavor.
- Orange Zest Chocolate Truffles: Infuse some fresh orange zest into the chocolate mixture for a zesty touch.
- Spiced Rum Chocolates: A splash of spiced rum elevates these truffles for adult enjoyment during celebrations.
- Nutty Truffles: Mix in finely ground nuts like hazelnuts or almonds to the chocolate mixture for added texture.
Dietary Adjustments
To create a vegan version of Chocolate Truffles – Christmas Edition: 3 Steps to Joyful Delights, simply substitute dark chocolate with dairy-free chocolate and use coconut cream instead of heavy cream. For gluten-free options, always check that your cocoa powder and any toppings are gluten-free.
Conclusion about Chocolate Truffles – Christmas Edition: 3 Steps to Joyful Delights
In the world of holiday desserts, few things rival the allure and satisfaction of Chocolate Truffles – Christmas Edition: 3 Steps to Joyful Delights. Simple to prepare, these decadent treats bring happiness, warmth, and togetherness. Their elegant appearance and delightful flavor make them a perfect addition to any festive gathering.
As you experiment with flavors and coatings, you can truly make this recipe your own. Involving family in the preparation process only heightens the joy associated with these sweets. So revel in the magic of the season and share these chocolates with those you love; you will have their hearts melting just like the truffles themselves!
FAQs about Chocolate Truffles – Christmas Edition: 3 Steps to Joyful Delights
Can I prepare it ahead of time?
Absolutely! You can make these truffles a few days in advance and store them in the fridge.
Can I freeze it?
Yes, you can freeze truffles for up to three months. Just make sure they’re stored in an airtight container.
How long does it last?
In the fridge, they typically last about a week. If frozen, they last up to three months.
What are the best substitutions?
You can use vegan chocolate and coconut cream for a dairy-free version.
Is this recipe family-friendly?
Definitely! It’s simple enough for kids to help out in the kitchen.
Can I add other flavors?
Yes! Feel free to experiment with different extracts and add-ins to customize your truffles.
How do I keep truffles from sticking together?
Store them in a single layer in an airtight container, or layer them with parchment paper.
Can I make truffles without cocoa powder?
Yes! You can coat them in crushed nuts, coconut, or powdered sugar for a different finish.
What chocolate works best?
Opt for high-quality dark chocolate, ideally with a cocoa content of 60% or higher for the best taste.
Can I use milk chocolate instead?
Yes, using milk chocolate will give your truffles a sweeter and creamier taste.
Now, gather your ingredients, invite your loved ones to join you, and create some delightful memories while whipping up these incredible Chocolate Truffles – Christmas Edition: 3 Steps to Joyful Delights!
Chocolate Truffles – Christmas Edition
Ingredients
For the truffles
- 8 oz dark chocolate Use high-quality chocolate for the best results.
- ½ cup heavy cream This adds creaminess and richness.
- 1 tsp vanilla extract Enhances the chocolate flavor.
- Cocoa powder For dusting, provides a classic finish.
- chopped nuts or sprinkles Optional; add flair and texture.


Instructions
Preparation
- Begin by gathering all your ingredients. Chop the dark chocolate into small pieces and set them aside in a heatproof bowl.
- In a saucepan, heat the heavy cream over medium heat until it just begins to simmer, then take it off the heat and pour it over the chopped chocolate.
- Allow the mixture to sit for about two minutes to let the chocolate soften.
- Stir the mixture gently until smooth, adding the vanilla extract once it is completely melted.
- Transfer the mixture to the fridge and allow it to chill for about two hours to firm up.
- Using a melon baller or your hands, scoop out small portions of the chocolate mixture and roll them into balls.
- Roll the truffles in cocoa powder, chopped nuts, or sprinkles.
- Place the truffles on a baking sheet lined with parchment paper.
- Refrigerate the truffles for an additional 30 minutes to ensure they hold their shape.