

This post may contain affiliate links. As an Amazon Associate, I earn from qualifying purchases at no extra cost to you.
Table of Contents
🍴 Top Kitchen Essentials You'll Love


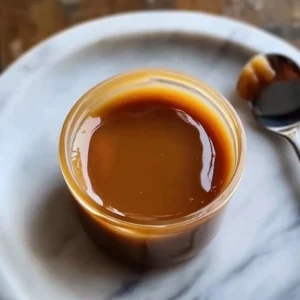
Introduction to Easy Condensed Milk Caramel
Have you ever wondered how to create a delightfully rich and velvety caramel sauce at home? If so, you’re in for a treat with the Easy Condensed Milk Caramel recipe. This dish is not just simple; it offers a burst of flavor that can elevate any dessert. Whether you’re drizzling it over ice cream, mixing it into brownies, or simply enjoying it straight from the jar, this caramel is a must-try!
What makes the Easy Condensed Milk Caramel so special is its unique combination of sweetness and creaminess. The fundamental ingredients come together effortlessly, allowing you to whip up a batch in no time. There’s something incredibly satisfying about making your own caramel, and this recipe streamlines the process, making it accessible to even the most novice of cooks.
Imagine the scent of caramelizing sugar wafting through your kitchen, teasing your taste buds, and inviting your family to gather around. It’s a perfect way to share love and joy through food. Moreover, you’ll find that the Easy Condensed Milk Caramel is wonderfully versatile. You can customize it to suit different moods or occasions, making it a valuable addition to your cooking repertoire.
Key Benefits of Easy Condensed Milk Caramel
Why You’ll Love This Recipe
- Rich Flavor: The combination of butter and brown sugar delivers a deep, complex taste.
- Simplicity: Requires only a few ingredients and minimal cooking skills to achieve great results.
- Quick Prep Time: Whip it together in about 20 minutes, perfect for last-minute desserts.
- Versatile Uses: Great with ice cream, cakes, pancakes, or even as a dip for fruits.
- Store-Bought Alternative: Offers a homemade touch that beats anything from a store.
- Customizable: Easily adapted for different dietary needs or flavor preferences.
What Makes It Stand Out
This Easy Condensed Milk Caramel sets itself apart through its straightforward approach. Traditional caramel recipes can be daunting, requiring precise temperatures and techniques. However, this recipe breaks it down into manageable steps, allowing everyone to enjoy its homemade essence.
Moreover, its versatility breathes new life into desserts. Whether it’s drizzled on a slice of cake, slathered on pancakes, or used as a filling for pastries, the possibilities are endless. You can even add your twist by incorporating flavored extracts or spices, making it an even more personal creation.
Ingredients for Easy Condensed Milk Caramel
Complete Ingredient List with Measurements
- 1 can sweetened condensed milk
- 1/2 cup butter
- 1 cup brown sugar
- 1 teaspoon vanilla extract
- Pinch of salt
Substitutes and Alternatives
If you’re looking for substitutes to accommodate dietary preferences or restrictions, there are several options. Use coconut milk instead of sweetened condensed milk for a dairy-free version, or replace butter with a plant-based alternative to make it vegan. If you’re reducing sugar, consider using a sugar substitute designed for cooking, but remember the results may vary in taste and texture.
How to Make Easy Condensed Milk Caramel – Step-by-Step Directions
Step 1 – Prepare Ingredients
Gather all the necessary ingredients and ensure your saucepan is clean and dry. This preparation helps streamline the cooking process and keeps your focus on making that delicious caramel.
Step 2 – Cook the Base
In a large saucepan over medium heat, combine the sweetened condensed milk, butter, and brown sugar. Stir constantly until the mixture comes to a boil. You’ll notice the brown sugar melting and blending beautifully with the butter and milk.
Step 3 – Bring to a Boil
Keep stirring as the mixture heats up. It’s crucial to prevent it from sticking to the bottom of the pan or burning. This initial boiling stage is essential as it activates the sugar.
Step 4 – Reduce Heat
Once it reaches a boil, lower the heat to maintain a gentle simmer. This is where the magic happens as the caramel thickens. Continue stirring for about 10-15 minutes.
Step 5 – Check Consistency
After 10-15 minutes, check the consistency of the caramel. It should have thickened to a syrup-like texture that can drip off a spoon. If it seems too thin, give it a few more minutes of stirring.
Step 6 – Add Flavorings
Once thickened, remove the saucepan from heat. Stir in the vanilla extract and a pinch of salt. These additions enhance the flavor profile, making your Easy Condensed Milk Caramel even more delicious.
Step 7 – Cool the Caramel
Let the caramel cool slightly in the saucepan before transferring it to a jar or container. This cooling period will further help it thicken up.
Step 8 – Store the Caramel
After cooling, transfer the caramel to an airtight container. It can be stored in the refrigerator for up to two weeks. Just a little bit goes a long way!
Serving Suggestions for Easy Condensed Milk Caramel
Best Occasions to Serve This Dish
Whether you’re hosting a birthday party or an intimate gathering, Easy Condensed Milk Caramel is sure to impress. Pour it over desserts at a family gathering, or use it for drizzling on a dessert bar at your next celebration.
What to Serve With It
This delicious caramel pairs wonderfully with a range of foods. Think vanilla ice cream, pancakes, waffles, or even a rich chocolate cake. It also complements fresh fruit, transforming a simple snack into an indulgent treat.
How to Store Easy Condensed Milk Caramel Properly
Best Storage Practices
To store Easy Condensed Milk Caramel correctly, make sure it has cooled completely before placing it in an airtight container. Keep it refrigerated, where it’ll stay fresh for up to two weeks.
Reheating and Freezing Tips
If you want to keep your caramel longer, consider freezing it. Simply pour it into an ice cube tray for easy portioning. When you need to use it, you can thaw it in the fridge overnight or gently reheat it in the microwave until smooth.
Tips & Tricks for Easy Condensed Milk Caramel
Mistakes to Avoid
- Skipping the Stirring: Caramel can stick and burn if not stirred properly, so keep the spatula moving.
- Cooking Over Too High Heat: This can lead to uneven cooking and a burnt taste. Medium heat is your best friend.
- Not Checking Consistency: Pay attention to thickness to ensure your caramel has the right texture.
- Using Unqualified Ingredients: Stick to quality butter and brown sugar for the best flavor.
- Cooling It Too Quickly: Let the caramel cool naturally to maintain texture.
Extra Tips for Better Results
For added depth of flavor, consider browning the butter before adding the other ingredients. This step enhances the caramel’s nutty notes. You can also experiment with a sprinkle of sea salt just before serving for a salted caramel twist.
Recipe Variations of Easy Condensed Milk Caramel
Creative Twists
- Chocolate Drizzle: Mix in cocoa powder for a chocolate-flavored caramel that’s perfect for topping brownies.
- Nutty Caramel: Stir in crushed nuts or nut butter for an added crunch and flavor.
- Spiced Caramel: Add a sprinkle of cinnamon or nutmeg for a warm, spiced version great for the fall.
Dietary Adjustments
For a dairy-free option, you can use coconut cream instead of sweetened condensed milk along with coconut oil instead of butter. Make sure to adjust cooking times as needed to achieve the desired consistency.
Conclusion about Easy Condensed Milk Caramel
In summary, the Easy Condensed Milk Caramel is not only simple and quick to make but also immensely versatile in its applications. Whether drizzled over dessert or transformed into a decadent filling, its rich flavor will undoubtedly win hearts. You can easily customize this caramel to match your taste preferences or dietary needs, making it a fantastic addition to your recipe collection. So why not give it a try? You might just find yourself never going back to store-bought caramel again!
FAQs about Easy Condensed Milk Caramel
How long does Easy Condensed Milk Caramel last?
When stored properly in an airtight container in the refrigerator, it can last up to two weeks.
Can I freeze Easy Condensed Milk Caramel?
Yes, you can freeze it for up to three months. Just pour it into ice cube trays for easy serving.
How do I reheat Easy Condensed Milk Caramel?
Thaw it in the fridge overnight and reheat in the microwave, stirring until smooth.
What can I substitute for sweetened condensed milk?
You can use coconut milk for a dairy-free version or make your own by combining milk and sugar.
Can I make it vegan?
Yes, you can replace the butter with a vegan alternative and use coconut cream instead of sweetened condensed milk.
How can I adjust the flavor?
Add cinnamon, cocoa powder, or even a splash of bourbon for a unique twist.
Is there a way to make it thicker?
If you want a thicker caramel, cook it longer while stirring continuously.
What’s the best way to serve it?
It’s great over ice cream, pancakes, or even drizzled on brownies and fruit!
Can I use a different type of sugar?
You can experiment with different sugars, but brown sugar gives the best flavor and consistency.
Why did my caramel turn out grainy?
Grainy caramel often occurs from not stirring enough or cooking over too high of a heat. Always keep the heat moderate and stir consistently.
Easy Condensed Milk Caramel
Ingredients
Main Ingredients
- 1 can sweetened condensed milk
- ½ cup butter Can be substituted with a plant-based alternative for vegan version.
- 1 cup brown sugar
- 1 teaspoon vanilla extract
- 1 pinch salt


Instructions
Preparation
- Gather all the necessary ingredients and ensure your saucepan is clean and dry.
Cooking
- In a large saucepan over medium heat, combine the sweetened condensed milk, butter, and brown sugar. Stir constantly until the mixture comes to a boil.
- Keep stirring as the mixture heats up to prevent it from sticking and burning.
- Once it reaches a boil, lower the heat to maintain a gentle simmer, stirring for about 10-15 minutes.
- Check the consistency after 10-15 minutes; it should be syrup-like. If too thin, stir longer.
- Remove from heat and stir in vanilla extract and a pinch of salt.
Cooling and Storing
- Let the caramel cool slightly before transferring it to a jar or container.
- Store in an airtight container in the refrigerator for up to two weeks.