
This post may contain affiliate links. As an Amazon Associate, I earn from qualifying purchases at no extra cost to you.
Table of Contents
🍴 Top Kitchen Essentials You'll Love


Introduction about Halloween Mini Pizzas
Halloween is that delightful time of year when spooky decorations adorn our homes, and costumes transform even the most mundane of us into creatures of frights and delights. The season calls for treats that are not only delicious but also fun and whimsical. Have you ever thought about how you can celebrate this festive occasion with a dish that combines creativity and simplicity? Enter Halloween Mini Pizzas!
These adorable mini pizzas are the perfect way to bring joy to your Halloween festivities. Whether you’re hosting a gathering or simply enjoying a cozy evening in, these bite-sized treats can add a spooktacular flair to any occasion. They allow you to easily engage your family in the kitchen, making it a fun and interactive experience. Plus, each mini pizza can be decorated in endless ways, inspiring imaginations young and old.
So why wait? Dive into the world of Halloween Mini Pizzas and discover how easy it is to whip up delightful treats that’ll wow your guests and make your Halloween celebration all the more memorable. Trust me; you’ll want to make these every year!
Key Benefits of Halloween Mini Pizzas
Why You’ll Love This Recipe
- Delicious Taste: The combination of crispy crust, tangy pizza sauce, and gooey cheese is irresistible.
- Easy to Make: A straightforward recipe that even novice cooks can master.
- Quick Preparation: Ready in about 30 minutes, perfect for last-minute gatherings!
- Family-Friendly Fun: Invite your kids to dress their pizzas; it’s a great bonding activity.
- Customizable: Everyone can create their unique designs with various toppings.
- Seasonally Themed: Perfectly aligns with the Halloween spirit, adding a festive touch to your table.
What Makes It Stand Out
What truly sets Halloween Mini Pizzas apart is their blend of creativity and flavor. Each pizza transforms into a mini canvas, inviting you to unleash your artistic flair. The ability to craft your jack-o’-lantern faces or creepy mummies makes it a hit for children and adults alike. There’s something magical about gathering around the kitchen to create these delightful goodies, making memories as you go.
Their versatility allows for seasonal themes but also serves as a fantastic base throughout the year. Imagine mini pizzas for birthday parties, family game nights, or just a cozy movie night! It’s a dish that’s as unique as your imagination, making it a staple in your recipe book.
Ingredients for Halloween Mini Pizzas
Complete Ingredient List with Measurements
To get started on your Halloween Mini Pizzas, gather the following ingredients:
- 8–10 Mini Pizza Crusts (personal size)
- 3/4 cup Pizza Sauce
- 1 cup Mozzarella Cheese (shredded)
- 1/4 cup Black Olives (sliced)
- 1/4 cup Mini Pepperoni (optional)
- Orange & Green Bell Peppers (thin strips for decorations)
- 4 sticks Part-Skim String Cheese (pulled apart for mummies)
- 2 tbsp Fresh Basil (chiffonade for garnish)
- Olive Oil Spray (for misting baking sheet)
Substitutes and Alternatives
Not every ingredient needs to be set in stone. Here are some substitutions and alternatives to consider:
- Mini Pizza Crusts: Use gluten-free mini crusts or whole wheat versions for a healthier option.
- Pizza Sauce: Substitute with pesto or ranch dressing for a different flavor.
- Cheese Options: Try vegan cheese for a dairy-free version or use a blend of cheeses for a gourmet touch.
- Olives and Toppings: Feel free to use jalapeños, bell peppers, or even fresh vegetables based on personal preference.
- Fresh Herbs: If basil isn’t your favorite, try Italian seasoning or oregano for added flavor.
How to Make Halloween Mini Pizzas – Step-by-Step Directions
Step 1 – Prep Your Workspace and Ingredients
Start by gathering all your ingredients and tools. Preheat your oven to 425°F (220°C). Lightly mist your baking sheet with olive oil spray for easy removal of the mini pizzas later. Make sure your mini pizza crusts are ready to go!
Step 2 – Prepare the Base or Crust
Place your mini pizza crusts on the prepared baking sheet. Ensure they’re spaced evenly to allow for even baking. This step sets the groundwork for your Halloween Mini Pizzas. The perfect crispy base awaits!
Step 3 – Spread the Pizza Sauce
Using a spoon, spread 1–2 tablespoons of pizza sauce on each mini crust, ensuring to leave a small border around the edges. This border will help keep the toppings secure and enhance the overall presentation.
Step 4 – Add the Cheese
Sprinkle 1/4 cup of shredded mozzarella cheese over half of the pizzas, reserving some for later decorations. The melted cheese will add a delightful gooeyness that complements the flavors.
Step 5 – Create Mummy Faces
Using the pulled-apart string cheese, create fun mummy faces on the cheese-covered pizzas. The stringy cheese can be placed in crisscross patterns over the surface, creating a spooky effect that is sure to thrill your guests.
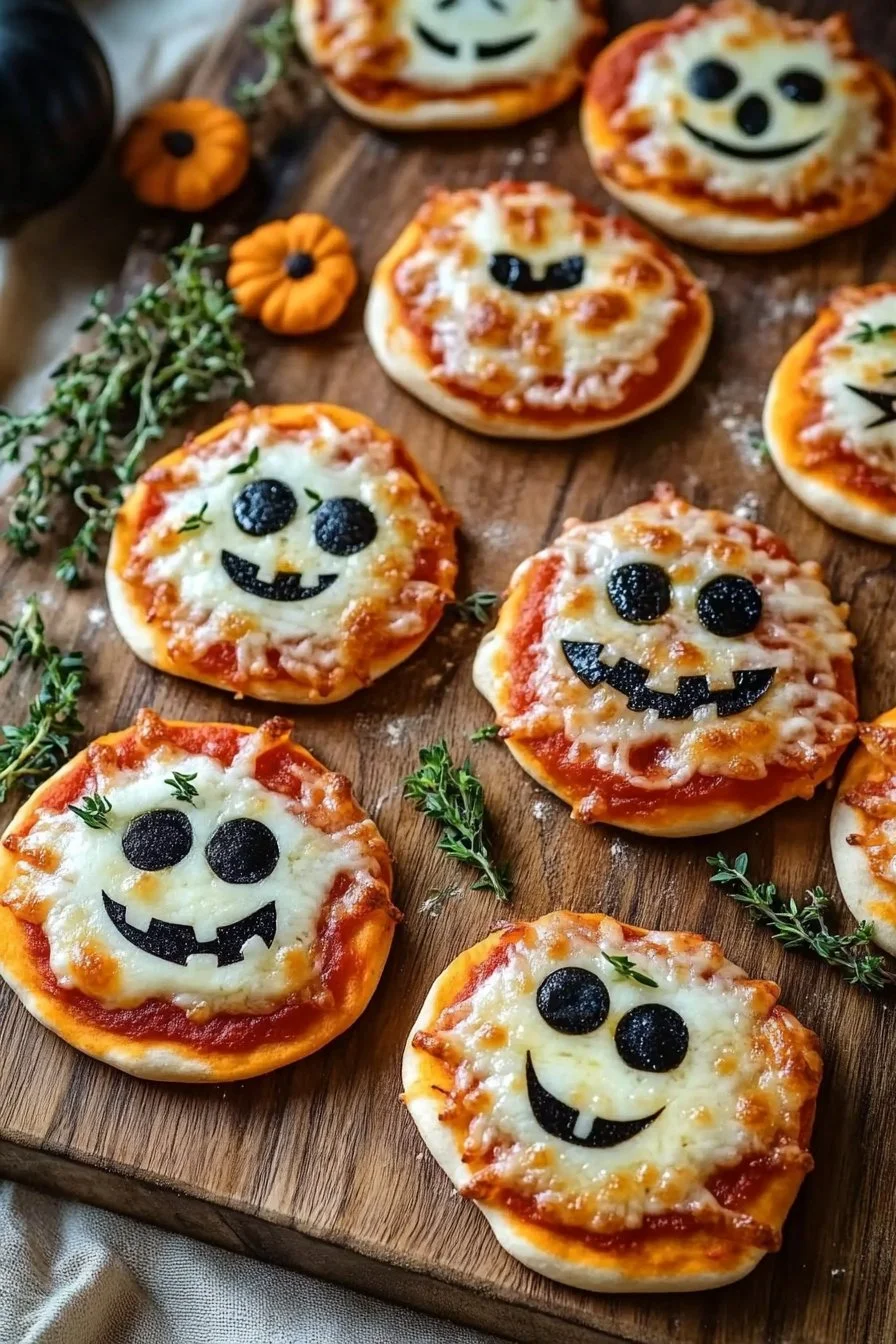
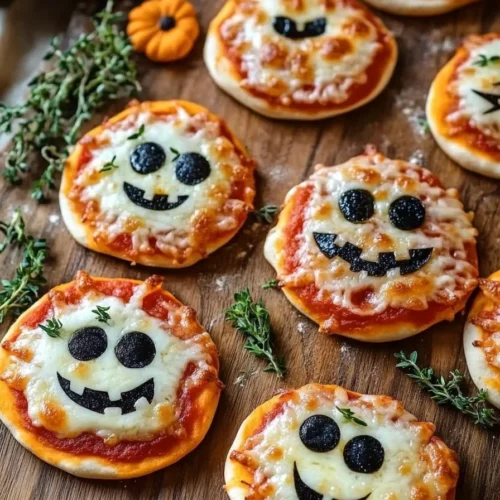
Step 6 – Decorate with Olives and Peppers
Now it’s time for creativity! Use the sliced black olives to make spider bodies, eyes, or other designs. With the thin strips of bell peppers, help craft jack-o’-lantern smiles or other fun facial expressions.
Step 7 – Optional Toppings
If desired, sprinkle some mini pepperoni over the remaining pizzas. This step adds an extra pop of flavor and fits the Halloween theme perfectly.
Step 8 – Bake
Place your decorated mini pizzas in the preheated oven. Bake them for about 10–12 minutes, or until the crusts are golden brown and the cheese is melted. Remember to rotate the pan halfway through to ensure even browning.
Step 9 – Cool and Garnish
Once out of the oven, allow the mini pizzas to cool for 2 minutes. This brief cooling time allows the cheese to firm up a bit, making them easier to handle. Garnish with freshly chiffonaded basil for an added touch of color and flavor.
Step 10 – Serve and Enjoy!
Now it’s time to serve your delightful Halloween Mini Pizzas! Arrange them on a festive platter and watch as your family and friends light up with excitement. Enjoy the festive spirit with every delicious bite!
Serving Suggestions for Halloween Mini Pizzas
Best Occasions to Serve This Dish
Halloween Mini Pizzas are wonderfully versatile and suitable for various occasions. Here are a few ideas:
- Halloween Parties: The perfect addition to any spooky gathering!
- Movie Nights: An easy snack to enjoy while watching your favorite Halloween films.
- Family Dinners: A delightful way to make dinner feel festive and fun for kids.
- School Functions: Great for school Halloween events where finger foods are preferred.
What to Serve With It
Pair your Halloween Mini Pizzas with these delightful accompaniments:
Dipping Sauces:
- Marinara sauce
- Garlic aioli
- Ranch dressing
Drinks:
- Apple cider (served warm or cold)
- Halloween-themed soda
- Mocktails or themed cocktails
Sides:
- A fresh salad with seasonal toppings
- Crunchy veggie sticks
- Roasted pumpkin seeds for a crunchy snack
Storing Halloween Mini Pizzas Properly
Best Storage Practices
To preserve your leftover Halloween Mini Pizzas, follow these storage practices:
- Refrigeration: Store the mini pizzas in an airtight container in the fridge for up to 3 days.
- Freezing: If you’d like to keep them longer, freeze the undecorated mini pizzas. They’ll last up to 2 months when properly wrapped.
Reheating and Freezing Tips
- Reheating: For the best results, reheat the mini pizzas in an oven at 350°F (175°C) for about 10 minutes. This method will help maintain their crispiness.
- Avoid Microwaving: While it’s quick, microwaving can make the crust chewy instead of crispy.
Tips & Tricks for Halloween Mini Pizzas
Mistakes to Avoid
- Overloading with Toppings: While it’s tempting, piling too many toppings can lead to soggy crusts. Balance is key!
- Not Preheating the Oven: Always preheat your oven to ensure even cooking.
- Skipping the Olive Oil Spray: This can lead to sticking, so don’t forget to mist your baking sheet!
Extra Tips for Better Results
- Use Fresh Ingredients: Fresh mozzarella and herbs will elevate the flavor immensely.
- Experiment with Shapes: Use cookie cutters to create different shapes with your peppers or shredded cheese.
- Explore Different Sauces: Don’t hesitate to try barbecue sauce or pesto for a unique twist!
Recipe Variations of Halloween Mini Pizzas
Creative Twists
- Spooky Shapes: Use cookie cutters to create spooky shapes with the mini crusts before adding toppings.
- Flavor Profiles: Try adding unique herbs like rosemary to your pizza sauce for an aromatic flavor.
- Seasonal Toppings: Incorporate roasted squash or seasonal veggies for a festive touch.
Dietary Adjustments
- Gluten-Free: Opt for gluten-free pizza crusts available in stores or made from alternative flours.
- Dairy-Free: Substitute regular cheese with cashew or almond-based cheese alternatives.
- Vegan: Use plant-based sausage crumbles and eliminate any cheese for a delicious vegan version.
Conclusion about Halloween Mini Pizzas
As you’ve seen, Halloween Mini Pizzas combine fun, creativity, and deliciousness in one bite-sized treat. This recipe is not only simple to make but also adaptable to different tastes and dietary preferences. You’ll delight in the ease of preparation, the joy of decorating, and the satisfaction of sharing these treats with loved ones.
So go ahead, embrace the spirit of Halloween by whipping up your own Halloween Mini Pizzas. Don’t forget to let your creativity shine—whether you’re crafting mummies or jack-o’-lanterns, each pizza will reflect your unique style. I can’t wait for you to try this recipe and see how much fun you and your family will have! Happy Halloween!
FAQs about Halloween Mini Pizzas
What if it doesn’t turn out right?
No worries! If your pizzas come out unevenly cooked, you can adjust the cooking time on your next attempt. Remember that oven temperatures can vary. If they’re too soggy, consider reducing the amount of sauce next time.
Can I prepare it ahead of time?
Absolutely! You can preassemble mini pizzas, cover them with plastic wrap, and refrigerate them a few hours before baking. Just add the toppings right before you pop them in the oven for the best results.
What are the best ingredient substitutions?
You can use any crust you prefer (gluten-free or whole wheat), swap the mozzarella for a dairy-free option, or even substitute veggies based on personal taste. The beauty of this recipe is its flexibility.
How long can it be stored?
Refrigerate leftover mini pizzas for up to 3 days in an airtight container. They can also be frozen, although it’s best to freeze them before baking for optimal texture.
Can I use store-bought dough or crust?
Definitely! Store-bought dough or pre-made crusts save time and effort, making them an excellent choice for busy cooks looking to enjoy Halloween Mini Pizzas.
Is this recipe kid-friendly or family-appropriate?
Yes! This fun recipe is perfect for families, and children love decorating their own mini pizzas. It’s a great way to involve them in cooking and make it an enjoyable experience.
Can I make this recipe allergen-free?
Yes! To make Halloween Mini Pizzas allergen-free, choose gluten-free crusts, dairy-free cheese, and check the labels for any packaged ingredients to ensure they meet allergen-free standards. Enjoy creating your spooky pizzas in a way that suits your dietary needs!
Halloween Mini Pizzas – Spooky & Delicious Treats
Equipment
- Baking sheet
- Oven
- Knife
- Mixing spoon
Ingredients
Main Ingredients
- 8-10 mini pizza crusts personal size
- ¾ cup pizza sauce
- 1 cup mozzarella cheese (shredded)
- ¼ cup black olives (sliced)
- ¼ cup mini pepperoni optional
- orange & green bell peppers (thin strips) for decorations
- 4 sticks part-skim string cheese pulled apart for mummy faces
- 2 tbsp fresh basil (chiffonade) for garnish
- olive oil spray to mist baking sheet


Instructions
- Preheat oven to 425°F (220°C). Mist a baking sheet with olive oil spray and arrange mini pizza crusts spaced apart.
- Spread about 1–2 tablespoons of pizza sauce onto each mini crust, leaving a small border.
- Sprinkle shredded mozzarella cheese over the sauce, reserving some for decoration.
- Use pulled-apart string cheese to create mummy face designs on some pizzas.
- Decorate with sliced black olives and bell pepper strips to form eyes, smiles, jack-o’-lantern faces or other spooky designs.
- Optionally, add mini pepperoni to some pizzas for extra flavor.
- Bake in preheated oven 10–12 minutes until crust edges are golden and cheese is bubbly, rotating pan halfway through if needed.
- Let cool for 2 minutes, then garnish with chiffonade basil and serve warm.