
This post may contain affiliate links. As an Amazon Associate, I earn from qualifying purchases at no extra cost to you.
Table of Contents
🍴 Top Kitchen Essentials You'll Love


Introduction About Healthy Pumpkin Blossoms
Have you ever found yourself craving something sweet yet wholesome? As the leaves turn golden and the days grow crisp, there’s something so inviting about the scent of pumpkin spice wafting through your kitchen. If you’re nodding along, you’re in for a delightful treat! Meet Healthy Pumpkin Blossoms, the perfect fusion of seasonal flavors and nutritious ingredients.
Imagine cozy fall afternoons spent baking with your loved ones, creating mouthwatering cookies that are not just delicious but also good for you. These pumpkin blossoms are incredibly simple to make. They’re packed with nutrient-rich pumpkin puree, sweetened with natural coconut sugar, and offer the delightful surprise of dark chocolate kisses baked right into the center. What’s there not to love? Let’s dive into how you can create these treats that everyone will adore!
Key Benefits of Healthy Pumpkin Blossoms
Why You’ll Love This Recipe
When it comes to a tasty and healthy snack, Healthy Pumpkin Blossoms truly deliver. Here are some reasons why you’ll cherish this recipe:
- Irresistible Flavor: The combination of pumpkin, warm spices, and rich chocolate creates a comforting taste explosion.
- Quick and Easy: With just a few ingredients and simple steps, you can whip up a batch in no time.
- Perfect for All Ages: These cookies are a hit with kids and adults alike, making them great for family gatherings or playdates.
- Healthier Choice: Made with almond flour and minimal sugar, they’re the ideal treat for health-conscious eaters.
- Seasonal Delight: Perfectly representative of autumn, these cookies capture the essence of the season in every bite.
- Customizable: You can easily modify the ingredients to suit your dietary preferences or get creative with flavors.
What Makes It Stand Out
What really sets Healthy Pumpkin Blossoms apart is their versatility. This recipe embraces the essence of fall with the use of pumpkins, a seasonal superstar. Whether you’re preparing for a cozy family dinner, a festive gathering, or just a quick snack, these cookies fit the bill perfectly.
The originality lies in the blend of wholesome ingredients. Using almond flour instead of traditional all-purpose flour makes these treats gluten-free, while coconut sugar provides a low-glycemic sweetener alternative. This means you can indulge without the guilt!
Ingredients for Healthy Pumpkin Blossoms
Complete Ingredient List with Measurements
To make your own Healthy Pumpkin Blossoms, gather the following ingredients:
- 1 cup pumpkin puree
- 1/2 cup coconut sugar
- 1/2 cup almond flour
- 1 teaspoon baking soda
- 1 teaspoon cinnamon
- 1/2 teaspoon nutmeg
- 1/4 teaspoon salt
- 1 teaspoon vanilla extract
- 1/2 cup dark chocolate kisses
Substitutes and Alternatives
If you have any dietary needs, here are some common swaps you can consider:
- Coconut Sugar: Use maple syrup or honey as a liquid alternative (adjust the dry ingredients accordingly).
- Almond Flour: Oat flour or a standard gluten-free blend can substitute for those allergic to nuts.
- Pumpkin Puree: You could use sweet potato puree for a slight twist.
- Dark Chocolate Kisses: Swap with vegan chocolate chips for a dairy-free version.
How to Make Healthy Pumpkin Blossoms – Step-by-Step Directions
Step 1 – Prep Your Workspace and Ingredients
Before diving into the baking process, take a moment to make sure your kitchen is clean and organized. Gather all your ingredients and tools, including mixing bowls, a baking sheet, and parchment paper. Preheating your oven to 350°F (175°C) is an essential first step, as it ensures your cookies bake perfectly.
Step 2 – Mix the Wet Ingredients
In a medium-sized bowl, combine 1 cup of pumpkin puree, 1/2 cup coconut sugar, and 1 teaspoon vanilla extract. Use a whisk or spatula to mix these until smooth and creamy. This mixture forms the base of your pumpkin blossoms, offering natural sweetness and wonderful moisture.
Step 3 – Combine the Dry Ingredients
In a separate bowl, mix 1/2 cup almond flour, 1 teaspoon baking soda, 1 teaspoon cinnamon, 1/2 teaspoon nutmeg, and 1/4 teaspoon salt. Whisk these together to ensure there are no clumps and that all ingredients are evenly distributed. The spices will add that delicious aromatic flavor we all associate with fall!
Step 4 – Mix Wet and Dry Ingredients
Now, gradually add the dry mixture to the wet ingredients until you have a combined dough. Use a spatula or wooden spoon to fold everything together gently. The mixture will be somewhat thick, and that’s perfectly okay!
Step 5 – Scoop the Dough onto Baking Sheet
Prepare your baking sheet by lining it with parchment paper. Using a tablespoon, scoop out portions of the dough and place them on the sheet, leaving about two inches between each scoop. This will allow the cookies to spread evenly without merging together.
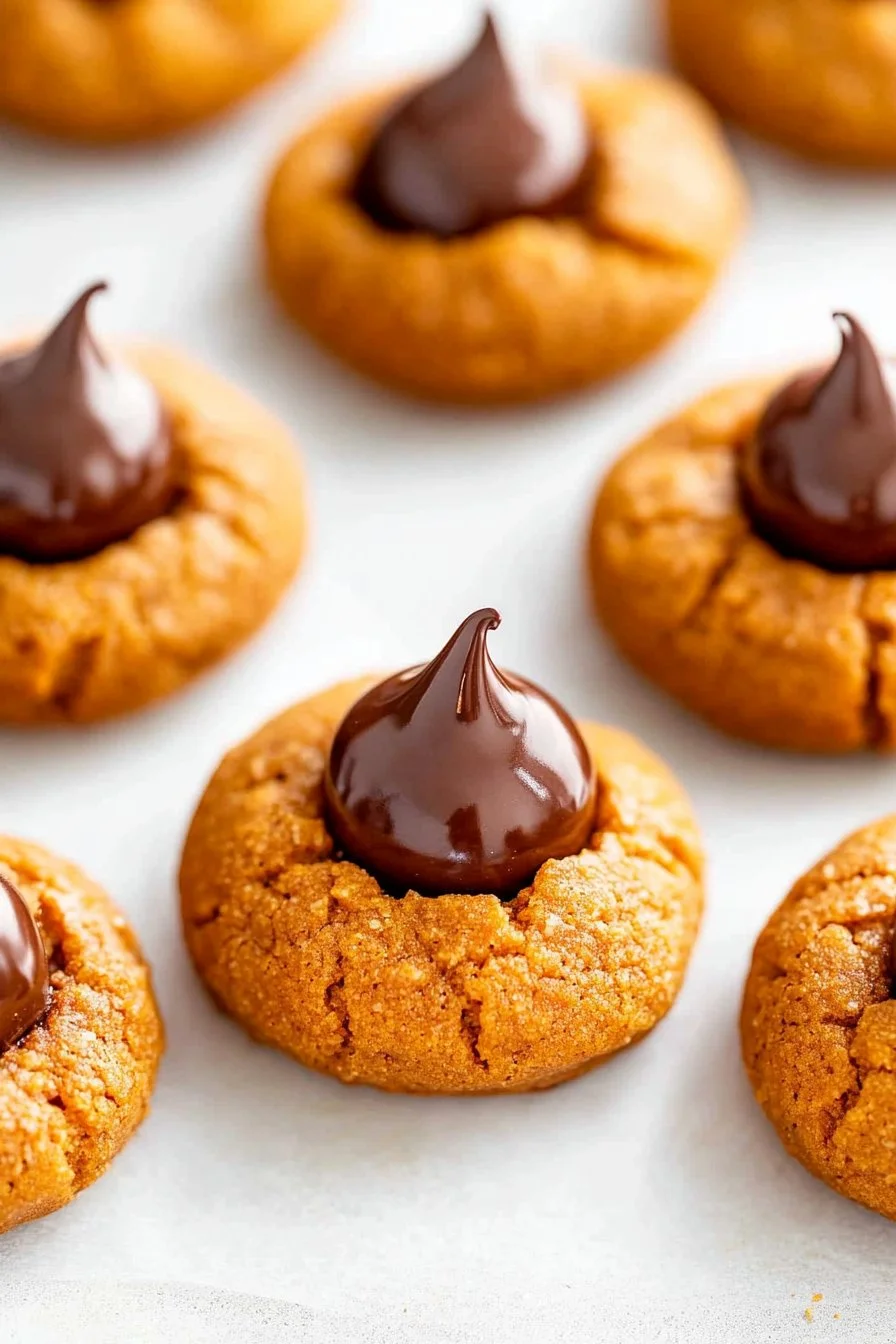
Step 6 – Press in the Dark Chocolate Kisses
Take your 1/2 cup dark chocolate kisses and gently press one into the center of each cookie dough scoop. This little step turns each cookie into a delightful surprise of melted chocolate in the middle, enhancing the overall experience.
Step 7 – Bake to Perfection
Put the baking sheet in your preheated oven and bake for 12-15 minutes, or until the edges of the cookies look set and start to turn golden. To help you gauge the doneness, they should be soft in the middle but firm around the edges.
Step 8 – Cool Before Enjoying
Once baked, remove the cookies from the oven and let them sit on the baking sheet for about 5 minutes. After that, transfer them to a cooling rack to cool completely. This step is crucial to prevent them from falling apart while still warm.
Step 9 – Serve Your Delicious Cookies
After cooling, your Healthy Pumpkin Blossoms are ready to be served! You can enjoy them warm, or store them for later. Either way, they’re sure to be a hit!
Step 10 – Enjoy and Share
Don’t forget to share your creation with family and friends! Maybe pack some for your child’s lunch or take them to a gathering. Everyone will appreciate your delicious and nutritious touch to fall baking.
Serving Suggestions for Healthy Pumpkin Blossoms
Best Occasions to Serve This Dish
These cookies are incredibly versatile and suit a variety of occasions. Here are a few perfect times to enjoy them:
- Family Gatherings: Bring them to family parties and enjoy the smiles that follow with each bite.
- School Events: Send them in your child’s lunchbox for a sweet surprise.
- Holiday Celebrations: Whether you’re hosting a cozy Thanksgiving or a festive Halloween bash, these cookies add a delightful touch.
- Snack Time: They make for a quick and healthy snack at any time of day!
What to Serve With It
Pair your Healthy Pumpkin Blossoms with these delightful accompaniments to enhance the experience:
Beverages:
- Hot apple cider
- Pumpkin spice latte
- Herbal tea
Toppings:
- A drizzle of almond butter
- Whipped coconut cream
Sides:
- Sliced fruit (like apples or pears)
- A handful of nuts for an added crunch
Storing Healthy Pumpkin Blossoms Properly
Best Storage Practices
To keep your Healthy Pumpkin Blossoms fresh:
- Refrigerating: Store in an airtight container in the fridge for up to 5 days. This helps retain moisture and flavor.
- Freezing: For longer storage, you can freeze the cookies. Place them in a single layer on a baking sheet first to freeze solid, then transfer to a freezer-safe bag or container. They can last for up to 3 months in the freezer.
Reheating and Freezing Tips
If you want to enjoy your cookies warm from the oven after they’ve been stored:
- Reheating: Place them in a preheated oven at 350°F (175°C) for about 5-10 minutes until warmed through. Avoid microwaving them as this can make them too soft or soggy.
- Thawing Frozen Cookies: To enjoy your frozen cookies, take them out of the freezer and let them thaw in the fridge overnight. Then, reheat as needed!
Tips & Tricks for Healthy Pumpkin Blossoms
Mistakes to Avoid
Here are some common pitfalls to avoid when making your Healthy Pumpkin Blossoms:
- Overmixing the Dough: Don’t overmix once you combine wet and dry ingredients to avoid dense cookies.
- Not Measuring Ingredients Properly: Use correct measuring cups for dry and wet ingredients for consistent results.
- Skipping Cooling Time: Allow the cookies to cool properly before moving them; this step is essential to their final texture.
Extra Tips for Better Results
- Taste Test Your Spices: Adjust the spices based on your personal preference; add more cinnamon for warmth if desired.
- Chocolate Variability: Experiment with different chocolate types, like cherry or caramel-filled kisses, for variety.
- Batch Prep: Make a double batch and freeze for quick snacks later on!
Recipe Variations of Healthy Pumpkin Blossoms
Creative Twists
Feel free to get creative with your Healthy Pumpkin Blossoms! Consider these fun twists:
- Add Nuts: Incorporate chopped walnuts or pecans for added texture and flavor.
- Spice It Up: Add in a pinch of cardamom or ginger for a warming kick.
- Seasonal Flavors: Experiment with a dash of maple syrup or pecan spice for a unique twist.
Dietary Adjustments
Easily adapt the recipe to meet various dietary needs:
- Gluten-Free: Stick with almond flour or try a gluten-free baking blend.
- Dairy-Free: Ensure your chocolate kisses are dairy-free or swap them out for vegan options.
- Vegan: Substitute the egg with a flaxseed or chia seed mix if you need a vegan-friendly alternative.
Conclusion About Healthy Pumpkin Blossoms
In summary, these Healthy Pumpkin Blossoms offer a fantastic way to enjoy fall flavors while being mindful of your health. Not only are they simple to prepare, but they also combine great taste with nutritious ingredients.
So why not gather your family and make these delightful treats together? You’ll create lasting memories, delicious cookies, and hopefully inspire others to indulge in the goodness of healthy baking.
Get ready to savor the goodness of Healthy Pumpkin Blossoms, and don’t forget to share your thoughts with friends and family! Happy baking!
FAQs About Healthy Pumpkin Blossoms
What if it doesn’t turn out right?
Don’t worry if your cookies don’t come out perfect! They might still taste great, even if the texture isn’t spot on. Remember to check your measurements, and ensure your baking soda is fresh, as these can greatly affect results.
Can I prepare it ahead of time?
Absolutely! You can prepare the dough a day in advance and store it in the fridge. Just scoop and bake when you’re ready for a fresh treat.
What are the best ingredient substitutions?
Common substitutions include using maple syrup in place of coconut sugar and oat flour instead of almond flour for those with nut allergies.
How long can it be stored?
Stored in an airtight container, these cookies can last up to 5 days in the fridge or up to 3 months in the freezer.
Can I use store-bought dough or crust?
While homemade provides the best flavor, you can certainly experiment with store-bought options if you’re short on time!
Is this recipe kid-friendly or family-appropriate?
Absolutely! Kids will love the chocolate in the center, and it’s a healthy treat that parents can feel good about serving.
Can I make this recipe allergen-free?
Yes! With simple swaps like using gluten-free flour or dairy-free chocolate, you can cater to various allergy needs while still enjoying delicious cookies.
Embrace the warmth and joy of fall with Healthy Pumpkin Blossoms. They’re as delightful to make as they are to eat, so gather your supplies and start baking!

Healthy Pumpkin Blossoms
Ingredients
Main Ingredients
- 1 cup pumpkin puree
- ½ cup coconut sugar
- ½ cup almond flour Can substitute with oat flour or a gluten-free blend.
- 1 teaspoon baking soda
- 1 teaspoon cinnamon
- ½ teaspoon nutmeg
- ¼ teaspoon salt
- 1 teaspoon vanilla extract
- ½ cup dark chocolate kisses Can swap with vegan chocolate chips.


Instructions
Preparation
- Preheat your oven to 350°F (175°C) and gather all your ingredients and tools.
- In a medium bowl, combine pumpkin puree, coconut sugar, and vanilla extract until smooth.
- In a separate bowl, mix almond flour, baking soda, cinnamon, nutmeg, and salt together.
- Gradually add the dry ingredients to the wet mixture, folding until combined.
- Scoop tablespoon portions of dough onto a lined baking sheet, leaving space between each.
- Press a dark chocolate kiss into the center of each dough scoop.
- Bake for 12-15 minutes, until edges are set and golden.
- Allow cookies to cool on the baking sheet for 5 minutes, then transfer to a cooling rack.