

This post may contain affiliate links. As an Amazon Associate, I earn from qualifying purchases at no extra cost to you.
Table of Contents
🍴 Top Kitchen Essentials You'll Love


Introduction to Key Lime Cookies
Imagine biting into a cookie that perfectly balances tangy and sweet flavors, sending a burst of citrus sunshine to your taste buds. That’s the magic of Key Lime Cookies. These delightful treats are more than just a dessert; they evoke memories of summer days spent by the beach, which makes you want to savor each bite slowly. Have you ever wondered how to recreate that refreshing taste of Key lime pie in a cookie? Look no further because this recipe brings the zest of tropical limes into a chewy and flavorful cookie.
What makes Key Lime Cookies truly special is their simplicity. You don’t need to be a baking expert to whip these up; just gather some essential ingredients, and you’re on your way to bringing a bit of Florida’s famous pie to your kitchen. Each step in the process is straightforward, ensuring that bakers of all levels can enjoy making these cookies.
But it’s not just about ease; it’s about enjoyment. Key Lime Cookies are incredibly versatile. Whether you serve them at a summer picnic, a birthday celebration, or simply as an afternoon snack, they always bring a smile. Plus, their vibrant color and zesty flavor make them a perfect conversation starter. So, if you’re on the hunt for a dessert that’s both delicious and memorable, look no further than this delightful cookie recipe.
Key Benefits of Key Lime Cookies
- Bright Flavor: The combination of fresh key lime juice and zest creates a zesty and refreshing taste experience.
- Easy to Prepare: You only need a handful of ingredients, making it a quick bake for any occasion.
- Customizable: Experiment with various add-ins or toppings to make your Key Lime Cookies unique.
- Perfect for Sharing: These cookies are ideal for gatherings and always impress friends and family.
- Great Texture: The chewiness of the cookie pairs perfectly with the zesty frosting, enhancing every bite.
- Versatile Occasions: Perfect for summer barbecues, birthday parties, or a simple dessert with dinner.
What Makes It Stand Out
What sets Key Lime Cookies apart from ordinary cookies is not only their flavor but also their inspiration. They draw from the classic Key lime pie, bringing that beloved taste into a handheld treat. The addition of key lime zest and juice ensures that the cookie captures the bright acidity and sweetness characteristic of this famous dessert.
You can also customize these cookies to fit special occasions. Add white chocolate chips for a touch of sweetness, or consider a drizzle of chocolate glaze for an eye-catching finish. Whatever your twist, the essence of Key Lime Cookies remains—refreshing, delicious, and incredibly satisfying.
Ingredients for Key Lime Cookies
Complete Ingredient List with Measurements
- ½ cup unsalted butter, softened to room temperature (one stick)
- 1 large egg
- ¾ cup sugar
- ¼ cup light brown sugar
- 1 tsp vanilla extract
- 2-3 tsp key lime zest
- 1 ¾ cups all-purpose flour (219g)
- ½ tsp baking soda
- ½ tsp salt
- 1 cup powdered sugar (for the frosting)
- 1 tbsp key lime juice
- 1 tbsp milk
- ¼ tsp vanilla (for the frosting)
- Pinch of salt (optional, for the frosting)
- ½ tsp key lime zest (for garnishing)
Substitutes and Alternatives
If you have specific dietary needs or ingredients that you can’t use, there are plenty of alternatives available. For a dairy-free option, consider using coconut oil or dairy-free butter in place of unsalted butter. You can also replace the egg with a flaxseed egg (1 tablespoon flaxseed meal mixed with 2.5 tablespoons water, let sit for 5-10 minutes) for a vegan version.
If you’re gluten-sensitive, it’s simple to make gluten-free Key Lime Cookies. Substitute the all-purpose flour with a 1:1 gluten-free baking flour, ensuring that the rest of your ingredients are also gluten-free. These modifications allow everyone to enjoy the delightful flavor of Key Lime Cookies.
How to Make Key Lime Cookies – Step-by-Step Directions
Step 1 – Prepare Ingredients
Start by gathering all your ingredients. Make sure the butter is softened to room temperature, which will help achieve a creamy dough. Pre-measure your lime zest to have everything ready for mixing.
Step 2 – Cream the Butter and Sugars
In a large mixing bowl, cream together the softened unsalted butter, sugar, and light brown sugar. Use an electric mixer on medium speed for 2-3 minutes until the mixture becomes fluffy and light. This process helps to incorporate air, giving your cookies a nice texture.
Step 3 – Add the Egg and Flavorings
Once the mixture is creamy, add in the large egg, vanilla extract, and key lime zest. Beat on medium speed until everything is well combined. The zesty freshness should start to shine through, heightening your anticipation for the cookies to come.
Step 4 – Mix Dry Ingredients
In a separate bowl, whisk together the flour, baking soda, and salt. This helps to evenly distribute leavening agents and ensures your cookies will have the perfect rise. Gradually incorporate the dry mixture into the wet ingredients using a spatula or a wooden spoon.
Step 5 – Form the Cookie Dough
After mixing all the ingredients, you should have a slightly sticky dough. If it’s too wet, feel free to add a little more flour, one tablespoon at a time until the consistency is just right. Once the dough is ready, cover it with plastic wrap and chill in the refrigerator for 30 minutes.
Step 6 – Preheat the Oven
While the dough chills, preheat your oven to 350°F (175°C). This step is essential, as putting cold dough in the oven creates a soft, chewy cookie rather than a flat one.
Step 7 – Scoop and Shape the Cookies
Once chilled, remove the dough from the fridge. Use a cookie scoop or tablespoon to portion out the dough, rolling them into balls. Place the cookie dough balls onto a parchment-lined baking sheet, ensuring they’re spaced about 2 inches apart to allow for spreading.
Step 8 – Bake the Cookies
Bake in the preheated oven for 10-12 minutes until the edges are glowing and lightly golden. The centers might appear a bit undercooked, but they will continue baking on the sheet once removed from the oven. Let them cool on the baking sheet for 5 minutes before transferring them to a wire rack.
Step 9 – Prepare the Frosting
While the cookies are cooling, it’s time to make the frosting. In a medium bowl, mix the powdered sugar, key lime juice, milk, and a pinch of salt until smooth. Adjust the consistency by adding more powdered sugar if it’s too runny or a splash of milk if it’s too thick.
Step 10 – Frost and Garnish the Cookies
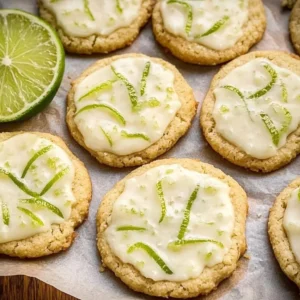
Once the cookies are cooled completely, pipe or spread the frosting onto the cookies. For an extra burst of flavor, sprinkle a dash of key lime zest over the frosting for a beautiful and zesty finish.
Serving Suggestions for Key Lime Cookies
Best Occasions to Serve This Dish
These delightful Key Lime Cookies are perfect for warm-weather gatherings. Their refreshing flavor makes them an ideal treat for summer picnics and barbecues. You can also serve them at birthday parties or family get-togethers as a unique alternative to traditional sweets.
Outside of celebrations, consider enjoying them during a quiet afternoon with a cup of tea or coffee. The cookies will elevate your teatime, making it feel like a special occasion.
What to Serve With It
Pair your Key Lime Cookies with a refreshing glass of iced tea or lemonade for a delightful combination. For an adult twist, consider serving them alongside a light cocktail or a glass of sparkling wine. If you wish to indulge a bit more, chocolate ice cream drizzled with a hint of key lime sauce can complement the citrus flavor beautifully.
How to Store Key Lime Cookies Properly
Best Storage Practices
To keep your Key Lime Cookies fresh, store them in an airtight container at room temperature for up to one week. The container should be kept in a cool, dry place, away from direct sunlight, to maintain their chewy texture and zesty flavor.
If you’re looking to store these cookies for a longer time, consider freezing them. Just make sure they’re completely cooled before placing them in a freezer-safe container or bag.
Reheating and Freezing Tips
To reheat your cookies, simply pop them in the microwave for about 10-15 seconds. This will also help rejuvenate their chewy texture after sitting out for a while. For best results, let them thaw in the refrigerator if frozen, then bring them back to room temperature before enjoying.
Tips & Tricks for Key Lime Cookies
Mistakes to Avoid
1 – Overmixing the Dough: Overmixing can lead to dense cookies instead of soft and chewy ones. Mix just until combined for the best results.
2 – Not Measuring Ingredients Accurately: Use the spoon and level method to measure flour, and avoid packing it in for accurate results.
3 – Skip the Chilling Step: Chilling the dough is crucial for controlling the spread and creating a chewy texture. Don’t skip this!
4 – Not Preheating the Oven: Always ensure your oven is at the right temperature before baking. An unheated oven can affect the cookies’ texture.
5 – Using Old Baking Soda: Check the expiration date on your baking soda. Fresh baking soda is needed for the necessary lift in your cookies.
Extra Tips for Better Results
- For an extra burst of flavor, consider adding a bit of lime juice to the cookie dough or frosting.
- If you enjoy texture, fold in some chopped macadamia nuts or slivered almonds for an added crunch.
- For a beautiful presentation, sift a little extra powdered sugar over the frosted cookies just before serving.
Recipe Variations of Key Lime Cookies
Creative Twists
1 – Key Lime Coconut Cookies: Mix shredded coconut into the dough for a tropical twist that enhances the flavor while adding texture.
2 – Chocolate Drizzle: After frosting, drizzle with melted dark or white chocolate to add richness and extra flavor notes that will surprise your taste buds.
3 – Sandwich Cookies: Create cookie sandwiches using frosting or even a layer of key lime cream cheese filling for an indulgent treat.
Dietary Adjustments
For those needing dietary modifications, making these cookies vegan is simple by using alternatives for butter and eggs. Similarly, you can make them gluten-free by substituting all-purpose flour with a gluten-free blend. Following these adjustments allows you to cater to various dietary needs without sacrificing that delicious key lime flavor.
Conclusion about Key Lime Cookies
In summary, Key Lime Cookies are a fantastic choice for anyone looking to explore a delicious blend of sweet and tangy flavors. They are easy to make, perfect for sharing, and can be customized to suit various preferences. Each bite is a reminder of summer warmth, making them suitable for all seasons. With the vibrant taste of key limes, this cookie recipe is bound to be a hit whether you make them for a special occasion or just because. Try baking them today and enjoy a refreshing twist on a classic dessert!
FAQs about Key Lime Cookies
Can I make Key Lime Cookies ahead of time?
Yes, you can prepare cookie dough ahead of time and refrigerate or freeze it. Just remember to thaw it in the fridge before baking.
How long do Key Lime Cookies last?
They can be stored in an airtight container at room temperature for up to a week and in the freezer for up to three months.
Can I substitute key lime juice with regular lime juice?
Yes, you can use regular lime juice, though the flavor will be slightly different. Key limes have a more distinctive taste.
Is there a way to make these cookies gluten-free?
Absolutely! Simply use a 1:1 gluten-free flour blend in place of the all-purpose flour.
Can I freeze the frosting?
Yes, you can freeze the frosting for up to three months. Just store it in an airtight container and let it thaw in the fridge before using.
How do I know when the cookies are done?
The edges should be lightly golden, and the center may look slightly underbaked. They will continue to firm up as they cool.
Is it necessary to chill the dough?
Yes, chilling helps control the spread of the cookies and enhances their chewy texture.
What can I add for more flavor?
You can include white chocolate chips, chopped nuts, or even a bit of coconut to add extra flavor and texture.
Can I use this recipe for cookie sandwiches?
Definitely! These cookies make great sandwich cookies with frosting or cream filling in the middle.
How do I reheat frozen cookies?
To reheat, let them thaw at room temperature or microwave for 10-15 seconds until warm.
Key Lime Cookies
Ingredients
For the cookies
- ½ cup unsalted butter, softened to room temperature one stick
- 1 large egg
- ¾ cup sugar
- ¼ cup light brown sugar
- 1 tsp vanilla extract
- 2-3 tsp key lime zest
- 1 ¾ cups all-purpose flour (219g)
- ½ tsp baking soda
- ½ tsp salt
For the frosting
- 1 cup powdered sugar
- 1 tbsp key lime juice
- 1 tbsp milk
- ¼ tsp vanilla for the frosting
- Pinch of salt optional, for the frosting
- ½ tsp key lime zest for garnishing


Instructions
Preparation
- Start by gathering all your ingredients. Make sure the butter is softened to room temperature.
- In a large mixing bowl, cream together the softened unsalted butter, sugar, and light brown sugar until fluffy and light using an electric mixer on medium speed for 2-3 minutes.
- Add in the large egg, vanilla extract, and key lime zest. Beat on medium speed until combined.
- In a separate bowl, whisk together the flour, baking soda, and salt. Gradually incorporate this into the wet mixture.
- Form the cookie dough, adjusting with more flour if too wet, and chill in the refrigerator for 30 minutes.
- Preheat your oven to 350°F (175°C).
- Once the dough has chilled, scoop and shape into balls, spacing them 2 inches apart on a parchment-lined baking sheet.
- Bake in the preheated oven for 10-12 minutes until edges are lightly golden.
- Let the cookies cool on the baking sheet for 5 minutes before transferring them to a wire rack.
- Prepare the frosting by mixing powdered sugar, key lime juice, milk, and a pinch of salt until smooth.
- Once cooled, frost the cookies and garnish with a sprinkle of key lime zest.