

This post may contain affiliate links. As an Amazon Associate, I earn from qualifying purchases at no extra cost to you.
Table of Contents
Have you ever wanted a dessert that’s not just delicious but also incredibly easy to make? A treat that feels special for any occasion and is guaranteed to impress family and friends? If these questions resonate with you, allow me to introduce you to the delightful No Bake Cherry Chocolate Chip Pie. This dessert is the perfect combination of sweet and tart, creamy and crunchy—all without the need to turn on your oven!
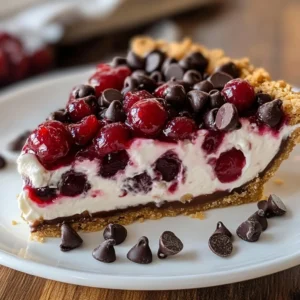
Imagine the excitement of guests as they dig into a beautifully chilled pie, where the luscious cream cheese layer meets the burst of juicy cherries and rich chocolate chips. This recipe is special for many reasons, but primarily because it embodies convenience without compromising on flavor or presentation. Whether you’re hosting a summer barbecue, celebrating a birthday, or simply treating yourself after a long week, this pie fits seamlessly into various occasions.
The foundation of this culinary masterpiece is a premade graham cracker crust, allowing you to save time while still delivering an outstanding dessert. With just a handful of ingredients—cherries, chocolate chips, cream cheese, whipped topping, powdered sugar, and vanilla extract—you can create a showstopper that looks and tastes like it took hours to prepare. Doesn’t that sound amazing? Whether you’re an experienced baker or a novice in the kitchen, this recipe is both forgiving and adaptable.
Perfect for cherry season or any time of year, the No Bake Cherry Chocolate Chip Pie brings out the best of summer fruits, but you can just as easily adapt it with seasonal favorites like strawberries or blueberries. The beauty of this pie lies in its versatility; it’s a canvas for your creativity. From holiday gatherings to casual weeknight dinners, this dessert can become a cherished staple in your recipe repertoire.
The rich layers and fresh flavors are irresistible, making it a crowd favorite at potlucks or family gatherings. Picture the vibrant red cherries on top, contrasting beautifully with the creamy filling and crumbly crust. Every slice tells a story of warmth, love, and the joy of sharing good food with great company. So why wait? Dive into the art of dessert-making and treat yourself to the divine experience of our No Bake Cherry Chocolate Chip Pie.
🍴 Top Kitchen Essentials You'll Love


Key Benefits of No Bake Cherry Chocolate Chip Pie
Why You’ll Love This Recipe
- Delicious Flavor Fusion: The combination of creamy chocolate and tart cherries creates a delightful contrast that hits all the right notes for dessert lovers. The slight tang of the cherries balances the sweetness of the chocolate and cream, making each bite an explosion of flavor.
- Simplicity at Its Best: With just a handful of ingredients and no baking required, this recipe is nicely streamlined. It’s perfect for anyone who may not feel confident in the kitchen but still wants to impress their guests.
- Time Efficient: Preparing the No Bake Cherry Chocolate Chip Pie takes no more than about 30 minutes, followed by a simple refrigeration period. This means you can whip up a stunning dessert in no time, allowing more hours for relaxation—or perhaps another episode of your favorite show!
- Versatile and Adaptable: While this pie is delightful in its original form, it is easily customizable. Different fruits can be used to match the season or what you have on hand. You can also experiment with mix-ins like nuts or flavored whipped toppings for a unique twist.
- Perfect for Any Occasion: This pie can seamlessly transition from casual weeknights to special occasions. Its elegant appearance makes it suitable for celebrations like birthdays, picnics, or holiday gatherings, while remaining relaxed enough for a simple family dinner.
- No Skills Required: Unlike many baked goods that require precise techniques, this pie is straightforward and forgiving. You don’t need to worry about overmixing or perfecting a crust—just mix, fold, and chill!
What Makes It Stand Out
The No Bake Cherry Chocolate Chip Pie is unique not only for its luscious flavor but also for its enticing textures. The creamy filling contrasts beautifully with the crunchy graham cracker base, while the juicy cherries add a refreshing burst in every bite. The velvety smoothness of cream cheese paired with the sweetness of whipped topping creates an indulgent layer that’s hard to resist.
Moreover, this pie stands out due to its adaptability across the seasons. During summer, fresh cherries shine, while in the colder months, you can make delightful modifications by incorporating spices or richer flavors—think pumpkin spice for fall or mint for winter! This flexibility allows you to enjoy the pie year-round, making it an all-time favorite that can be adjusted for different tastes and preferences.
Ingredients for No Bake Cherry Chocolate Chip Pie
Complete Ingredient List with Measurements
- 1 pre-made graham cracker crust: This serves as the delightful base of your pie, providing texture and sweetness.
- 1 cup cherries, pitted and halved: Fresh cherries add a juicy pop and are essential for the tartness that balances out the creaminess of the filling.
- 1 cup chocolate chips: These are the stars of the filling, providing richness and a buttery melt-in-your-mouth experience.
- 8 oz cream cheese, softened: This ingredient forms the base of the filling, lending a creamy texture and tangy flavor.
- 1 cup whipped topping: This lightens and aerates the filling, making it fluffy and easy to spread.
- 1/2 cup powdered sugar: Sweetens the mixture without adding graininess, ensuring a smooth consistency.
- 1 teaspoon vanilla extract: Elevates the overall flavor profile, adding warmth to the sweet notes of the dessert.
Substitutes and Alternatives
Adapting the No Bake Cherry Chocolate Chip Pie for different dietary needs or personal preferences is quite straightforward. For those with gluten intolerance, consider using a gluten-free graham cracker crust or an alternative base made from blended nuts and dates. If you’re aiming for a lower sugar option or have dietary restrictions, sugar substitutes can be used to sweeten the cream cheese mixture without compromising the recipe’s integrity.
For a dairy-free version, swap out the cream cheese for a vegan alternative, such as cashew cream or a store-bought dairy-free cream cheese spread. To achieve the same smooth and creamy filling, you can add a bit of coconut cream to give it an extra rich texture. Using non-dairy whipped topping will also keep this pie compliant with a vegan lifestyle.
Fruit substitutions are also encouraged; you can replace the cherries with other fruits like raspberries or blueberries to create a different seasonal flavor palette. The flexibility of this recipe means you can cater it to your dietary needs or whatever ingredients you have on hand.
How to Make No Bake Cherry Chocolate Chip Pie – Step-by-Step Directions
Step 1 – Prepare Your Workspace and Ingredients
Before diving into making the No Bake Cherry Chocolate Chip Pie, it’s crucial to set the stage for a smooth cooking experience. Begin by gathering all your ingredients together, measuring them accurately, and having your tools at the ready. You will need mixing bowls, a spatula, and a pie dish, preferably one that fits the pre-made graham cracker crust.
The importance of organization cannot be overstated; it helps save time and reduces stress while cooking. Ensuring that everything is within arm’s reach allows you to focus on creating a delicious dessert rather than running back and forth from the pantry. A clean workspace also prevents any cross-contamination, particularly if you’re working with different allergens.
Step 2 – Prepare the Cream Cheese Mixture
In a medium-sized mixing bowl, combine the softened cream cheese, powdered sugar, and vanilla extract. Using a hand mixer or a spatula, blend the ingredients together until smooth and creamy. The mixture should be free of lumps, with a light and airy texture.
For best results, allow the cream cheese to soften at room temperature for about 20 to 30 minutes before using it. This makes it easier to blend and leads to a smoother texture. Be sure to scrape down the sides of the bowl to ensure that all the ingredients are fully combined.
Step 3 – Fold in Whipped Topping and Chocolate Chips
Once your cream cheese mixture reaches a creamy consistency, it’s time to fold in the whipped topping gently. This step is crucial as it adds lightness to the filling, ensuring that it doesn’t become too dense. Use a spatula to carefully incorporate the whipped topping, mixing it until fully combined.
After that, add the chocolate chips and fold them into the mixture. The chocolate chips will provide bursts of flavor and texture, enhancing the overall enjoyment of your pie. Remember, the goal with “folding” is to maintain as much airiness as possible, which will give the pie its delightful light texture.
Step 4 – Transfer the Mixture into the Graham Cracker Crust
With the creamy filling thoroughly mixed, it’s time to transfer it to the pre-made graham cracker crust. Spoon the mixture into the crust using a spatula to spread it evenly, ensuring that it reaches the edges. The filling should be leveled off for a smooth finish, and any stray bits can be gently pushed back into place for an appealing presentation.
At this stage, you want to make sure the filling is distributed evenly so that every slice of pie will have an equal amount of creaminess and flavor. If you have any extra, feel free to taste-test before chilling—after all, you’ve earned it!
Step 5 – Top with Halved Cherries
Now comes the fun part—adding the cherries on top! Arrange the pitted and halved cherries in a decorative manner atop the creamy filling. Not only does this add a pop of color, but it also introduces that tartness that will perfectly balance the sweetness of the pie.
Feel free to be creative with your arrangement! You can sprinkle them randomly or create a lovely pattern that showcases the cherries. This visual appeal is essential, as we eat with our eyes first.
Step 6 – Refrigerate Until Set
After you’ve adorned your lovely pie with cherries, it’s time to let it chill. Place the pie in the refrigerator for a minimum of four hours, preferably overnight. This time allows the flavors to meld together and the filling to firm up, making slicing easier later on.
The chilling process also helps set the creamy mixture, allowing it to be sliced cleanly. Being patient here will pay off in delicious rewards when you finally serve it!
Step 7 – Prepare for Serving
When you’re ready to serve your No Bake Cherry Chocolate Chip Pie, take it out of the fridge, and let it sit for about 15 minutes at room temperature before slicing. This additional step will help soften the chilled filling, making it easier to cut through and ensuring a smooth slice.
Additionally, you can garnish the pie with a dollop of whipped topping or even more cherries for a finishing touch. If you’re feeling adventurous, drizzling chocolate sauce on top will add extra elegance.
Step 8 – Slice and Enjoy!
Using a sharp knife, cut into the pie with steady, deliberate movements. Ensure your knife is clean between cuts for neat slices—this not only improves presentation but also creates a lasting impression among your guests. Serve the slices on dessert plates, allowing your guests to admire the beautiful layers.
As the flavors come together in each bite, you’ll be met with happiness and satisfaction—it’s truly the essence of comfort.
Serving Suggestions for No Bake Cherry Chocolate Chip Pie
Best Occasions to Serve This Dish
The No Bake Cherry Chocolate Chip Pie is a versatile dessert that fits seamlessly into all sorts of gatherings. It’s perfect for summer picnics, birthday parties, and festive holidays. Imagine setting up a beautiful outdoor table during a summer barbecue, where this pie shines under the sun, beckoning guests to indulge.
It’s equally excellent on cozy winter evenings, served as a light yet sumptuous dessert after a hearty meal. The contrast between the cool pie and the warm ambiance of home creates an inviting atmosphere that will delight your family and friends. Whether celebrating a special occasion or simply gathering for a family dinner, this pie can cater to the mood and season, making it a beloved choice for any event.
What to Serve With It
To complement your No Bake Cherry Chocolate Chip Pie, consider pairing it with some refreshing beverages and additional dessert options. Light, crisp drinks like sparkling lemonade or iced tea can offset the rich flavors of the pie.
If you prefer something warm, a rich cup of coffee or hot chocolate could work marvelously. When it comes to side options, consider serving it alongside a scoop of vanilla ice cream or a simple fruit salad for a pop of freshness. Each additional dish enhances the experience, allowing your guests to experience a feast of flavors alongside the beautiful pie.
Storing No Bake Cherry Chocolate Chip Pie Properly
Best Storage Practices
To ensure your No Bake Cherry Chocolate Chip Pie maintains its delicious flavor and fresh texture, proper storage is key. It’s best kept in the refrigerator wrapped tightly in plastic wrap or aluminum foil. This will prevent it from absorbing odors and will also protect it from drying out.
If you don’t plan on consuming the pie within three days, you might want to consider freezing it. While the pie can be frozen, the texture may change slightly upon thawing, although it will still be delicious. When freezing, cut the pie into pieces for easy individual servings later on and store them in an airtight container or wrap each slice securely.
Reheating and Freezing Tips
When it comes to reheating, there’s no need to worry. This pie is best served chilled, so simply remove it from the fridge and let it sit for a few moments before slicing. If frozen, place it in the refrigerator to thaw overnight, or allow it to sit out at room temperature for about 30 minutes before serving.
However, if your pie has been frozen and you’re concerned about texture, it’s advisable not to refreeze it after thawing, as it may become watery. Enjoying fresh slices is the best way to experience the bliss of this pie!
Tips & Tricks for No Bake Cherry Chocolate Chip Pie
Mistakes to Avoid
Making the No Bake Cherry Chocolate Chip Pie is simple, but avoiding common mistakes will ensure a flawless dessert:
- Ignoring Temperature of Ingredients: Ensuring your cream cheese is softened is crucial for a smooth filling.
- Overmixing: When adding whipped topping, gentle folding is essential to retain airiness; overmixing can lead to a dense texture.
- Cutting the Pie Too Early: Allow the pie adequate time to set in the refrigerator; otherwise, the filling may ooze out when sliced.
- Not Pitting the Cherries Thoroughly: Cherries need to be pitted for safety and textural integrity; unpitted cherries can lead to unpleasant surprises when serving.
- Serving Immediately After Preparation: The pie needs time to chill. Serving it right after making will not give the flavors time to meld or allow the filling to set.
- Poor Presentation: Take the time to arrange the cherries attractively for a visually appealing pie.
Extra Tips for Better Results
To elevate your No Bake Cherry Chocolate Chip Pie experience, consider the following pro tips:
- Garnish Thoughtfully: Adding fresh mint leaves or a dusting of cocoa powder on top can create a stunning presentation. Additionally, a drizzle of chocolate sauce can add an extra layer of flavor.
- Use Quality Ingredients: Using high-quality chocolate chips and fresh cherries can significantly improve the final taste of your pie. Seek out organic cherries when possible for a fresher flavor.
- Experiment with Flavors: Play around with flavored extracts, like almond or coconut, to take your pie to the next level. These can alter the taste profile and contribute another enjoyable layer of flavor.
- Serve in Individual Portions: For gatherings, consider creating mini individual pies using small tart shells. This allows guests to have their personalized portions while still enjoying the same flavors.
- Temperature is Key: For the best experience, keep the pie in the fridge until you are ready to serve it, ensuring every bite is a refreshing delight.
Recipe Variations of No Bake Cherry Chocolate Chip Pie
Creative Twists
The possibilities with the No Bake Cherry Chocolate Chip Pie are practically endless. Here are some inspiring variations:
Strawberry Chocolate Chip Pie: Substitute the cherries with fresh strawberries for a different flavor while maintaining the chocolatey goodness. This version is especially delightful during the spring and early summer months when strawberries are in full bloom.
Peach and Nut Pie: During peach season, consider using sliced peaches instead of cherries. The sweet peaches will blend beautifully in the filling, while finely chopped nuts can be folded in for added crunch and flavor.
Peppermint Chocolate Version: For a festive touch during the holidays, add crushed peppermint candies or peppermint extract. Top with crushed candy canes for an eye-catching and delicious twist on the classic pie.
Lemon Cherry Twist: Incorporate a squeeze of fresh lemon juice into the filling for a zingy addition. The citrus will cut through the richness, providing a refreshing contrast.
Dietary Adjustments
If you’re looking to tailor your dessert to specific dietary needs, here’s how you can modify the recipe:
Vegan Version: Opt for a vegan cream cheese substitute and replace whipped topping with coconut whipped cream or a non-dairy version. This will give you a dairy-free delight without sacrificing flavor.
Gluten-Free Option: Use a gluten-free graham cracker crust or make a cookie crust using gluten-free cookies. Be sure to check the labels on all ingredients for hidden gluten.
Low-Fat Alternative: For a healthier twist, use reduced-fat cream cheese and whipped topping. The taste may still be delicious, but you’ll feel a little better about indulging.
Keto-Friendly Adaptation: Swap out the graham cracker crust for an almond flour crust and use sugar-free chocolate chips. Make sure to adjust the sweeteners accordingly to stay within keto guidelines.
Conclusion about No Bake Cherry Chocolate Chip Pie
In summary, the No Bake Cherry Chocolate Chip Pie is a culinary delight that marries simplicity with flavor perfectly. It’s a dessert that everyone can appreciate, from children to adults, and is adaptable for various occasions and dietary needs. With its easy preparation, luscious texture, and beautiful presentation, it is sure to become a cherished recipe in your home.
So go ahead, invite your friends over, throw together this stunning pie, and bask in the glow of satisfied smiles. Whether at a summer gathering or a cozy family dinner, sharing this pie invites love, joy, and delicious moments that create lasting memories. Make a batch today and experience the wonderful world of flavors wrapped up in the No Bake Cherry Chocolate Chip Pie!
FAQs about No Bake Cherry Chocolate Chip Pie
What if it doesn’t turn out right?
Mistakes can happen while cooking, but if your pie doesn’t set properly, try putting it back in the refrigerator for longer. If you find yourself in a situation where the filling is too runny, consider blending in a couple of tablespoons of cornstarch or gelatin next time to achieve a firmer texture.
Can I prepare it ahead of time?
Absolutely! The No Bake Cherry Chocolate Chip Pie can be made a day in advance, making it a fantastic choice for events. Simply store it in the refrigerator, covered, and serve it within two to three days for the best freshness.
What are the best ingredient substitutions?
For a lighter option, you can use low-fat cream cheese or try vegan cream cheese for a dairy-free version. You can also substitute the cherries for other fruits, such as blueberries, raspberries, or strawberries, for different flavor profiles.
How long can it be stored?
The pie is best enjoyed within three to four days if stored in the refrigerator. If necessary, it can be frozen for up to a month, although the texture may change slightly upon thawing.
Can I use store-bought dough or sauce?
While the pie does utilize a store-bought crust to simplify the process, fresh fruit is recommended for the best taste! For instance, you may use pre-made cherry sauce or topping if you don’t have fresh cherries on hand.
Is this recipe kid-friendly?
Yes! With its sweet chocolate and fruity cherries, this pie is a popular choice among kids. It’s simple and fun to make, allowing children to participate in the preparation.
Can I make it allergen-free?
To accommodate allergies, use a gluten-free crust, dairy-free cream cheese, and whipped topping. Always be mindful of specific allergens and check ingredient labels when accommodating special dietary needs.
What side dishes go best with it?
This pie pairs wonderfully with light, refreshing sides like fruit salads, whipped cream, or vanilla ice cream. Beverages like lemonade or iced tea also complement this dessert perfectly.
Can I double or halve the recipe?
Certainly! If you need a larger pie or want to make mini pies, simply adjust the ingredient quantities accordingly. If halving, ensure you still use the appropriate ratios to maintain the flavor balance.
What’s the secret to the best flavor?
Using high-quality ingredients and allowing the pie to chill adequately will yield the best flavor. Fresh cherries and good chocolate chips will elevate the experience, making the pie all the more enjoyable for you and your guests.
No Bake Cherry Chocolate Chip Pie
Equipment
- Mixing Bowl
- Hand Mixer
- Spatula
- Refrigerator
Ingredients
Pie Base
- 1 pre-made graham cracker crust
Filling
- 8 oz cream cheese softened
- ½ cup powdered sugar
- 1 tsp vanilla extract
- 1 cup whipped topping
- 1 cup chocolate chips
Topping
- 1 cup cherries pitted and halved


Instructions
- In a medium bowl, beat softened cream cheese, powdered sugar, and vanilla extract until smooth and creamy.
- Gently fold in whipped topping using a spatula until well combined.
- Stir in chocolate chips evenly throughout the mixture.
- Spoon the mixture into the graham cracker crust and spread evenly to the edges.
- Top with halved cherries, arranging them decoratively over the filling.
- Refrigerate for at least 4 hours or overnight until set.
- Before serving, let the pie sit at room temperature for 15 minutes, slice, and enjoy!