

This post may contain affiliate links. As an Amazon Associate, I earn from qualifying purchases at no extra cost to you.
Table of Contents
🍴 Top Kitchen Essentials You'll Love


Introduction about Old Fashioned Fudge: 7 Tips for Nostalgic Sweetness
Have you ever tasted a piece of homemade fudge that transported you back to your childhood? That rich, creamy texture paired with the sweetness of chocolate is simply irresistible. In this article, we delve into Old Fashioned Fudge: 7 Tips for Nostalgic Sweetness, a recipe that not only delivers on flavor but also brings back those warm, fuzzy memories of cozy kitchens and family gatherings.
This recipe is not just simple; it’s a journey through time, reminding us of the joy that dessert can bring. With just a handful of ingredients, you can whip up a treat that echoes the flavors of yesteryear. Let’s celebrate the uniqueness of Old Fashioned Fudge: 7 Tips for Nostalgic Sweetness, and get ready to bake up a storm!
Key Benefits of Old Fashioned Fudge: 7 Tips for Nostalgic Sweetness
When it comes to making Old Fashioned Fudge: 7 Tips for Nostalgic Sweetness, the advantages are as delicious as the treat itself. This fudge isn’t just your average dessert; it’s a delightful experience that invigorates the senses and brings out your inner child.
Why you’ll love this recipe
- Simplicity: With just a few ingredients, it’s easy to make even for beginners.
- Nostalgic taste: It offers that classic flavor that many crave.
- Customizable: You can add nuts, spices, or different chocolates to keep it fresh.
- Quick to prepare: The cooking time is short, making it a great last-minute treat.
- Shared joy: Fudge is a crowd-pleaser, perfect for gatherings and parties.
What makes it stand out
What makes Old Fashioned Fudge: 7 Tips for Nostalgic Sweetness truly special is its originality. This isn’t just any fudge; it’s a recipe that has been passed down through generations. The method of boiling sugar, butter, and milk to create a silky smooth base earns it a spot in the absolute classic dessert category.
Seasonal appeal is another highlight of this delightful fudge. Whether you’re making it for Thanksgiving, Christmas, or just because, it fits perfectly into any occasion. You can easily customize it to match the flavors of the season, such as adding peppermint for the holidays or orange zest in the summer.
The customization options available make this fudge stand out as well. Want a nutty crunch? Toss in some chopped nuts. Looking for a caramel kick? Swirl in some caramel sauce. Old Fashioned Fudge: 7 Tips for Nostalgic Sweetness allows your creativity to shine through, making it a versatile treat for any palate.
Ingredients for Old Fashioned Fudge: 7 Tips for Nostalgic Sweetness
To prepare your batch of Old Fashioned Fudge: 7 Tips for Nostalgic Sweetness, you’ll need a few key ingredients that are likely already in your pantry. This recipe highlights the beauty of simplicity, emphasizing how a small selection of basic items can create something extraordinary.
Complete ingredient list with measurements
- 2 cups sugar
- 1/2 cup butter
- 1 cup milk
- 1 cup chocolate chips
- 1 teaspoon vanilla extract
- 1/2 cup chopped nuts (optional)
Substitutes and alternatives
If you’re looking to adapt the recipe, there are several substitutes you can consider:
- Sugar substitutes: Use coconut sugar or stevia for a healthier option.
- Butter alternatives: Use coconut oil or vegan butter for a dairy-free option.
- Chocolate options: Dark chocolate chips or white chocolate can add a different flair to your fudge.
- Nut alternatives: If you’re not a fan of nuts, you can replace them with dried fruits like cranberries or raisins for added sweetness and chewiness.
How to Make Old Fashioned Fudge: 7 Tips for Nostalgic Sweetness – Step-by-Step Directions
Now let’s get into the fun part! Making Old Fashioned Fudge: 7 Tips for Nostalgic Sweetness is not just about following a recipe; it’s a delightful experience that fills your kitchen with enticing aromas.
Step 1: Gather your ingredients
Begin by gathering all the necessary ingredients. This ensures you won’t have to run around in the middle of mixing. Lay them out on your countertop for easy access.
Step 2: Prepare your pan
Take a greased pan, typically an 8×8 inch square one, and ensure it’s set aside for pouring the fudge later.
Step 3: Combine sugar, butter, and milk
In a medium saucepan, combine the sugar, butter, and milk. This mixture serves as the base of your fudge.
Step 4: Heat over medium
Place the saucepan over medium heat. Stir constantly as the butter melts and begins to combine with the sugar and milk. It’s essential to keep stirring at this point to prevent the mixture from sticking to the bottom.
Step 5: Bring to a boil
Once everything is well mixed, allow the mixture to come to a boil. It should start bubbling vigorously. Continue to stir to maintain consistency while it’s boiling.
Step 6: Boil without stirring
Once it reaches a rolling boil, let it boil for exactly 5 minutes without stirring. This step is crucial as it allows the sugar to reach the right temperature for fudge consistency.
Step 7: Remove from heat
After 5 minutes, carefully remove your saucepan from the heat. Be cautious as the mixture will be extremely hot.
Step 8: Stir in chocolate chips and vanilla
Now, add the chocolate chips and vanilla extract. Stir until the chocolate is fully melted and is combined into the mixture, creating a luscious and creamy fudge base.
Step 9: Add nuts (if desired)
If you’re choosing to incorporate nuts, now is the time to add them. Stir well to evenly distribute throughout the fudge.
Step 10: Pour into the pan
Lastly, pour the fudge mixture into your prepared greased pan. Spread it evenly and let it cool at room temperature. Once set, it can be cut into squares for serving.
Serving Suggestions for Old Fashioned Fudge: 7 Tips for Nostalgic Sweetness
What’s great about Old Fashioned Fudge: 7 Tips for Nostalgic Sweetness is not only how delicious it is, but how versatile it can be when it comes to serving it.
Best occasions to serve this dish
- Family gatherings: Fudge is a sweet treat that everyone loves, making it perfect for family meals.
- Holiday celebrations: Whether it’s Christmas or Thanksgiving, fudge always adds a festive touch.
- Bake sales or potlucks: This treat is easy to cut, wrap, and share, perfect for group settings.
- Movie nights: Fudge makes for a great after-dinner indulgence during family movie nights at home.
What to serve with it
- Hot chocolate: Pair with a warm mug of cocoa for an extra sweet treat.
- Coffee or tea: A small slice of fudge complements the richness of your favorite beverage.
- Caramel sauce: Drizzle on top for added sweetness.
- Ice cream: Serve alongside a scoop of vanilla for a delightful contrast.
Storing Old Fashioned Fudge: 7 Tips for Nostalgic Sweetness Properly
To ensure your Old Fashioned Fudge: 7 Tips for Nostalgic Sweetness stays fresh for as long as possible, proper storage methods are essential.
Best storage practices
- Room temperature: Store the fudge in an airtight container at room temperature for up to a week.
- Refrigerator: For longer storage, refrigerate it, where it can last for up to two weeks.
- Freezer: If you want to keep it even longer, wrap pieces in plastic wrap and place them in a freezer-safe container for up to three months.
Reheating and freezing tips
- To reheat: If you want a soft fudge consistency, microwave it for a few seconds. Be sure to monitor closely to avoid melting it too much.
- Avoid sogginess: When freezing, remove excess air from packaging to keep the texture intact when thawing.
Tips & Tricks for Old Fashioned Fudge: 7 Tips for Nostalgic Sweetness
Even the simplest recipe can come with a few pitfalls. Here are some helpful tips and tricks to ensure your Old Fashioned Fudge: 7 Tips for Nostalgic Sweetness turns out perfectly every time.
Mistakes to avoid
- Stirring while boiling: Resist the urge to stir once the mixture reaches a boil; this can affect the texture.
- Under or over boiling: Follow the 5-minute boiling rule closely for the right consistency.
- Not greasing the pan: Make sure the pan is well-greased to avoid sticking and tearing when cutting.
Extra tips for better results
- Use a candy thermometer: For precise temperature control, this can help gauge the perfect moment to remove from heat.
- Experiment with flavors: Customize with extracts like peppermint or almond for unique variations.
- Let it set completely: Allow the fudge to set at room temperature for best results, rather than rushing the process.
Recipe Variations of Old Fashioned Fudge: 7 Tips for Nostalgic Sweetness
The beauty of Old Fashioned Fudge: 7 Tips for Nostalgic Sweetness lies in its adaptability. Here are some exciting variations you can explore.
Creative twists
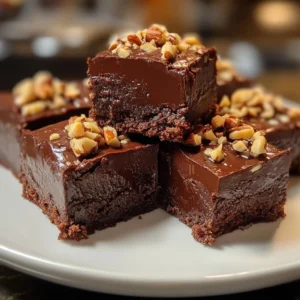
- Nutty fudge: Toss in different nuts like pecans or walnuts for crunch.
- Spicy fudge: Add a pinch of cayenne or cinnamon for a warm kick.
- Festive fudge: Fold in festive colors with sprinkles or seasonal candies to make it special.
- Fruit-infused fudge: Incorporate dried fruits like cherries or bits of orange for added flavor and texture.
Dietary adjustments
- Vegan fudge: Swap butter with coconut oil and dairy-free chocolate chips for a vegan-friendly version.
- Gluten-free fudge: Since this recipe is naturally gluten-free, simply ensure your chocolate chips are certified gluten-free.
- Dairy-free fudge: Replace milk with almond milk or oat milk for those who cannot consume dairy.
Conclusion about Old Fashioned Fudge: 7 Tips for Nostalgic Sweetness
In wrapping up our journey through Old Fashioned Fudge: 7 Tips for Nostalgic Sweetness, it’s easy to see why this delight remains a beloved treat. The taste, ease of preparation, and versatility make it a standout option for any occasion.
So, why not gather your ingredients and bring a taste of nostalgia into your home? Try out this recipe, share it with family, and watch as everyone falls in love with the bliss of homemade fudge.
FAQs about Old Fashioned Fudge: 7 Tips for Nostalgic Sweetness
What if it doesn’t turn out right?
If your fudge doesn’t set properly, it might be due to not boiling long enough or overheating. Don’t worry! You can reheat it with a splash of milk and try again.
Can I prepare it ahead of time?
Absolutely! Fudge can be made several days in advance. Just store it in an airtight container to keep it fresh.
What are the best ingredient substitutions?
Coconut oil can substitute for butter, and different kinds of chocolate can be used. Different nuts, seeds, or dried fruits can also add unique flavors.
How long can it be stored?
When properly stored, fudge lasts about a week at room temperature, two weeks in the fridge, and up to three months in the freezer.
Can I use store-bought dough or crust?
This recipe does not require a crust or dough. Fudge is its own delightful creation!
Is this recipe kid-friendly?
Yes, kids love fudge! It’s a fun treat to make together and can be cut into fun shapes.
Can I make it allergen-free?
Yes! With the right substitutions for dairy and gluten, you can create a delicious allergen-free version of fudge.
Now that you’re armed with all this delicious knowledge, get to making your Old Fashioned Fudge: 7 Tips for Nostalgic Sweetness today! Enjoy every bite and the memories that come with it.
Irresistible Old Fashioned Fudge
Equipment
- Saucepan
- Wooden Spoon
- Candy Thermometer
- 8×8 inch Pan
- Spatula
Ingredients
- 2 cups sugar
- ½ cup butter
- 1 cup milk
- 1 cup chocolate chips semi-sweet or dark
- 1 tsp vanilla extract
- ½ cup chopped nuts optional


Instructions
- Grease an 8×8 inch pan and set aside.
- In a medium saucepan, combine sugar, butter, and milk.
- Heat over medium, stirring constantly until the butter melts.
- Bring to a rolling boil and let it boil for exactly 5 minutes without stirring.
- Remove from heat and stir in chocolate chips and vanilla until smooth.
- Fold in chopped nuts if desired.
- Pour the mixture into the greased pan, spread evenly, and let it cool completely.
- Once set, cut into squares and serve.