

This post may contain affiliate links. As an Amazon Associate, I earn from qualifying purchases at no extra cost to you.
Table of Contents
🍴 Top Kitchen Essentials You'll Love


Introduction to Pear Jam Recipe
Have you ever tasted a jar of homemade jam that instantly transports you back to sunlit orchards brimming with fresh fruit? Pear Jam Recipe is one of those delightful treats that can recreate that experience right in your kitchen. This recipe isn’t just about mixing ingredients; it’s about capturing the essence of perfectly ripe pears and transforming them into a spread that’s both versatile and delicious. Whether you slather it on toast at breakfast or use it as a filling in pastries, Pear Jam adds a touch of sweetness to your everyday meals.
The beauty of this Pear Jam Recipe lies in its simplicity. With just a handful of ingredients, anyone can easily make this jam, regardless of their cooking skill level. The result? A vibrant, homemade jam that tastes so much better than anything you can buy in a store. Imagine enjoying the rich, fruity flavor of pears preserved at their peak, enveloped in just the right amount of sweetness and citrusy zest from lemon juice.
What sets Pear Jam Recipe apart from other fruit jams is its unique flavor profile. While strawberries and raspberries have their charm, the gentle sweetness of ripe pears is a breath of fresh air. It’s subtle yet profoundly satisfying, making it a wonderful alternative for those looking to try something new. Plus, this recipe is adaptable! You can easily tweak the sweetness, explore mix-ins like cinnamon or ginger, or even play around with the texture to your preference.
In a world filled with complexities, there is something comforting about the straightforward process of making Pear Jam Recipe. With a little effort, you’ll have jars of this delightful spread that can last for months, bringing a taste of summer right to your pantry. So grab some ripe pears and let’s dive into this delightful journey of making Pear Jam that you and your friends will surely savor.
Key Benefits of Pear Jam Recipe
Why You’ll Love This Recipe
- Delicious Flavor: The natural sweetness of pears combined with lemon juice creates a refreshing taste that’s hard to resist.
- Simple Process: With just a few basic ingredients, making Pear Jam Recipe is straightforward and easy.
- Versatile Use: This jam can be used on toast, in baking, or as a topping for desserts and cheeses.
- Homemade Touch: Nothing beats the satisfaction of enjoying a product made from scratch, knowing exactly what’s in it.
- Gift-Worthy: Beautifully jarred, this jam makes for a heartfelt, homemade gift for friends and family.
- Long Shelf Life: When canned properly, Pear Jam Recipe can be stored for months, allowing you to enjoy the flavors of summer long after the harvest.
What Makes It Stand Out
Pear Jam Recipe stands out in the world of jams because of its unique balance of flavors. Ripe pears offer a delicate sweetness that pairs wonderfully with a hint of tartness from lemon juice. This balance not only elevates the jam’s taste but also makes it an excellent companion to both sweet and savory dishes.
Customization is another aspect that makes Pear Jam Recipe truly shine. You can add spices like cinnamon or nutmeg for warmth or mix in other fruits such as apples for a different profile. Whether you’re preparing a breakfast spread or an elegant dessert topping, Pear Jam provides a canvas for creativity. It’s perfect for all occasions, from casual family breakfasts to more formal gatherings, ensuring there’s something for everyone to enjoy.
Ingredients for Pear Jam Recipe
Complete Ingredient List with Measurements
- 2 pounds ripe pears, peeled, cored, and chopped into small pieces
- 4 cups granulated sugar
- 1/4 cup lemon juice (freshly squeezed is best)
- 1 package (1.75 oz) fruit pectin (pectin for making jam)
- 1 cup water
Substitutes and Alternatives
If you are looking for alternatives due to allergies or dietary preferences, it’s easy to customize this Pear Jam recipe. For a lower-sugar option, you can use fruit sweeteners like agave nectar or maple syrup, though you’ll need to experiment with the proportions as they differ in sweetness compared to granulated sugar.
If you’re after a more unique flavor, consider using different types of citrus juice instead of lemon, like lime or orange juice. Just keep in mind that this might alter the overall taste. For pectin, if you prefer a natural thickener, you can explore using chia seeds, though the texture will differ from traditional pectin-based jams.
How to Make Pear Jam Recipe – Step-by-Step Directions
Step 1 – Prepare Jars and Lids
Before you get cooking, it’s essential to prepare your jars and lids for canning. Start by sterilizing them in boiling water for 10 minutes. This step ensures your Pear Jam Recipe will last longer without spoilage.
Step 2 – Peel, Core, and Chop Pears
Next, take your ripe pears and peel them carefully. Make sure to remove the cores before chopping them into small, even pieces. This process allows the pears to cook evenly and break down nicely.
Step 3 – Cook the Base
In a large pot, combine the chopped pears, sugar, lemon juice, and water. Stir the mixture gently and set over medium heat. You want to bring this to a simmer, allowing the sugar to dissolve and the pears to soften, which usually takes about 10-15 minutes.
Step 4 – Bring Mixture to a Boil
Once the sugar is dissolved, increase the heat to medium-high and bring the mixture to a rolling boil. Stir continuously to prevent it from sticking. The goal here is to reach a full boil where bubbling is vigorous.
Step 5 – Add Pectin
After achieving a boil, prepare to add your pectin. Sprinkle the pectin into the pot while stirring constantly. This is crucial for even distribution and to ensure the pectin dissolves completely into the mixture.
Step 6 – Boil Jam Mixture
Continue boiling the jam mixture for about 10 minutes. Stir frequently to avoid any burning and to monitor the consistency. The mixture should thicken slightly as it cooks.
Step 7 – Test the Jam’s Set
To check if your Pear Jam Recipe is ready, place a small spoonful on a cold plate. Allow it to sit for a moment, then tilt the plate. If the jam holds its shape and doesn’t run, it’s good to go. If it appears too runny, continue boiling for a few more minutes before testing again.
Step 8 – Fill and Seal Jars
Once the jam is set, carefully ladle the hot jam into your prepared jars, leaving about 1/4-inch headspace at the top. Use a clean cloth to wipe the rims of the jars before placing the lids on. This ensures a good seal.
Step 9 – Process in Water Bath
Process the jars in a boiling water bath for 5-10 minutes. This step is vital for ensuring food safety and preserving your Pear Jam Recipe for storage. Ensure the jars are fully submerged in water.
Step 10 – Cool and Store
After the processing time is complete, carefully remove the jars from the boiling water and let them cool on a clean towel or cooling rack. Once completely cooled, check the seals before storing them in a cool, dark place.
Serving Suggestions for Pear Jam Recipe
Best Occasions to Serve This Dish
Pear Jam Recipe is wonderfully versatile, making it suitable for numerous occasions. For breakfast, spread it generously on warm toast or scones to kickstart your day on a sweet note. It also pairs beautifully with rich cheeses and crackers for a stylish appetizer during gatherings.
During the holidays, consider using Pear Jam Recipe as a delectable filling for pastries or a topping for holiday desserts. It can elevate any dish or simple meal, making it a favorite for both casual and festive events.
What to Serve With It
Pair Pear Jam Recipe with an assortment of sides and toppings. For breakfast, serve it alongside creamy butter, yogurt, or ricotta cheese. Use it as a finishing touch over pancakes or waffles for a delightful twist.
When it comes to savory pairings, consider using Pear Jam Recipe as a condiment on sandwiches or as a topping for roasted meats. It’s also great complements to charcuterie boards—adding a touch of sweetness to balance out salty flavors.
How to Store Pear Jam Recipe Properly
Best Storage Practices
The best way to store your Pear Jam Recipe is in a cool, dark place. Once sealed, jars can be stored at room temperature for up to a year. After opening, refrigerate any unused jam and consume within a few weeks to enjoy the preserved freshness.
Reheating and Freezing Tips
If you find yourself with leftover jam that you can’t consume quickly, you can freeze Pear Jam Recipe for long-term storage. Use freezer-safe containers or bags, ensuring you leave extra space for expansion as it freezes. To thaw, place in the refrigerator overnight before using.
Tips & Tricks for Pear Jam Recipe
Mistakes to Avoid
- Using Unripe Pears: Ensure your pears are ripe for the sweetest flavor.
- Skipping the Pectin: Omitting pectin can result in a runnier jam.
- Not Sterilizing Jars Properly: Failure to sterilize can lead to spoilage.
- Ignoring Temperature Control: Cooking at too high a temperature can scorch the jam.
- Not Checking the Set: Testing the set is crucial; otherwise, you risk ending with syrup instead of jam.
Extra Tips for Better Results
For a richer flavor, consider roasting your pears beforehand. This adds a depth of taste that elevates your Pear Jam Recipe. Additionally, experiment with spice additions like cinnamon or nutmeg for a cozy aroma.
Recipe Variations of Pear Jam Recipe
Creative Twists
- Pear Ginger Jam: Add fresh grated ginger for a spicy kick.
- Pineapple Pear Jam: Mix in crushed pineapple for a tropical flavor twist.
- Spiced Pear Jam: Incorporate star anise or cloves for a winter-inspired jam.
- Berry Pear Jam: Blend in some raspberries or blackberries for a mixed fruit delight.
Dietary Adjustments
If you’re following a vegan diet, ensure your pectin is plant-based and use agave syrup instead of sugar. For gluten-free considerations, note that this recipe is inherently gluten-free but always check labels on processed ingredients.
Conclusion about Pear Jam Recipe
Making Pear Jam Recipe is not only a rewarding experience but also a wonderful way to enjoy one of nature’s sweetest fruits year-round. This recipe highlights the joy of simple, homemade goodness. With its delightful flavor and versatility, Pear Jam can transform a mundane meal into something special. Plus, it’s easy to adapt, whether you like it sweet or spiced.
So, why not give this Pear Jam recipe a try? Whether you’re canning for yourself, gifting it to friends, or simply enjoying it with family, you’ll find that Pear Jam Recipe can quickly become a cherished staple in your pantry. Its bright, fruity flavor will add a touch of joy to each spoonful, allowing you to savor the essence of fresh, ripened pears with ease.
FAQs about Pear Jam Recipe
How long can I store Pear Jam?
Homemade Pear Jam can be stored at room temperature for up to a year if sealed properly. Once opened, it should be refrigerated and consumed within a few weeks.
Can I make Pear Jam Recipe without pectin?
Yes, you can make Pear Jam Recipe without pectin, but it may not set properly. Using ripe pears can help thicken the jam naturally, though the texture may differ.
Can I freeze Pear Jam Recipe?
Absolutely! Pear Jam Recipe can be frozen in airtight containers. Leave some headspace in containers for expansion when freezing.
What can I use instead of lemon juice?
If you don’t have lemon juice, you can substitute it with lime juice or vinegar for a slightly different flavor profile.
How can I tell if my Pear Jam Recipe has spoiled?
Check for any mold, off smells, or discoloration. If the seal is broken after storage or the jam looks off, it’s best to discard it.
Can I reduce the sugar in this recipe?
Yes, you can reduce the sugar; however, it might affect the jam’s sweetness and preservation. Consider using fruit sweeteners for a healthier option.
Is Pear Jam Recipe suitable for gifting?
Certainly! When jarred neatly with a label, Pear Jam Recipe makes for a lovely homemade gift for friends and family during holidays or special occasions.
How long does it take for Pear Jam Recipe to set?
Typically, Pear Jam Recipesets after boiling for about 10 minutes. You can test it by placing a spoonful on a cold plate and assessing its consistency.
Can I mix other fruits into my Pear Jam ?
Yes! Mixing in fruits like apples, berries, or even tropical fruits like pineapple can add exciting new flavors to your Pear Jam Recipe.
What’s the best way to serve Pear Jam ?
Pear Jam Recipe is delightful on toast, in baking, as a topping for desserts, or even alongside cheeses and meats as a condiment.
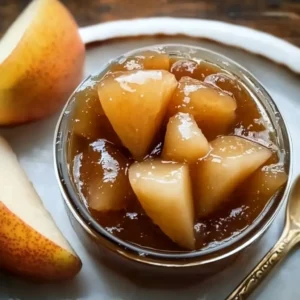
Pear Jam
Ingredients
Main Ingredients
- 2 pounds ripe pears, peeled, cored, and chopped Ensure the pears are ripe for the best flavor.
- 4 cups granulated sugar Can substitute with fruit sweeteners for lower sugar.
- ¼ cup fresh lemon juice Freshly squeezed is best for flavor.
- 1 package fruit pectin (1.75 oz) Pectin helps the jam to set properly.
- 1 cup water Needed to combine with the pears.


Instructions
Preparation
- Sterilize jars and lids by boiling them in water for 10 minutes.
- Peel, core, and chop ripe pears into small pieces.
Cooking
- In a large pot, combine chopped pears, sugar, lemon juice, and water, and set over medium heat.
- Bring the mixture to a simmer, stirring gently until the sugar dissolves and pears soften, about 10-15 minutes.
- Increase heat to medium-high and bring the mixture to a rolling boil, stirring continuously.
- Sprinkle pectin into the pot while stirring constantly to ensure even distribution.
- Boil the jam mixture for about 10 minutes, stirring frequently to avoid burning.
- To check if the jam is set, place a small spoonful on a cold plate and tilt it; if it holds its shape, it’s ready.
Canning
- Ladle hot jam into prepared jars, leaving a 1/4-inch headspace.
- Wipe the rims of the jars with a clean cloth and place lids on.
- Process the jars in a boiling water bath for 5-10 minutes.
- Remove jars and let them cool on a clean towel or cooling rack.