

This post may contain affiliate links. As an Amazon Associate, I earn from qualifying purchases at no extra cost to you.
Table of Contents
When it comes to festive desserts, nothing quite captures the holiday spirit like Santa Claus Dome Cakes. These delightful dome-shaped treats bring together the magic of Christmas and the joy of baking. Imagine a dessert that not only looks enchanting but also tastes like a dream. The soft chocolate cake layers, filled with rich chocolate ganache and luscious mousse, create a captivating experience for both kids and adults alike. Isn’t it wonderful how a dessert can evoke such joy and warmth during the holiday season?
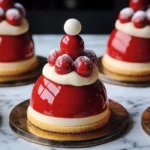
Santa Claus Dome Cakes aren’t just any ordinary treat; they are a celebration of flavors and creativity. They offer a unique way to indulge in the classic tastes of Christmas while adding a playful twist. The vibrant red of the Santa hat, the fluffy whipped cream, and the adorable chocolate decorations truly make these cakes a show-stopper. Perfect for gatherings, parties, or just a cozy evening at home, Santa Claus Dome Cakes are a delightful addition to your holiday festivities.
Not only are they visually stunning, but they also deliver on flavor. The combination of chocolate, cream, and a hint of vanilla creates a symphony of tastes that is hard to resist. Plus, the process of making these dome cakes provides a fantastic opportunity for bonding with family. Imagine gathering around the kitchen, mixing batter, whipping cream, and decorating your snowy Santa creations together. It’s these moments that make the holidays special.
The ease of this recipe is one of its key attractions. You don’t need to be a master baker to whip up these festive treats. With simple steps and commonly available ingredients, Santa Claus Dome Cakes are made accessible for everyone. Can you picture the excitement on your family’s faces when you unveil these cheerful desserts? Moreover, their versatile nature means you can customize them based on your tastes or dietary needs, ensuring everyone can partake in the joy.
So, why not bring some extra cheer to your holiday celebrations this year? Whether you’re impressing guests or creating sweet memories with loved ones, the easy and delicious Santa Claus Dome Cakes are the perfect choice. Let’s dive into everything you need to know about making these festive delights!
🍴 Top Kitchen Essentials You'll Love


Key Benefits of Santa Claus Dome Cakes
Why You’ll Love This Recipe
- Delicious Flavor: The rich chocolate flavor paired with a creamy filling makes each bite an indulgent experience.
- Visual Appeal: Their festive appearance is sure to impress and delight both kids and adults.
- Versatile: You can customize the flavors and decorations to match your holiday theme.
- Family-Friendly: Making these together can become a cherished family tradition during the holidays.
- Easy to Make: With straightforward instructions, you can create these impressive cakes without extensive baking skills.
What Makes It Stand Out
Santa Claus Dome Cakes are unique not only because of their charming design but also due to their flavor combination. The use of chocolate cake combined with a rich ganache and fluffy mousse provides a fantastic textural contrast that makes them irresistible. You can also make adjustments based on personal preferences, allowing you to add a twist to the traditional recipe.
These dome cakes also shine during various occasions. While they are perfect for Christmas, you can adapt the design and colors for birthday parties, baby showers, or any festive gathering. The flexibility of this recipe allows you to celebrate in style, making it a go-to dessert for all your special events.
Ingredients for Santa Claus Dome Cakes
Complete Ingredient List with Measurements
- 2 cups all-purpose flour
- 1 1/2 cups granulated sugar
- 1/2 cup unsweetened cocoa powder
- 1 cup buttermilk
- 1/2 cup vegetable oil
- 3 large eggs
- 1 teaspoon vanilla extract
- 1 teaspoon baking powder
- 1 teaspoon baking soda
- 1/2 teaspoon salt
- 1 cup heavy cream
- 1/2 cup powdered sugar
- 1/4 cup red gel food coloring (for decoration)
- Chocolate Ganache (for filling)
- Whipped cream (for decoration)
- Chocolate decorations (for eyes and buttons)
These ingredients are easily accessible, ensuring that you can whip up Santa Claus Dome Cakes without hassle. Each plays a crucial role in achieving the delightful flavors and textures that make these cakes special.
Substitutes and Alternatives
If you have dietary restrictions or allergies, there are several ways to adjust this recipe. For instance, you can use almond flour or a gluten-free baking mix in place of all-purpose flour for a gluten-free version. For those avoiding dairy, almond milk or oat milk can serve as suitable alternatives to buttermilk.
To substitute eggs, consider using flaxseed meal mixed with water or a commercial egg replacer, making it easy to adapt the recipe for vegan diets. Remember, the key is to maintain the moisture levels within the cake, so choose alternatives that will yield a similar texture.
How to Make Santa Claus Dome Cakes – Step-by-Step Directions
Step 1 – Prepare Ingredients
Start by gathering all your ingredients and preheating your oven to 350°F (175°C). Grease your dome cake molds to ensure easy removal once baked.
Step 2 – Cook the Base
In a large bowl, mix the flour, sugar, cocoa powder, baking powder, baking soda, and salt. Stir well to combine all the dry ingredients.
Step 3 – Blend the Wet Ingredients
Add the buttermilk, vegetable oil, eggs, and vanilla extract to the dry mixture. Beat the mixture until smooth and fully combined, ensuring there are no lumps in your batter.
Step 4 – Fill the Molds
Divide the batter evenly among the greased dome molds. Make sure not to overfill them to allow for rising while baking.
Step 5 – Bake
Bake the cakes in the preheated oven for 20 to 25 minutes. To check for doneness, insert a toothpick into the center. It should come out clean without any wet batter sticking.
Step 6 – Cool Completely
Remove the cakes from the oven and allow them to cool in the molds for about 10 minutes. Then, transfer them to a wire rack to cool completely.
Step 7 – Prepare the Mousse
While the cakes are cooling, whip the heavy cream in a mixing bowl until soft peaks form. Gradually fold in the powdered sugar to enhance the sweetness of the mousse.
Step 8 – Fill the Cakes
Once the cakes are cooled, gently remove them from the molds. Fill each dome with chocolate ganache and a layer of mousse. You can alternate layers if desired for a more dramatic effect.
Step 9 – Add the Red Color
To create Santa’s signature hat, drizzle the red gel food coloring over the top of each dome cake. This adds both flavor and visual appeal.
Step 10 – Decorate and Serve
Finish off your Santa Claus Dome Cakes by decorating them with whipped cream and chocolate decorations for eyes and buttons. Serve immediately or chill to set the decorations in place.
Serving Suggestions for Santa Claus Dome Cakes
Best Occasions to Serve This Dish
Santa Claus Dome Cakes are ideal for holiday parties, family gatherings, or as a charming centerpiece for Christmas dinners. They make excellent gifts when packaged nicely, spreading festive cheer beyond your own table.
Another perfect occasion could be a children’s party. The playful shape and vibrant decorations are sure to excite the young guests, making dessert time a highlight of the event.
What to Serve With It
To enhance your Santa Claus Dome Cakes experience, consider pairing them with:
- Hot cocoa or festive flavored coffee
- Vanilla ice cream for added richness
- Fresh berries like strawberries or raspberries for a tart contrast
- A selection of holiday cookies on the side for variety
How to Store Santa Claus Dome Cakes Properly
Best Storage Practices
To store your Santa Claus Dome Cakes, keep them in an airtight container in the refrigerator. They can last for up to 3-4 days, maintaining their freshness and flavor.
If you made more than you can consume, you can also freeze the cakes. Wrap each dome individually in plastic wrap and then in aluminum foil to prevent freezer burn. They can be stored in the freezer for up to a month.
Reheating and Freezing Tips
When ready to enjoy frozen cakes, remove them from the freezer and let them thaw in the fridge overnight. For best results, do not microwave the cakes; instead, let them warm up gradually at room temperature.
If needed, you can refresh the whipped cream topping just before serving by adding a splash of vanilla extract and re-whipping it to restore its fluffiness.
Tips & Tricks for Santa Claus Dome Cakes
Mistakes to Avoid
- Overmixing the Batter: This can make the cake dense instead of fluffy. Mix just until combined.
- Undercooking: Always check with the toothpick test to ensure the cakes are fully baked.
- Skipping Cooling Time: Filling the cakes while they’re warm can lead to melting and unwanted textures.
- Not Greasing Molds Properly: This may result in the cakes sticking, ruining their shape.
- Ignoring Ingredient Temp: Using cold eggs or buttermilk can affect the mixing process; let them come to room temperature.
Extra Tips for Better Results
Consider adding a splash of espresso powder to the cake batter for heightened chocolate flavor. You could also mix in some mini chocolate chips for added texture.
For an elegant finish, dust your dome cakes with cocoa powder or edible glitter to elevate their festive look.
Recipe Variations of Santa Claus Dome Cakes
Creative Twists
- Mint Chocolate Version: Add peppermint extract to the mousse for a refreshing holiday twist.
- Red Velvet Version: Swap cocoa powder for red velvet cake mix for a colorful variation.
- Coconut Cream Filling: Substitute mousse with coconut cream for a tropical flair.
Dietary Adjustments
- Vegan Santa Claus Dome Cakes: Use plant-based milk, coconut oil, and flaxseed eggs to replace traditional ingredients.
- Gluten-Free: Opt for a gluten-free flour blend in place of all-purpose flour to accommodate gluten-sensitive dessert lovers.
- Dairy-Free: Substitute heavy cream with coconut cream and buttermilk with non-dairy yogurt.
Conclusion about Santa Claus Dome Cakes
Santa Claus Dome Cakes not only serve as a delightful holiday treat but also as a vessel for creative expression and family bonding. Their playful design and rich flavors make them an exceptional addition to any festive gathering. Whether you serve them at a Christmas party or surprise loved ones with a batch for home, these cakes are sure to bring smiles all around.
By making these dome cakes, you create memories and traditions that will be cherished for years to come. The experience of baking and decorating together, alongside the joy of indulging in these festive sweets, embodies the true spirit of the holiday season. So grab your mixing bowls and get ready to create the most enchanting dessert with Santa Claus Dome Cakes!
FAQs about Santa Claus Dome Cakes
Can I prepare it ahead of time?
Yes, you can make the cakes a day in advance and store them in the fridge. Just wait to add the decorations until right before serving.
Can I freeze it?
Absolutely! These dome cakes freeze well for up to a month. Just wrap them carefully to prevent freezer burn.
How long do they last?
Stored correctly in the fridge, Santa Claus Dome Cakes will stay fresh for about 3-4 days.
What are the best substitutions?
You can use gluten-free flour for those with dietary restrictions and flaxseed meal as an egg replacement for a vegan version.
Is this recipe family-friendly?
Definitely! Kids will love both baking and decorating the Santa Claus Dome Cakes.
What can I use instead of buttermilk?
If you don’t have buttermilk on hand, you can substitute it with a mixture of regular milk and a splash of vinegar or lemon juice.
How do I know when the cakes are done?
Perform the toothpick test; if it comes out clean, the cakes are done baking.
Can I customize the decorations?
Yes! Feel free to get creative with your decorations. Try using different colors and shapes for a personalized touch.
What sides go well with these cakes?
Pair these festive treats with hot chocolate, coffee, or a scoop of ice cream to make dessert even more special.
Santa Claus Dome Cakes
Ingredients
Cake Ingredients
- 2 cups all-purpose flour
- 1.5 cups granulated sugar
- 0.5 cups unsweetened cocoa powder
- 1 cup buttermilk Can substitute with almond milk or oat milk.
- 0.5 cups vegetable oil
- 3 large eggs Can substitute with flaxseed meal mixed with water for vegan option.
- 1 teaspoon vanilla extract
- 1 teaspoon baking powder
- 1 teaspoon baking soda
- 0.5 teaspoon salt
Filling and Decoration
- 1 cup heavy cream Can substitute with coconut cream for dairy-free option.
- 0.5 cups powdered sugar
- 0.25 cups red gel food coloring For decoration.
- Chocolate Ganache For filling
- Whipped cream For decoration
- Chocolate decorations For eyes and buttons


Instructions
Preparation
- Gather all your ingredients and preheat your oven to 350°F (175°C). Grease your dome cake molds.
Mix Dry Ingredients
- In a large bowl, mix the flour, sugar, cocoa powder, baking powder, baking soda, and salt.
Mix Wet Ingredients
- Add the buttermilk, vegetable oil, eggs, and vanilla extract to the dry mixture. Beat until smooth.
Fill Molds
- Divide the batter evenly among the greased dome molds, ensuring not to overfill.
Bake
- Bake the cakes for 20 to 25 minutes. Check with a toothpick for doneness.
Cool Cakes
- Remove the cakes from the oven, cool in molds for 10 minutes, then transfer to a wire rack to cool completely.
Prepare Mousse
- In a mixing bowl, whip the heavy cream until soft peaks form. Then fold in the powdered sugar.
Fill Cakes
- Once the cakes are cooled, gently remove from molds. Fill each dome with chocolate ganache and mousse.
Decorate
- Drizzle red gel food coloring on top for Santa’s hat and decorate with whipped cream and chocolate decorations.