
This post may contain affiliate links. As an Amazon Associate, I earn from qualifying purchases at no extra cost to you.
Table of Contents
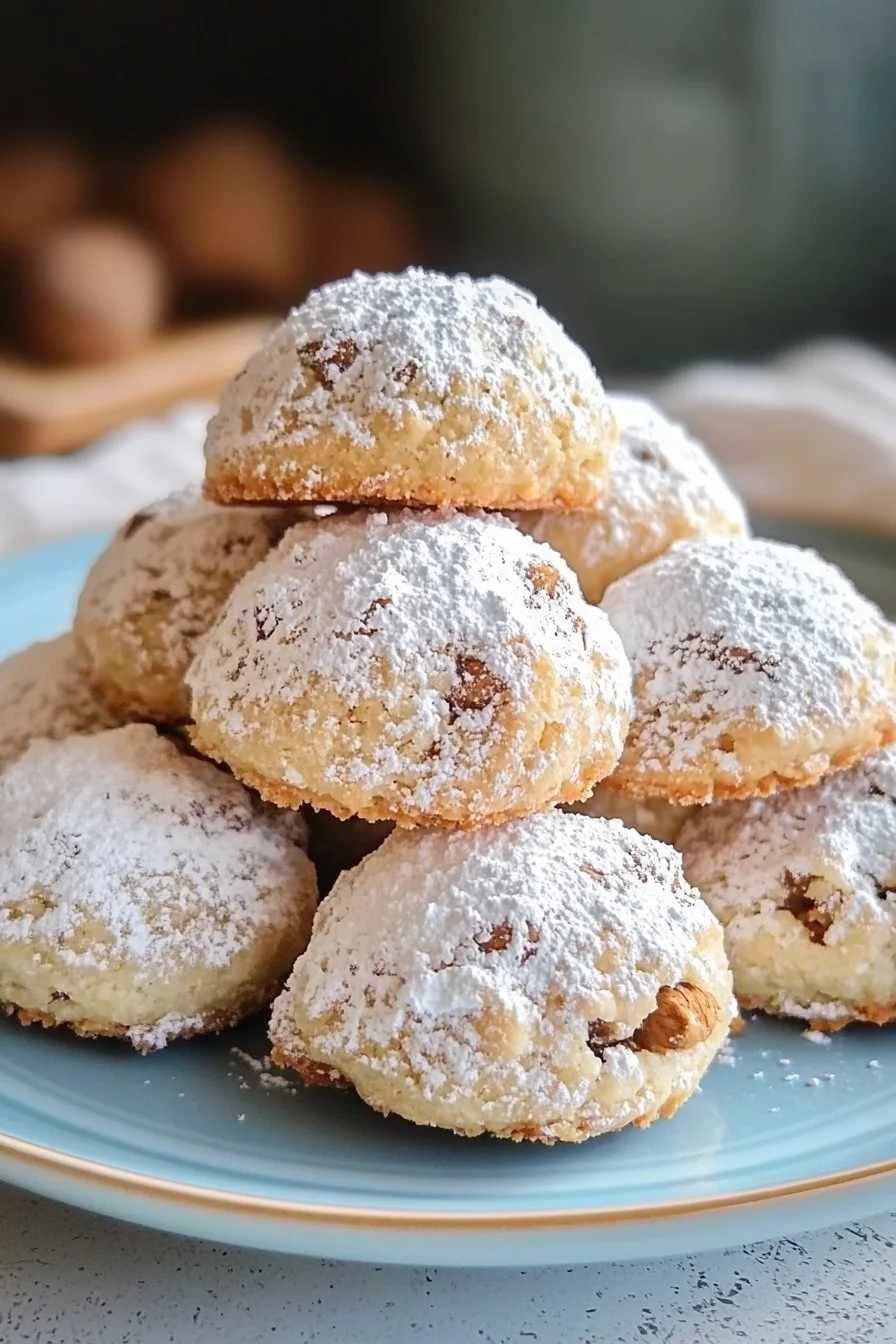
Snowball Cookies. The very name conjures images of sweet, buttery treats dusted in powdered sugar, bursting with nutty flavor. Have you ever tried snowball cookies? If you have, you know they are more than just a dessert; they’re a cherished tradition. If you haven’t, well, you’re in for a delightful experience. This simple yet delightful recipe transforms basic ingredients into a melt-in-your-mouth treat that’s perfect for any occasion.
The unique allure of Snowball Cookies lies in their charming appearance and heavenly taste. They are easy to whip up and incredibly appealing, making them a go-to for everything from holiday gatherings to cozy family dinners. Let’s dive deeper into what makes these cookies so special and how you can easily make them at home.
🍴 Top Kitchen Essentials You'll Love


Key Benefits of Snowball Cookies
Why you’ll love this recipe
- Easy to Make: Even novice bakers find this recipe a breeze.
- No Special Equipment Needed: Just basic kitchen tools are required.
- Customizable: Add your favorite nuts or spices to make it uniquely yours.
- Perfect for Any Occasion: Whether it’s a holiday or a simple family night, these cookies fit right in.
- Great for Gift Giving: Pack them up in festive tins for a sweet homemade gift.
What makes it stand out
Snowball Cookies aren’t just cookies; they are an experience. Their original recipe has been passed down through generations, making them a truly timeless delight. They often evoke fond memories of laughter-filled kitchens and warm family gatherings. What’s more, these cookies are perfect for the winter season but are delightful any time of year.
The simplicity of the ingredients is what makes Snowball Cookies universally appealing. With just a handful of pantry staples, you create something extraordinary. Customize them with a bit of cocoa powder or festive sprinkles for a seasonal touch. They are as versatile as they are delightful, allowing you to make them your own in myriad ways.
Ingredients for Snowball Cookies
Before we get started, let’s gather the ingredients. You’ll find that everything is likely already in your pantry brimming with potential sweetness.
Complete ingredient list with measurements
- 1 cup unsalted butter, softened
- 1/2 cup powdered sugar
- 1 teaspoon vanilla extract
- 2 cups all-purpose flour
- 1 cup finely chopped nuts (such as walnuts or pecans)
- Additional powdered sugar for rolling
Substitutes and alternatives
- Butter: You can opt for vegan butter for a dairy-free version.
- Nuts: If you have nut allergies, try using seeds like sunflower seeds or omit them entirely.
- All-purpose flour: Use a gluten-free flour blend if you need a gluten-free option.
How to Make Snowball Cookies – Step-by-Step Directions
Now, let’s get into the fun part: making those delicious Snowball Cookies!
Step 1: Preheat Oven
Begin by preheating your oven to 350°F (175°C). This is crucial to ensure your cookies bake evenly.
Step 2: Cream Butter and Sugar
In a large bowl, cream together 1 cup softened unsalted butter and 1/2 cup powdered sugar. Use an electric mixer on medium speed until the mixture becomes smooth and fluffy. This step should take about 2-3 minutes.
Step 3: Add Vanilla
Stir in 1 teaspoon vanilla extract until it’s fully incorporated into your butter-sugar mixture. The aroma is heavenly!
Step 4: Incorporate Flour and Nuts
Gradually blend in 2 cups of all-purpose flour and 1 cup finely chopped nuts until the dough starts to come together. You may find it easier to switch to a spatula or your hands at this point.
Step 5: Shape the Dough
Once your dough is well combined, grab a small portion, about the size of a tablespoon, and roll it into a one-inch ball. Place the balls on an ungreased baking sheet, giving them a little space to expand while baking.
Step 6: Bake Cookies
Place the baking sheet in the preheated oven and bake for 10-12 minutes. You’re looking for a slight golden color on the bottoms while the tops remain pale.
Step 7: Roll in Powdered Sugar
Once baked, allow the cookies to cool slightly. While still warm, roll them in some additional powdered sugar. This not only adds sweetness but creates that lovely snowy coating!
Step 8: Cool Completely
Let the cookies cool completely on a wire rack. If you want extra sweetness, feel free to roll them in powdered sugar again!
Step 9: Serve and Enjoy
Now that your Snowball Cookies are ready, serve them on a festive platter. Invite family and friends to join you as you savor these delightful treats.
Tips for Success
- Ensure your butter is softened at room temperature for easier mixing.
- Don’t skip the second rolling in powdered sugar; it enhances the visual appeal and flavor.
Serving Suggestions for Snowball Cookies
Best occasions to serve this dish
Snowball Cookies are the ultimate crowd-pleaser, making them perfect for:
- Holiday parties
- Family get-togethers
- Potlucks
- Baking exchanges
- Cookie jars during cozy evenings
What to serve with it
Pair your Snowball Cookies with:
- Hot cocoa or coffee
- Herbal teas
- Vanilla ice cream on the side
- Festive cocktails
- Fruit preserves as a tart complement
Storing Snowball Cookies Properly
Best storage practices
For the best results, store your Snowball Cookies in an airtight container. If stored correctly, they can last up to one week at room temperature. You can also refrigerate them for extended freshness.
Reheating and freezing tips
If you want to freeze your Snowball Cookies, place them in a single layer in a freezer-safe container. They can last up to three months in the freezer. To enjoy them later, simply leave them at room temperature or warm them for a few minutes in the oven to bring back that delightful texture.
Tips & Tricks for Snowball Cookies
Mistakes to avoid
- Using cold butter: Always use softened butter for a smooth batter.
- Overmixing the dough: Mix just until combined; overmixing can lead to tough cookies.
- Skipping the cooling phase: Allow the cookies to cool before rolling in sugar for better coating adherence.
Extra tips for better results
- Experiment with different nuts or omit them for a classic version.
- Add a touch of cinnamon or nutmeg for extra warmth, especially during the holidays.
- Make your holiday version by adding little chunks of chocolate or dried fruit.
Recipe Variations of Snowball Cookies
Creative twists
Why not spice things up a bit? Here are some ideas:
- Chocolate Snowballs: Incorporate cocoa powder into your dough for a chocolatey twist.
- Spiced Snowballs: Add cinnamon or nutmeg for a cozy flavor.
- Seasonal Flavors: Introduce peppermint for a festive holiday flair.
Dietary adjustments
You can easily adapt the Snowball Cookies to meet dietary needs:
- Vegan: Substitute the butter with coconut oil or vegan butter and use aquafaba (chickpea water) in place of eggs.
- Gluten-Free: Use a gluten-free flour mix instead of all-purpose flour.
- Dairy-Free: Coconut-based products work well for dairy alternatives in both butter and milk.
Conclusion about Snowball Cookies
In the delightful world of baking, Snowball Cookies stand out as light, buttery confections that deliver a sweet punch in every bite. Their simplicity and adaptability make this recipe a staple in kitchens across the globe. Whether you savor them at family gatherings or share them as a heartfelt gift, these cookies are meant to be enjoyed.
So, gather your ingredients, roll up your sleeves, and give Snowball Cookies a try. You’ll be glad you did, and your friends and family will thank you, too!
FAQs about Snowball Cookies
What if it doesn’t turn out right?
If your Snowball Cookies don’t turn out as expected, double-check your measurements. Make sure your butter is softened, not melted, and avoid overmixing the dough.
Can I prepare it ahead of time?
Absolutely! You can prepare the dough up to a day in advance and store it in the fridge. Just make sure to let it come to room temperature before rolling.
What are the best ingredient substitutions?
For allergies, consider using gluten-free flour, nut butter, or coconut oil instead of regular butter. The recipe is flexible and forgiving.
How long can it be stored?
Snowball Cookies can be stored in an airtight container for about a week at room temperature or up to three months in the freezer.
Can I use store-bought dough or crust?
While making dough from scratch is highly recommended for the best flavor, you can experiment with store-bought variants, but the results may vary.
Is this recipe kid-friendly?
Definitely! Kids love helping shape and roll these cookies in powdered sugar, making them a fun family baking activity.
Can I make it allergen-free?
Of course! Use nut-free options, gluten-free flour, and dairy substitutes like coconut oil or vegan butter to create allergen-free Snowball Cookies.
Now you have everything you need to whip up delightful Snowball Cookies, spread joy, and make countless memories. Enjoy your baking adventure!
Snowball Cookies
Ingredients
Main Ingredients
- 1 cup unsalted butter, softened Ensure butter is at room temperature.
- ½ cup powdered sugar Extra for rolling.
- 1 teaspoon vanilla extract For flavor enhancement.
- 2 cups all-purpose flour Can substitute with a gluten-free blend.
- 1 cup finely chopped nuts Use walnuts or pecans or omit for nut-free version.


Instructions
Preparation
- Preheat your oven to 350°F (175°C).
- In a large bowl, cream together softened unsalted butter and powdered sugar until smooth and fluffy (2-3 minutes).
- Stir in vanilla extract until fully combined.
- Gradually blend in all-purpose flour and chopped nuts until the dough starts coming together.
- Take small portions of the dough (about one tablespoon) and roll them into one-inch balls.
- Place the dough balls on an ungreased baking sheet, ensuring space for expansion.
- Bake in the preheated oven for 10-12 minutes until bottoms are lightly golden.
- Allow them to cool slightly before rolling in powdered sugar.
- Let cool completely on a wire rack and roll in powdered sugar again for extra sweetness.
- Serve on a festive platter.