
This post may contain affiliate links. As an Amazon Associate, I earn from qualifying purchases at no extra cost to you.
Table of Contents
🍴 Top Kitchen Essentials You'll Love


Introduction about Spooky Halloween Skull Potatoes
Ah, Halloween! It’s that enchanting time of year when costumes abound, haunted houses emerge, and candy fills the air with sweetness. But let’s not forget about the food! If you’re like me, you love to impress your family and friends with festive dishes that not only look good but taste amazing too. That’s where Spooky Halloween Skull Potatoes come in!
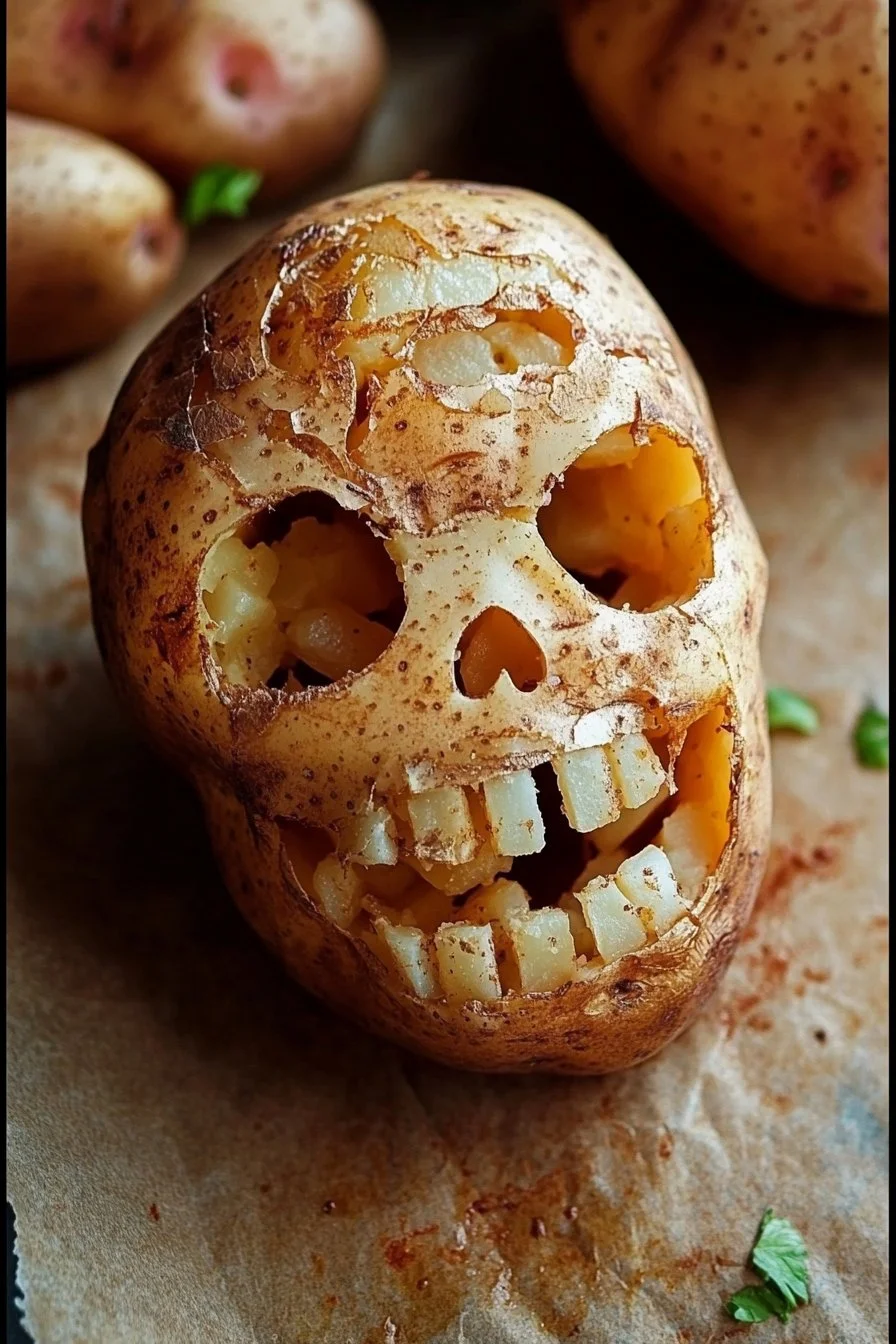
Imagine golden, crispy potatoes cut into eerie skull shapes, seasoned with herbs and spices. Isn’t that a delightful way to celebrate the season? The beauty of these spooky skull potatoes is their simplicity and versatility, making them perfect for Halloween gatherings, school parties, or just a fun family dinner.
In this article, I’ll guide you through every step of making these delicious treats, ensuring they’re not only the centerpiece of your table but also a hit with everyone who tries them. Let’s dive into the fun world of Spooky Halloween Skull Potatoes and discover why you’ll want to whip them up this October!
Key Benefits of Spooky Halloween Skull Potatoes
Why You’ll Love This Recipe
- Deliciously Unique: The blend of olive oil, garlic powder, and herbs creates a flavor that’s both savory and delicious.
- Simple Preparation: With just a few ingredients and easy steps, this recipe is beginner-friendly!
- Fun for the Entire Family: Kids love the quirky skull shapes. It’s a fun way to get them involved in meal prep!
- Quick Cooking Time: Bake these bad boys in just 25-30 minutes, making them a great last-minute snack or side dish.
- Perfect for Halloween: This recipe is specially designed for October festivities, adding a touch of spookiness to your meals.
- Customization Options: You can easily adapt the recipe with your favorite herbs or toppings for a personalized twist.
What Makes It Stand Out
The originality of Spooky Halloween Skull Potatoes lies in their unique presentation. Shaped like skulls, these potatoes are not just another dish; they’re a conversation starter! The seasonal theme is perfect for Halloween gatherings, and their eye-catching appearance will impress guests.
Customization is another standout feature. You can switch up the herbs to match your flavor preferences, or add food coloring to make them even more festive. Want to spice things up? Consider adding chili powder or paprika for a kick!
Ingredients for Spooky Halloween Skull Potatoes
Complete Ingredient List with Measurements
To create your very own Spooky Halloween Skull Potatoes, you’ll need the following ingredients:
- Potatoes: 4 medium-sized (Russet or Yukon Gold work best)
- Garlic Powder: 1 teaspoon
- Herbs: 1 tablespoon (fresh rosemary and thyme, or 1 teaspoon dried)
- Olive Oil: 2 tablespoons
- Salt: 1 teaspoon (to taste)
- Pepper: ½ teaspoon (to taste)
- Food Coloring (optional for decoration): A few drops of black, orange, or green
Substitutes and Alternatives
If you have dietary preferences or ingredient availability issues, here are some substitutes you can consider:
- Potatoes: Sweet potatoes or butternut squash for a different flavor profile.
- Garlic Powder: Fresh minced garlic (about 1 clove) for more robust flavor.
- Herbs: Use Italian seasoning or parsley if you don’t have rosemary and thyme.
- Olive Oil: Avocado oil or melted coconut oil as a lighter alternative.
- Food Coloring: Use natural vegetable dyes or simply skip it for a more rustic look.
How to Make Spooky Halloween Skull Potatoes – Step-by-Step Directions
Step 1 – Prep Your Workspace and Ingredients
Before you get cooking, make sure to gather all your ingredients. Wash everything thoroughly, and lay out your cutting board, cookie cutters (skull-shaped, if you have one), and a baking sheet lined with parchment paper. Preheat your oven to 425°F (220°C) so it’s ready when your potatoes are!
Step 2 – Wash and Peel the Potatoes
Take your washed potatoes, and using a peeler, carefully remove the skin. This not only gives them a nice appearance but also allows the seasonings to penetrate better. Once peeled, rinse them under cold water to remove any excess starch.
Step 3 – Cut Potatoes into Skull Shapes
Grab your cookie cutter and press it firmly onto the potato. If you don’t have one, don’t fret! Just use a knife to carefully carve out skull shapes. Aim for about 1/2 inch thick so they cook evenly. You can save the extra potato pieces for making mashed potatoes or fries.
Step 4 – Create your Seasoning Mixture
In a bowl, combine the olive oil, garlic powder, herbs, salt, and pepper. Mix them until they form a cohesive blend. Feel free to adjust the seasoning to suit your taste!
Step 5 – Coat the Potato Skulls
Take the cut potato shapes and place them in the bowl with the seasoning mixture. Toss them around gently until each piece is well-coated. This step is crucial for that delicious flavor and crispy texture!
Step 6 – Arrange on the Baking Sheet
Place the seasoned potato skulls on your lined baking sheet. Make sure there’s enough space between each piece so they don’t steam. This allows them to get nice and crispy!
Step 7 – Bake for Golden Perfection
Pop the baking sheet into the preheated oven. Bake your potatoes for about 25-30 minutes. Check them halfway through; flip them over for even browning. You’re looking for a golden color and a crispy exterior.
Step 8 – Add Food Coloring (Optional)
Once out of the oven, let your potatoes cool slightly. If you want to add a festive touch with food coloring, use a brush to paint on the colors of your choice. Be as creative as you like!
Step 9 – Serve Warm
Plate your Spooky Halloween Skull Potatoes and serve them warm. Enjoy the delighted reactions as you dish these out at your Halloween gathering!
Step 10 – Store or Enjoy!
If you have leftovers (which is rare), store them for later enjoyment. Details on storing will be covered later in this article.
Serving Suggestions for Spooky Halloween Skull Potatoes
Best Occasions to Serve This Dish
Spooky Halloween Skull Potatoes are ideal not just for Halloween parties but also for:
- Family movie nights with spooky themes
- School Halloween events and potlucks
- Casual get-togethers with friends
- Barbecues or outdoor gatherings in the autumn season
What to Serve with It
Pair your skull potatoes with delicious accompaniments for a complete meal experience:
- Dips:
- Ketchup or garlic aioli
- Spicy ranch or sour cream
- Drinks:
- Apple cider or pumpkin-spiced lattes for a festive feel
- Blood-red berry smoothies or mocktails
- Main Courses:
- Grilled chicken or veggie skewers
- Fall salads with roasted vegetables
Storing Spooky Halloween Skull Potatoes Properly
Best Storage Practices
To keep your Spooky Halloween Skull Potatoes fresh, it’s essential to store them correctly.
- Refrigerator: Store them in an airtight container, and they can last 3-4 days.
- Freezer: For longer storage, freeze them in a single layer, then transfer to a freezer bag. They can remain good for up to 2-3 months.
Reheating and Freezing Tips
- To Reheat: Oven or air fryer works best! Preheat to 350°F (175°C) and heat for about 10-15 minutes until warmed through.
- To Freeze/Thaw: If you’ve frozen them, place them in the refrigerator overnight to thaw before reheating. Avoid microwaving as it makes them soggy!
Tips & Tricks for Spooky Halloween Skull Potatoes
Mistakes to Avoid
- Overcrowding the Baking Sheet: Doing so leads to steaming instead of crisping. Make sure to leave space!
- Not Drying the Potatoes: Excess moisture will prevent them from getting crispy. Pat dry after washing!
- Skipping Seasoning: A well-seasoned potato makes all the difference in flavor. Don’t skimp!
Extra Tips for Better Results
- Experiment with different herbs like dill or basil for unique flavors!
- If you want to add some heat, try adding a pinch of cayenne pepper or red pepper flakes to the seasoning mix.
- For a spooky touch, serve with a side of “bloody” ketchup or spicy dipping sauce.
Recipe Variations of Spooky Halloween Skull Potatoes
Creative Twists
If you’re feeling adventurous, why not add some creativity to your Spooky Halloween Skull Potatoes? Here are some fun ideas:
- Cheesy Skull Potatoes: Sprinkle some cheddar cheese on top during the last 5 minutes of baking for a delicious twist.
- Autumn Spices: Mix in cinnamon or nutmeg with your herbs for a seasonal flavor boost.
- Stuffed Skulls: Scoop out a bit of the potato and fill with a mixture of cheese, bacon bits, or caramelized onions before baking.
Dietary Adjustments
If you or your guests have dietary restrictions, here’s how to adapt the recipe:
- Gluten-Free: This recipe is already gluten-free! Just ensure any herbs or spices are certified gluten-free.
- Dairy-Free/Vegan: Simply skip cheese additions. These potatoes are flavorful enough on their own!
- Low Carb/Keto: Use cauliflower as a substitute for potatoes, and season as directed for a low-carb version.
Conclusion about Spooky Halloween Skull Potatoes
Who knew that creating a spooky and delicious dish could be so easy? Spooky Halloween Skull Potatoes offer a fantastic way to celebrate the Halloween spirit with friends and family. Their crispy texture and savory flavor are sure to win everyone over, making them a memorable addition to any festive gathering.
As you give this recipe a try, feel free to get creative with flavors, decorations, and serving styles. I encourage you to share your experiences and any delicious variations you come up with. After all, cooking is about having fun and enjoying the delicious results with loved ones!
FAQs about Spooky Halloween Skull Potatoes
What if it doesn’t turn out right?
If your potatoes don’t come out as expected, it’s not the end of the world! They can still be delicious. If they’re not crispy, next time try adjusting your baking time or spacing them out on the baking sheet.
Can I prepare it ahead of time?
Absolutely! You can cut the potatoes and prepare the seasoning a day in advance. Just keep the mixture in the fridge until you’re ready to bake!
What are the best ingredient substitutions?
Common swaps could include using sweet potatoes instead of regular potatoes, or swapping fresh herbs for dried ones. Get creative with what you have on hand!
How long can it be stored?
In the refrigerator, your potatoes can last up to 3-4 days. If frozen correctly, they can last for 2-3 months.
Can I use store-bought dough or crust?
This recipe doesn’t include a crust, but if you want to incorporate one, feel free to top your skull potatoes with a ready-made pastry crust for a different texture!
Is this recipe kid-friendly or family-appropriate?
Yes, it’s very kid-friendly! The fun skull shape makes it appealing to children, and the flavors are simple enough for everyone to enjoy.
Can I make this recipe allergen-free?
Definitely! Ensure your seasoning and any additional ingredients are free from common allergens, and you’re good to go!
Hopefully, you now feel excited and ready to whip up your very own Spooky Halloween Skull Potatoes. Let the fun begin!

Spooky Halloween Skull Potatoes
Ingredients
Main Ingredients
- 4 medium Potatoes Russet or Yukon Gold work best
- 1 teaspoon Garlic Powder
- 1 tablespoon Herbs Fresh rosemary and thyme, or 1 teaspoon dried
- 2 tablespoons Olive Oil
- 1 teaspoon Salt To taste
- ½ teaspoon Pepper To taste
- a few drops Food Coloring (optional for decoration) Black, orange, or green


Instructions
Preparation
- Prep your workspace and ingredients by washing everything thoroughly and gathering your cutting board, skull-shaped cookie cutters, and a baking sheet lined with parchment paper. Preheat your oven to 425°F (220°C).
- Wash and peel the potatoes, then rinse them under cold water to remove excess starch.
- Cut the potatoes into skull shapes using the cookie cutter or carve them out with a knife to about 1/2 inch thick.
- In a bowl, combine olive oil, garlic powder, herbs, salt, and pepper to create your seasoning mixture.
- Coat the potato skulls in the seasoning mixture until well-coated.
- Arrange the seasoned potato skulls on the lined baking sheet, ensuring there’s space between each piece.
Cooking
- Bake the potato skulls in the preheated oven for about 25-30 minutes, checking midway to flip them for even browning.
- Let them cool slightly, then add food coloring if desired by brushing it on.
- Serve warm during your Halloween gathering!
Storage
- Store leftovers in an airtight container in the refrigerator for 3-4 days.
- For longer storage, freeze them in a single layer and transfer to a freezer bag for up to 2-3 months.